2012 MERCEDES-BENZ GL light
[x] Cancel search: lightPage 207 of 384
Activating/deactivating DSR
Activating
DSR can only be activated if you are driving
no faster than 20 mph (30 km/h).
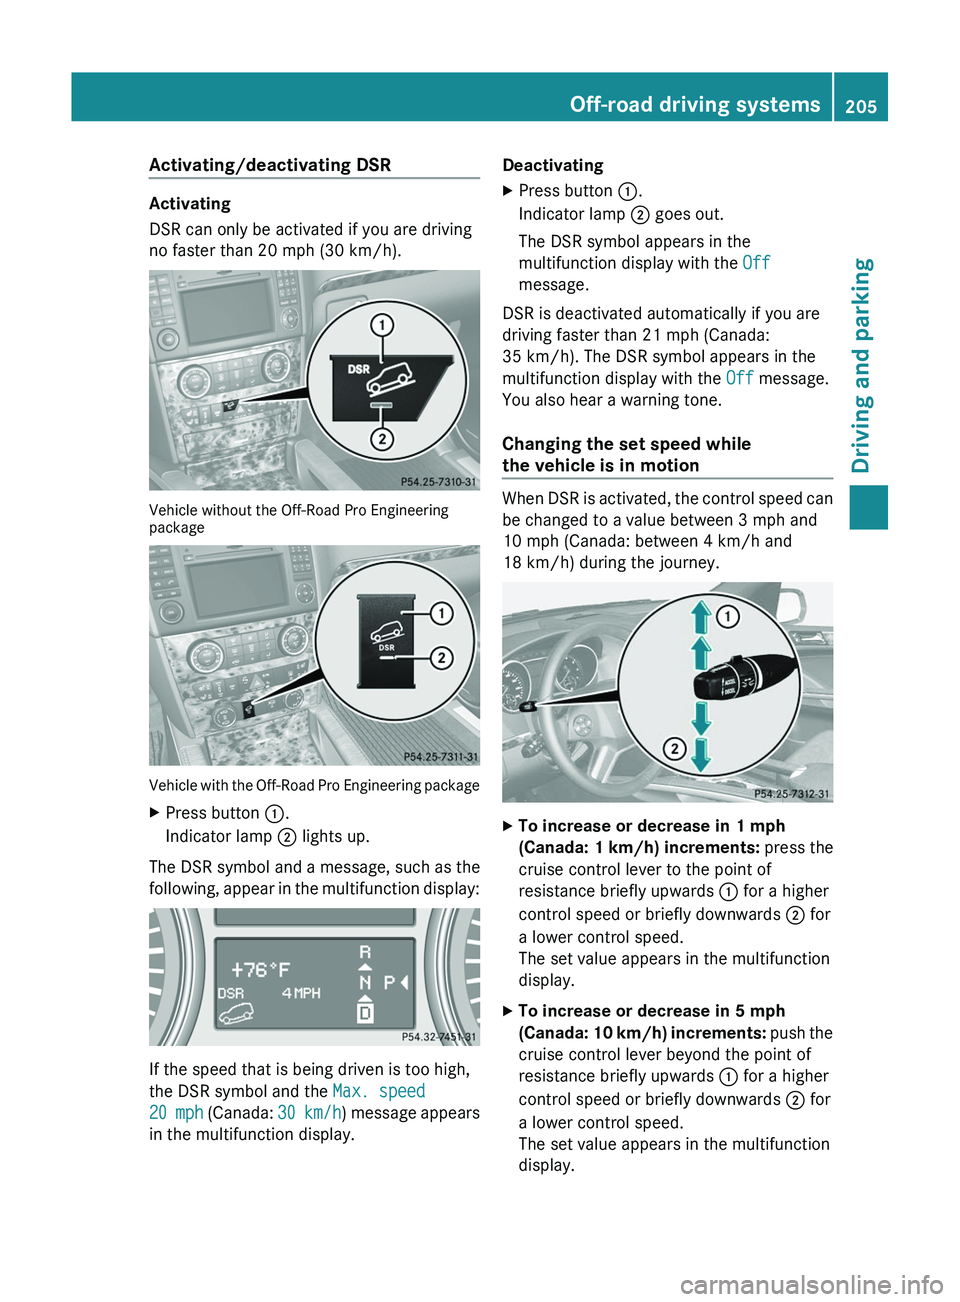
Vehicle without the Off-Road Pro Engineering
package
Vehicle with the Off-Road Pro Engineering package
XPress button :.
Indicator lamp ; lights up.
The DSR symbol and a message, such as the
following, appear in the multifunction display:
If the speed that is being driven is too high,
the DSR symbol and the Max. speed
20 mph (Canada: 30 km/h) message appears
in the multifunction display.
DeactivatingXPress button :.
Indicator lamp ; goes out.
The DSR symbol appears in the
multifunction display with the Off
message.
DSR is deactivated automatically if you are
driving faster than 21 mph (Canada:
35 km/h). The DSR symbol appears in the
multifunction display with the Off message.
You also hear a warning tone.
Changing the set speed while
the vehicle is in motion
When DSR is activated, the control speed can
be changed to a value between 3 mph and
10 mph (Canada: between 4 km/h and
18 km/h) during the journey.
XTo increase or decrease in 1 mph
(Canada: 1 km/h) increments: press the
cruise control lever to the point of
resistance briefly upwards : for a higher
control speed or briefly downwards ; for
a lower control speed.
The set value appears in the multifunction
display.XTo increase or decrease in 5 mph
(Canada: 10 km/h) increments: push the
cruise control lever beyond the point of
resistance briefly upwards : for a higher
control speed or briefly downwards ; for
a lower control speed.
The set value appears in the multifunction
display.Off-road driving systems205Driving and parkingZ
Page 208 of 384
Off-road drive program
i The off-road drive program is available
only in vehicles without the Off-Road Pro
engineering package.
The off-road drive program assists you in
driving off-road. The engine’s performance
characteristics and the gearshifting
characteristics of the automatic transmission
are adapted for this purpose. ABS, ESP ®
and
4 ETS programs especially adapted to off-
road driving are also activated.
Do not use the off-road drive program on
roads that are covered in snow or icy or if you
have installed snow chains on your vehicle.
For information about driving off-road, see
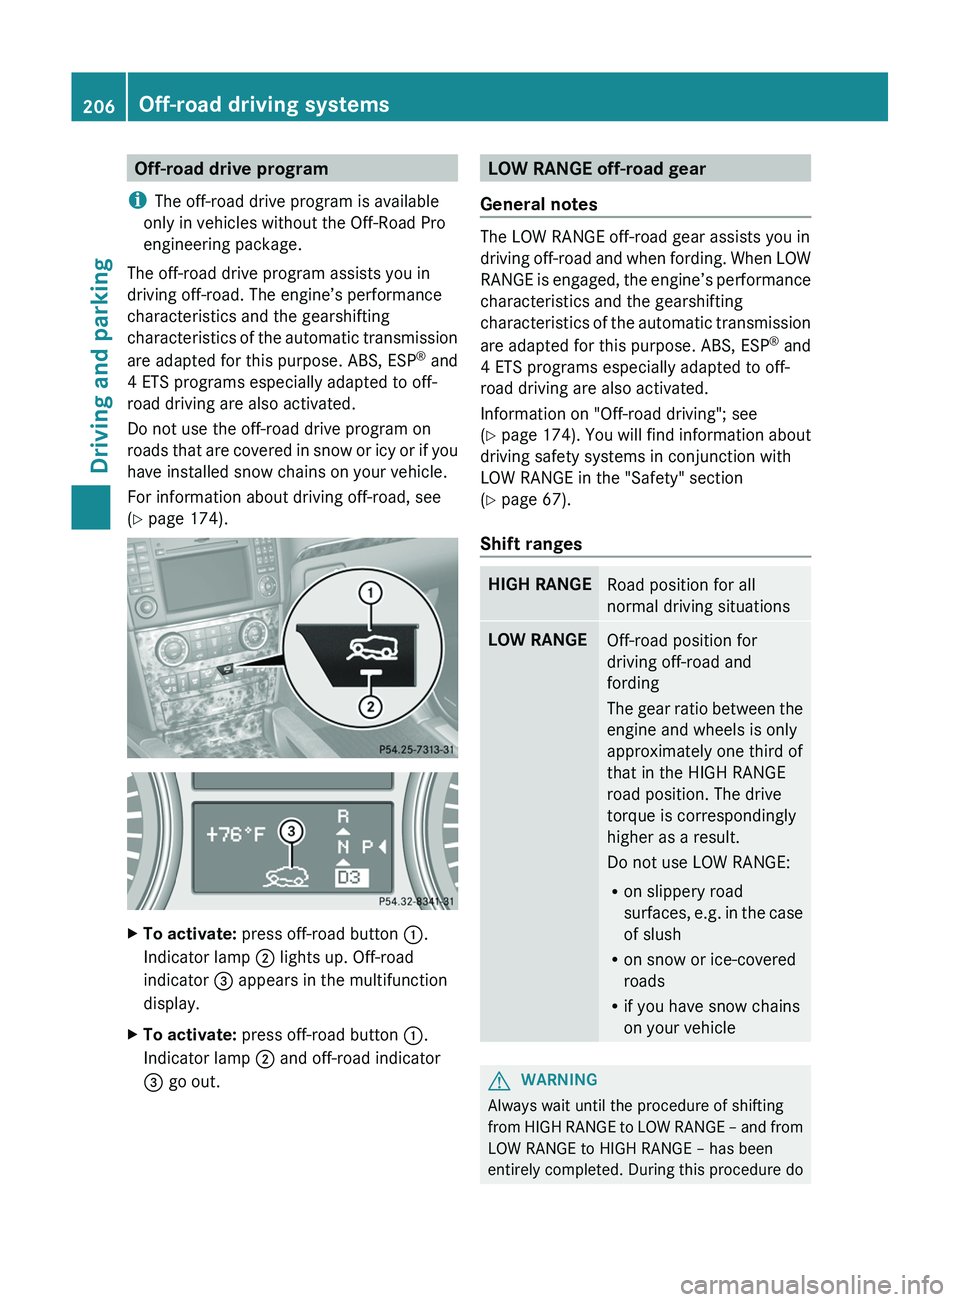
( Y page 174).XTo activate: press off-road button :.
Indicator lamp ; lights up. Off-road
indicator = appears in the multifunction
display.XTo activate: press off-road button :.
Indicator lamp ; and off-road indicator
= go out.LOW RANGE off-road gear
General notes
The LOW RANGE off-road gear assists you in
driving off-road and when fording. When LOW
RANGE is engaged, the engine’s performance
characteristics and the gearshifting
characteristics of the automatic transmission
are adapted for this purpose. ABS, ESP ®
and
4 ETS programs especially adapted to off-
road driving are also activated.
Information on "Off-road driving"; see
( Y page 174) . You will find information about
driving safety systems in conjunction with
LOW RANGE in the "Safety" section
( Y page 67).
Shift ranges
HIGH RANGERoad position for all
normal driving situationsLOW RANGEOff-road position for
driving off-road and
fording
The gear ratio between the
engine and wheels is only
approximately one third of
that in the HIGH RANGE
road position. The drive
torque is correspondingly
higher as a result.
Do not use LOW RANGE:
R on slippery road
surfaces, e.g. in the case
of slush
R on snow or ice-covered
roads
R if you have snow chains
on your vehicleGWARNING
Always wait until the procedure of shifting
from HIGH RANGE to LOW RANGE – and from
LOW RANGE to HIGH RANGE – has been
entirely completed. During this procedure do
206Off-road driving systemsDriving and parking
Page 209 of 384
not turn off the engine or shift the automatic
transmission into another gear.
If you do not wait until the shifting procedure
has been entirely completed then it might not
be correctly performed. The transfer case
might be in neutral, thus interrupting the
transfer of power between the engine and the
drive axle.
The vehicle is then freely movable, even if a
gear has been selected, and could
unintentionally be set into motion –
particularly on up – or downhill grades. This
could lead to an accident and cause injury to
yourself and others.
Please observe related messages appearing
in the multifunction display.
From HIGH RANGE to LOW RANGE
! Only carry out the gear change process if:
R the engine is running
R the transmission is in position N
R you are not driving faster than
25 mph (40 km/h)
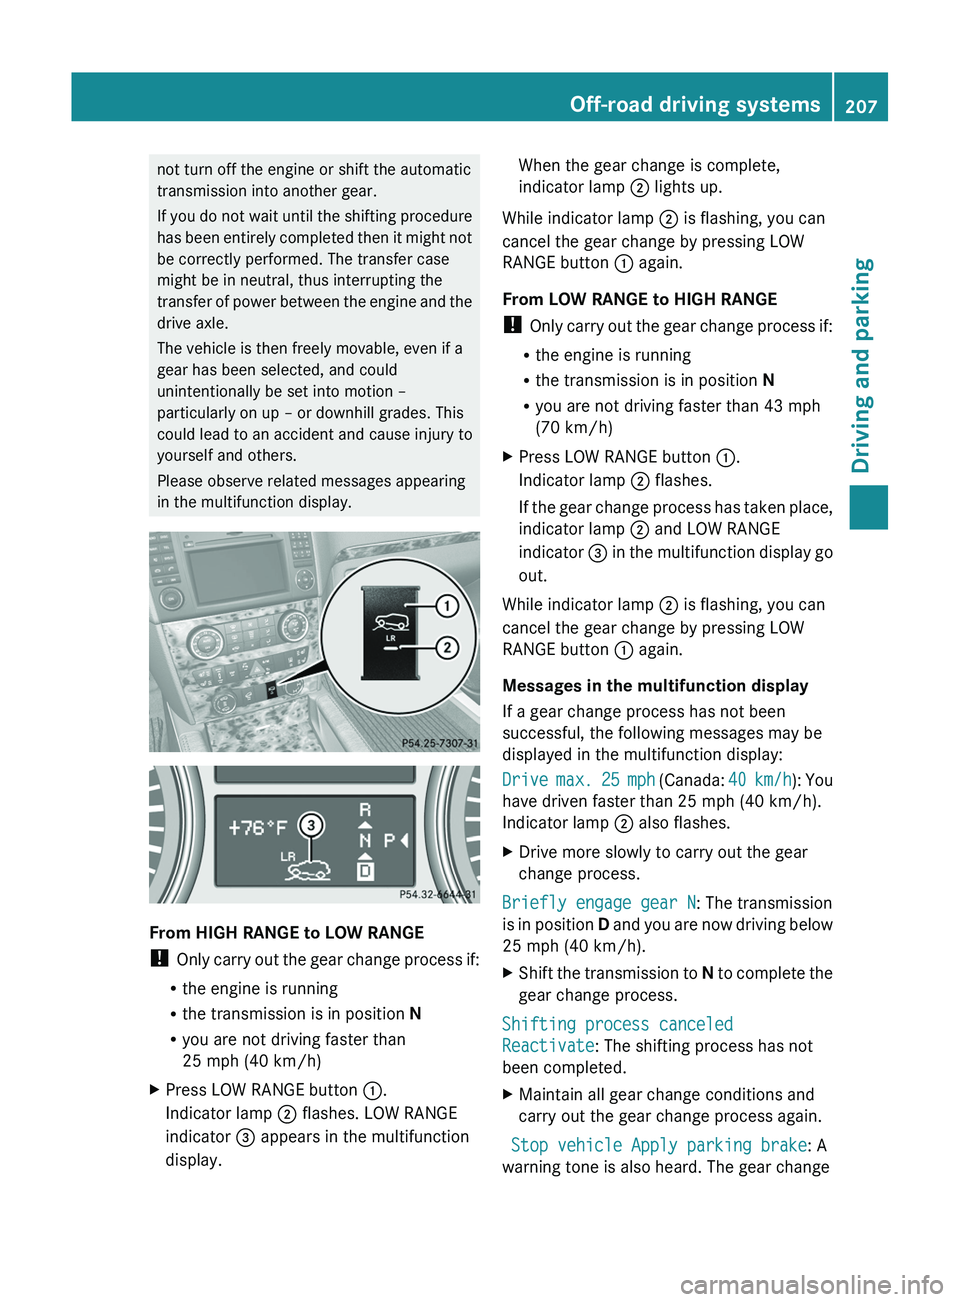
XPress LOW RANGE button :.
Indicator lamp ; flashes. LOW RANGE
indicator = appears in the multifunction
display.When the gear change is complete,
indicator lamp ; lights up.
While indicator lamp ; is flashing, you can
cancel the gear change by pressing LOW
RANGE button : again.
From LOW RANGE to HIGH RANGE
! Only carry out the gear change process if:
R the engine is running
R the transmission is in position N
R you are not driving faster than 43 mph
(70 km/h)
XPress LOW RANGE button :.
Indicator lamp ; flashes.
If the gear change process has taken place,
indicator lamp ; and LOW RANGE
indicator = in the multifunction display go
out.
While indicator lamp ; is flashing, you can
cancel the gear change by pressing LOW
RANGE button : again.
Messages in the multifunction display
If a gear change process has not been
successful, the following messages may be
displayed in the multifunction display:
Drive max. 25 mph (Canada: 40 km/h): You
have driven faster than 25 mph (40 km/h).
Indicator lamp ; also flashes.
XDrive more slowly to carry out the gear
change process.
Briefly engage gear N : The transmission
is in position D and you are now driving below
25 mph (40 km/h).
XShift the transmission to N to complete the
gear change process.
Shifting process canceled
Reactivate : The shifting process has not
been completed.
XMaintain all gear change conditions and
carry out the gear change process again.
Stop vehicle Apply parking brake : A
warning tone is also heard. The gear change
Off-road driving systems207Driving and parkingZ
Page 211 of 384
lost and steering would no longer be possible.
The differential locks must therefore only be
activated off-road and only if activating the
other driving systems (4ETS, ESP ®
and LOW
Range off-road gear) is no longer sufficient.
Engaging the differential locks
! Pull away slowly when the differential
locks are activated.
Function or performance tests may only be
performed on a 2-axle dynamometer. If you
wish to operate the vehicle on such a
dynamometer, please consult an
authorized Mercedes-Benz Center
beforehand. You could otherwise damage
the drive train or the brake system.
Automatic mode
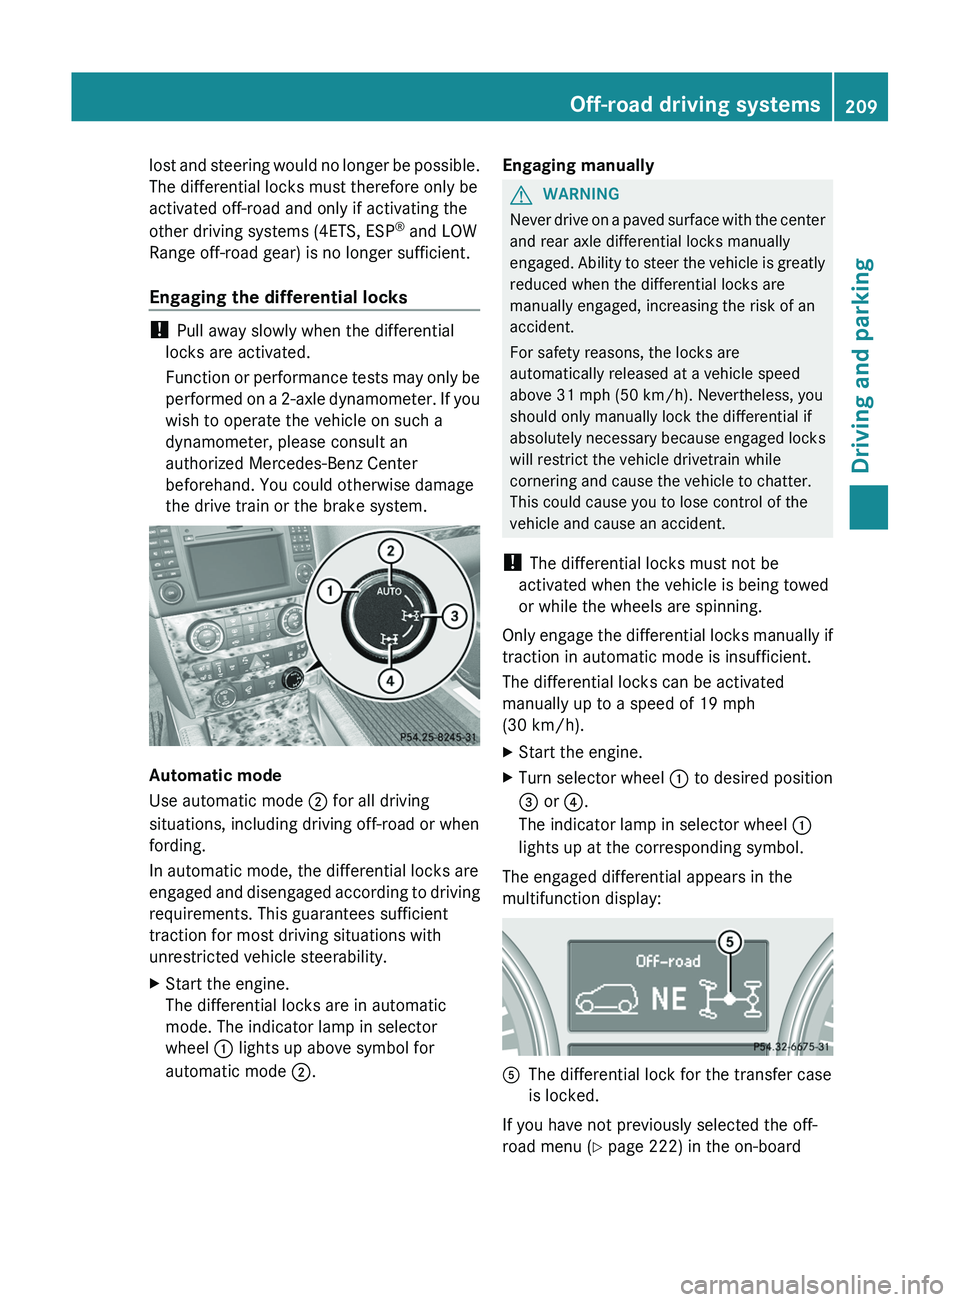
Use automatic mode ; for all driving
situations, including driving off-road or when
fording.
In automatic mode, the differential locks are
engaged and disengaged according to driving
requirements. This guarantees sufficient
traction for most driving situations with
unrestricted vehicle steerability.
XStart the engine.
The differential locks are in automatic
mode. The indicator lamp in selector
wheel : lights up above symbol for
automatic mode ;.Engaging manuallyGWARNING
Never drive on a paved surface with the center
and rear axle differential locks manually
engaged. Ability to steer the vehicle is greatly
reduced when the differential locks are
manually engaged, increasing the risk of an
accident.
For safety reasons, the locks are
automatically released at a vehicle speed
above 31 mph (50 km/h). Nevertheless, you
should only manually lock the differential if
absolutely necessary because engaged locks
will restrict the vehicle drivetrain while
cornering and cause the vehicle to chatter.
This could cause you to lose control of the
vehicle and cause an accident.
! The differential locks must not be
activated when the vehicle is being towed
or while the wheels are spinning.
Only engage the differential locks manually if
traction in automatic mode is insufficient.
The differential locks can be activated
manually up to a speed of 19 mph
(30 km/h).
XStart the engine.XTurn selector wheel : to desired position
= or ?.
The indicator lamp in selector wheel :
lights up at the corresponding symbol.
The engaged differential appears in the
multifunction display:
AThe differential lock for the transfer case
is locked.
If you have not previously selected the off-
road menu ( Y page 222) in the on-board
Off-road driving systems209Driving and parkingZ
Page 213 of 384
Allow for enough play in the chains to
facilitate turning tight corners.
R a separate brake system for certain types
of trailer.
R a safety switch for braked trailers. Check
the specific legal requirements applicable
to your federal state.
If the trailer detaches from the towing
vehicle, the safety switch applies the
trailer's brakes.
! Do not connect the trailer's brake system
(if featured) to the hydraulic brake system
of the towing vehicle, as the latter is
equipped with an anti-lock brake system.
Doing so will result in a loss of function of
the brake systems of both the vehicle and
the trailer.
i The vehicle's wiring harness features a
line to the brake indicator lamp.XMake sure that the automatic transmission
is set to position P.XApply the vehicle's parking brake.XStart the engine.XSelect highway level.XVehicles with the adaptive damping
system: set ADS to AUTO or COMF .XSwitch off the engine.XClose all doors and the tailgate.XCouple up the trailer.XEstablish all electrical connections.
i
Vehicles with the AIRMATIC package:
with a trailer attached, the vehicle will
always remain at highway level. When
coupling up a trailer, please observe the
following:
R if highway level has not been set
manually, the vehicle will automatically
sink to highway level as soon as it
reaches a speed of 5 mph (8 km/h).
R high-speed level is not available.
These restrictions apply to all accessories
powered through a connection to the trailer
power socket of your vehicle, e.g. a bicycle
carrier.
Towing a trailer
There are numerous legal requirements
concerning the towing of a trailer, e.g. speed
restrictions. Make sure that your vehicle/
trailer combination complies with the local
requirements not only in your area of
residence but also at any location to which
you are traveling. The police and local
authorities can provide reliable information.
Please observe the following when towing a
trailer:
R To acquaint yourself with driving with a
trailer and with the resulting changes to
handling, you should practice cornering,
stopping and reversing in a traffic-free
location.
R Before driving, check:
- the trailer tow hitch
- the safety switch for braked trailers
- the safety chains
- the electrical connections
- the lights
- the wheels
R Adjust the exterior mirrors to provide an
unobstructed view of the rear section of the
trailer.
R If the trailer features electronically
controlled brakes, pull away the vehicle/
trailer combination carefully, manually
brake using the brake controller, and check
the brakes for correct function.
R Secure any objects on the trailer to prevent
the cargo from slipping when the vehicle is
in motion.
R If you couple up a trailer, regularly check
the cargo for secure fastening and make
sure that the trailer lamps and (if
applicable) the trailer brakes are
functioning correctly.
R Bear in mind that the handling will be less
stable when towing a trailer than when
Trailer towing211Driving and parkingZ
Page 219 of 384
surface is free of ice. The road may still be icy,
especially in wooded areas or on bridges.
Changes in the outside temperature are
displayed after a short delay.
Speedometer with segments
The segments in the speedometer indicate
which speed range is available.
DISTRONIC ( Y page 182) activated:
One or two segments in the set speed range
light up.
DISTRONIC detects a vehicle in front:
The segments between the speed of the
vehicle in front and the stored speed light up.
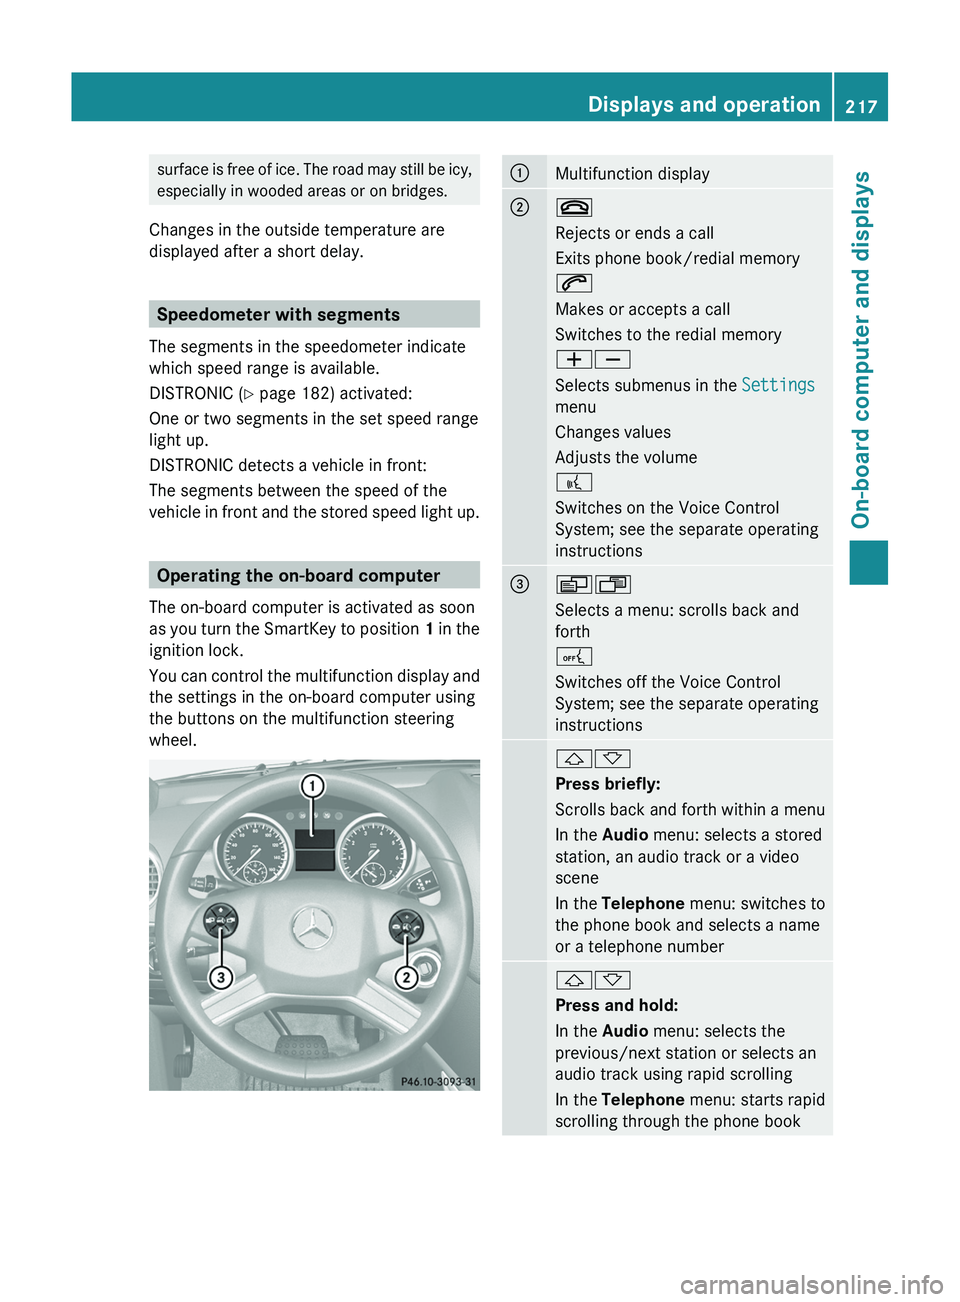
Operating the on-board computer
The on-board computer is activated as soon
as you turn the SmartKey to position 1 in the
ignition lock.
You can control the multifunction display and
the settings in the on-board computer using
the buttons on the multifunction steering
wheel.
:Multifunction display;~
Rejects or ends a call
Exits phone book/redial memory
6
Makes or accepts a call
Switches to the redial memory
WX
Selects submenus in the Settings
menu
Changes values
Adjusts the volume
?
Switches on the Voice Control
System; see the separate operating
instructions=VU
Selects a menu: scrolls back and
forth
A
Switches off the Voice Control
System; see the separate operating
instructions&*
Press briefly:
Scrolls back and forth within a menu
In the Audio menu: selects a stored
station, an audio track or a video
scene
In the Telephone menu: switches to
the phone book and selects a name
or a telephone number&*
Press and hold:
In the Audio menu: selects the
previous/next station or selects an
audio track using rapid scrolling
In the Telephone menu: starts rapid
scrolling through the phone bookDisplays and operation217On-board computer and displaysZ
Page 225 of 384

Example display for vehicles with the Off-Road Pro
engineering package
Settings menu
Introduction
The Settings menu can be used for:
R restoring the factory settings
R changing the instrument cluster settings
R changing the time/date settings 27
R changing the light settings
R changing the vehicle settings
R changing the convenience settings
Resetting to factory settings
For safety reasons, the Daytime Running
Lamps function in the Lighting submenu is
only reset when the engine is switched off.
XPress V or U on the steering wheel
to select the Settings menu.XPress and hold the . reset button on the
instrument cluster for approximately three
seconds.
A prompt appears in the multifunction
display asking you to confirm by pressing
the . reset button again.XPress the . reset button again.
The settings of most functions are restored
to the factory settings.
or
XIf you want to retain the settings, do not
press the . reset button a second time.
After approximately five seconds, the
Settings menu reappears.XPress the V or U button to select a
different menu.
Instrument cluster
Selecting the unit of measurement for
distance
This function is only available in Canada.
The Display unit Speedometer/
Odometer function allows you to choose
whether certain displays appear in kilometers
or miles.
The selected unit of measurement for
distance applies to:
R the analog speedometer
R the odometer and the trip odometer
R the trip computer
R the navigation instruction in the
Navigation menu
R DISTRONIC
XPress the V or U button on the
steering wheel to select the Settings
menu.XPress the & button to call up the
selection of submenus.XPress the W or X button to select the
Instrument Cluster submenu.XPress the & button to select Display
Unit Speedometer/Odometer .XPress the W or X button to select
km or Miles as the unit of measurement for
distance.XPress the &, V or U button to
select a different display.27 This function is not available in vehicles with the navigation module.Menus and submenus223On-board computer and displaysZ
Page 226 of 384
Selecting the unit of distance for the
digital speedometerXPress V or U on the steering wheel
to select the Settings menu.XPress the & button to select submenus.XPress the W or X button to select the
Instrument cluster submenu.XPress the & button to display Display
unit Digital speedometer .XPress the W or X button to select
km or miles as the unit of measurement for
distance.XPress the &, V or U button to
select a different display.
Selecting the language
The Language: function allows you to select
the language for the instrument cluster.
XPress V or U on the steering wheel
to select the Settings menu.XPress the & button to select submenus.XPress W or X to select the
Instrument cluster submenu.XPress & to select Language .XPress the W or X button to select the
desired language.XPress the &, V or U button to
select a different display.
Selecting the status line display
XPress V or U on the steering wheel
to select the Settings menu.XPress the & button to select submenus.XPress W or X to select the
Instrument cluster submenu.XPress & to select Status line
display .XPress W or X to select the display in
the status line: speed ( Speed) or outside
temperature ( Outside temp. ).
The selected display now appears
constantly in the lower multifunction
display. When you scroll through theStandard display menu (Y page 220), you
will see the display you have not selected.XPress the &, V or U button to
select a different display.
Time/date
This submenu is only available on vehicles
with no navigation module. To set the time
and the date for vehicles with a navigation
module, see the separate operating
instructions.
In the Time/date submenu, you can set the
time and date.
XPress V or U on the steering wheel
to select the Settings... menu.XPress the & button to select submenus.XPress the W or X button to select the
Time/date submenu.XTo set the time: press & to select
Clock Set Hour or Clock Set
Minute(s) .
or
XTo set the date: press & to select
Date Set Day , Date Set Month or Date
Set Year .XPress W or X to set a value.XPress the &, V or U button to
select a different display.
Lights
Switching the daytime running lamps on/
off
This function is not available in Canada.
If you have activated the Daytime Running
Lights function and the light switch is in the
$ or à position, the daytime running
lamps are automatically switched on when
the engine is running.
In the dark, the following also light up:
R the low-beam headlamps
R the parking lamps
R the tail lamps
224Menus and submenusOn-board computer and displays