2012 MERCEDES-BENZ E-CLASS ESTATE ignition
[x] Cancel search: ignitionPage 212 of 457
If indicator lamp
;is not lit:
X Press button :.
Indicator lamp ;lights up. The vehicle
heighti s adjusted to raised level.
The Vehicle rising message appears in
the display.
The "Raised level" setting is cancelled if you:
R drive at a speed above approximately
120 km/h.
R drive for approximately three minutes at a
speed above 80 km/h.
The "Raised Level" remains saved when you
are not driving within these speed ranges.
Setting the normal level
X Start the engine.
If indicator lamp ;is lit:
X Press button :.
Indicator lamp ;goes out. The vehicle is
adjusted to normal level.
Suspension tuning General notes
The electronically controlled damping system
works continuously. This improves driving
safety and ride comfort.
The damping is tuned individually to each
wheel and depends on:
R your driving style, e.g. sporty
R the road surface condition, e.g. bumps
R your individual selection, i.e. sports or com-
fort
Your selection remains stored even if you
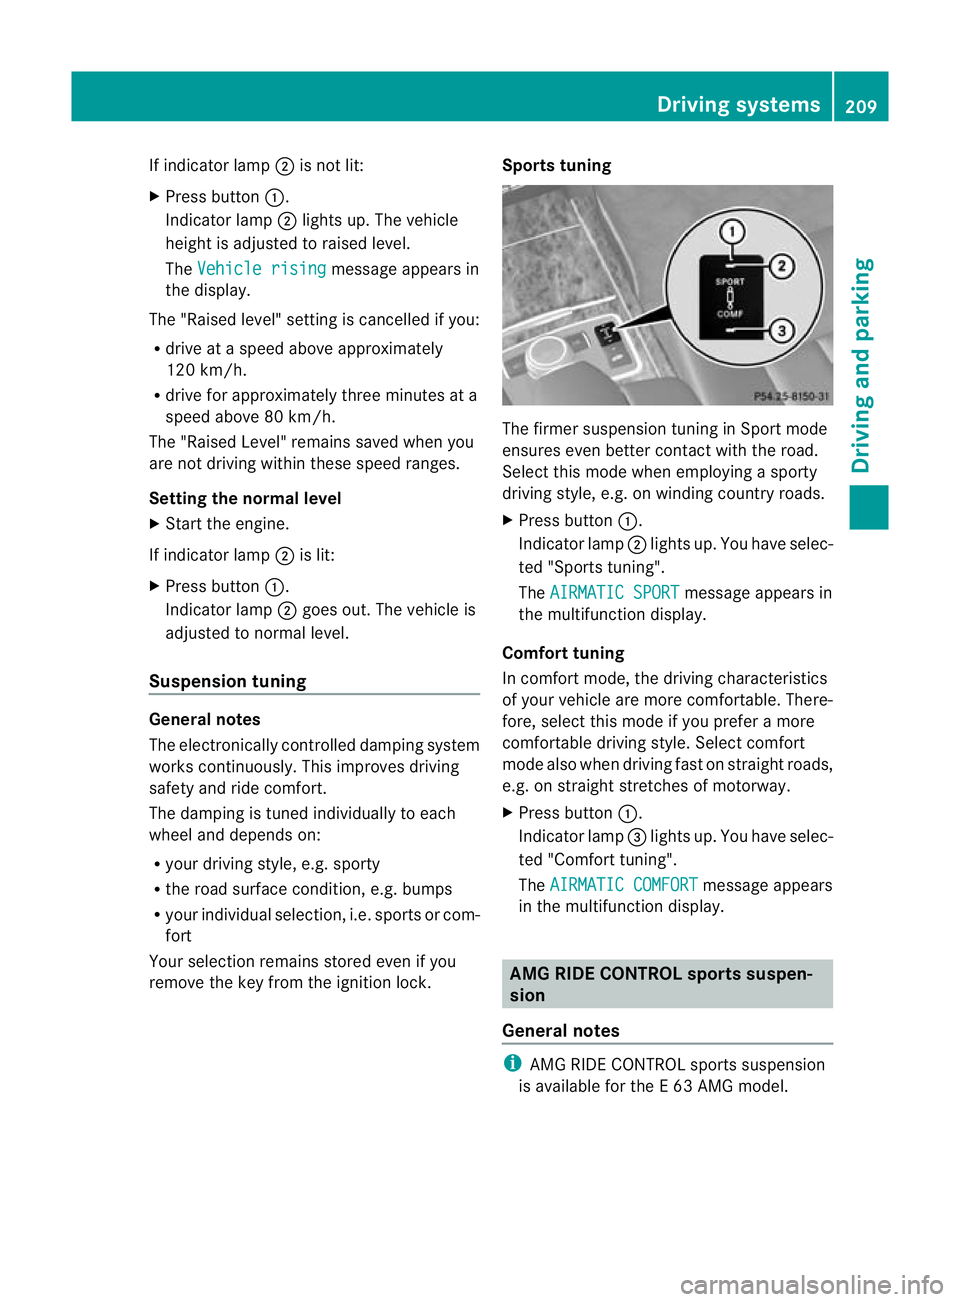
remove the key from the ignition lock. Sports tuning The firmer suspension tuning in Sport mode
ensures even better contact with the road.
Select this mode when employing a sporty
driving style, e.g. on winding country roads.
X
Press button :.
Indicator lamp ;lights up. You have selec-
ted "Sports tuning".
The AIRMATIC SPORT message appears in
the multifunction display.
Comfort tuning
In comfort mode, the driving characteristics
of your vehicle are more comfortable. There-
fore, select this mode if you prefer a more
comfortable driving style. Select comfort
mode also when driving fast on straight roads,
e.g. on straight stretches of motorway.
X Press button :.
Indicator lamp =lights up. You have selec-
ted "Comfort tuning".
The AIRMATIC COMFORT message appears
in the multifunction display. AMG RIDE CONTROL sports suspen-
sion
General notes i
AMG RIDE CONTROL sports suspension
is available for the E63AMG model. Driving systems
209Driving and parking Z
Page 214 of 457
X
To store: press AMG button ;until you
hea ratone.
X To call up: press AMG button ;.
The stored suspensio ntuning and drive
program are selected.
X To display: briefly press AMG button ;.
Your selection appears in the multifunction
display. 4MATIC (permanent all-wheel drive)
G
WARNING
4MATIC canno treduce the risk of an accident
if you drive too fast.
If a drive wheel spins due to insufficient grip:
R only depress the accelerator pedal as far as
necessary when pulling away.
R accelerate less when driving.
R adapt your driving style to suit road and
traffic conditions.
! Never tow the vehicle with one axle
raised. This may damage the transfer case.
Damage of this sort is not covered by the
Mercedes-Benz implied warranty. All
wheels must remain either on the ground
or be fully raised. Observe the instructions
for towing the vehicle with all wheels in full
contact with the ground.
i In wintry driving conditions, the maximum
effect of 4MATIC can only be achieved if
you use winter tyres (M+ Styres), with snow
chains if necessary.
4MATIC ensures that all four wheels are per-
manently driven. Together with ESP ®
, it
improves the traction of your vehicle when-
eve radrive wheel spins due to insufficient
grip. PARKTRONIC
Important safety notes G
WARNING
PARKTRONIC is only an aid and may not
detec tall obstacles. It is not a substitute for
attentive driving.
You are always responsible for safety and
must continue to pay attention to your imme-
diate surroundings when parking and
manoeuvring. You could otherwise endanger
yourself and others. G
WARNING
Make sure that no persons or animals are in
the manoeuvring range. Otherwise, they
could be injured.
PARKTRONIC is an electronic parking aid with
ultrasonic sensors .Itindicates visually and
audibly the distance between your vehicle
and an object.
PARKTRONIC is activated automatically if
you:
R switch on the ignition
R shift to position D,Ror Non vehicles with
automatic transmission
R release the parking brake
PARKTRONIC is deactivated at speeds above
18 km/h. It is reactivated at lower speeds.
PARKTRONIC monitors the area around your
vehicle using si xsensors in the fron tbumper
and four sensors in the rear bumper.
Range of the sensors General notes
!
When parking, pay particular attention to
objects above or below the sensors, such
as flower pots or trailer drawbars. PARK-
TRONIC does no tdetec tsuch objects when
they are in the immediat evicinity of the
vehicle. You could damage the vehicle or
the objects. Driving systems
211Driving and parking Z
Page 216 of 457
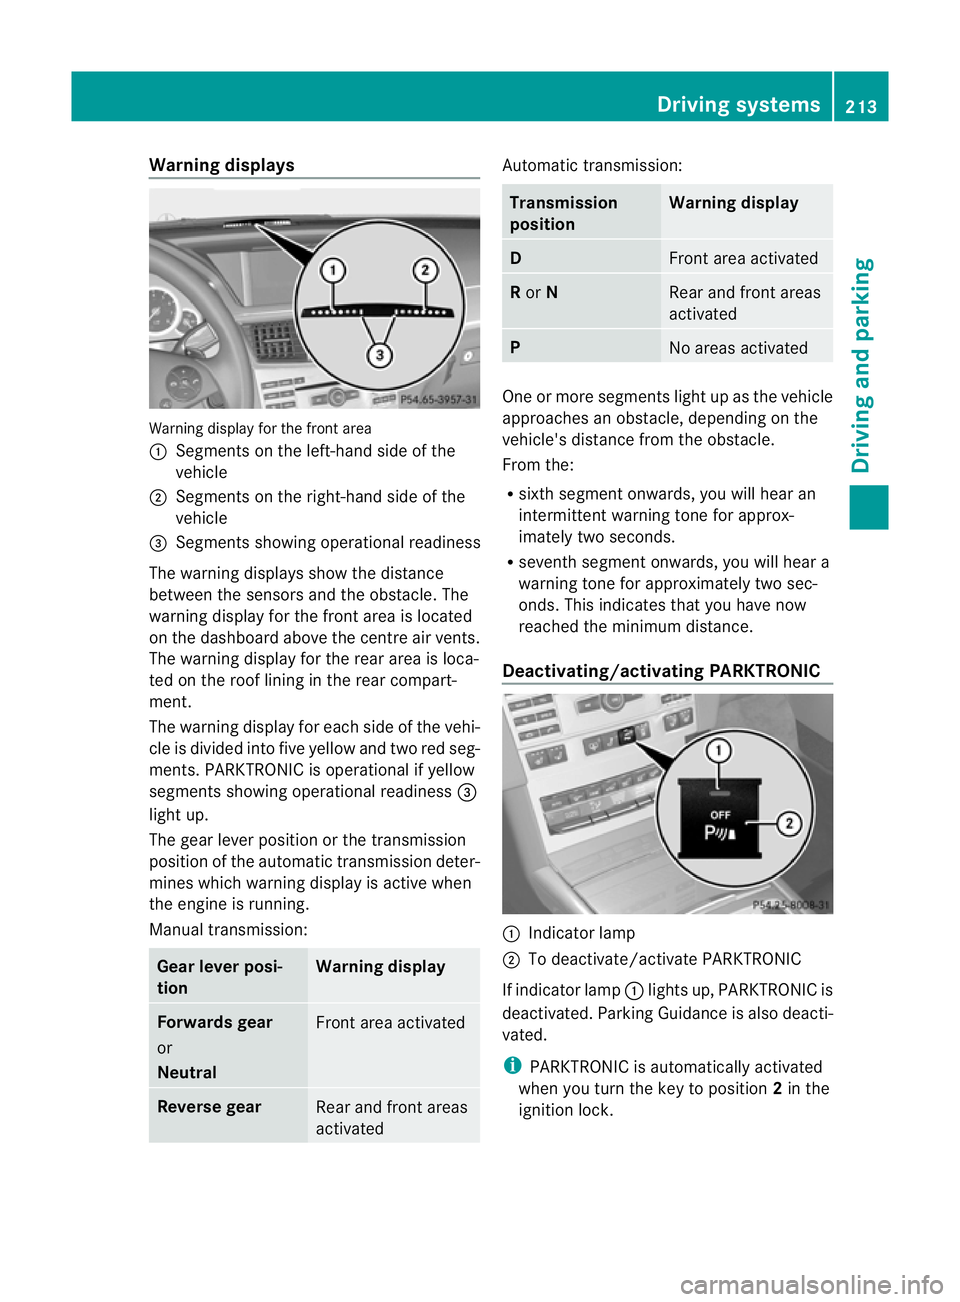
Warning displays
Warning display for the front area
:
Segments on the left-hand side of the
vehicle
; Segments on the right-hand side of the
vehicle
= Segments showing operational readiness
The warning displays show the distance
between the sensors and the obstacle. The
warning display for the front area is located
on the dashboard above the centre airv ents.
The warning display for the rear area is loca-
ted on the roof lining in the rear compart-
ment.
The warning display for each side of the vehi-
cle is divided into five yellow and two red seg-
ments. PARKTRONIC is operational if yellow
segments showing operational readiness =
light up.
The gear lever position or the transmission
position of the automatic transmission deter-
mines which warning display is active when
the engine is running.
Manual transmission: Gear lever posi-
tion Warning display
Forwards gear
or
Neutral
Front area activated
Reverse gear
Rear and front areas
activated Automatic transmission:
Transmission
position Warning display
D
Front area activated
R
or N Rear and front areas
activated
P
No areas activated
One or more segments light up as the vehicle
approaches an obstacle, depending on the
vehicle's distance from the obstacle.
From the:
R
sixth segmen tonwards, you will hea ran
intermittent warning ton efor approx-
imately two seconds.
R seventh segment onwards, you will hear a
warning tone for approximately two sec-
onds. This indicates that you have now
reached the minimum distance.
Deactivating/activating PARKTRONIC :
Indicator lamp
; To deactivate/activate PARKTRONIC
If indicator lamp :lights up, PARKTRONIC is
deactivated. Parking Guidance is also deacti-
vated.
i PARKTRONIC is automatically activated
when you turn the key to position 2in the
ignition lock. Driving systems
213Driving and parking Z
Page 218 of 457
Problems with PARKTRONIC
Problem Possible causes/consequences and
M Solutions
Only the red segments
in the PARKTRONIC
warning displays are lit.
You also hear a warning
tone for approximately
two seconds.
PARKTRONIC is deacti-
vated after approx-
imately 20 seconds,
and the indicator lamp
in the PARKTRONIC
button lights up. PARKTRONIC has malfunctioned and has switched off.
X
If problems persist, have PARKTRONIC checked at a qualified
specialist workshop. Only the red segments
in the PARKTRONIC
warning displays are lit.
PARKTRONIC is deacti-
vated after approx-
imately 20seconds. The PARKTRONIC sensors are dirty or there is interference.
X
Cleant he PARKTRONIC sensors (Y page 354).
X Switch the ignition back on. The problem may be caused by an external source of radio or
ultrasound waves.
X See if PARKTRONIC functions in a different location. Parking Guidance
Important safety notes G
WARNING
Parking Guidance is merely an aid and may
recommend parking spaces that are not suit-
able for parking. For example, these might be
spaces where parking is prohibited, drive-
ways, unsuitable surfaces, etc.
Parking Guidance measures the parking
space as you drive past it. Any later changes
to the parking space are not taken into
account. For instance, this may be the case
when the vehicle parked in front of or behind
the space changes its position or when an
obstacle is moved into the parking space.
Parking Guidance does not relieve you of the
responsibility for paying attention. If you rely
solely on Parking Guidance, you could cause
an accident and injure yourself and others. You are always responsible for safety and
must continue to pay attention to your imme-
diate surroundings when parking and
manoeuvring.
G
WARNING
Objects located above the height range of
Parking Guidance will not be detected when
the parking space is measured. These are not
taken into account when the parking proce-
dure is calculated, e.g. overhanging loads, tail
sections or loading ramps of goods vehicles.
In some circumstances, Parking Guidance
might therefore issue steering instructions
too soon. This may lead to a collision. For this
reason, you should avoid using Parking Guid-
ance in such situations. Driving systems
215Driving and parking Z
Page 222 of 457
could otherwise endanger yoursel
fand oth-
ers. G
WARNING
Unde rthe following circumstances, the
reversing camera will not function, or will
function in a limited manner:
R if the tailgate is open
R in heavy rain, snow or fog
R at night or in very dark places
R if the camera is exposed to very bright light
R if the area is lit by fluorescent light or LED
lighting (the display may flicker)
R if there is a sudden change in temperature,
e.g. when driving into a heated garage in
winter
R if the camera lens is dirty or obstructed
R if the rear of your vehicle is damaged. In this
event, have the camera position and setting
checked at a qualified specialist workshop.
Mercedes-Ben zrecommends that you use
a Mercedes-Benz Service Centre for this
purpose.
Do not use the reversing camera in these
types of situation .You could otherwise injure
others or damage objects and your vehicle
while you are parking.
The area behind the vehicle is displayed as a
mirror image, as in the rear-view mirror.
Activating the reversing camera X
Make sure that the key is in position 2in
the ignition lock.
X Make sure that the "Reversing camera"
function is selected in COMAND APS (see
the separate operating instructions for
COMAND APS).
X Engage reverse gear.
The area behind the vehicle is shown with
guide lines in the COMAND display. Guide lines in the COMAND display G
WARNING
Using the reversing camera can be dangerous
if you are colour blind or your ability to distin-
guish colours is impaired.
Only use the reversing camera if you can see
and distinguish between all the coloured
guide lines that are displayed by the reversing
camera in the COMAND display. G
WARNING
Please note that objects not at ground level
may appear to be further away than they
actually are. These include:
R the bumper of a vehicle that is parked
behind your vehicle
R a trailer drawbar
R the ball coupling of a trailer tow hitch
R the tail-end of a lorry
R slanted posts
The lines are only guides, not accurate meas-
urements of the distance to an obstacle.
Therefore, you should never pass the red line
when approaching an obstacle. You could oth-
erwise cause an accident and injure yourself
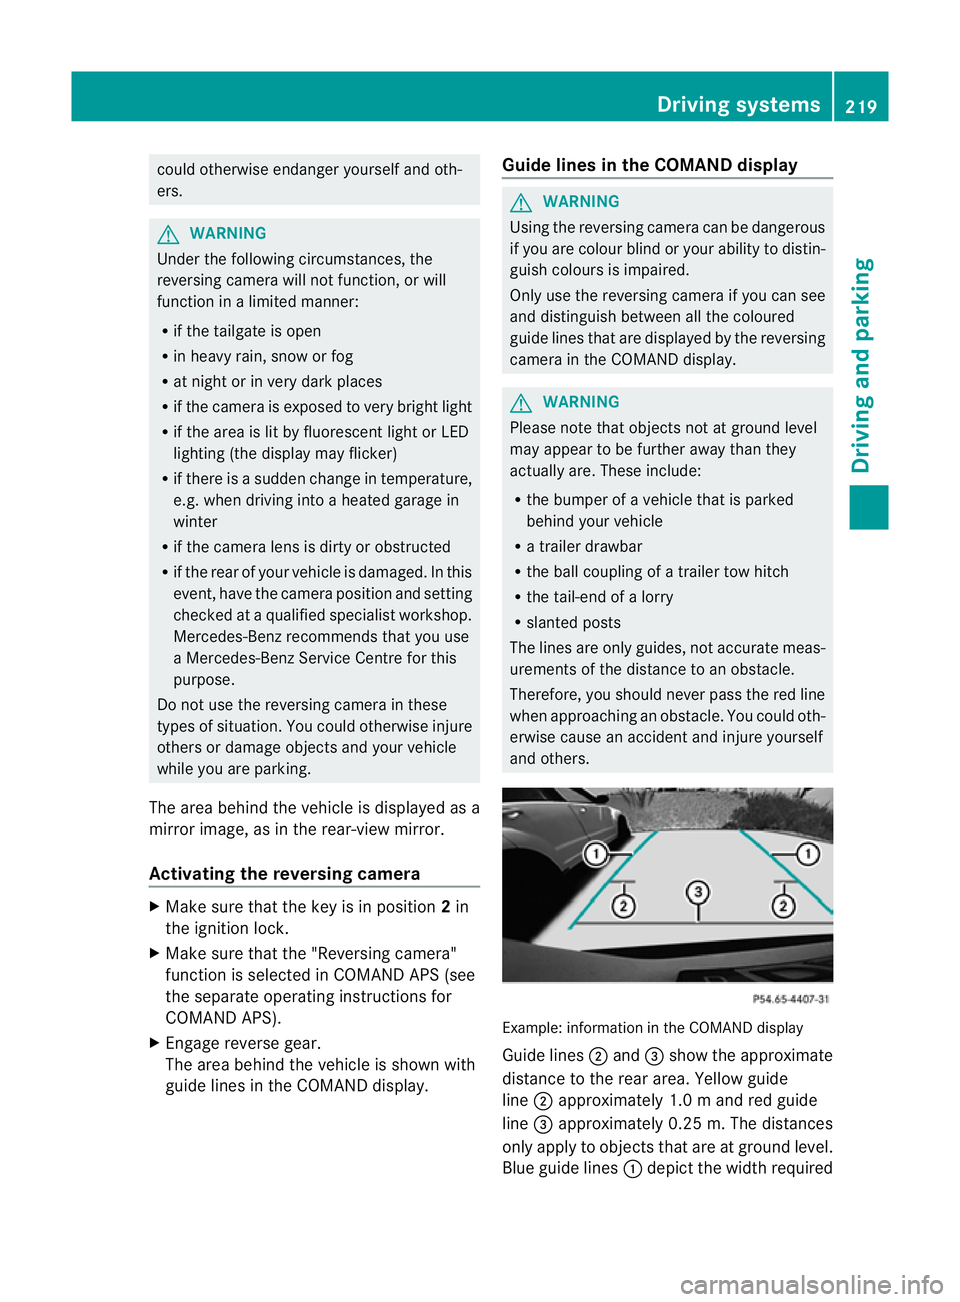
and others. Example: information in the COMAND display
Guide lines
;and =show the approximate
distance to the rear area. Yellow guide
line ;approximately 1.0 mand red guide
line =approximately 0.25 m. The distances
only apply to objects that are at ground level.
Blue guide lines :depict the width required Driving systems
219Driving and parking Z
Page 226 of 457
display in the multifunction display. This is
also the case if you cannot switch on the
main-beam headlamps due to oncoming traf-
fic.
i Infrared light is not visible to the human
eye and therefore does not dazzle. Night
View Assist Plus can therefore remain
switched on even if there is oncoming traf-
fic.
Activating Night View Assist Plus Activation conditions
You can only activate Night View Assist Plus
if:
R the key is in position 2in the ignition lock.
R it is dark.
R the light switch is in the ÃorL posi-
tion.
R reverse gear has not been engaged.
Activating Night View Assist Plus X
Make sure that COMAND APS is switched
on.
X Press button :.
The Night View Assist Plus display appears
in the COMAND display.
You can read about how to adjust the bright-
ness of the COMAND display in the COMAND
APS operating instructions.
i The infrared headlamps only switch on
when the vehicle is being driven at speeds
of at least 10 km/h. This means that you
do not have the full visual range while sta- tionary and cannot check whether Night
View Assist Plus is working.
Pedestrian recognition G
WARNING
Pedestrian recognition may be impaired or
inoperative if:
R pedestrians are partially or entirely
obscured by objects, e.g. by parked vehi-
cles.
R the silhouette of the pedestrian in the Night
View Assist Plus display is incomplete or
interrupted, e.g. by powerful light reflec-
tions.
R pedestrians do not contrast with the sur-
roundings.
R pedestrians are not in an upright position,
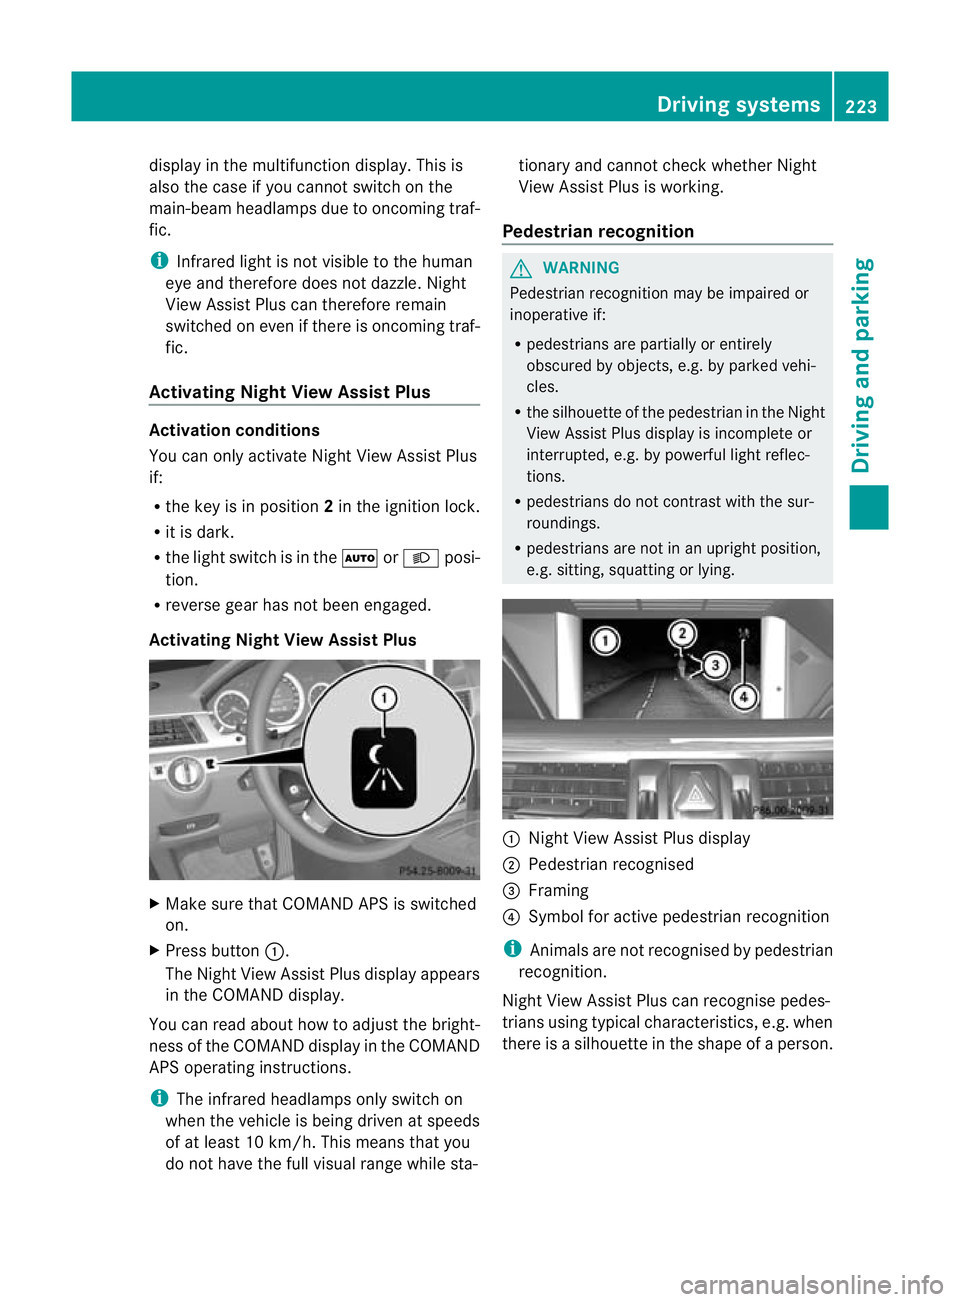
e.g. sitting, squatting or lying. :
Night View Assist Plus display
; Pedestrian recognised
= Framing
? Symbol for active pedestrian recognition
i Animals are not recognised by pedestrian
recognition.
Night View Assist Plus can recognise pedes-
trians using typical characteristics, e.g. when
there is a silhouette in the shape of a person. Driving systems
223Driving and parking Z
Page 230 of 457
If a vehicle is detected within the monitoring
range of Blind Spot Assist at speeds above
30 km/h, warning lamp :on the corre-
sponding side lights up red. This warning
always occurs when a vehicle enters the blind
spot monitoring range from behind or from
the side. When you overtake a vehicle, the
warning only occurs if the difference in speed
is less than 12 km/h.
The yellow indicator lamp goes out if reverse
gear is engaged. Blind Spot Assist is then
deactivated.
The brightness of the indicator/warning
lamps is adjusted automatically according to
the ambient light.
Collision warning
If a vehicle is detected in the monitoring range
of Blind Spot Assist and you switch on the
corresponding turn signal, a double warning
tone sounds. Red warning lamp :flashes. If
the turn signal remains on, detected vehicles
are indicated by the flashing of red warning
lamp :.There are no further warning tones.
Switching on Blind Spot Assist
X Make sure that the radar sensor system
(Y page 262) and Blind Spot Assist
(Y page 257) are activated in the on-board
computer.
X Turn the key to position 2in the ignition
lock.
Warning lamps :in the exterior mirrors
light up red for approximately
1.5 seconds and then turn yellow.
Towing atrailer
If you attach a trailer, make sure tha tyou have
correctly established the electrical connec-
tion. This can be accomplished by checking
the trailer lighting. Blind Spot Assist is then
deactivated. The indicator lamp lights up yel-
low in the exterior mirrors and the message:
Blind Spot Assist currently unavail‐
able See Owner's Manual appears in the
multifunction display. i
You can deactivate the indicator lamps in
the exterior mirrors.
To do so, switch off Blind Spot Assist if:
R the key is in position 2in the ignition
lock.
R the engine is not running.
R the electrical connection to the trailer
has been established.
Lane Keeping Assist Important safety notes
G
WARNING
Lane Keeping Assist does not keep your vehi-
cle in its lane. It is only an aid and may detect
the lane markings on the road incorrectly or
not at all.
The system may be impaired or may not func-
tion if:
R there is poor visibility, e.g. due to insuffi-
cient illumination of the road, or due to
snow, rain, fog or spray.
R there is glare, e.g. from oncoming traffic,
the sun, or reflection from other vehicles.
R the windscreen is dirty, misted up or cov-
ered, for instance by a sticker, in the vicinity
of the camera
R several or no lane markings for a single lane
are present.
R the lane markings are worn away, dark or
covered up, e.g. by dirt or snow.
R the distance to the vehicle in front is too
small and the lane markings thus cannot be
detected.
R the lane markings on the road are unclear,
e.g. near roadworks.
R the lane markings change quickly, e.g.
lanes branch off, cross one another or
merge.
R the road is narrow and winding.
Lane Keeping Assist cannot detect road and
traffic conditions. It is not a substitute for
attentive driving. You are responsible for the
vehicle's speed, braking in good time, and Driving systems
227Driving and parking
Z
Page 235 of 457
R
ESP ®
is deactivated.
R a loss of tyre pressure or a defective tyre is
detected.
Activating Active Blind Spo tAssist
X Make sure that the radar sensor system
(Y page 262) and Active Blind Spot Assist
(Y page 257) are activated in the on-board
computer.
X Turn the key to position 2in the ignition
lock.
Warning lamps :in the exterior mirrors
light up red for approximately
1.5 seconds and then turn yellow.
Towing atrailer
If you attach a trailer, make sure tha tyou have
correctly established the electrical connec-
tion. This can be accomplished by checking
the trailer lighting. Active Blind Spot Assist is
then deactivated. The indicator lamp lights up
yellow in the exterior mirrors and the ActiveBlind Spot Assist currently unavail‐
able See Owner's Manual message
appears in the multifunction display.
Active Lane Keeping Assist Important safety notes
G
WARNING
Active Lane Keeping Assist does not keep
your vehicle in its lane. It is only an aid and
may detect the lane markings on the road
incorrectly or not at all.
The system may be impaired or may not func-
tion if:
R there is poor visibility, e.g. due to inade-
quate illumination of the road surface,
snow, rain, fog or spray.
R there is glare, e.g. from oncoming traffic,
the sun, or reflection from other vehicles.
R the windscreen is dirty, fogged up or cov-
ered, for instance by a sticker, in the vicinity
of the camera. R
several or no lane markings for a single lane
are present.
R the lane markings are worn away, dark or
covered up, e.g. by dirt or snow.
R the distance to the vehicle in front is too
small and as a result the lane markings can-
not be recognised.
R the lane markings on the road are unclear,
e.g. near roadworks.
R the lane markings change quickly, e.g.
branch off, cross, or merge.
R the road is narrow and winding.
Active Lane Keeping Assist cannot detect
road and traffic conditions. It is not a substi-
tute for attentive driving. You are responsible
for the vehicle's speed, braking in good time,
and steering correctly. Always adapt your
driving style to suit the prevailing road and
weather conditions. Always pay attention to
traffic conditions and your surroundings. Oth-
erwise, you may fail to recognise dangers in
time, cause an accident and injure yourself
and others.
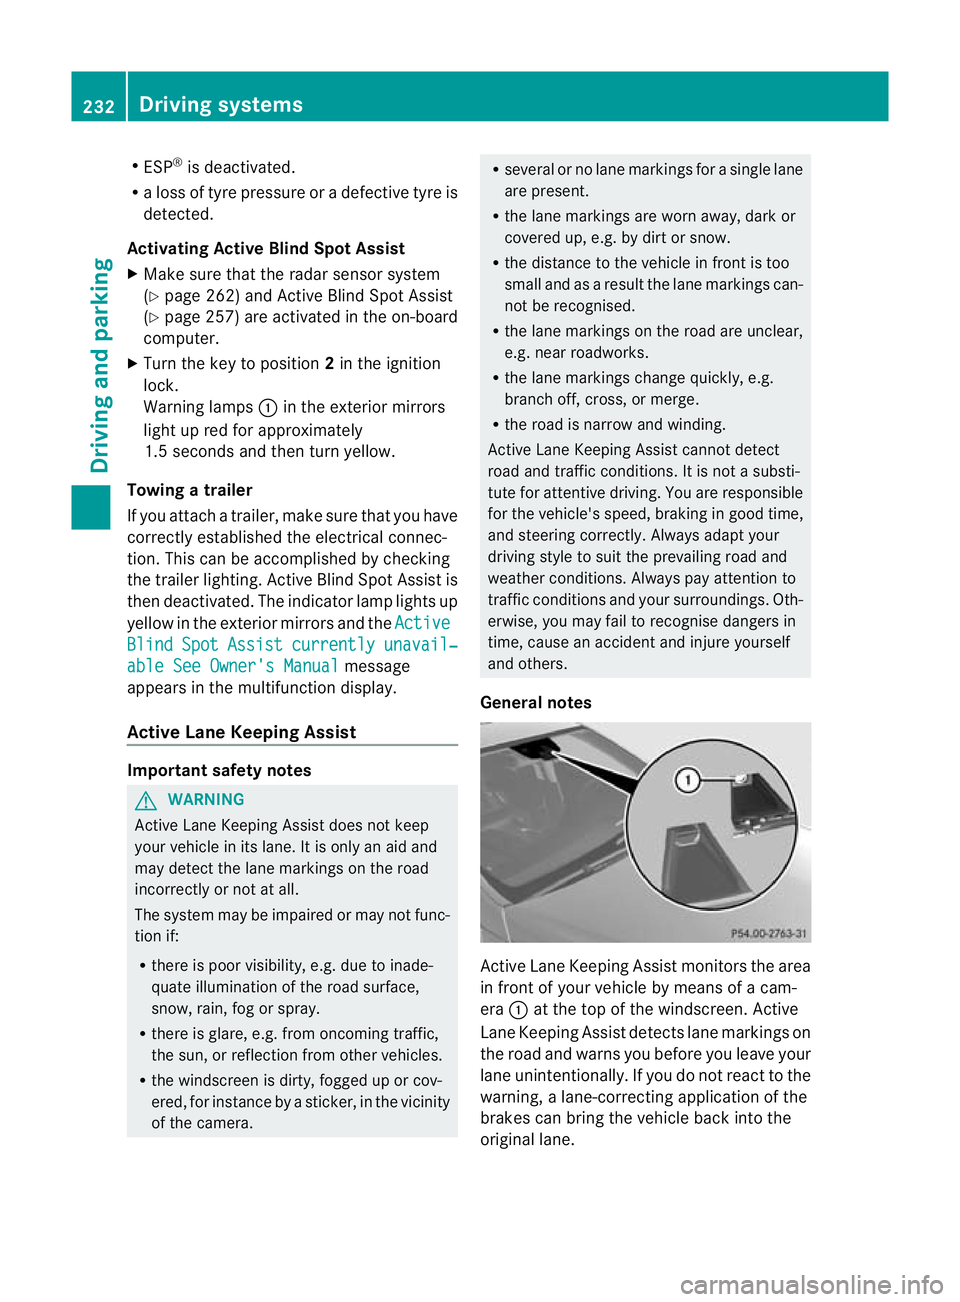
General notes Active Lane Keeping Assist monitors the area
in front of your vehicle by means of a cam-
era :at the top of the windscreen. Active
Lane Keeping Assist detect slane markings on
the road and warns you before you leave your
lane unintentionally. If you do no treact to the
warning, a lane-correcting application of the
brakes can bring the vehicle back into the
original lane. 232
Driving systemsDriving and parking