2012 MERCEDES-BENZ E-CLASS ESTATE radio
[x] Cancel search: radioPage 300 of 457
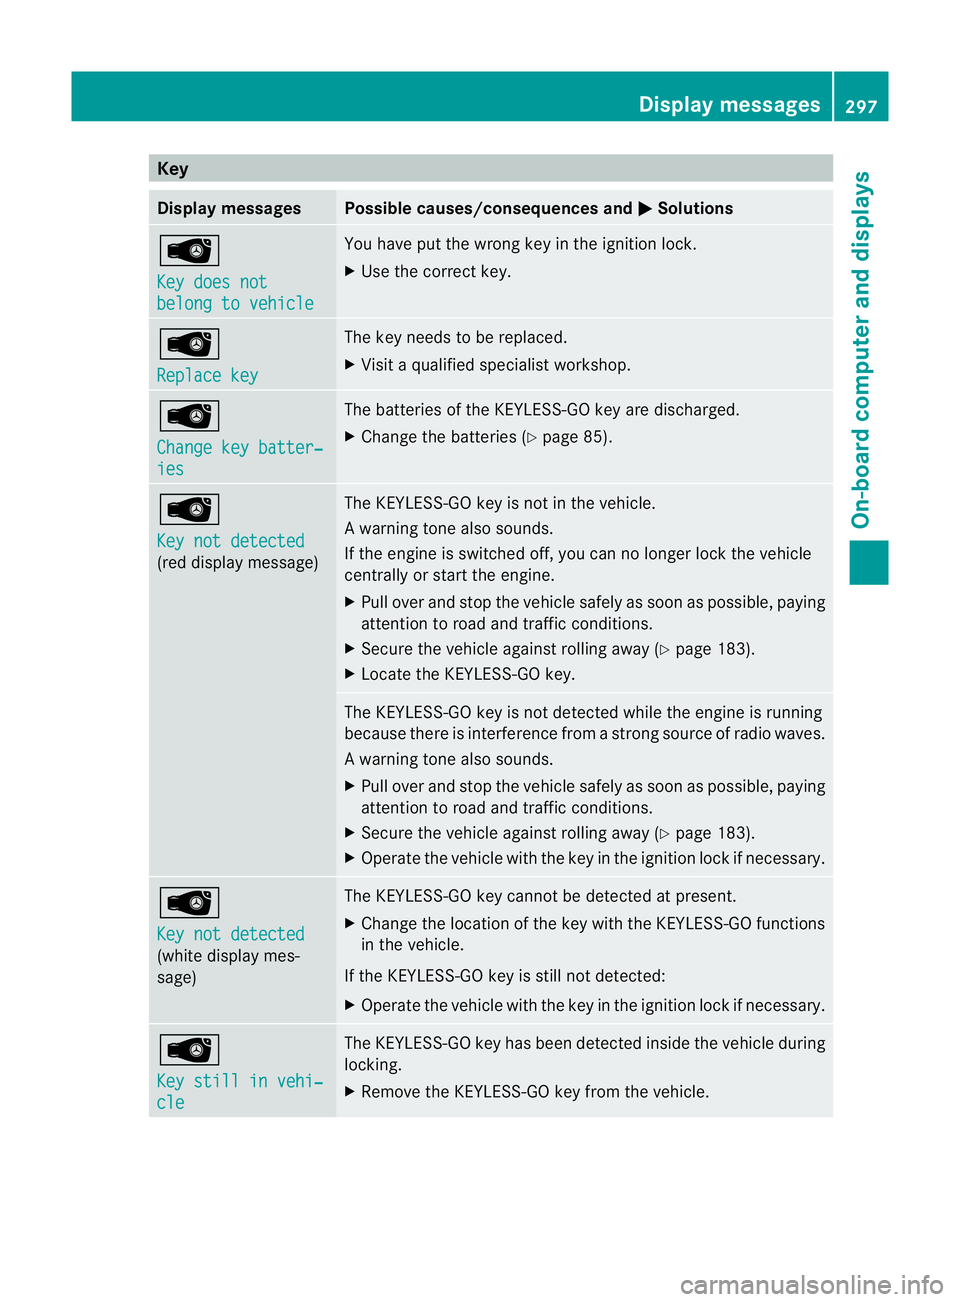
Key
Display messages Possible causes/consequences and
M Solutions
Â
Key does not
belong to vehicle You have put the wrong key in the ignition lock.
X
Use the correct key. Â
Replace key The key needs to be replaced.
X
Visit a qualified specialist workshop. Â
Change key batter‐
ies The batteries of the KEYLESS-GO key are discharged.
X Change the batteries ( Ypage 85). Â
Key not detected
(red display message) The KEYLESS-GO key is not in the vehicle.
Aw
arning tone also sounds.
If the engine is switched off, you can no longer loc kthe vehicle
centrally or start the engine.
X Pull over and stop the vehicle safely as soon as possible, paying
attention to road and traffic conditions.
X Secure the vehicle against rolling away (Y page 183).
X Locate the KEYLESS-GO key. The KEYLESS-GO key is not detected while the engine is running
because there is interference from a strong source of radio waves.
Aw
arning tone also sounds.
X Pull ove rand stop the vehicle safely as soo nas possible, paying
attention to road and traffic conditions.
X Secure the vehicle against rolling away (Y page 183).
X Operate the vehicle with the key in the ignition lock if necessary. Â
Key not detected
(white display mes-
sage) The KEYLESS-GO key cannot be detected at present.
X
Change the location of the key with the KEYLESS-GO functions
in the vehicle.
If the KEYLESS-GO key is still not detected:
X Operate the vehicle with the key in the ignition lock if necessary. Â
Key still in vehi‐
cle The KEYLESS-GO key has been detected inside the vehicle during
locking.
X
Remove the KEYLESS-GO key from the vehicle. Display messages
297On-board computer and displays Z
Page 336 of 457
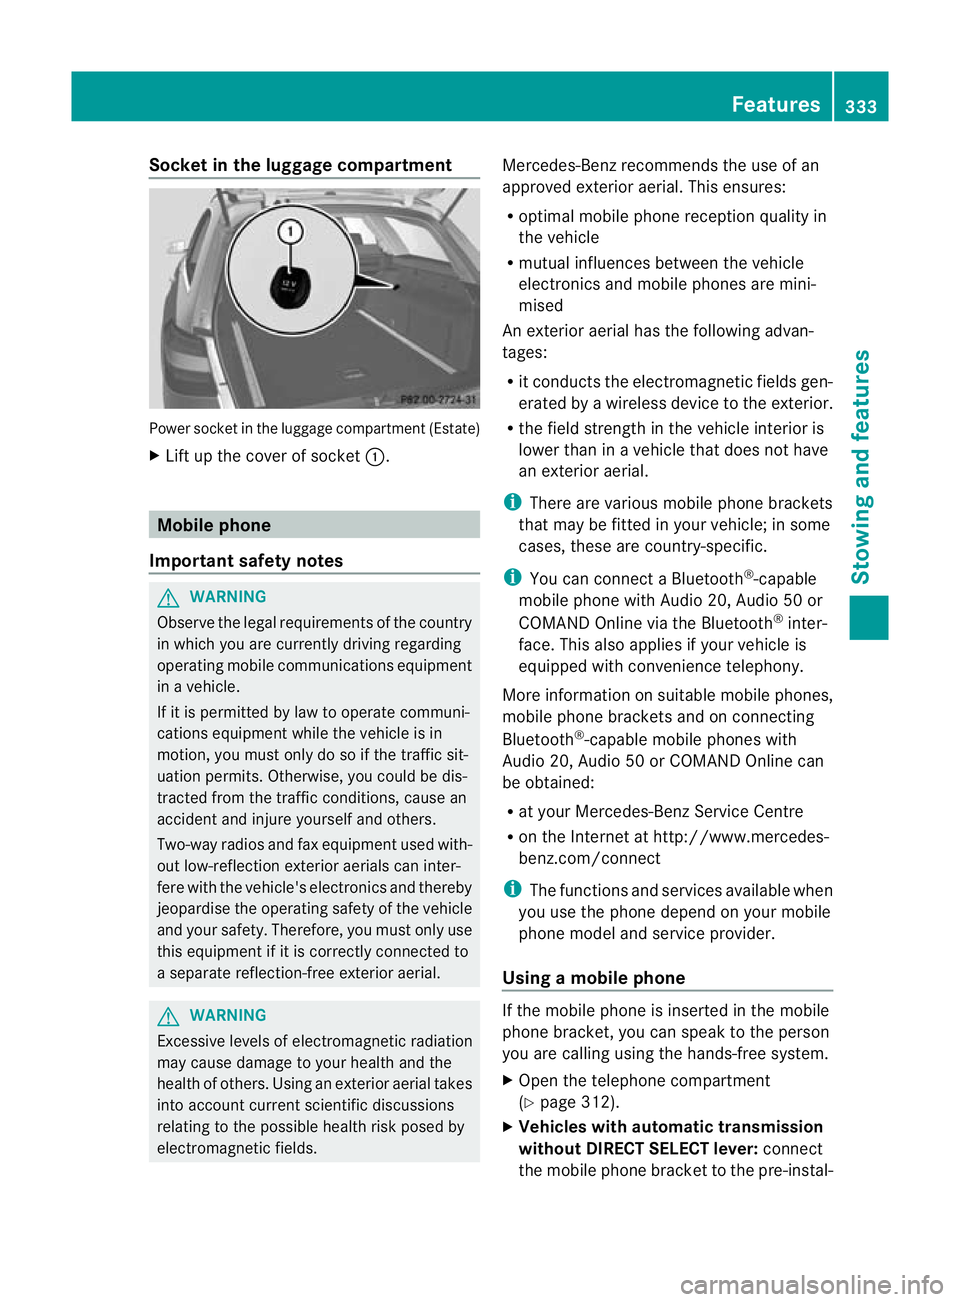
Socket in the luggage compartment
Power socket in the luggage compartmen
t(Estate)
X Lift up the cover of socket :.Mobile phone
Important safety notes G
WARNING
Observe the legal requirements of the country
in which you are currently driving regarding
operating mobile communications equipment
in a vehicle.
If it is permitted by law to operate communi-
cations equipment while the vehicle is in
motion, you must only do so if the traffic sit-
uatio npermits .Otherwise, you could be dis-
tracted from the traffic conditions, cause an
accident and injure yourself and others.
Two-way radios and fa xequipment used with-
out low-reflection exterior aerials can inter-
fere with the vehicle's electronics and thereby
jeopardise the operating safety of the vehicle
and your safety. Therefore, you must only use
this equipment if it is correctly connected to
a separate reflection-free exterior aerial. G
WARNING
Excessive levels of electromagnetic radiation
may cause damage to your health and the
health of others. Using an exterior aerial takes
into account current scientific discussions
relating to the possible health risk posed by
electromagnetic fields. Mercedes-Benz recommends the use of an
approved exterior aerial. This ensures:
R
optimal mobile phone reception quality in
the vehicle
R mutual influences between the vehicle
electronics and mobile phones are mini-
mised
An exterior aerial has the following advan-
tages:
R it conducts the electromagnetic fields gen-
erated by a wireless device to the exterior.
R the field strength in the vehicle interior is
lower than in a vehicle that does not have
an exterior aerial.
i There are various mobile phone brackets
that may be fitted in your vehicle; in some
cases, these are country-specific.
i You can connect a Bluetooth ®
-capable
mobile phone with Audio 20, Audio 50 or
COMAND Online via the Bluetooth ®
inter-
face. This also applies if your vehicle is
equipped with convenience telephony.
More information on suitable mobile phones,
mobile phone brackets and on connecting
Bluetooth ®
-capable mobile phones with
Audio 20, Audio 50 or COMAND Online can
be obtained:
R at your Mercedes-Benz Service Centre
R on the Internet at http://www.mercedes-
benz.com/connect
i The functions and services available when
you use the phone depend on your mobile
phone model and service provider.
Using amobile phone If the mobile phone is inserted in the mobile
phone bracket, you can speak to the person
you are calling using the hands-free system.
X
Open the telephone compartment
(Y page 312).
X Vehicles with automatic transmission
without DIRECT SELECT lever: connect
the mobile phone bracket to the pre-instal- Features
333Stowing and features Z
Page 341 of 457
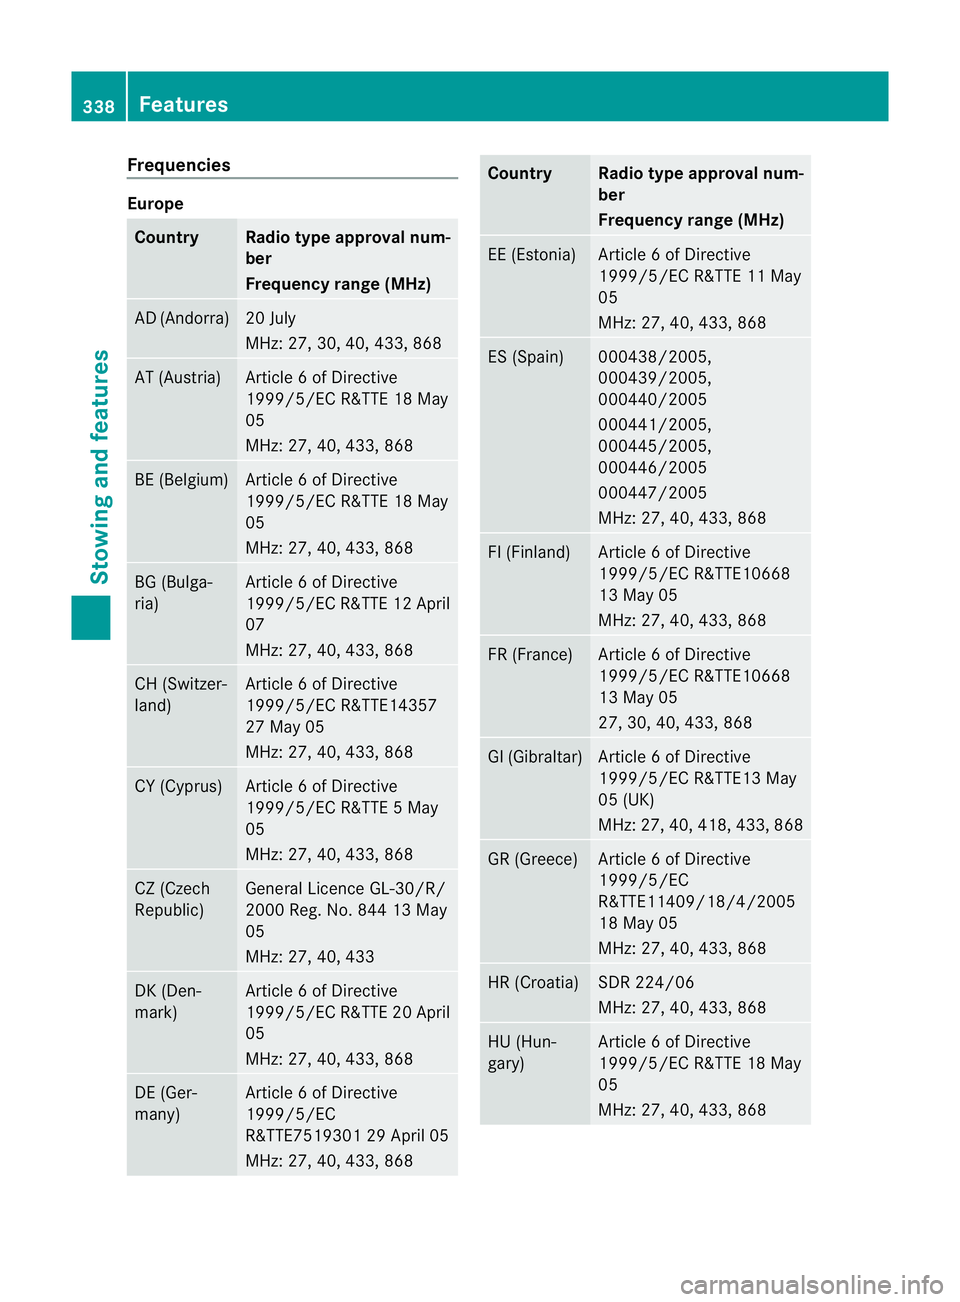
Frequencies
Europe
Country Radio type approval num-
ber
Frequency range (MHz)
AD (Andorra) 20 July
MHz: 27, 30, 40
,433, 868 AT (Austria) Article 6 of Directive
1999/5/EC R&TTE 18 May
05
MHz: 27, 40, 433, 868
BE (Belgium) Article 6 of Directive
1999/5/EC R&TTE 18 May
05
MHz: 27, 40, 433, 868
BG (Bulga-
ria) Article 6 of Directive
1999/5/EC R&TTE 12 April
07
MHz: 27, 40, 433, 868
CH (Switzer-
land) Article 6 of Directive
1999/5/EC R&TTE14357
27 May 05
MHz: 27, 40, 433, 868
CY (Cyprus) Article 6 of Directive
1999/5/EC R&TTE 5 May
05
MHz: 27, 40, 433, 868
CZ (Czech
Republic) General Licence GL-30/R/
2000 Reg. No. 844 13 May
05
MHz: 27, 40, 433
DK (Den-
mark) Article 6 of Directive
1999/5/EC R&TTE 20 April
05
MHz: 27, 40, 433, 868
DE (Ger-
many) Article 6 of Directive
1999/5/EC
R&TTE7519301 29 April 05
MHz: 27, 40, 433, 868 Country Radio type approval num-
ber
Frequency range (MHz)
EE (Estonia) Article 6 of Directive
1999/5/EC R&TTE 11 May
05
MHz: 27, 40, 433, 868
ES (Spain) 000438/2005,
000439/2005,
000440/2005
000441/2005,
000445/2005,
000446/2005
000447/2005
MHz: 27, 40, 433, 868
FI (Finland) Article 6 of Directive
1999/5/EC R&TTE10668
13 May 05
MHz: 27, 40, 433, 868
FR (France) Article 6 of Directive
1999/5/EC R&TTE10668
13 May 05
27, 30, 40, 433, 868
GI (Gibraltar) Article 6 of Directive
1999/5/EC R&TTE13 May
05 (UK)
MHz: 27, 40, 418, 433, 868
GR (Greece) Article 6 of Directive
1999/5/EC
R&TTE11409/18/4/2005
18 May 05
MHz: 27, 40, 433, 868
HR (Croatia) SDR 224/06
MHz: 27, 40, 433, 868
HU (Hun-
gary) Article 6 of Directive
1999/5/EC R&TTE 18 May
05
MHz: 27, 40, 433, 868338
FeaturesStowing and features
Page 342 of 457
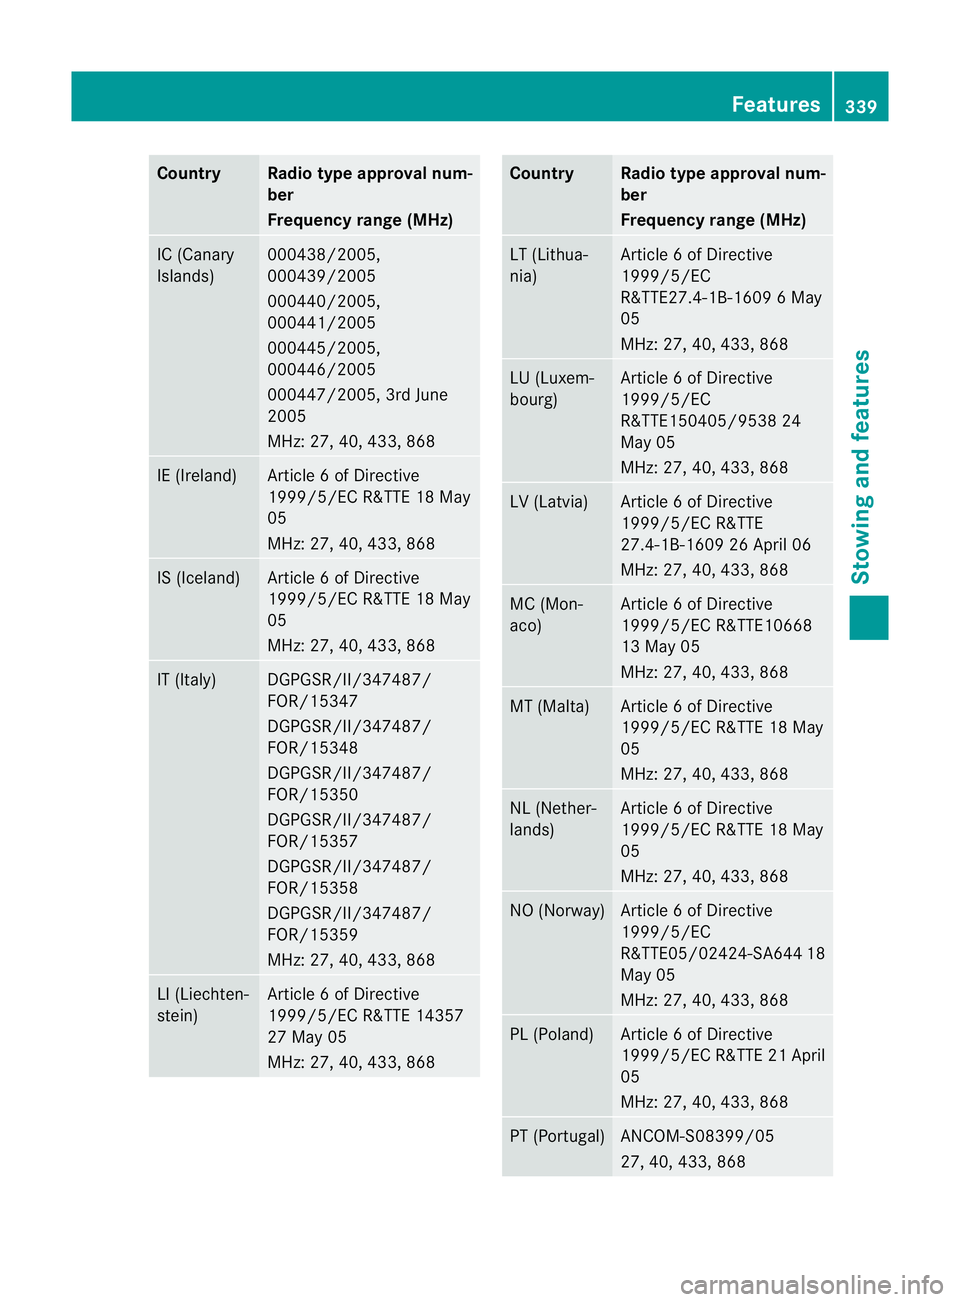
Country Radio type approval num-
ber
Frequency range (MHz)
IC (Canary
Islands) 000438/2005,
000439/2005
000440/2005,
000441/2005
000445/2005,
000446/2005
000447/2005, 3rd June
2005
MHz: 27, 40, 433, 868
IE (Ireland) Article 6 of Directive
1999/5/EC R&TTE 18 May
05
MHz: 27, 40, 433, 868 IS (Iceland) Article 6 of Directive
1999/5/EC R&TTE 18 May
05
MHz: 27, 40, 433, 868 IT (Italy) DGPGSR/II/347487/
FOR/15347
DGPGSR/II/347487/
FOR/15348
DGPGSR/II/347487/
FOR/15350
DGPGSR/II/347487/
FOR/15357
DGPGSR/II/347487/
FOR/15358
DGPGSR/II/347487/
FOR/15359
MHz: 27, 40, 433, 868
LI (Liechten-
stein) Article 6 of Directive
1999/5/EC R&TTE 14357
27 May 05
MHz: 27, 40, 433, 868 Country Radio type approval num-
ber
Frequency range (MHz)
LT (Lithua-
nia) Article 6 of Directive
1999/5/EC
R&TTE27.4-1B-1609 6 May
05
MHz: 27, 40, 433, 868
LU (Luxem-
bourg) Article 6 of Directive
1999/5/EC
R&TTE150405/9538 24
May 05
MHz: 27, 40, 433, 868
LV (Latvia) Article 6 of Directive
1999/5/EC R&TTE
27.4-1B-1609 26 April 06
MHz: 27, 40, 433, 868
MC (Mon-
aco) Article 6 of Directive
1999/5/EC R&TTE10668
13 May 05
MHz: 27, 40, 433, 868
MT (Malta) Article 6 of Directive
1999/5/EC R&TTE 18 May
05
MHz: 27, 40, 433, 868
NL (Nether-
lands) Article 6 of Directive
1999/5/EC R&TTE 18 May
05
MHz: 27, 40, 433, 868
NO (Norway) Article 6 of Directive
1999/5/EC
R&TTE05/02424-SA64
418
May 05
MHz: 27, 40, 433, 868 PL (Poland) Article 6 of Directive
1999/5/ECR
&TTE 21 April
05
MHz: 27, 40, 433, 868 PT (Portugal) ANCOM-S08399/05
27, 40, 433, 868 Features
339Stowing and features Z
Page 343 of 457
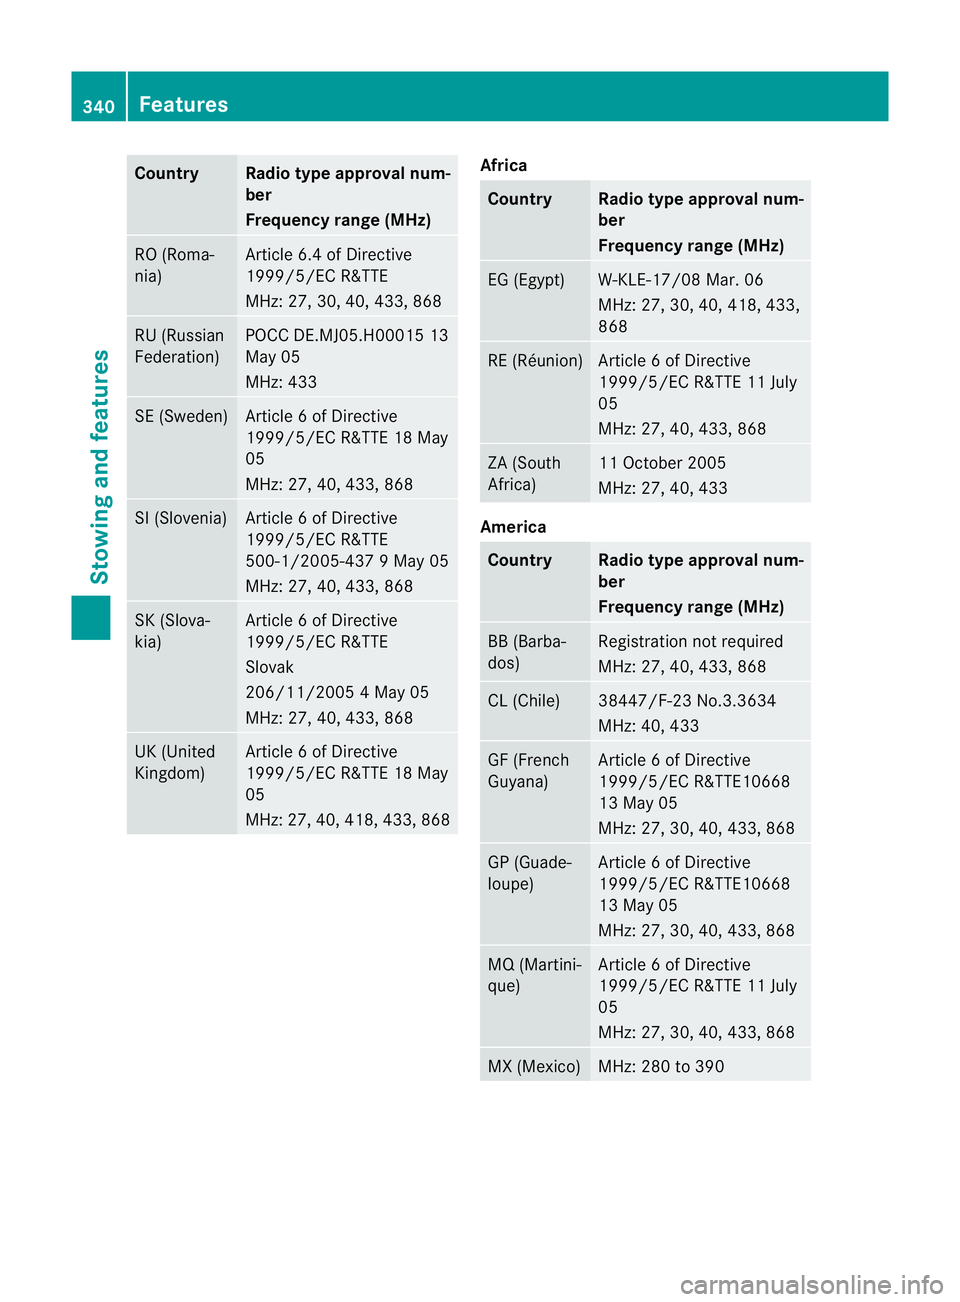
Country Radio type approval num-
ber
Frequency range (MHz)
RO (Roma-
nia) Article 6.4 of Directive
1999/5/EC R&TTE
MHz: 27, 30, 40
,433, 868 RU (Russian
Federation) POCC DE.MJ05.H00015 13
May 05
MHz: 433
SE (Sweden) Article 6 of Directive
1999/5/EC R&TTE 18 May
05
MHz: 27, 40, 433, 868
SI (Slovenia) Article 6 of Directive
1999/5/EC R&TTE
500-1/2005-437 9 May 05
MHz: 27, 40, 433, 868
SK (Slova-
kia) Article 6 of Directive
1999/5/EC R&TTE
Slovak
206/11/2005 4 May 05
MHz: 27, 40, 433, 868
UK (United
Kingdom) Article 6 of Directive
1999/5/EC R&TTE 18 May
05
MHz: 27, 40, 418, 433, 868 Africa
Country Radio type approval num-
ber
Frequency range (MHz)
EG (Egypt) W-KLE-17/08 Mar. 06
MHz: 27, 30, 40, 418, 433,
868
RE (Réunion) Article 6 of Directive
1999/5/EC R&TTE 11 July
05
MHz: 27, 40, 433, 868
ZA (South
Africa) 11 October 2005
MHz: 27, 40, 433
America
Country Radio type approval num-
ber
Frequency range (MHz)
BB (Barba-
dos) Registration not required
MHz: 27, 40, 433, 868
CL (Chile) 38447/F-23 No.3.3634
MHz: 40, 433
GF (French
Guyana) Article 6 of Directive
1999/5/EC R&TTE10668
13 May 05
MHz: 27, 30, 40, 433, 868
GP (Guade-
loupe) Article 6 of Directive
1999/5/EC R&TTE10668
13 May 05
MHz: 27, 30, 40, 433, 868
MQ (Martini-
que) Article 6 of Directive
1999/5/EC R&TTE 11 July
05
MHz: 27, 30, 40, 433, 868
MX (Mexico) MHz: 280 to 390340
FeaturesStowing and features
Page 344 of 457
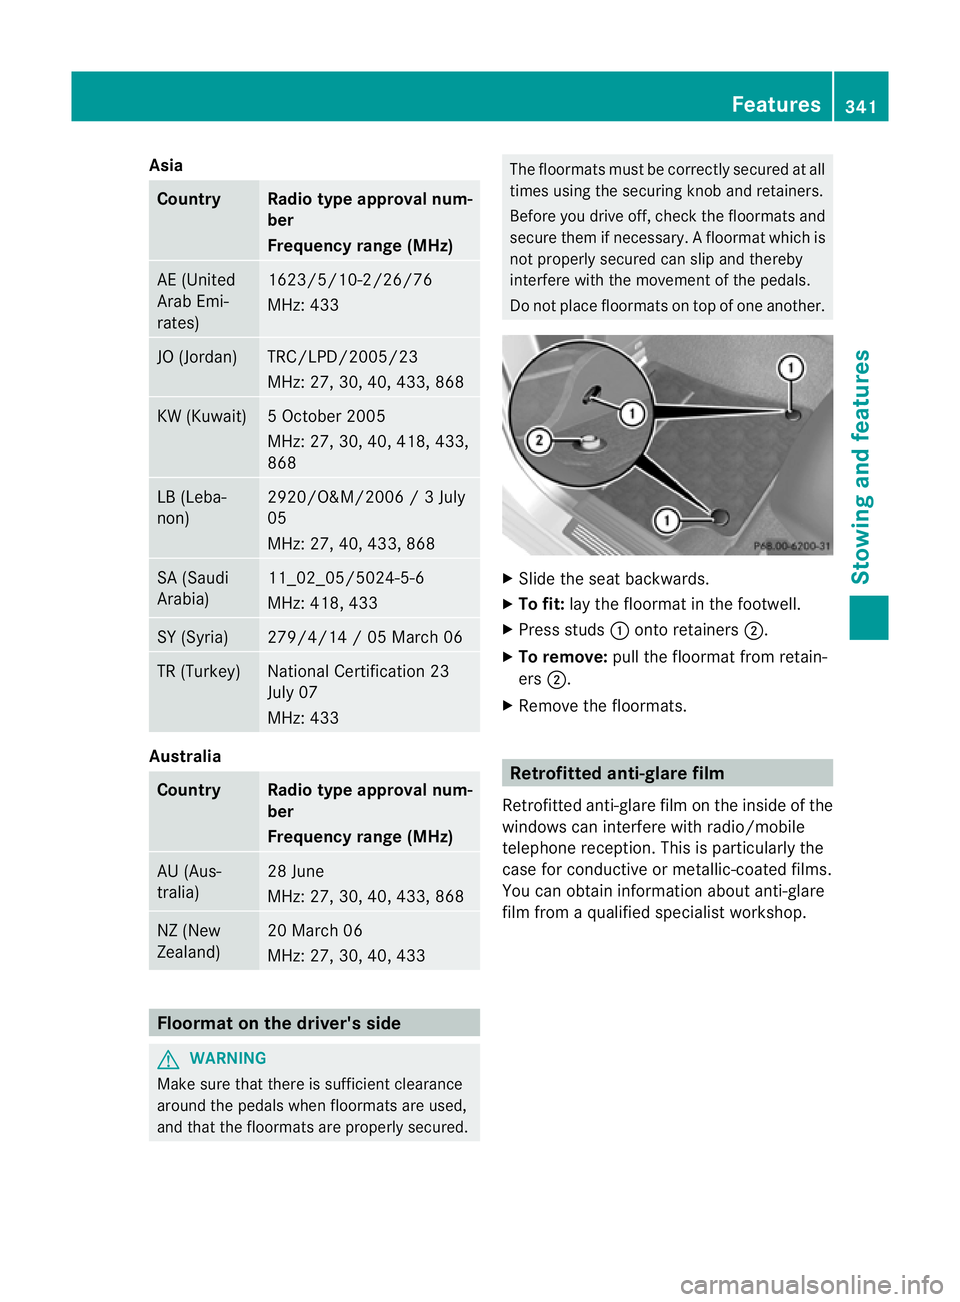
Asia
Country Radio type approval num-
ber
Frequency range (MHz)
AE (United
Arab Emi-
rates) 1623/5/10-2/26/76
MHz: 433
JO (Jordan) TRC/LPD/2005/23
MHz: 27, 30, 40
,433, 868 KW (Kuwait) 5 October 2005
MHz: 27, 30, 40, 418, 433,
868
LB (Leba-
non) 2920/O&M/2006 / 3 July
05
MHz: 27, 40, 433, 868
SA (Saudi
Arabia) 11_02_05/5024-5-6
MHz: 418, 433
SY (Syria) 279/4/14 / 05 March 06
TR (Turkey) National Certification 23
July 07
MHz: 433
Australia
Country Radio type approval num-
ber
Frequency range (MHz)
AU (Aus-
tralia) 28 June
MHz: 27, 30, 40, 433, 868
NZ (New
Zealand) 20 March 06
MHz: 27, 30, 40, 433
Floormat on the driver's side
G
WARNING
Make sure that there is sufficient clearance
around the pedals whe nfloormats are used,
and that the floormats are properly secured. The floormats must be correctly secured at all
times using the securing knob and retainers.
Before you drive off, chec
kthe floormats and
secure them if necessary. Afloormat which is
not properly secured can slip and thereby
interfere with the movemen tofthe pedals.
Do not place floormats on top of one another. X
Slide the seat backwards.
X To fit: lay the floormat in the footwell.
X Press studs :onto retainers ;.
X To remove: pull the floormat from retain-
ers ;.
X Remove the floormats. Retrofitted anti-glare film
Retrofitted anti-glare film on the inside of the
windows can interfere with radio/mobile
telephone reception. This is particularly the
case for conductive or metallic-coated films.
You can obtain information about anti-glare
film from a qualified specialist workshop. Features
341Stowing and features Z
Page 374 of 457
X
Automatic transmission: move the selector lever toP.
X Switch off all electrical consumers (e.g. radio, blower, etc.).
X Open the bonnet (Y page 345).
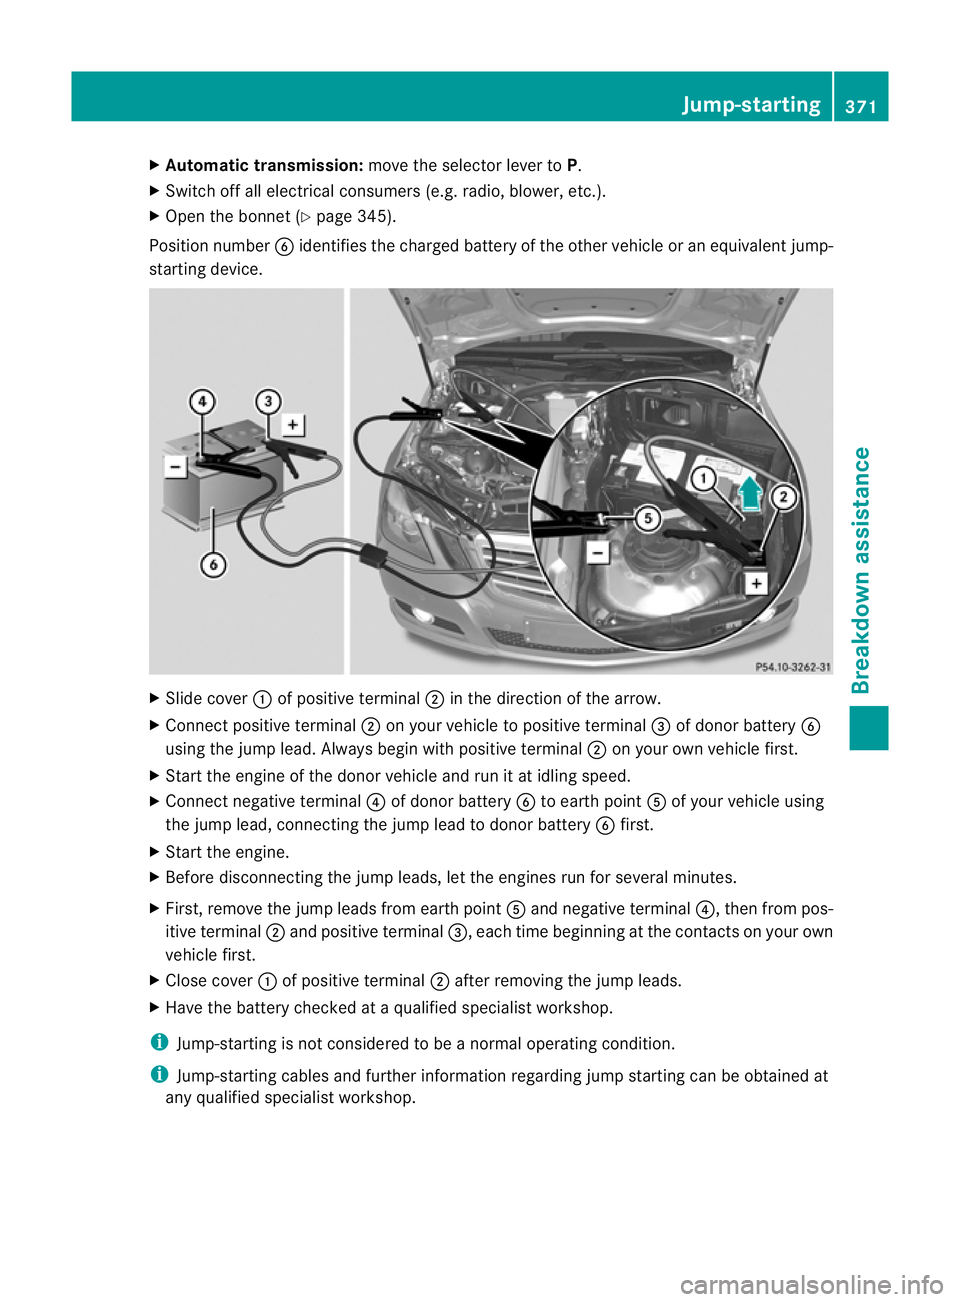
Position number Bidentifies the charged battery of the other vehicle or an equivalen tjump-
starting device. X
Slide cover :of positive terminal ;in the direction of the arrow.
X Connect positive terminal ;on your vehicle to positive terminal =of donor battery B
using the jump lead. Always begin with positive terminal ;on your own vehicle first.
X Start the engine of th edonor vehicle and run it at idling speed.
X Connect negative terminal ?of donor battery Bto earth point Aof your vehicle using
the jump lead, connectingt he jump lead to donor battery Bfirst.
X Start the engine.
X Before disconnecting the jump leads, let the engines run for several minutes.
X First, remove the jump leads from earth point Aand negative terminal ?, then from pos-
itive terminal ;and positive terminal =, each time beginning at the contacts on your own
vehicle first.
X Close cover :of positive terminal ;after removing the jump leads.
X Have the battery checked at a qualified specialist workshop.
i Jump-starting is not considered to be a normal operating condition.
i Jump-starting cables and further information regarding jump starting can be obtained at
any qualified specialist workshop. Jump-starting
371Breakdown assistance Z
Page 389 of 457
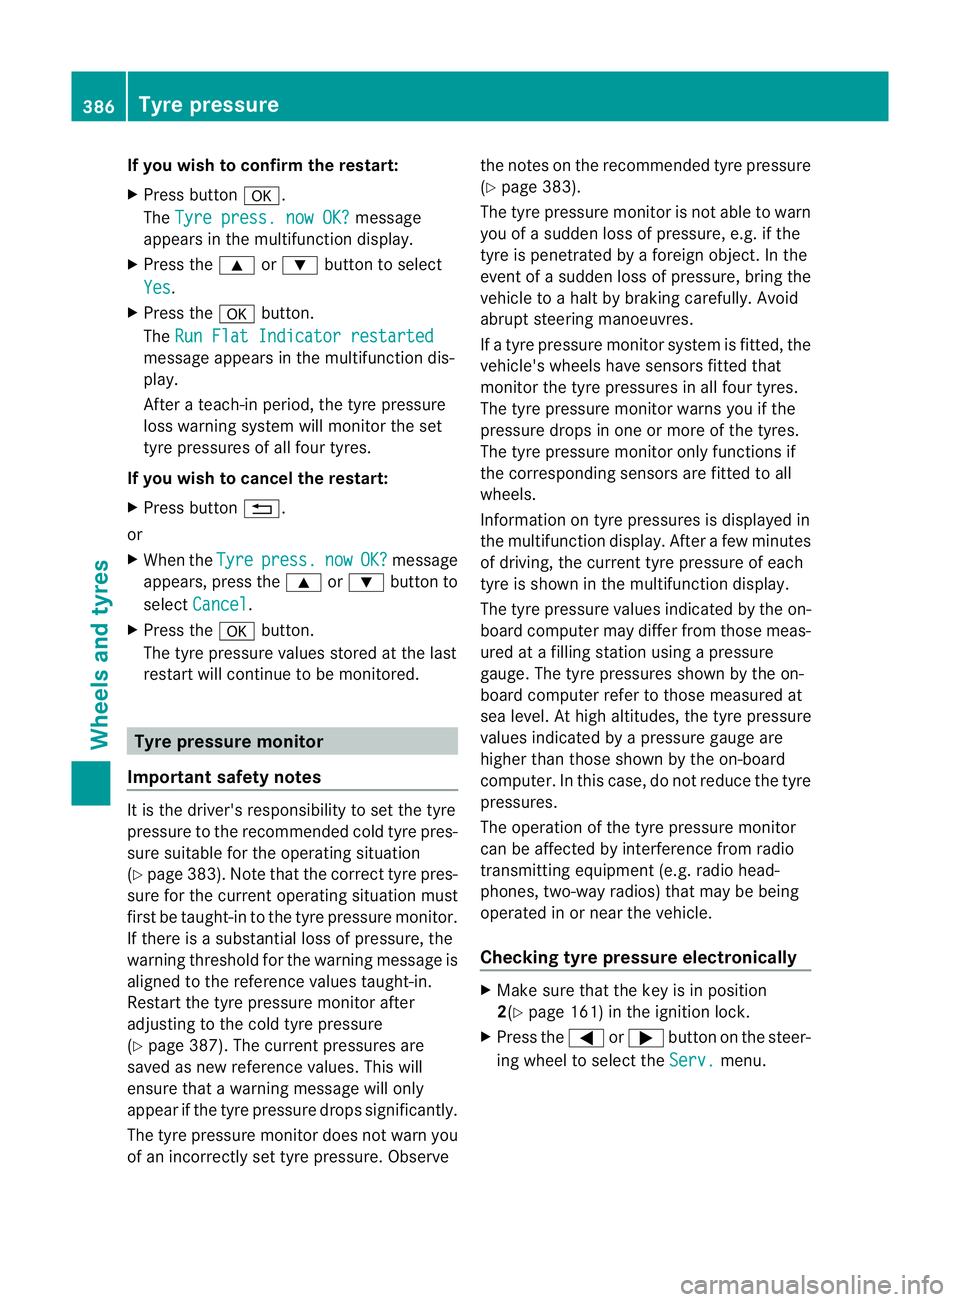
If you wish to confirm the restart:
X
Press button a.
The Tyre press. now OK? message
appears in the multifunction display.
X Press the 9or: buttonto select
Yes .
X Press the abutton.
The Run Flat Indicator restarted message appears in the multifunction dis-
play.
After a teach-in period, the tyre pressure
loss warning system will monitor the set
tyre pressures of all four tyres.
If you wish to cancel the restart:
X Press button %.
or
X When the Tyre press. now OK? message
appears, press the 9or: button to
select Cancel .
X Press the abutton.
The tyre pressure values stored at the last
restart will continue to be monitored. Tyre pressure monitor
Important safety notes It is the driver's responsibility to set the tyre
pressure to the recommended cold tyre pres-
sure suitable for the operating situation
(Y
page 383). Note that the correc ttyre pres-
sure fo rthe current operating situation must
first be taught-in to the tyre pressure monitor.
If there is a substantial loss of pressure, the
warning threshold for the warning message is
aligned to the reference values taught-in.
Restart the tyre pressure monitor after
adjusting to the cold tyre pressure
(Y page 387). The current pressures are
saved as new reference values. This will
ensure that a warning message will only
appearift he tyre pressure drops significantly.
The tyre pressure monitor does not warn you
of an incorrectly set tyre pressure. Observe the notes on the recommended tyre pressure
(Y
page 383).
The tyre pressure monitor is not able to warn
you of a sudden loss of pressure, e.g. if the
tyre is penetrated by a foreign object. In the
event of a sudden loss of pressure, bring the
vehicle to a halt by braking carefully. Avoid
abrupt steering manoeuvres.
If a tyre pressure monitor system is fitted, the
vehicle's wheels have sensors fitted that
monitor the tyre pressures in all four tyres.
The tyre pressure monitor warns you if the
pressure drops in one or more of the tyres.
The tyre pressure monitor only functions if
the corresponding sensors are fitted to all
wheels.
Information on tyre pressures is displayed in
the multifunction display. After a few minutes
of driving, the current tyre pressure of each
tyre is shown in the multifunction display.
The tyre pressure values indicated by the on-
board computer may differ from those meas-
ured at a filling station using a pressure
gauge. The tyre pressures shown by the on-
board computer refer to those measured at
sea level. At high altitudes, the tyre pressure
values indicated by a pressure gauge are
higher than those shown by the on-board
computer. In this case, do not reduce the tyre
pressures.
The operation of the tyre pressure monitor
can be affected by interference from radio
transmitting equipment (e.g. radio head-
phones, two-way radios) that may be being
operated in or near the vehicle.
Checking tyre pressure electronically X
Make sure that the key is in position
2(Y page 161) in the ignition lock.
X Press the =or; button on the steer-
ing wheel to select the Serv. menu.386
Tyre pressureWheels and tyres