2012 MERCEDES-BENZ E-CLASS ESTATE headlamp
[x] Cancel search: headlampPage 262 of 457
X
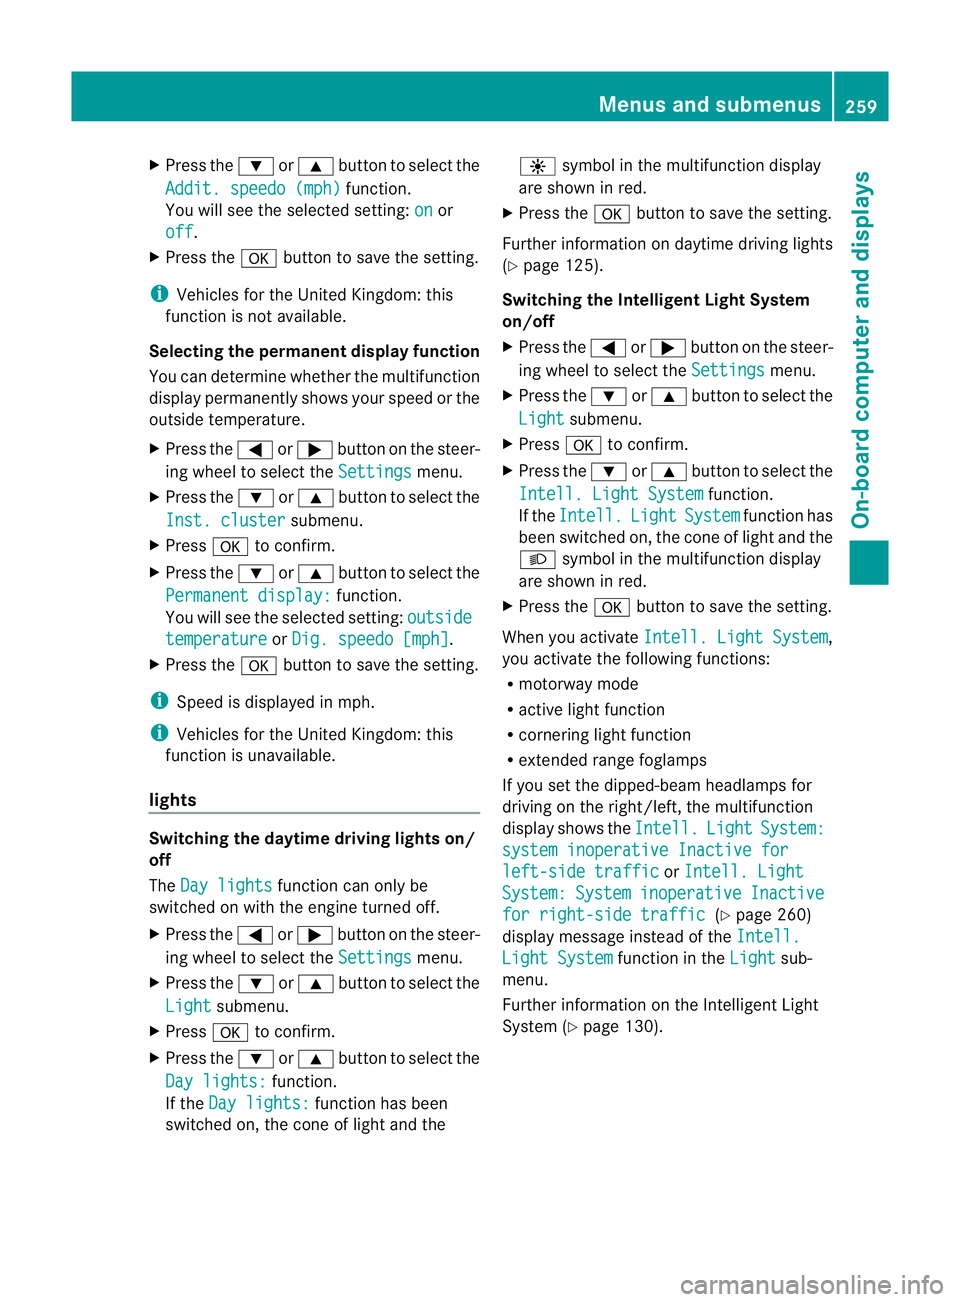
Press the :or9 button to select the
Addit. speedo (mph) function.
You will see the selected setting: on or
off .
X Press the abutton to save the setting.
i Vehicles for the United Kingdom: this
function is not available.
Selecting the permanent display function
You can determine whether the multifunction
display permanently shows your speed or the
outside temperature.
X Press the =or; button on the steer-
ing wheel to select the Settings menu.
X Press the :or9 button to select the
Inst. cluster submenu.
X Press ato confirm.
X Press the :or9 button to select the
Permanent display: function.
You will see the selected setting: outsidetemperature or
Dig. speedo [mph] .
X Press the abutton to save the setting.
i Speed is displayed in mph.
i Vehicles for the United Kingdom: this
function is unavailable.
lights Switching the daytime driving lights on/
off
The Day lights function can only be
switched on with the engine turned off.
X Press the =or; button on the steer-
ing wheel to select the Settings menu.
X Press the :or9 button to select the
Light submenu.
X Press ato confirm.
X Press the :or9 button to select the
Day lights: function.
If the Day lights: function has been
switched on, the cone of light and the W
symbol in the multifunction display
are shown in red.
X Press the abutton to save the setting.
Further information on daytime driving lights
(Y page 125).
Switching the Intelligent Light System
on/off
X Press the =or; button on the steer-
ing wheel to select the Settings menu.
X Press the :or9 button to select the
Light submenu.
X Press ato confirm.
X Press the :or9 button to select the
Intell. Light System function.
If the Intell. Light System function has
been switched on, the cone of light and the
L symbol in the multifunction display
are shown in red.
X Press the abutton to save the setting.
When you activate Intell. Light System ,
you activate the following functions:
R motorway mode
R active light function
R cornering light function
R extended range foglamps
If you set the dipped-beam headlamps for
driving on the right/left, the multifunction
display shows the Intell. Light System:
system inoperative Inactive for
left-side traffic or
Intell. Light System: System inoperative Inactive
for right-side traffic (Y
page 260)
display message instead of the Intell. Light System function in the
Light sub-
menu.
Further information on the Intelligent Light
System (Y page 130). Menus and submenus
259On-board computer and displays Z
Page 263 of 457
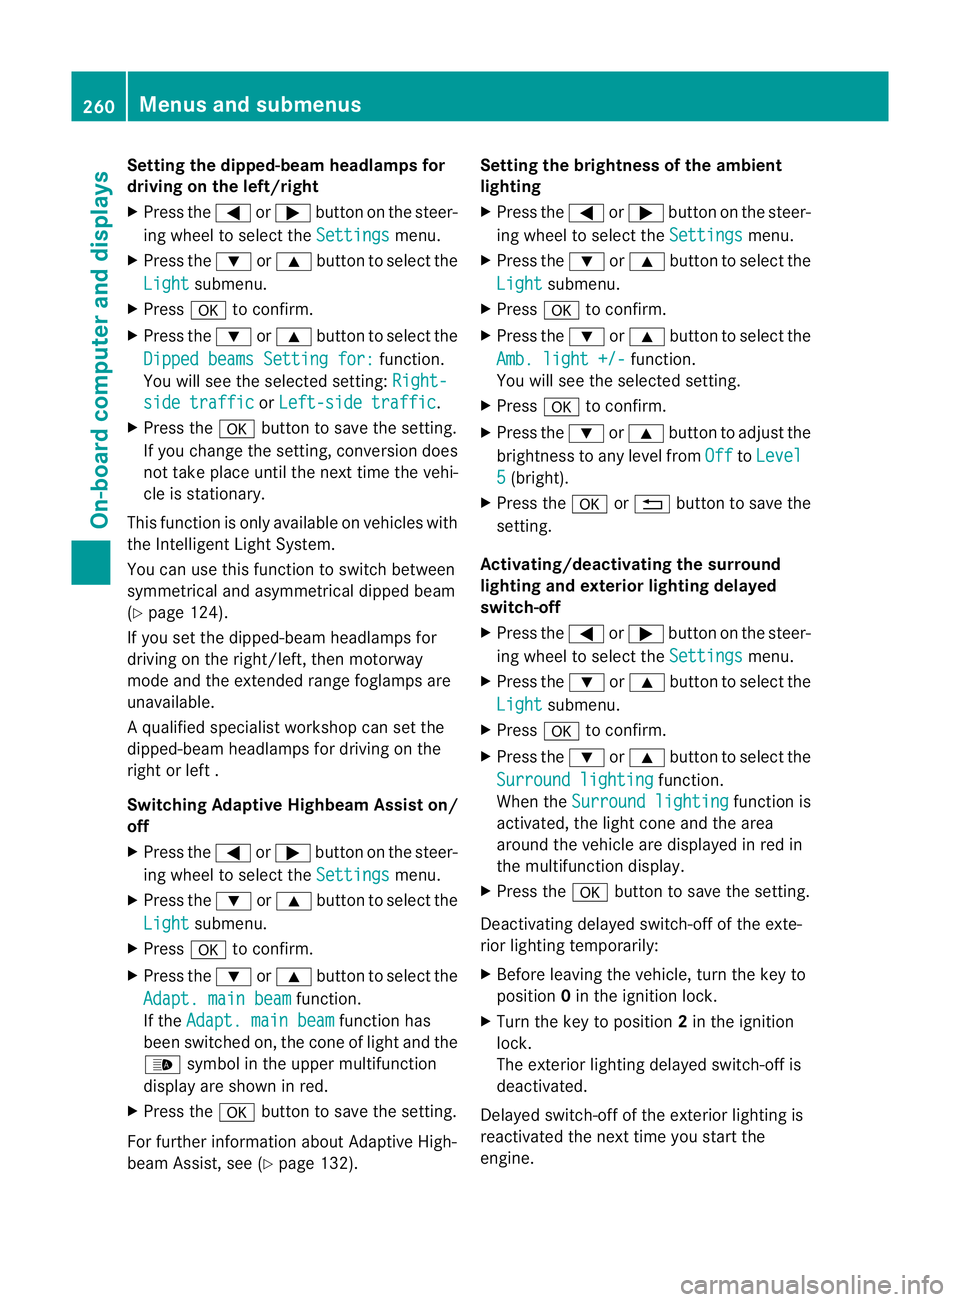
Setting the dipped-beam headlamps for
driving on the left/right
X
Press the =or; button on the steer-
ing wheel to select the Settings menu.
X Press the :or9 button to select the
Light submenu.
X Press ato confirm.
X Press the :or9 button to select the
Dipped beams Setting for: function.
You will see the selected setting: Right-side traffic or
Left-side traffic .
X Press the abutton to save the setting.
If you change the setting, conversion does
not take place until the next time the vehi-
cle is stationary.
This function is only available on vehicles with
the Intelligent Light System.
You can use this function to switch between
symmetrical and asymmetrical dipped beam
(Y page 124).
If you set the dipped-beam headlamps for
driving on the right/left, then motorway
mode and the extended range foglamps are
unavailable.
Aq ualified specialist workshop can set the
dipped-beam headlamps for driving on the
right or left .
Switching Adaptive Highbeam Assis ton/
off
X Press the =or; button on the steer-
ing wheel to select the Settings menu.
X Press the :or9 button to select the
Light submenu.
X Press ato confirm.
X Press the :or9 button to select the
Adapt. main beam function.
If the Adapt. main beam function has
been switched on, the cone of light and the
_ symbol in the upper multifunction
display are shown in red.
X Press the abutton to save the setting.
For further information about Adaptive High-
beam Assist, see (Y page 132). Setting the brightness of the ambient
lighting
X
Press the =or; button on the steer-
ing wheel to select the Settings menu.
X Press the :or9 button to select the
Light submenu.
X Press ato confirm.
X Press the :or9 button to select the
Amb. light +/- function.
You will see the selected setting.
X Press ato confirm.
X Press the :or9 button to adjust the
brightness to any level from Off to
Level 5 (bright).
X Press the aor% button to save the
setting.
Activating/deactivating the surround
lighting and exterior lighting delayed
switch-off
X Press the =or; button on the steer-
ing wheel to select the Settings menu.
X Press the :or9 button to select the
Light submenu.
X Press ato confirm.
X Press the :or9 button to select the
Surround lighting function.
When the Surround lighting function is
activated, the light cone and the area
around the vehicle are displayed in red in
the multifunction display.
X Press the abutton to save the setting.
Deactivating delayed switch-off of the exte-
rior lighting temporarily:
X Before leaving the vehicle, turn the key to
position 0in the ignition lock.
X Turn the key to position 2in the ignition
lock.
The exterior lighting delayed switch-off is
deactivated.
Delayed switch-off of the exterior lighting is
reactivated the next time you start the
engine. 260
Menus and submenusOn-board computer and displays
Page 264 of 457
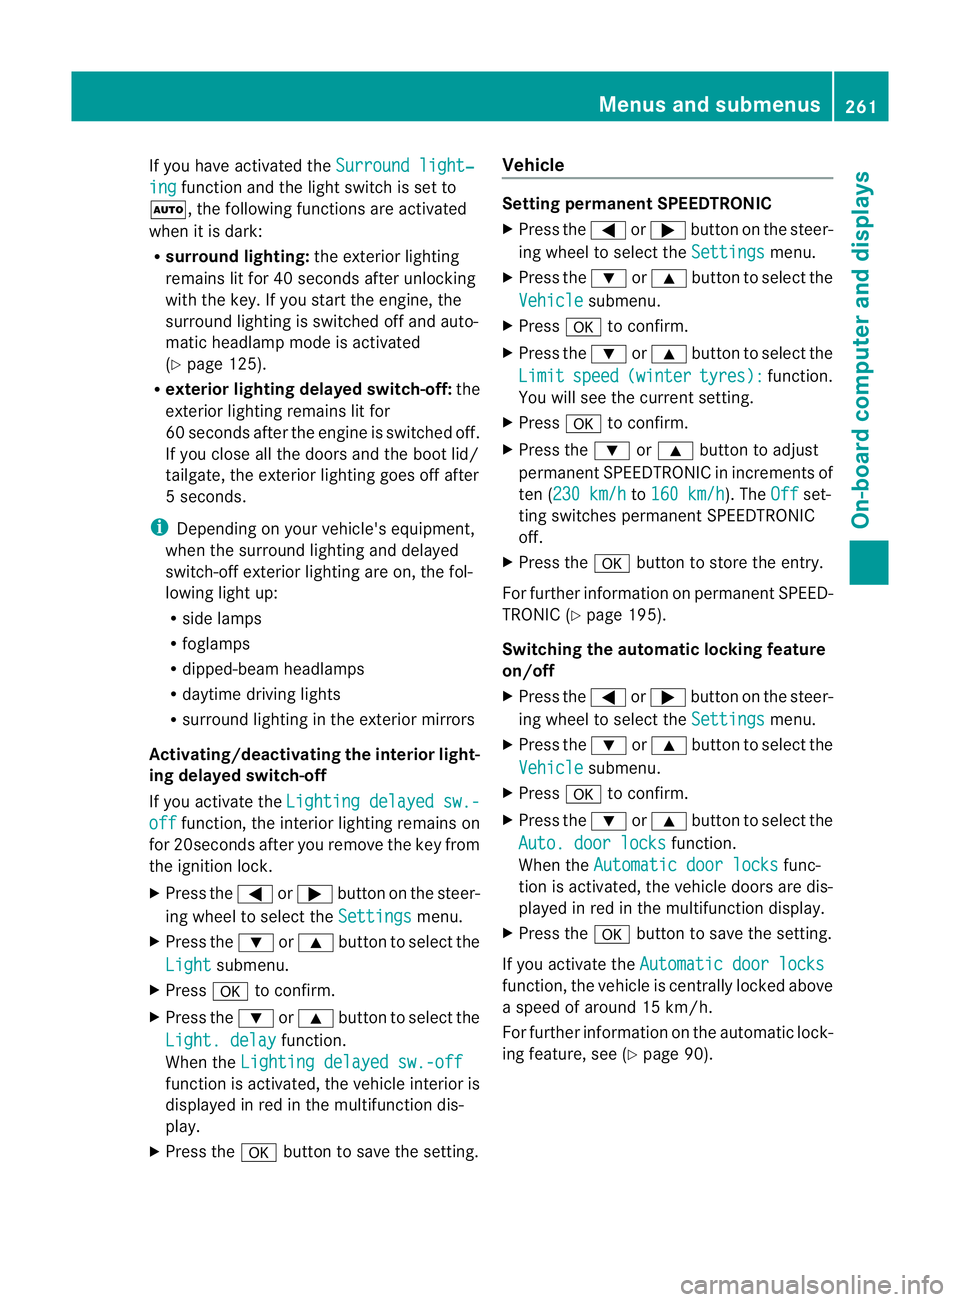
If you have activated the
Surround light‐ing function and the light switch is set to
Ã, the following functions are activated
when it is dark:
R surround lighting: the exterior lighting
remains lit for 40 seconds after unlocking
with the key. If you start the engine, the
surround lighting is switched off and auto-
matic headlamp mode is activated
(Y page 125).
R exterio rlighting delayed switch-off: the
exterior lighting remains lit for
60 seconds afte rthe engine is switched off.
If you close all the doors and the boot lid/
tailgate, the exterior lighting goes off after
5s econds.
i Depending on your vehicle's equipment,
when the surround lighting and delayed
switch-off exterior lighting are on, the fol-
lowing light up:
R side lamps
R foglamps
R dipped-beam headlamps
R daytime driving lights
R surround lighting in the exterior mirrors
Activating/deactivating the interior light-
ing delayed switch-off
If you activate the Lighting delayed sw.- off function, the interior lighting remains on
for 20seconds after you remove the key from
the ignition lock.
X Press the =or; button on the steer-
ing wheel to select the Settings menu.
X Press the :or9 button to select the
Light submenu.
X Press ato confirm.
X Press the :or9 button to select the
Light. delay function.
When the Lighting delayed sw.-off function is activated, the vehicle interior is
displayed in red in the multifunction dis-
play.
X Press the abutton to save the setting. Vehicle Setting permanent SPEEDTRONIC
X
Press the =or; button on the steer-
ing wheel to select the Settings menu.
X Press the :or9 button to select the
Vehicle submenu.
X Press ato confirm.
X Press the :or9 button to select the
Limit speed (winter tyres): function.
You will see the curren tsetting.
X Press ato confirm.
X Press the :or9 button to adjust
permanent SPEEDTRONIC in increment sof
ten ( 230 km/h to
160 km/h ). The
Off set-
ting switches permanent SPEEDTRONIC
off.
X Press the abutton to store the entry.
For further information on permanent SPEED-
TRONIC (Y page 195).
Switching the automatic locking feature
on/off
X Press the =or; button on the steer-
ing wheel to select the Settings menu.
X Press the :or9 button to select the
Vehicle submenu.
X Press ato confirm.
X Press the :or9 button to select the
Auto. door locks function.
When the Automatic door locks func-
tio nis activated, the vehicle doors are dis-
played in red in the multifunction display.
X Press the abutton to save the setting.
If you activate the Automatic door locks function, the vehicle is centrally locked above
a speed of around 15 km/h.
For further information on the automatic lock-
ing feature, see (Y
page 90). Menus and submenus
261On-board computer and displays Z
Page 278 of 457
Display messages Possible causes/consequences and
M Solutions
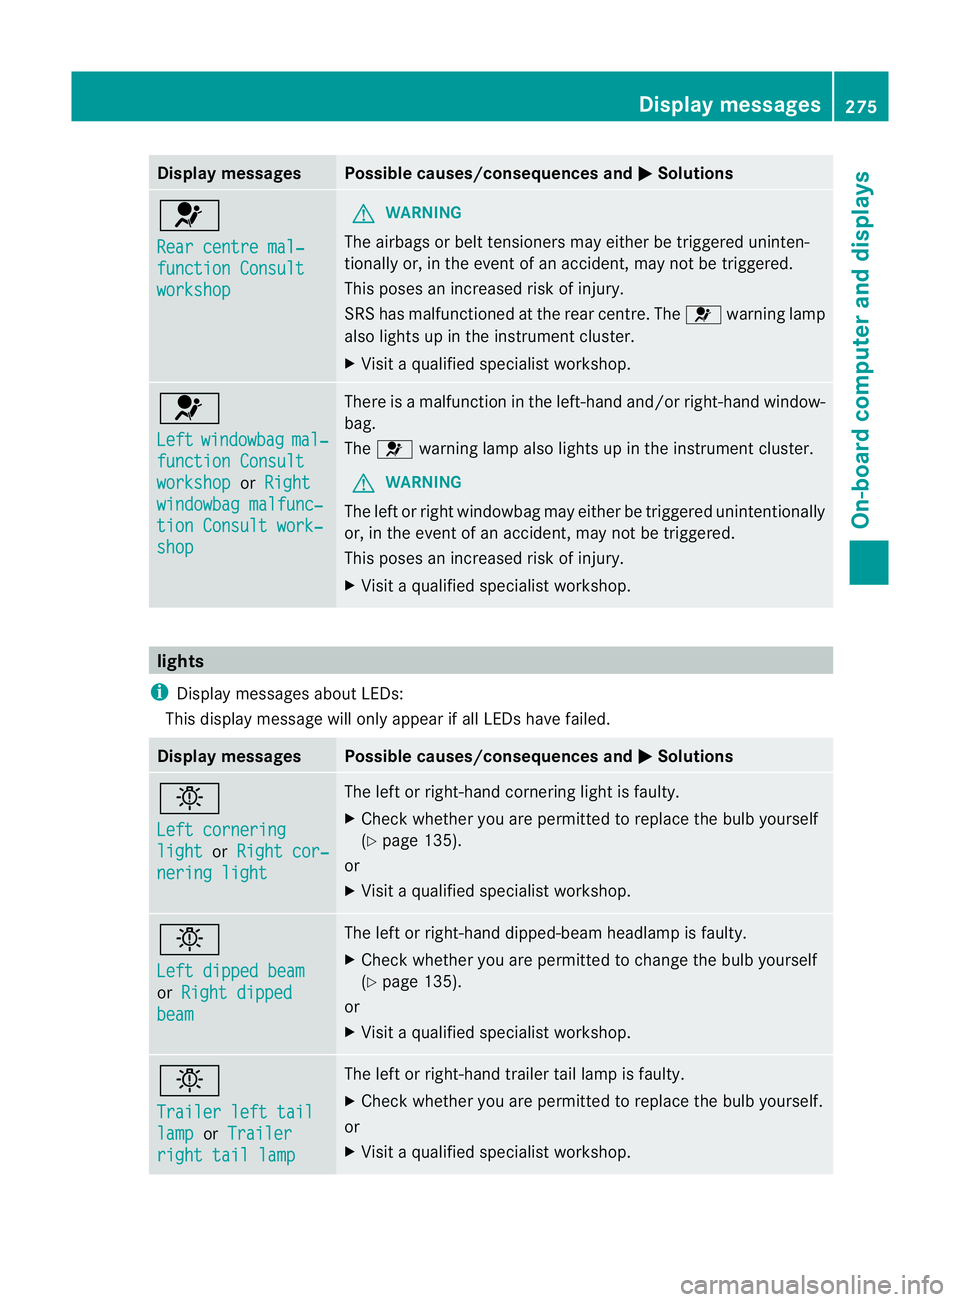
6
Rear centre mal‐
function Consult
workshop G
WARNING
The airbags or belt tensioners may either be triggered uninten-
tionally or, in the event of an accident, may no tbe triggered.
This poses an increased risk of injury.
SRS has malfunctioned at the rear centre. The 6warning lamp
also lights up in the instrument cluster.
X Visit a qualified specialist workshop. 6
Left
windowbag mal‐
function Consult
workshop or
Right windowbag malfunc‐
tion Consult work‐
shop There is a malfunction in the left-hand and/or right-hand window-
bag.
The
6 warning lamp also lights up in the instrument cluster.
G WARNING
The left or right windowbag may either be triggered unintentionally
or, in the event of an accident, may not be triggered.
This poses an increased risk of injury.
X Visit a qualified specialist workshop. lights
i Display messages about LEDs:
This display message will only appear if all LEDs have failed. Display messages Possible causes/consequences and
M Solutions
b
Left cornering
light or
Right cor‐ nering light The left or right-hand cornering light is faulty.
X
Check whether you are permitted to replace the bulb yourself
(Y page 135).
or
X Visit a qualified specialist workshop. b
Left dipped beam
or
Right dipped beam The left or right-hand dipped-beam headlamp is faulty.
X
Check whether you are permitted to change the bulb yourself
(Y page 135).
or
X Visit a qualified specialist workshop. b
Trailer left tail
lamp or
Trailer right tail lamp The left or right-hand trailer tail lamp is faulty.
X
Check whether you are permitted to replace the bulb yourself.
or
X Visit a qualified specialist workshop. Display messages
275On-board computer and displays Z
Page 301 of 457
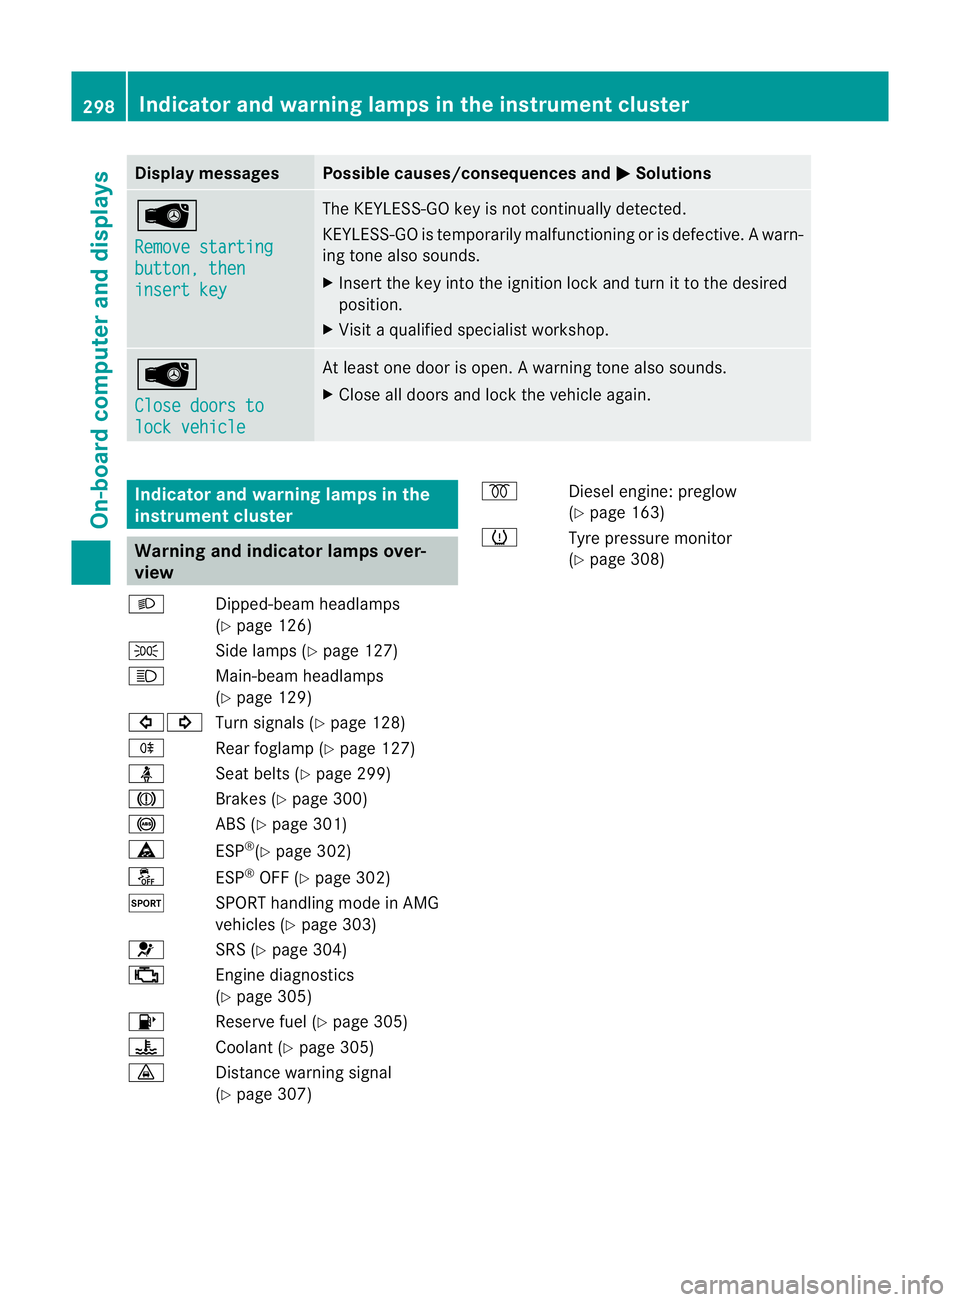
Display messages Possible causes/consequences and
M Solutions
Â
Remove starting
button, then
insert key The KEYLESS-GO key is no
tcontinually detected.
KEYLESS-GO is temporarily malfunctioning or is defective. Awarn-
ing tone also sounds.
X Insert the key into the ignition lock and turn it to the desired
position.
X Visi taqualified specialist workshop. Â
Close doors to
lock vehicle At least one door is open.
Awarning tone also sounds.
X Close all doors and loc kthe vehicle again. Indicator and warning lamps in the
instrument cluster
Warning and indicator lamps over-
view
L Dipped-beam headlamps
(Ypage 126)
T Side lamps (Y page 127)
K Main-beam headlamps
(Ypage 129)
#! Turn signals (Y page 128)
R Rear foglamp (Y page 127)
ü Seat belts (Y page 299)
J Brakes (Ypage 300)
! ABS (Ypage 301)
ä ESP®
(Y page 302)
å ESP®
OFF (Y page 302)
M SPORT handling mode in AMG
vehicles (Ypage 303)
6 SRS (Ypage 304)
; Engine diagnostics
(Ypage 305)
8 Reserve fuel (Y page 305)
? Coolant (Ypage 305)
· Distance warning signal
(Ypage 307) %
Diesel engine: preglow
(Ypage 163)
h Tyre pressure monitor
(Ypage 308) 298
Indicator and warning lamps in the instrument clusterOn-board computer and displays
Page 352 of 457
Topping up the windscreen washe
rsys-
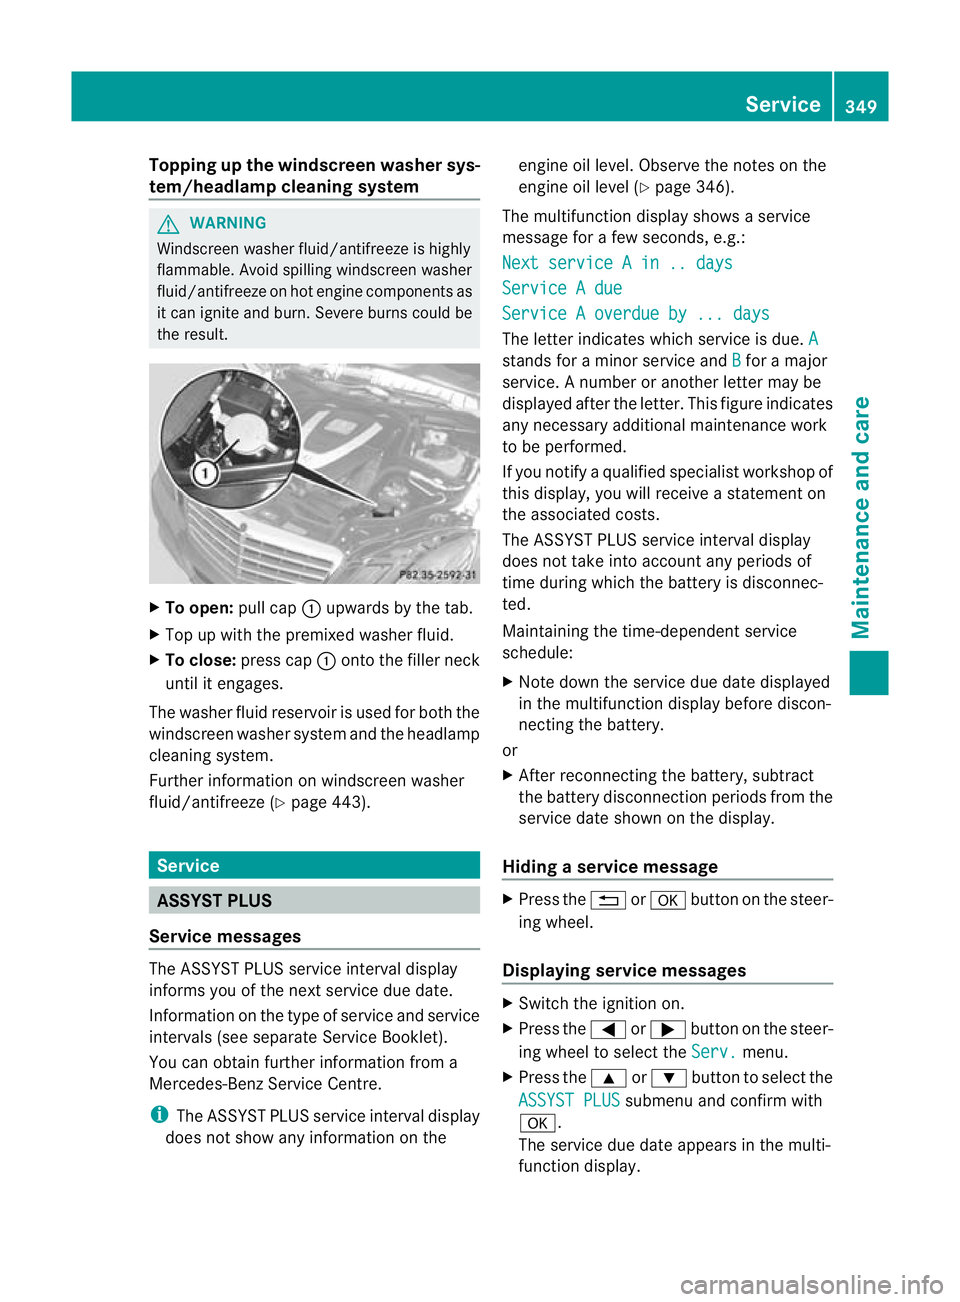
tem/headlamp cleaning system G
WARNING
Windscreen washer fluid/antifreeze is highly
flammable. Avoid spilling windscreen washer
fluid/antifreeze on hot engine components as
it can ignite and burn. Severe burns could be
the result. X
To open: pull cap:upwards by the tab.
X Top up with the premixed washerf luid.
X To close: press cap :onto the filler neck
until it engages.
The washer fluid reservoir is used for both the
windscreen washer system and the headlamp
cleaning system.
Further information on windscreen washer
fluid/antifreeze (Y page 443). Service
ASSYST PLUS
Service messages The ASSYST PLUS service interval display
informs you of the nex tservice due date.
Information on the type of service and service
intervals (see separate Service Booklet).
You can obtain further information from a
Mercedes-Benz Service Centre.
i The ASSYST PLUS servic einterval display
does not show any informatio nonthe engine oil level. Observe the notes on the
engine oil level (Y
page 346).
The multifunction display shows a service
message for a few seconds, e.g.:
Next service A in .. days Service A due
Service A overdue by ... days
The letter indicates which service is due.
A stands for a minor service and
B for a major
service. A number or another letter may be
displayed after the letter. This figure indicates
any necessary additional maintenance work
to be performed.
If you notify a qualified specialist workshop of
this display, you will receive a statementon
the associated costs.
The ASSYST PLU Sservice interval display
does not take into accoun tany periods of
time during which the battery is disconnec-
ted.
Maintaining the time-dependent service
schedule:
X Note down the service due date displayed
in the multifunctio ndisplay before discon-
necting the battery.
or
X After reconnecting the battery, subtract
the battery disconnection periods fro mthe
service date shown on the display.
Hiding aservice message X
Press the %ora button on the steer-
ing wheel.
Displaying service messages X
Switch the ignitio non.
X Press the =or; button on the steer-
ing wheel to select the Serv. menu.
X Press the 9or: button to select the
ASSYST PLUS submenu and confirm with
a.
The service due date appears in the multi-
functio ndisplay. Service
349Maintenance and care Z
Page 446 of 457
!
Only add coolant that has been premixed
with the desired antifreeze protection. You
could otherwise damage the engine.
Further information on coolants can be
found in the Mercedes-Benz Specifications
for Service Products, MB Specifications for
Service Products 310.1, e.g. on the Inter-
net at http://bevo.mercedes-benz.com.
Or contact a qualified specialist workshop.
! Always use a suitable coolant mixture,
even in countries where high temperatures
prevail.
Otherwise, the engine cooling system is not
sufficiently protected from corrosion and
overheating.
! The engine cooling system is filled with
coolant, which must be renewed after
15 years or after 250,000 kilometres at the
latest.
The coolant is a mixture of water and anti-
freeze/corrosion inhibitor. It performs the
following tasks:
R anti-corrosion protection
R antifreeze protection
R raising the boiling point
If antifreeze/corrosion inhibitor is present in
the correct concentration, the boiling point of
the coolant during operation will be around
130 †.
The antifreeze/corrosion inhibitor concentra-
tion in the engine cooling system should:
R be at least 50 %. This will protect the engine
cooling system against freezing down to
around -37 †.
R not exceed 55 % (antifreeze protection
down to -45 †). Hea twill otherwise not be
dissipated as effectively.
If the vehicle has lost coolant, top it up with
equal amounts of water and antifreeze/cor-
rosio ninhibitor. Mercedes-Benz recom-
mends an antifreeze/corrosion inhibito rcon-
centrate in accordance with MB Specifica-
tions for Service Products 310.1. The coolant is checked at every maintenance
interval at a qualified specialist workshop.
i
When the vehicle is first delivered, it is fil-
led with a coolant mixture that ensures
adequate antifreeze and corrosion protec-
tion. Windscreen and headlam
pcleaning
system
Important safety notes G
WARNING
Windscreen washer fluid/antifreeze is highly
flammable. Avoid spilling windscreen washer
fluid/antifreeze on hot engine components as
it can ignite and burn. Severe burns could be
the result.
! Only use washer fluid that is suitable for
plastic lamp lenses, e.g. MB SummerFit or
MB WinterFit. Unsuitable washer fluid
could damage the plastic lense softhe
headlamps.
! Do not use distilled or de-ionised water in
the washer fluid reservoir. Otherwise, the
level sensor may be damaged.
! Only the washer fluids SummerFit and
WinterFit can be mixed. Otherwise, the
spraying nozzles could become blocked.
At temperatures above freezing:
X Fill the washer fluid reservoir with a mixture
of water and washer fluid, e.g. MB Sum-
merFit.
Mix 1 part MB SummerFit to 100 parts water. Service products and capacities
443Technical data Z