2012 MERCEDES-BENZ E-CLASS ESTATE ESP
[x] Cancel search: ESPPage 101 of 457
X
Touch recessed sensor surface :on the
door handle until the side windows and the
sliding sunroof or the panorama sliding
sunroof are fully closed.
i Make sure you only touch recessed sen-
sor surface :.
X Make sure that all the side windows and the
sliding sunroof or panorama sliding sunroof
are closed.
On vehicles with a panorama sliding sunroof:
X Touch recessed sensor surface :on the
door handle again until the roller sunblinds
of the panorama sliding sunroof close.
X To interrupt convenience closing:
release recessed sensor surface :on the
door handle. Resetting the side windows
If a side window can no longer be closed fully,
you must reset it.
X Close all doors.
X Turn the key to position 1or 2in the ignition
lock.
X Pull the corresponding switch on the door
control panel until the side window is com-
pletely closed. (Y page 96)
X Hold the switch for an additional second.
If the side window opens again slightly:
X Immediately pull the corresponding switch
on the door control panel until the side win-
dow is completely closed (Y page 96).
X Hold the switch for an additional second.
X If the corresponding side window remains
closed after the button has been released,
the side window has been reset correctly.
If this is not the case, repeat the steps
above again. 98
Side windowsOpening and closing
Page 102 of 457
Problems with the side windows
G
WARNING
Closing the side windows with increased force or without the anti-entrapment feature could lead
to serious or even fatal injury. Make sure that nobody can become trapped when closing the side
windows. Problem Possible causes/consequences and
M Solutions
As
ide window cannot
be closed because it is
blocked by objects, e.g.
leaves in the window
guide. X
Remove the objects.
X Close the side window. As
ide window cannot
be closed and you can-
not see the cause. If a side window is obstructed during closing and reopens again
slightly:
X
Immediately after the window blocks, pull the corresponding
switch again until the side window has closed.
The side window is closed with increased force.
If a side window is obstructed again during closing and reopens
again slightly:
X Immediately after the window blocks, pull the corresponding
switch again until the side window has closed.
The side window is closed without the anti-entrapmen tfeature. Sliding sunroof
Important safety notes
G
WARNING
Make sure that nobody can become trapped
when opening and closing the sliding sunroof.
If there is a risk of entrapment, release the
switch immediately. During automatic opera-
tion, push the switch briefly in any direction
to stop the sliding sunroof. G
WARNING
The glass in the panorama sunroof could
break in an accident. If you are not wearing a
seat belt, there is a risk that you could be
thrown through the opening in the event of the
vehicle overturning .Therefore, always wear a
seat belt to reduce the risk of injuries. G
WARNING
Children could injure themselves if they oper-
ate the sliding sunroof.
Never leave children unsupervised in the vehi-
cle. Always take the key with you when leaving
the vehicle, even if you are only leaving it for
a short time.
! Only open the panorama sliding sunroof
if it is free of snow and ice. Otherwise, mal-
functions may occur.
Do not allow anything to protrude from the
sliding sunroof. Otherwise, the seals could
be damaged.
i Resonance noises can occur in addition
to the usual airflow noises when the sliding
sunroof is open. They are caused by minor
pressure fluctuations in the vehicle interior. Sliding sunroof
99Opening and closing Z
Page 112 of 457
=
Sea theight
? Seat fore-and-aft adjustment
A Backrest angle
i Vehicles with memory function: if PRE-
SAFE ®
has been triggered, the front-
passenger seat will be moved to a better
position if it was previously in an unfavour-
able position.
i You can store the seat settings using the
memory function (Y page 121).
i Vehicles with the through-loading feature
and memory function: if you fold down a
rear seat backrest, the respective front
seat is moved forwards slightly if neces-
sary.
i Vehicles with memory function :when the
seat is moved forwards or backwards, the
headrest is moved up or down automati-
cally. Adjusting the head restraints
Adjusting the head restraints manually Adjusting the head restraint height
Vehicles without Rear Seat Entertainment System
Vehicles with Rear Seat Entertainment System
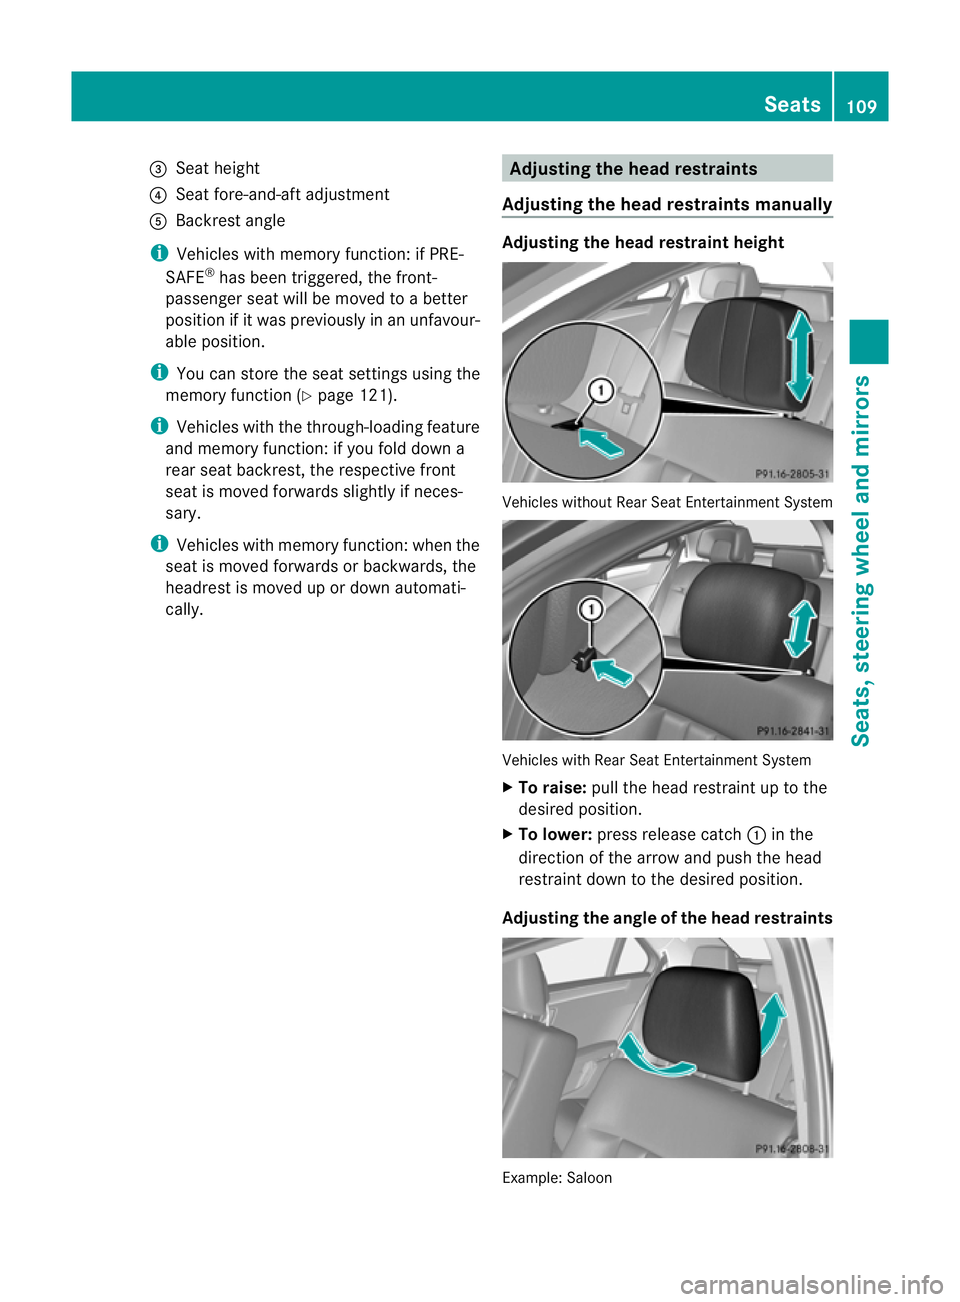
X
To raise: pull the head restraint up to the
desired position.
X To lower: press release catch :in the
direction of the arrow and push the head
restraint down to the desired position.
Adjusting the angle of the head restraints Example: Saloon Seats
109Seats, steering wheel and mirrors Z
Page 121 of 457
Vehicles with KEYLESS-GO: when you switch
off the ignition and open the driver's door, the
steering wheel heating is switched off.
i
The steering wheel heating does not
switch off automatically.
Problems with the steering wheel heat-
ing If steering wheel heating indicator lamp
=is
flashing, the steering wheel heating has
switched off automatically. The vehicle's
electrical system voltage is too low because
too many electrical consumers are switched
on.
X Switch off electrical consumers that you do
not need, such as the rear window heating
or interior lighting.
Once the battery is sufficiently charged, the
steering wheel heating will switch back on
automatically. EASY-ENTRY/EXIT feature
Important safety notes G
WARNING
Make sure that nobody can become trapped
when you activate the EASY-ENTRY/EXIT fea-
ture.
If there is a risk of someone becoming trap-
ped, stop the adjustment procedure. To halt
the procedure:
R press the steering column adjustment but-
ton.
R briefly press one of the memory function
position buttons.
The steering column stops moving immedi-
ately.
Do not keep the memory function position
button pressed down, otherwise the memory
function will start and the steering wheel and
seat will begin to move.
Never leave children unsupervised in the vehi-
cle. They could open the driver's door and thereby unintentionally activate the EASY-
ENTRY feature and become trapped.
The EASY-ENTRY/EXIT feature makes getting
in and out of yourv ehicle easier.
You can activate and deactivate the EASY-
ENTRY/EXIT feature in the on-board com-
puter (Y page 263).
Position of the steering wheel when the
EASY-ENTRY/EXIT feature is active The steering wheel tilts upwards if you:
R
remove the key from the ignition lock
R open the driver's door and KEYLESS-GO is
in position 1
R open the driver's door and the key is in
position 0or 1in the ignition lock
i The steering wheel only moves upwards if
it has not already reached the upper end
stop.
Position of the steering wheel for driv-
ing The steering wheel is moved to the previously
set position if:
R the driver's door is closed and
R you insert the key intot he ignition lock
or
R you press the Start/Stop button once on
vehicles with KEYLESS-GO.
If you close the driver's door with the key
inserted into the ignition lock, the steering
wheel is automatically moved to the previ-
ously set position.
The last position of the steering wheel is
stored when you switch off the ignition or
when you store the settingw ith the memory
function (Y page 121).
Crash-responsive EASY-EXIT feature If the crash-responsive EASY-EXIT feature is
triggered in an accident, the steering column
will move upwards when the driver's door is 118
Steering wheelSeats, steering wheel and mirrors
Page 122 of 457
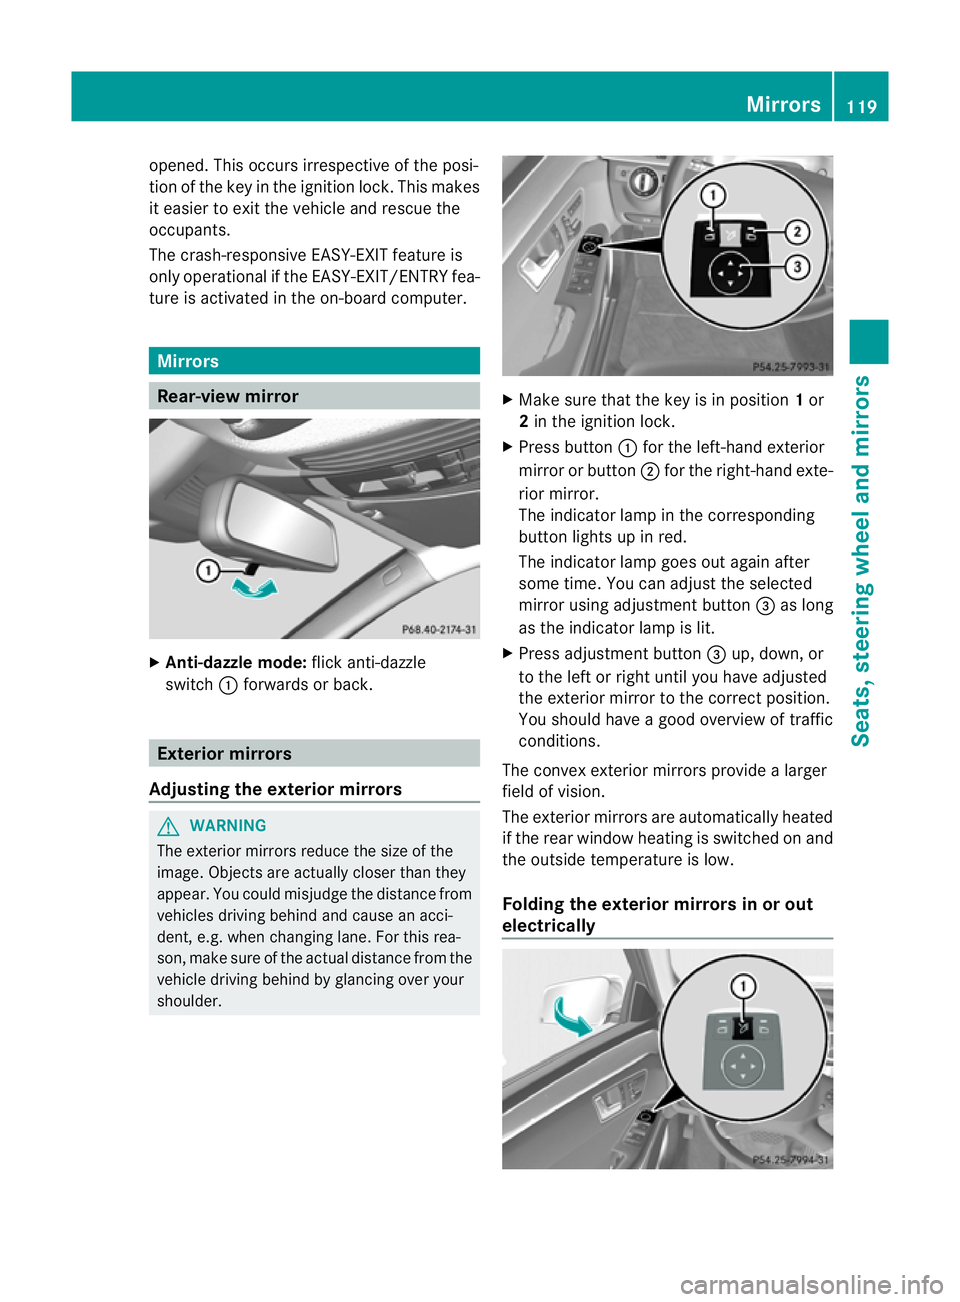
opened. This occurs irrespective of the posi-
tion of the key in the ignition lock. This makes
it easier to exit the vehicle and rescue the
occupants.
The crash-responsive EASY-EXIT feature is
only operational if the EASY-EXIT/ENTRY fea-
ture is activated in the on-board computer. Mirrors
Rear-view mirror
X
Anti-dazzle mode: flick anti-dazzle
switch :forwards or back. Exterior mirrors
Adjusting the exterior mirrors G
WARNING
The exterior mirrors reduce the size of the
image. Objects are actually closer than they
appear. You could misjudge the distance from
vehicles driving behind and cause an acci-
dent, e.g. when changing lane. For this rea-
son, make sure of the actual distance from the
vehicle driving behind by glancing over your
shoulder. X
Make sure that the key is in position 1or
2 in the ignition lock.
X Press button :for the left-hand exterior
mirror or button ;for the right-hand exte-
rior mirror.
The indicator lamp in the corresponding
button lights up in red.
The indicator lamp goes out again after
some time. You can adjust the selected
mirror using adjustment button =as long
as the indicator lamp is lit.
X Press adjustmen tbutton =up, down, or
to the left or right until you have adjusted
the exterior mirror to the correct position.
You should have a good overview of traffic
conditions.
The convex exterio rmirrors provide a larger
field of vision.
The exterior mirrors are automatically heated
if the rear window heatin gis switched on and
the outside temperature is low.
Folding the exterior mirrors in or out
electrically Mirrors
119Seats, steering wheel and mirrors Z
Page 128 of 457
R
combination switch (Y page 128)
R on-board compute r(Ypage 259)
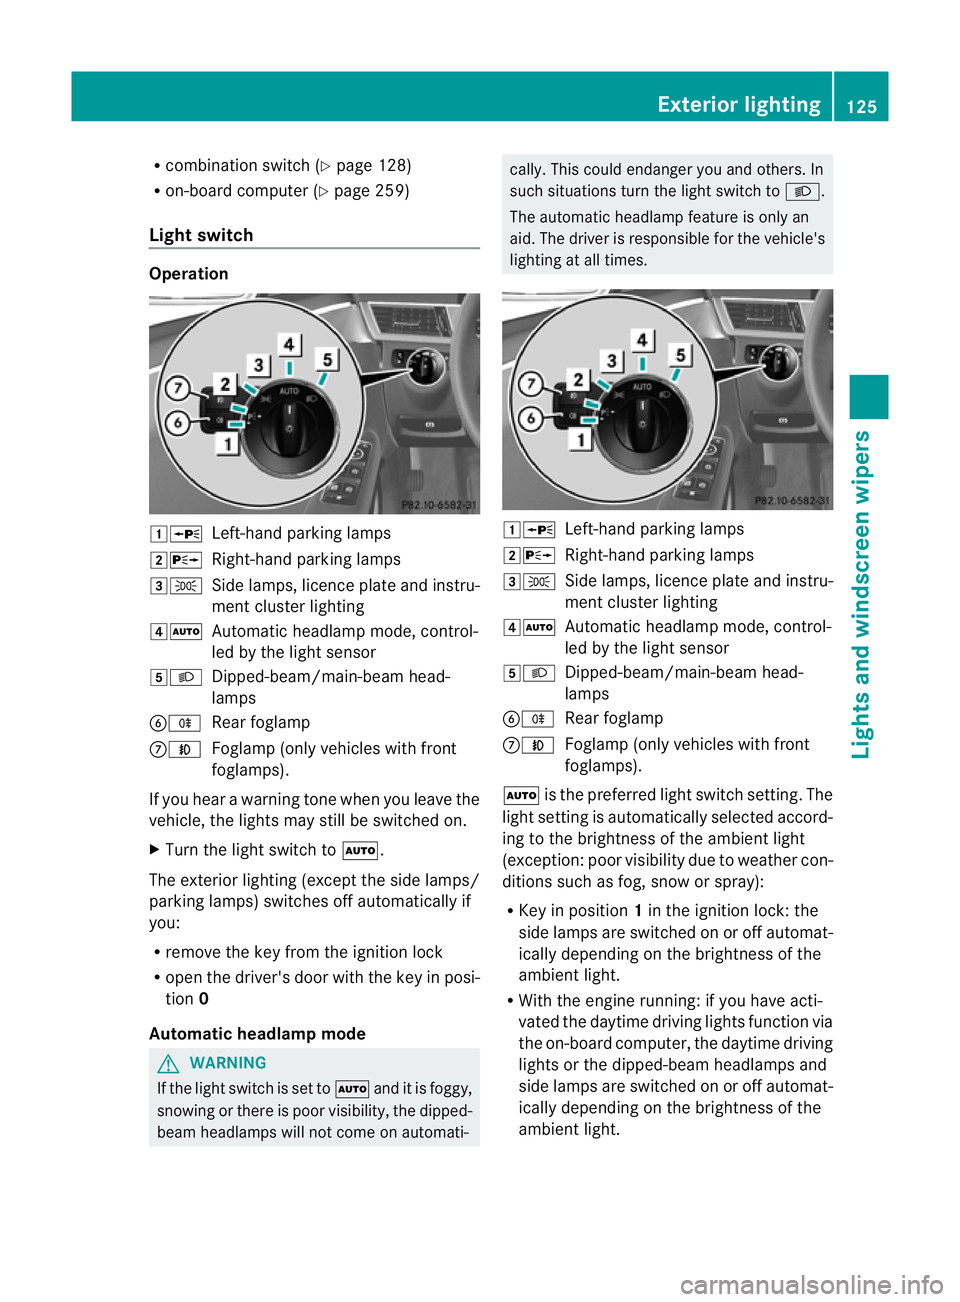
Light switch Operation
1W
Left-hand parking lamps
2X Right-hand parking lamps
3T Side lamps, licence plate and instru-
ment cluster lighting
4Ã Automatic headlamp mode, control-
led by the light sensor
5L Dipped-beam/main-beam head-
lamps
BR Rear foglamp
CN Foglamp (only vehicles with front
foglamps).
If you hear a warning tone when you leave the
vehicle, the lights may still be switched on.
X Turn the light switch to Ã.
The exterior lighting (except the side lamps/
parking lamps) switches off automatically if
you:
R remove the key from the ignition lock
R open the driver's door with the key in posi-
tion 0
Automatic headlamp mode G
WARNING
If the light switch is set to Ãand it is foggy,
snowing or there is poor visibility, the dipped-
beam headlamps will not come on automati- cally. This could endanger you and others. In
such situations turn the light switch to
L.
The automatic headlamp feature is only an
aid. The driver is responsible for the vehicle's
lighting at all times. 1W
Left-hand parking lamps
2X Right-hand parking lamps
3T Side lamps, licence plate and instru-
ment cluster lighting
4Ã Automatic headlamp mode, control-
led by the light sensor
5L Dipped-beam/main-beam head-
lamps
BR Rear foglamp
CN Foglamp (only vehicles with front
foglamps).
à is the preferred light switch setting. The
light setting is automatically selected accord-
ing to the brightness of the ambient light
(exception :poor visibility due to weather con-
ditions such as fog, snow or spray):
R Key in position 1in the ignition lock: the
side lamps are switched on or off automat-
ically depending on the brightness of the
ambient light.
R With the engine running: if you have acti-
vated the daytime driving lights function via
the on-board computer, the daytime driving
lights or the dipped-beam headlamps and
side lamps are switched on or off automat-
ically depending on the brightness of the
ambient light. Exterior lighting
125Lights and windscreen wipers Z
Page 129 of 457
X
To switch on automatic headlamp
mode: turn the light switch to Ã.
The daytime driving lights improve the visibil-
ity of your vehicle during the day. Here, the
daytime driving lights functio nmust be
switched on via the on-board computer
(Y page 259).
When the dipped-beam headlamps are
switched on, the green Lindicator lamp
in the instrumen tcluster lights up and the
daytime driving lights go out or are dimmed.
Dipped-beam headlamps G
WARNING
If the light switch is set to Ãand it is foggy,
snowing or there is poor visibility, the dipped-
beam headlamps will not come on automati-
cally. This could endanger you and others. In
such situations tur nthe light switch to L.
The automatic headlamp feature is only an
aid. The driver is responsible for the vehicle's
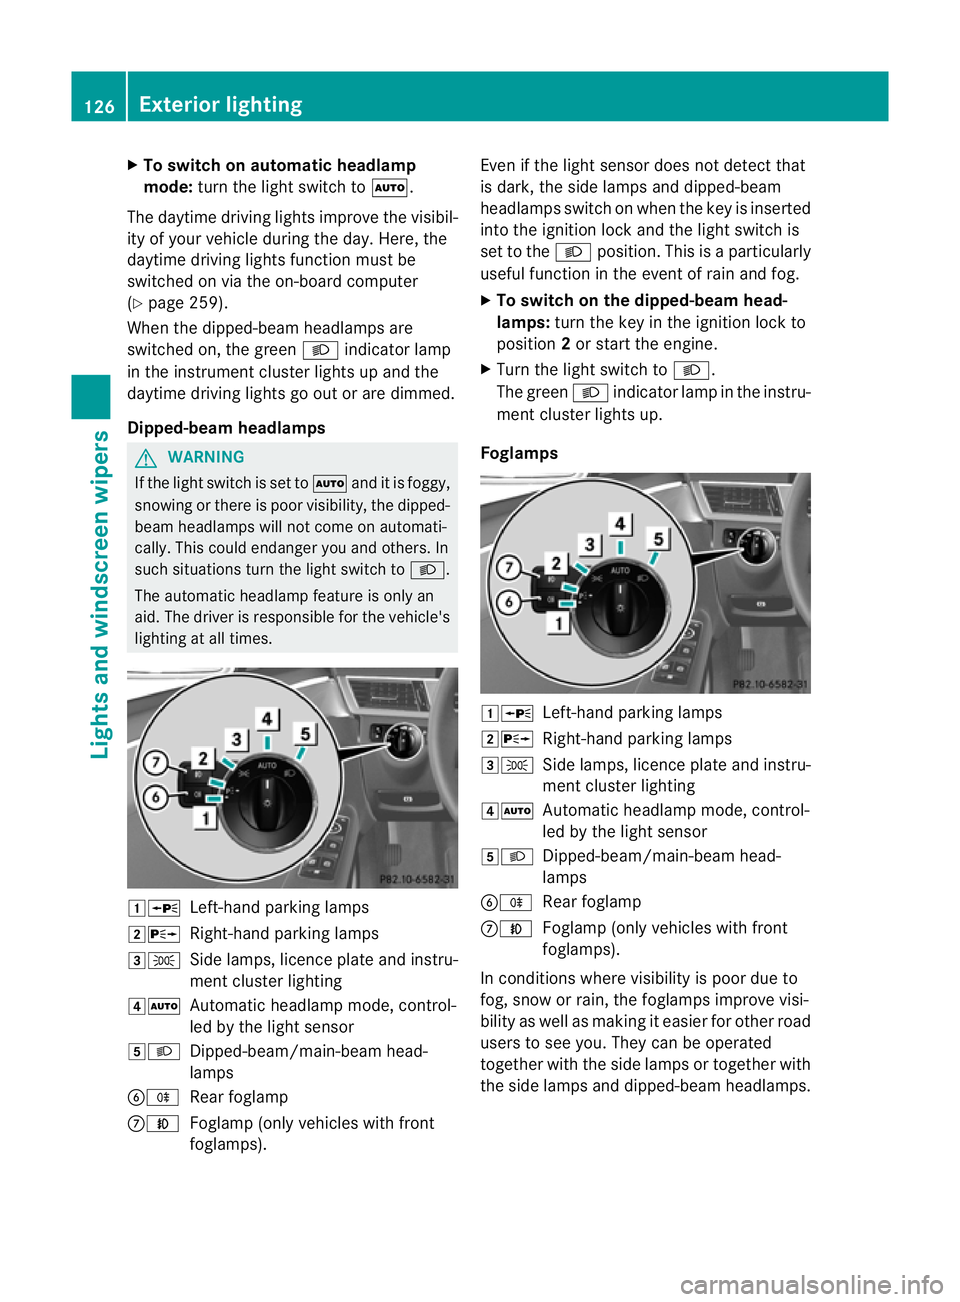
lighting at all times. 1W
Left-hand parking lamps
2X Right-hand parking lamps
3T Side lamps, licence plate and instru-
ment cluster lighting
4Ã Automatic headlamp mode, control-
led by the light sensor
5L Dipped-beam/main-beam head-
lamps
BR Rear foglamp
CN Foglamp (only vehicles with front
foglamps). Even if the light sensor does not detect that
is dark, the side lamps and dipped-beam
headlamps switch on when the key is inserted
into the ignition lock and the light switch is
set to the
Lposition. This is a particularly
useful function in the event of rain and fog.
X To switch on the dipped-beam head-
lamps: turn the key in the ignition lock to
position 2or start the engine.
X Turn the light switch to L.
The green Lindicator lamp in the instru-
ment cluster lights up.
Foglamps 1W
Left-hand parking lamps
2X Right-hand parking lamps
3T Side lamps, licence plate and instru-
ment cluster lighting
4Ã Automatic headlamp mode, control-
led by the light sensor
5L Dipped-beam/main-beam head-
lamps
BR Rear foglamp
CN Foglamp (only vehicles with front
foglamps).
In conditions where visibility is poor due to
fog, snow or rain, the foglamps improve visi-
bility as well as making it easier for other road
users to see you. They can be operated
together with the side lamps or together with
the side lamps and dipped-beamh eadlamps.126
Exterior lightingLights and windscreen wipers
Page 131 of 457
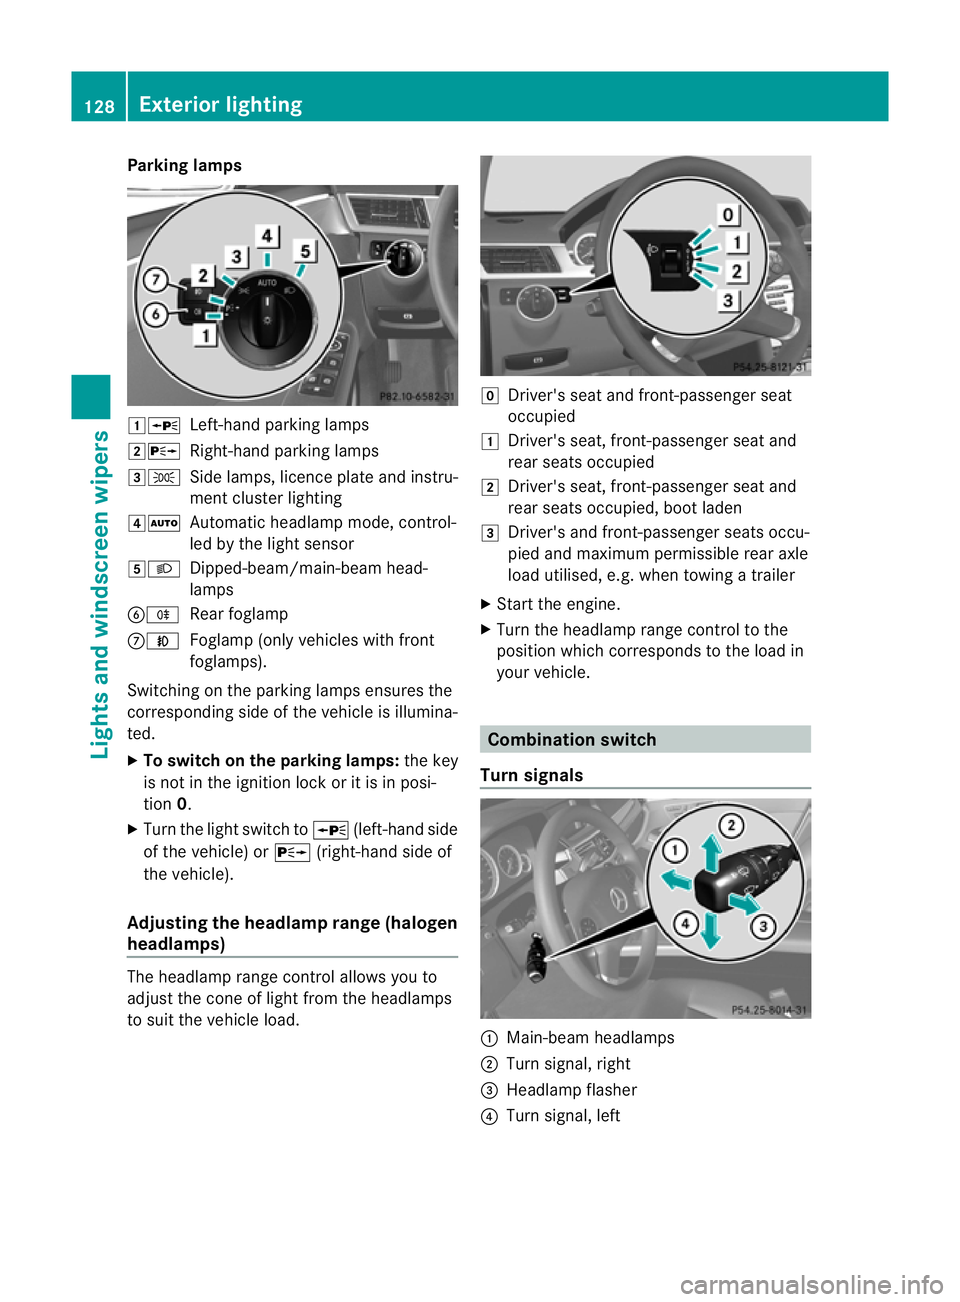
Parking lamps
1W
Left-hand parking lamps
2X Right-hand parking lamps
3T Side lamps, licence plate and instru-
ment cluster lighting
4Ã Automatic headlamp mode, control-
led by the light sensor
5L Dipped-beam/main-beam head-
lamps
BR Rear foglamp
CN Foglamp (only vehicles with front
foglamps).
Switching on the parking lamps ensures the
corresponding side of the vehicle is illumina-
ted.
X To switch on the parking lamps: the key
is not in the ignition lock or it is in posi-
tion 0.
X Turn the light switch to W(left-hand side
of the vehicle) or X(right-hand side of
the vehicle).
Adjusting the headlampr ange (halogen
headlamps) The headlamp range control allows you to
adjust the cone of light from the headlamps
to sui tthe vehicle load. g
Driver's seat and front-passenger seat
occupied
1 Driver's seat, front-passenger seat and
rear seats occupied
2 Driver's seat, front-passenger seat and
rear seats occupied, boot laden
3 Driver's and front-passenger seats occu-
pied and maximum permissible rear axle
load utilised, e.g. when towing a trailer
X Start the engine.
X Turn the headlamp range control to the
position which corresponds to the load in
your vehicle. Combination switch
Turn signals :
Main-beam headlamps
; Turn signal, right
= Headlamp flasher
? Turn signal, left 128
Exterior lightingLights and windscreen wipers