2012 MERCEDES-BENZ E-CLASS ESTATE tow
[x] Cancel search: towPage 322 of 457
Observe the following notes on securing
loads:
R
secure the load using the lashing eyelets.
R do not use elastic straps or nets to secure
a load, as these are only intended as an
anti-slip protection for light loads.
R do not route lashing materials across sharp
edges or corners.
R pad sharp edges for protection.
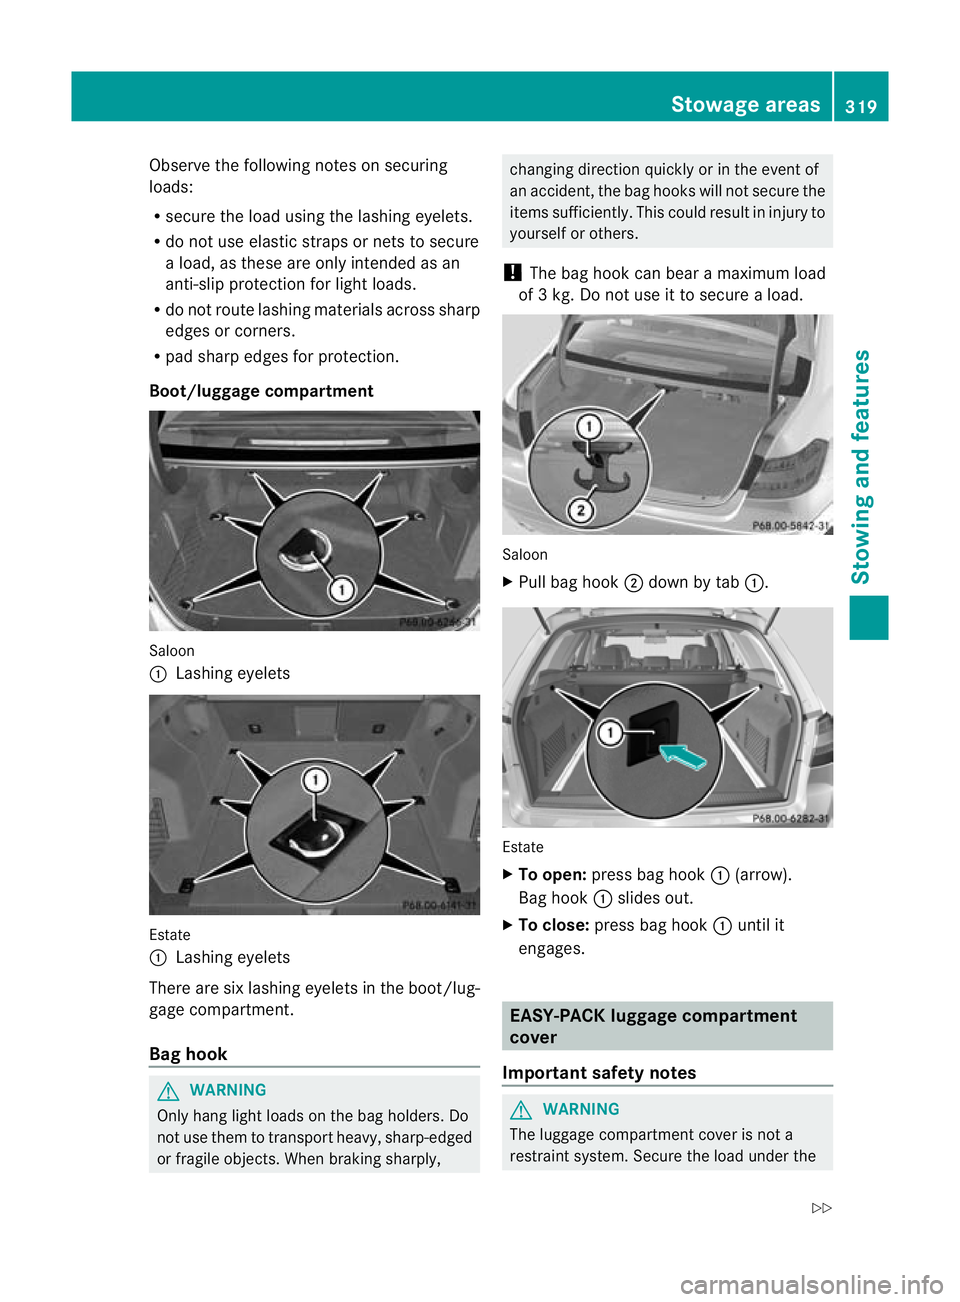
Boot/luggage compartment Saloon
:
Lashing eyelets Estate
:
Lashing eyelets
There are six lashing eyelets in the boot/lug-
gage compartment.
Bag hook G
WARNING
Only hang light loads on the bag holders. Do
not use them to transport heavy, sharp-edged
or fragile objects. When braking sharply, changing direction quickly or in the event of
an accident, the bag hooks will not secure the
items sufficiently. This could result in injury to
yourselforo
thers.
! The bag hoo kcan bear a maximum load
of 3 kg. Do not use it to secure a load. Saloon
X
Pull bag hook ;down by tab :. Estate
X
To open: press bag hook :(arrow).
Bag hook :slides out.
X To close: press bag hook :until it
engages. EASY-PACK luggage compartment
cover
Important safety notes G
WARNING
The luggage compartmen tcover is not a
restraint system. Secure the load under the Stowage areas
319Stowing and features
Z
Page 323 of 457
luggage compartmen
tcover by suitable
means. Make sure that the luggage compart-
ment cover is engaged securely. If luggage is
not sufficiently secured, it can be thrown over
the backrest into the passenger compart-
ment, for instance during heavy braking, sud-
den changes of direction or in the event of an
accident .You could cause an accident or
cause injury to yourself and others.
! When loading the vehicle, make sure that
you do not stack the load in the luggage
compartment higher than the lower edge of
the side windows. Do not place heavy
objects on top of the luggage compartment
cover.
The luggage compartment cover and the
safety net are attached to anchorages on the
right and left in the luggage compartment as
a combined luggage cover and net.
When the tailgate is opened, the luggage
compartment cover is automatically raised to
make loading easier. It is automatically low-
ered again when the tailgate is closed.
When the luggage compartment cover is clip-
ped in, there should be no objects obstructing
the downwards movement of the cover in the
luggage compartment when the tailgate is
closed. The luggage compartment cover will
otherwise be raised again.
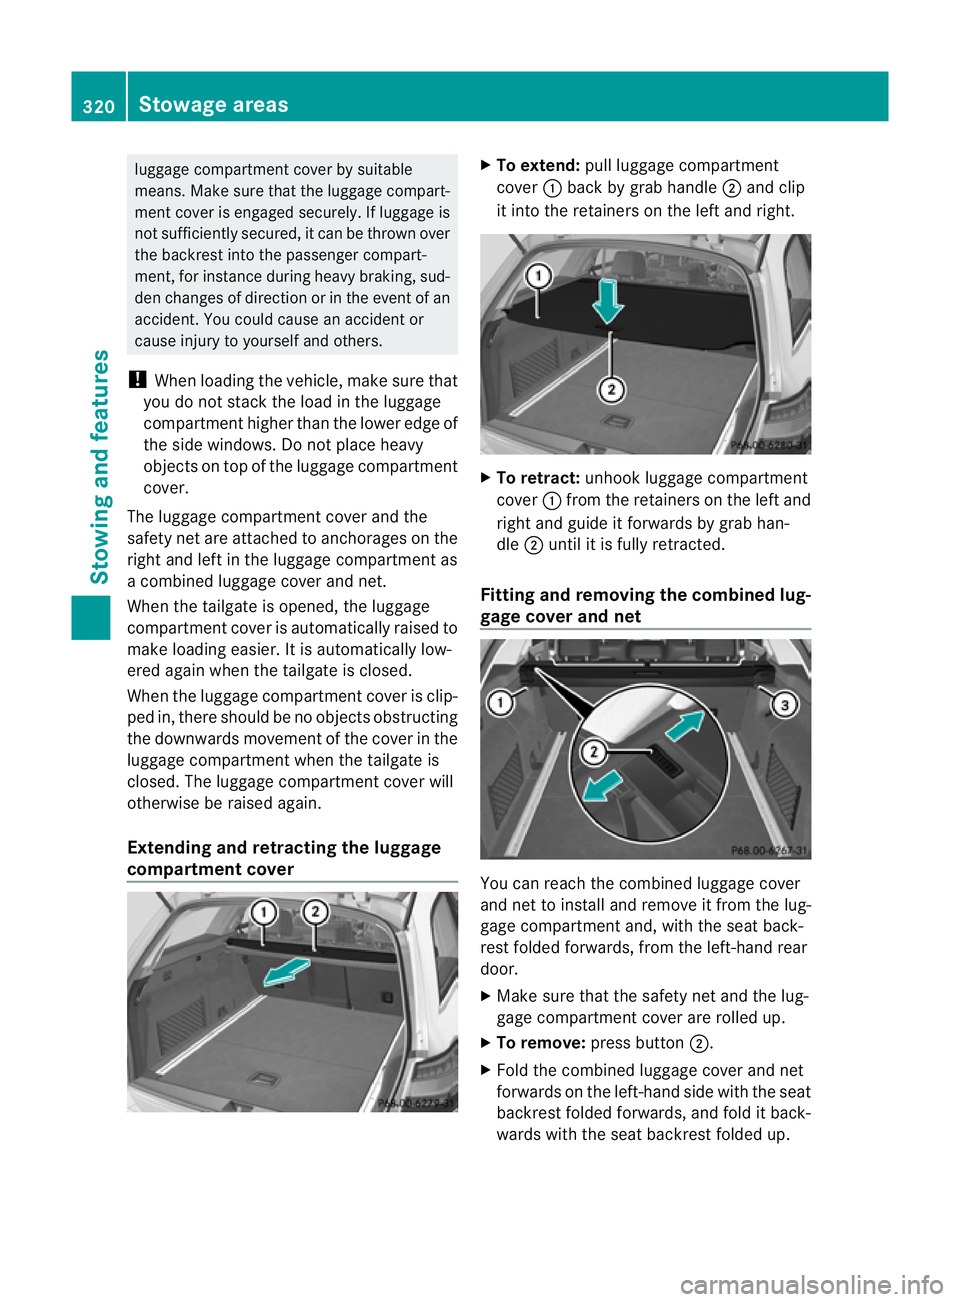
Extending and retracting the luggage
compartment cover X
To extend: pull luggage compartment
cover :back by grab handle ;and clip
it into the retainers on the left and right. X
To retract: unhook luggage compartment
cover :from the retainers on the left and
right and guide it forwards by grab han-
dle ;until it is fully retracted.
Fitting and removing the combined lug-
gage cover and net You can reach the combined luggage cover
and net to install and remove it from the lug-
gage compartment and, with the seat back-
rest folded forwards, from the left-hand rear
door.
X
Make sure that the safety net and the lug-
gage compartment cover are rolled up.
X To remove: press button ;.
X Fold the combined luggage cover and net
forwards on the left-hand side with the seat
backrest folded forwards, and fold it back-
wards with the seat backrest folded up. 320
Stowage areasStowing and features
Page 324 of 457
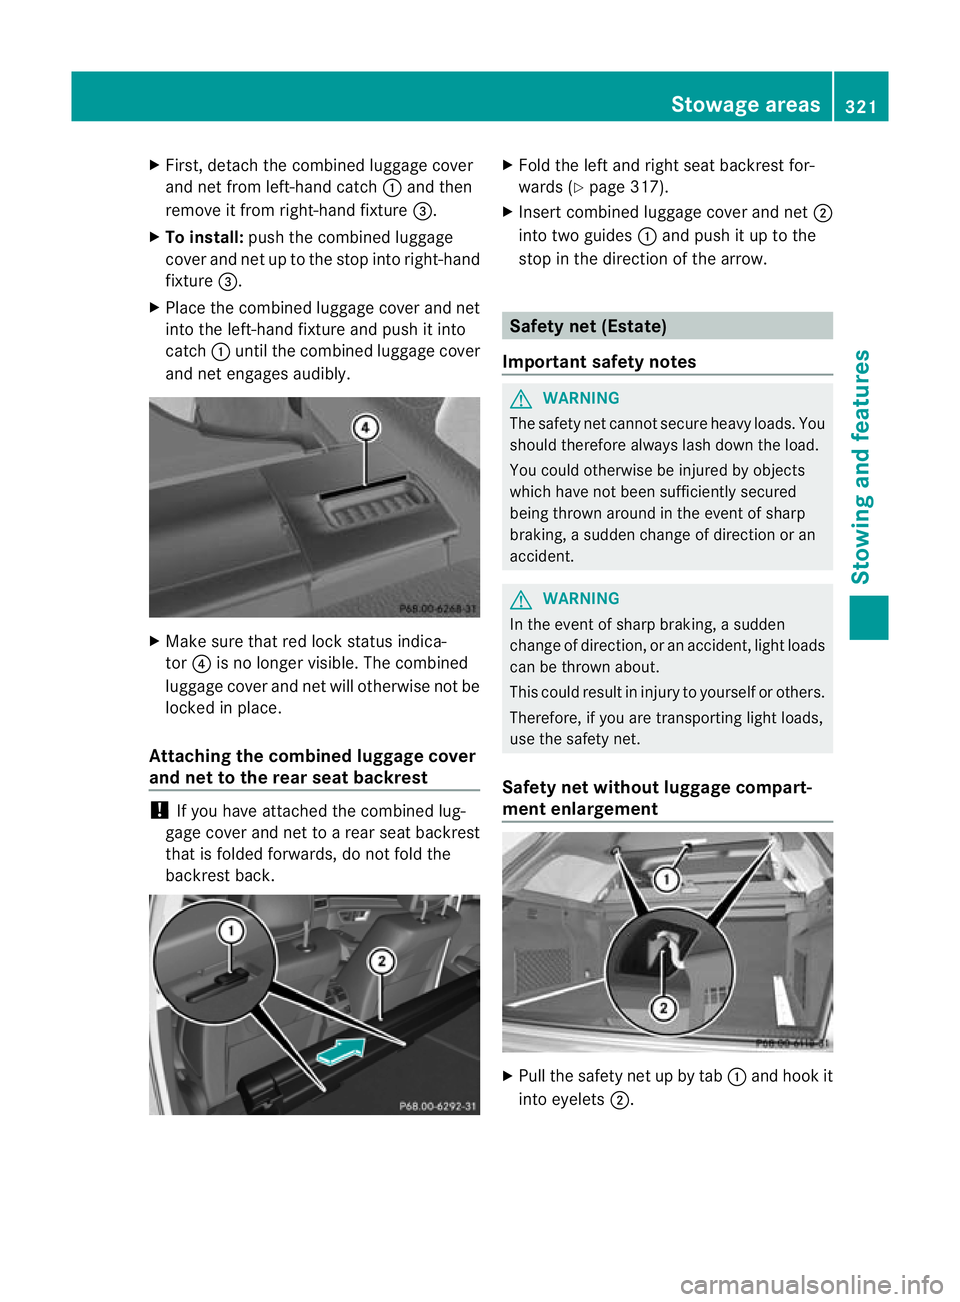
X
First, detach the combined luggage cover
and net from left-hand catch :and then
remove it from right-hand fixture =.
X To install: push the combined luggage
cover and net up to the stop into right-hand
fixture =.
X Place the combined luggage cover and net
into the left-hand fixture and push it into
catch :until the combined luggage cover
and net engages audibly. X
Make sure that red lock status indica-
tor ?is no longer visible .The combined
luggage cover and net will otherwise not be
locked in place.
Attaching the combined luggage cover
and net to the rear seat backrest !
If you have attached the combined lug-
gage cover and net to arear seat backrest
that is folded forwards, do not fold the
backrest back. X
Fold the left and right seat backrest for-
wards (Y page 317).
X Inser tcombined luggage cover and net ;
into two guides :and push it up to the
stop in the direction of the arrow. Safety net (Estate)
Important safety notes G
WARNING
The safety net cannot secure heavy loads. You
should therefore always lash down the load.
You could otherwise be injured by objects
which have not been sufficiently secured
being thrown around in the event of sharp
braking, a sudden change of direction or an
accident. G
WARNING
In the event of sharp braking, a sudden
change of direction, or an accident, light loads
can be thrown about.
This could result in injury to yourself or others.
Therefore, if you are transporting light loads,
use the safety net.
Safety net without luggage compart-
ment enlargement X
Pull the safety net up by tab :and hook it
into eyelets ;. Stowage areas
321Stowing and features Z
Page 325 of 457
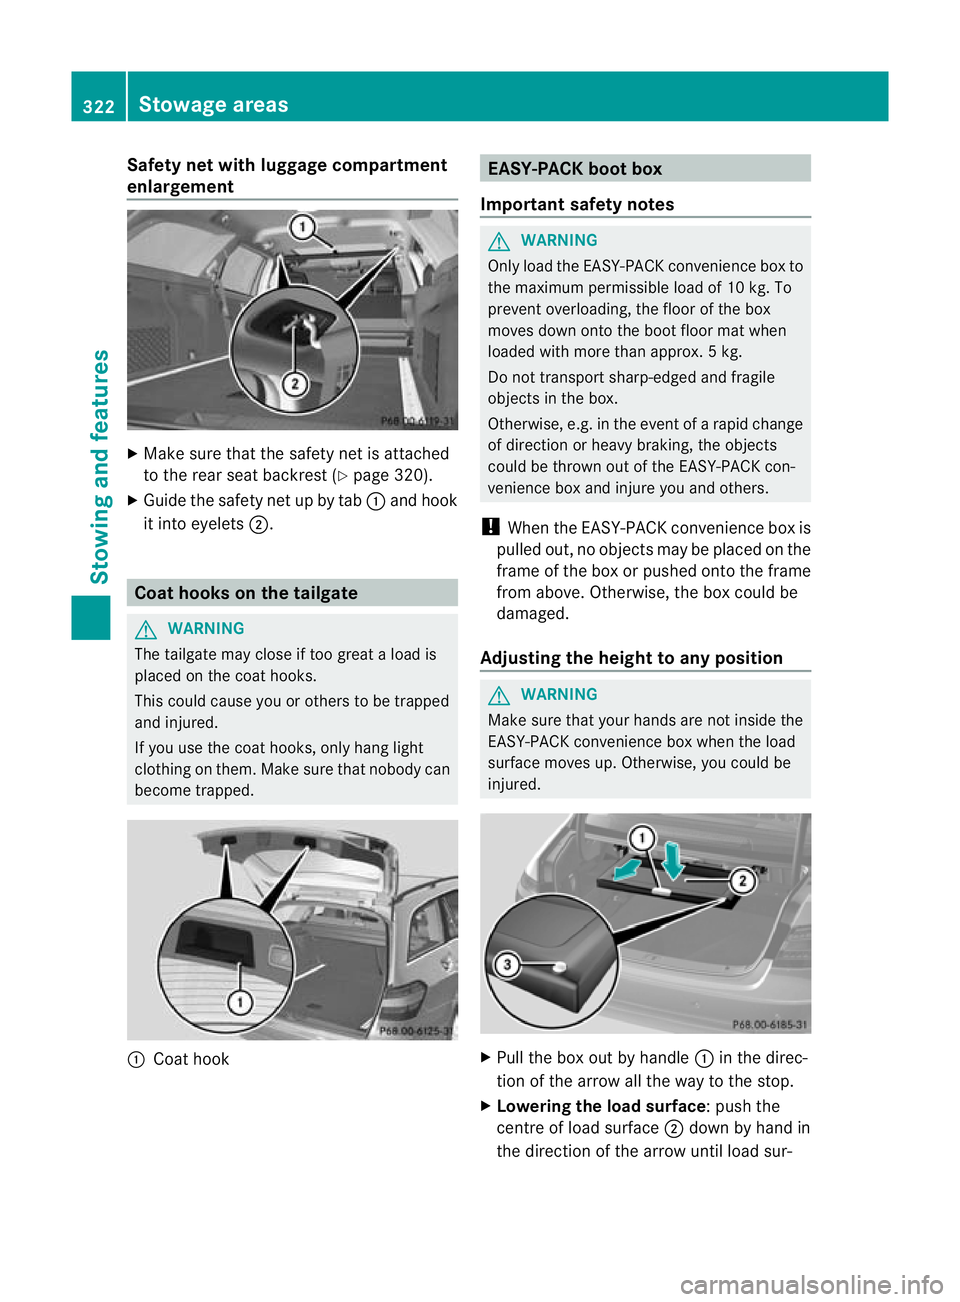
Safety net with luggage compartment
enlargement
X
Make sure that the safety net is attached
to the rear seat backrest (Y page 320).
X Guide the safety net up by tab :and hook
it into eyelets ;. Coat hooks on the tailgate
G
WARNING
The tailgate may close if too great a load is
placed on the coat hooks.
This could cause you or others to be trapped
and injured.
If you use the coat hooks, only hang light
clothing on them. Make sure that nobody can
become trapped. :
Coat hook EASY-PACK boot box
Important safety notes G
WARNING
Only load the EASY-PACK convenience box to
the maximum permissible load of 10 kg. To
prevent overloading, the floor of the box
moves down onto the boot floor mat when
loaded with more than approx. 5kg.
Do not transpor tsharp-edged and fragile
objects in the box.
Otherwise, e.g. in the event of a rapid change
of direction or heavy braking, the objects
could be thrown out of the EASY-PACK con-
venience box and injure you and others.
! When the EASY-PACK convenience box is
pulled out, no objects may be placed on the
frame of the box or pushed onto the frame
from above. Otherwise, the box could be
damaged.
Adjusting the height to any position G
WARNING
Make sure that your hands are not inside the
EASY-PACK convenience box when the load
surface moves up. Otherwise, you could be
injured. X
Pull the box out by handle :in the direc-
tion of the arrow all the way to the stop.
X Lowering the load surface:p ush the
centre of load surface ;down by hand in
the direction of the arrow until load sur- 322
Stowage areasStowing and featu
res
Page 326 of 457
face
;has reached the desired position
and the box is the desired size.
X To raise the load surface: press switch
=.
Load surface ;of the box moves up auto-
matically.
X To stow the box: push the box in by han-
dle :all the way to the stop.
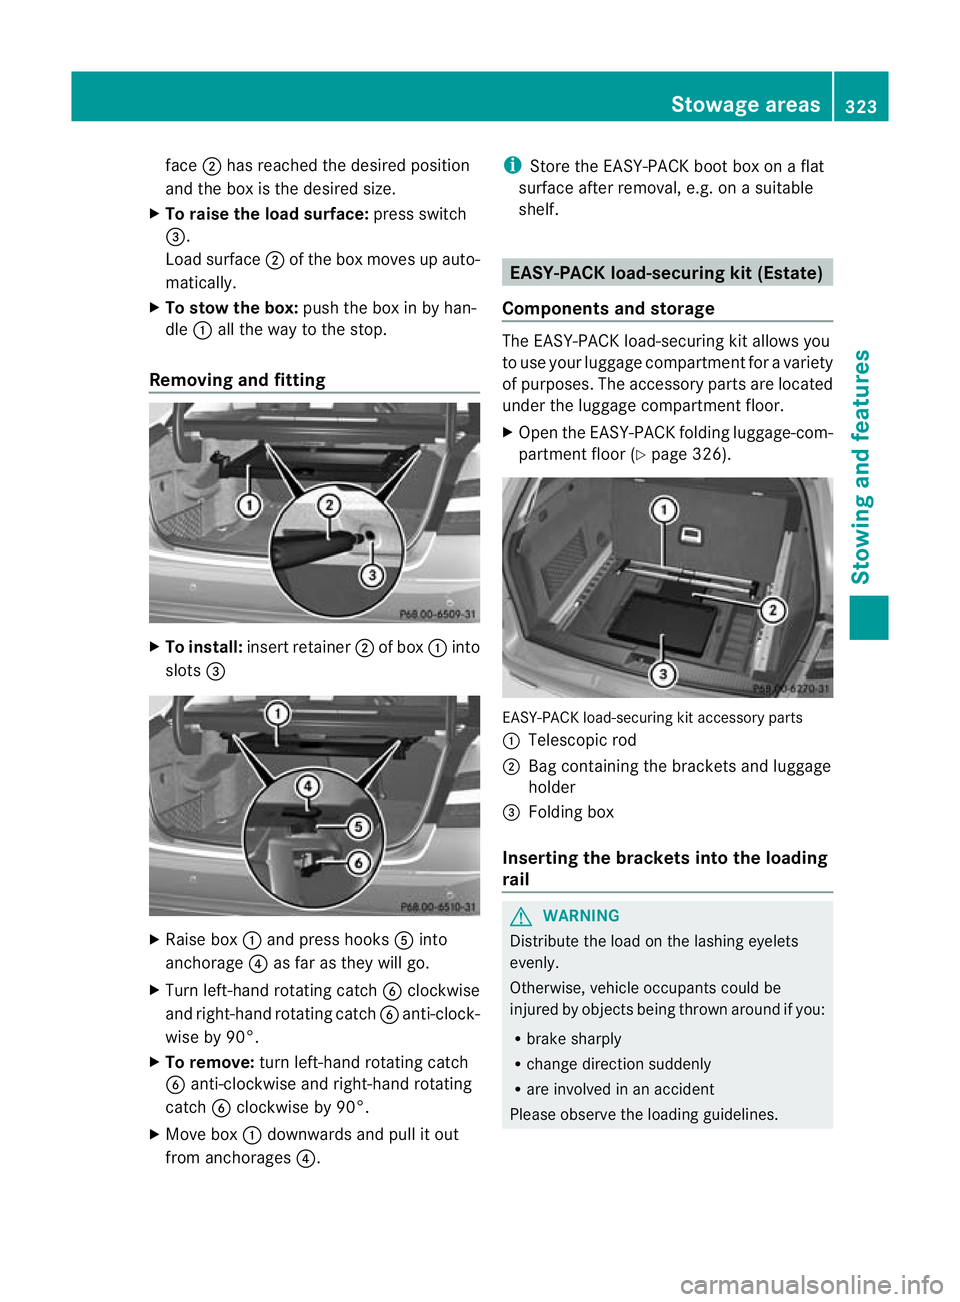
Removing and fitting X
To install: insert retainer ;of box :into
slots = X
Raise box :and press hooks Ainto
anchorage ?as far as they will go.
X Turn left-hand rotating catch Bclockwise
and right-hand rotating catch Banti-clock-
wise by 90°.
X To remove: turn left-hand rotating catch
B anti-clockwise and right-hand rotating
catch Bclockwise by 90°.
X Move box :downwards and pull it out
from anchorages ?. i
Store the EASY-PACK boot box on a flat
surface after removal, e.g. on a suitable
shelf. EASY-PACK load-securing kit (Estate)
Components and storage The EASY-PACK load-securing kit allows you
to use you
rluggage compartmen tfor a variety
of purposes. The accessory parts are located
under the luggage compartment floor.
X Open the EASY-PACK folding luggage-com-
partment floor (Y page 326). EASY-PACK load-securing kit accessory parts
:
Telescopic rod
; Bag containing the brackets and luggage
holder
= Folding box
Inserting the brackets into the loading
rail G
WARNING
Distribute the load on the lashing eyelets
evenly.
Otherwise, vehicle occupants could be
injured by objects being thrown around if you:
R brake sharply
R change direction suddenly
R are involved in an accident
Please observe the loading guidelines. Stowage areas
323Stowing and features Z
Page 327 of 457
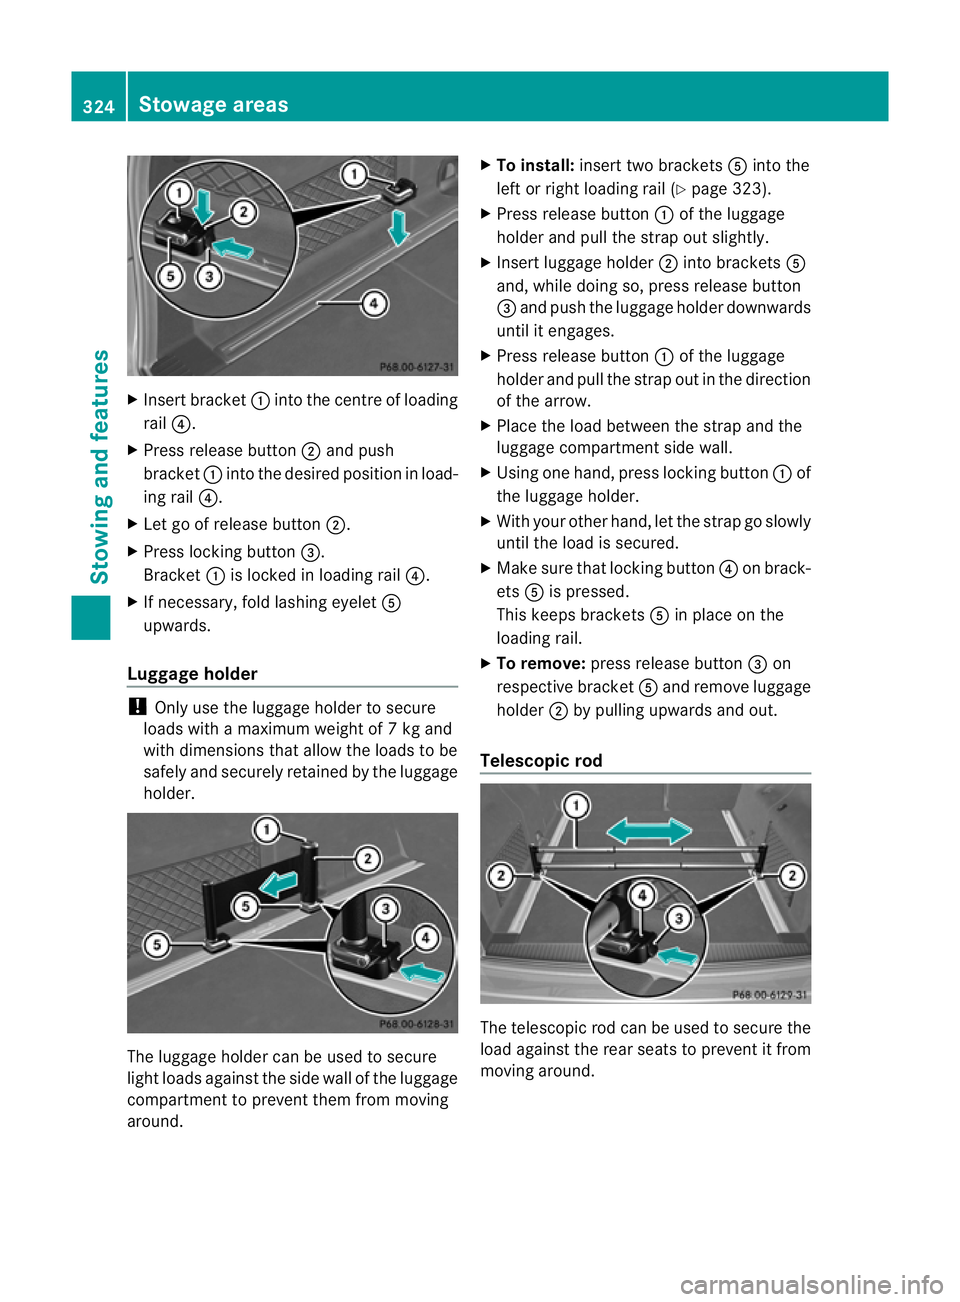
X
Insert bracket :into the centre of loading
rail ?.
X Press release button ;and push
bracket :into the desired positio ninload-
ing rail ?.
X Let go of release button ;.
X Press locking button =.
Bracket :is locked in loading rail ?.
X If necessary, fold lashing eyelet A
upwards.
Luggage holder !
Only use the luggage holder to secure
loads with a maximum weight of 7kg and
with dimensions that allow the loads to be
safely and securely retained by the luggage
holder. The luggage holder can be used to secure
light loads against the side wall of the luggage
compartment to prevent them from moving
around. X
To install: insert two brackets Ainto the
left or right loading rail (Y page 323).
X Press release button :of the luggage
holder and pull the strap out slightly.
X Insert luggage holder ;into brackets A
and, while doing so, press release button
= and push the luggage holder downwards
until it engages.
X Press release button :of the luggage
holder and pull the strap out in the direction
of the arrow.
X Place the load between the strap and the
luggage compartment side wall.
X Using one hand, press locking button :of
the luggage holder.
X With your other hand, let the strap go slowly
until the load is secured.
X Make sure that locking button ?on brack-
ets Ais pressed.
This keeps brackets Ain place on the
loading rail.
X To remove: press release button =on
respective bracket Aand remove luggage
holder ;by pulling upwards and out.
Telescopic rod The telescopic rod can be used to secure the
load against the rear seats to prevent it from
moving around.324
Stowage areasStowing and features
Page 328 of 457
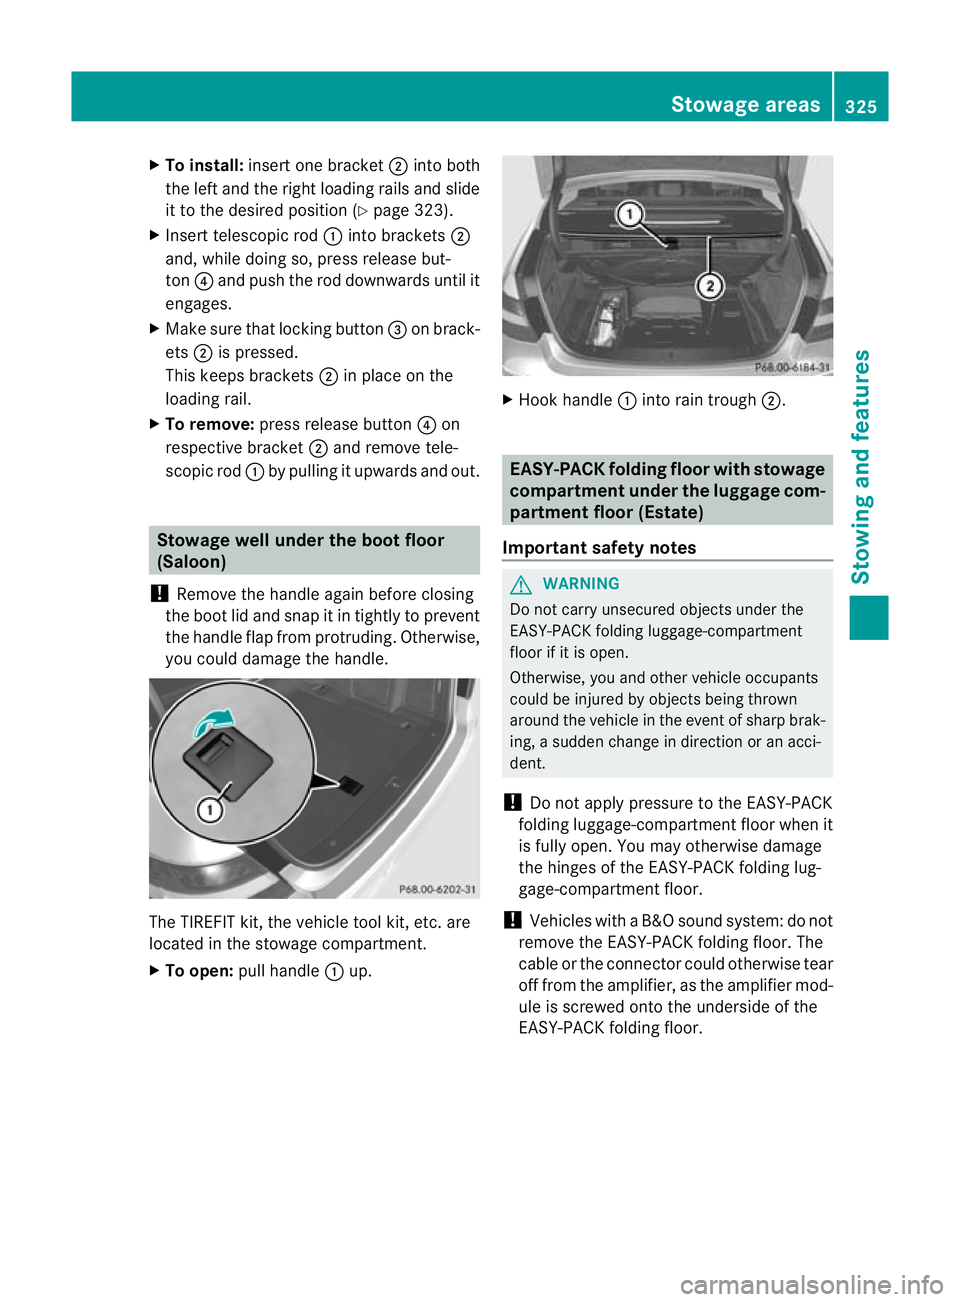
X
To install: insert one bracket ;into both
the left and the right loading rails and slide
it to the desired positio n(Ypage 323).
X Insert telescopic rod :into brackets ;
and, while doing so, press release but-
ton ?and push the rod downwards until it
engages.
X Make sure that locking button =on brack-
ets ;is pressed.
This keeps brackets ;in place on the
loading rail.
X To remove: press release button ?on
respective bracket ;and remove tele-
scopic rod :by pulling it upwards and out. Stowage well under the boot floor
(Saloon)
! Remove the handle again before closing
the boot lid and snap it in tightly to prevent
the handle flap from protruding. Otherwise,
you could damage the handle. The TIREFIT kit, the vehicle tool kit
,etc. are
located in the stowage compartment.
X To open: pull handle :up. X
Hoo khandle :into rain trough ;. EASY-PACK folding floor with stowage
compartment under th
eluggag ecom-
partment floor (Estate)
Important safety notes G
WARNING
Do not carry unsecured objects under the
EASY-PACK folding luggage-compartment
floo rifiti s open.
Otherwise, you and other vehicle occupants
could be injured by objects being thrown
around the vehicle in the event of sharp brak-
ing, a sudden change in direction or an acci-
dent.
! Do not apply pressure to the EASY-PACK
folding luggage-compartmentf loor when it
is fully open .You may otherwise damage
the hinges of the EASY-PACK folding lug-
gage-compartment floor.
! Vehicles with a B&O sound system: do not
remove the EASY-PACK folding floor. The
cable or the connector could otherwise tear
off from the amplifier, as the amplifier mod-
ule is screwed onto the underside of the
EASY-PACK folding floor. Stowage areas
325Stowing and features Z
Page 329 of 457
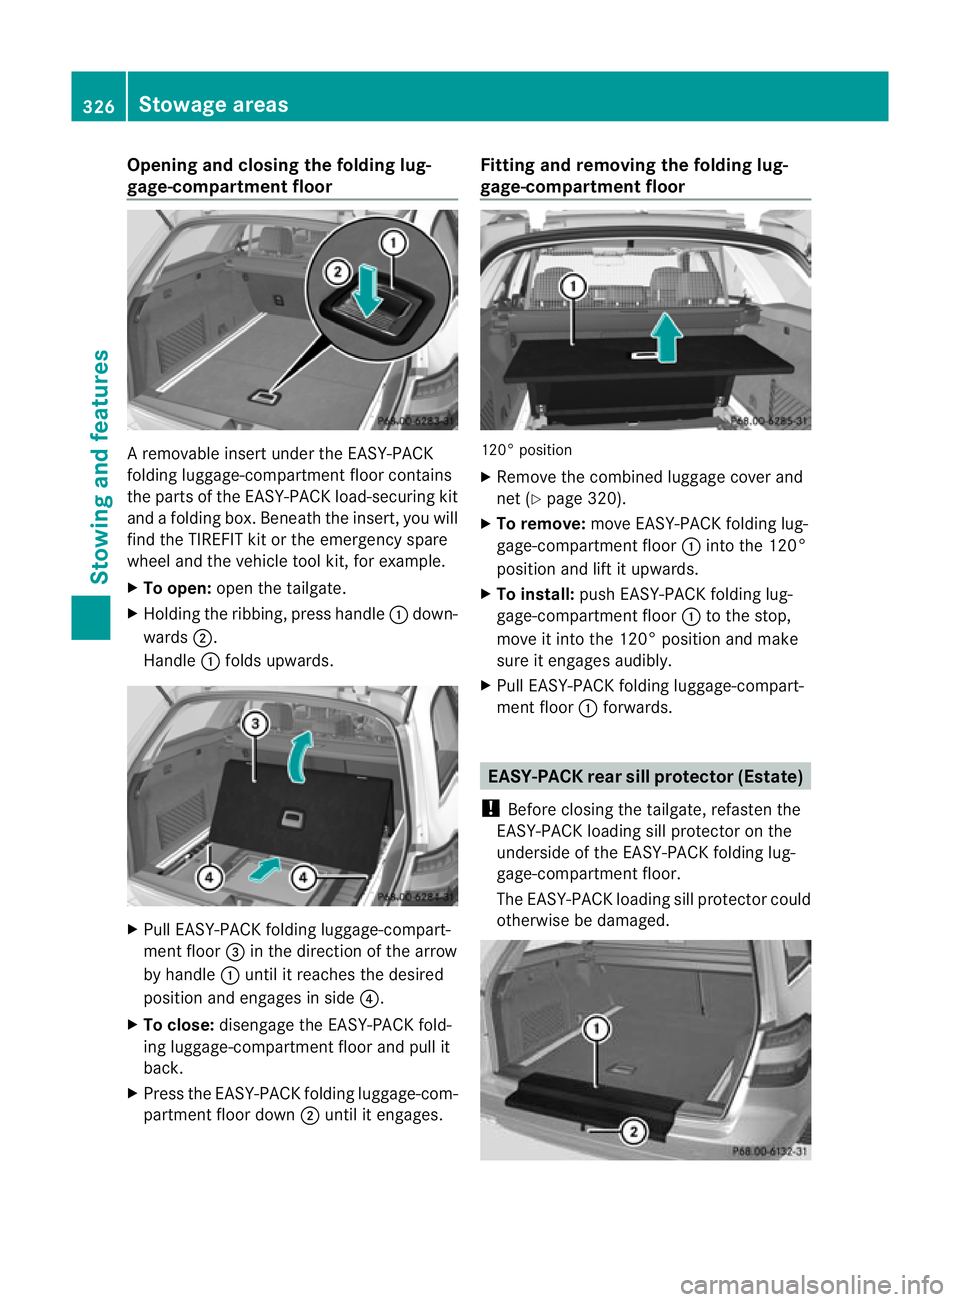
Opening and closing the folding lug-
gage-compartment floor
A removable insert under the EASY-PACK
folding luggage-compartment floor contains
the parts of the EASY-PACK load-securing kit
and a folding box. Beneath the insert, you will
find the TIREFIT kit or the emergency spare
wheel and the vehicle tool kit, for example.
X
To open: open the tailgate.
X Holding the ribbing, press handle :down-
wards ;.
Handle :folds upwards. X
Pull EASY-PACK folding luggage-compart-
ment floor =in the direction of the arrow
by handle :until it reaches the desired
position and engages in side ?.
X To close: disengage the EASY-PACK fold-
ing luggage-compartment floor and pull it
back.
X Press the EASY-PACK folding luggage-com-
partment floor down ;until it engages. Fitting and removing the folding lug-
gage-compartment floor
120° position
X
Remove the combined luggage cover and
net (Y page 320).
X To remove: move EASY-PACK folding lug-
gage-compartmen tfloor :into the 120°
position and lift it upwards.
X To install: push EASY-PACK folding lug-
gage-compartmen tfloor :to the stop,
move it into the 120° position and make
sure it engages audibly.
X Pull EASY-PACK folding luggage-compart-
ment floor :forwards. EASY-PACK rea
rsill protector (Estate)
! Before closing the tailgate, refasten the
EASY-PACK loading sill protector on the
underside of the EASY-PACK folding lug-
gage-compartmen tfloor.
The EASY-PACK loading sill protector could
otherwise be damaged. 326
Stowage areasStowing and features