2012 MERCEDES-BENZ E-CLASS COUPE lights
[x] Cancel search: lightsPage 219 of 389
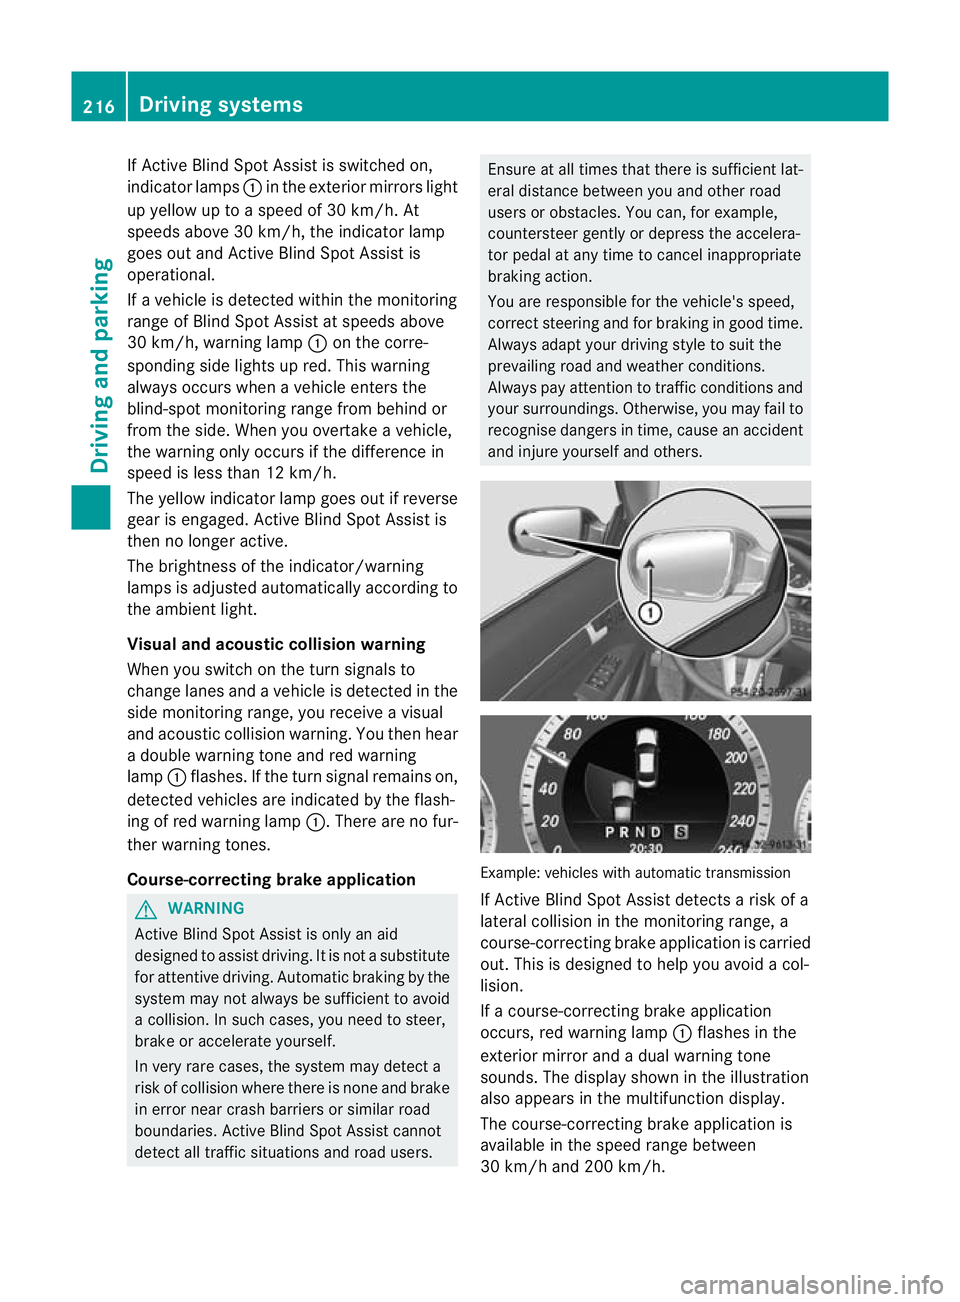
If Active Blind Spot Assist is switched on,
indicator lamps :in the exterior mirrors light
up yellow up to a speed of 30 km/h. At
speeds above 30 km/h, the indicator lamp
goes out and Active Blind Spot Assist is
operational.
If a vehicle is detected within the monitoring
range of Blind Spot Assist at speeds above
30 km/h, warning lamp :on the corre-
sponding side lights up red. This warning
always occurs when a vehicle enters the
blind-spot monitoring range from behind or
from the side. When you overtake a vehicle,
the warning only occurs if the difference in
speed is less than 12 km/h.
The yellow indicator lamp goes out if reverse
gear is engaged. Active Blind Spot Assist is
then no longer active.
The brightness of the indicator/warning
lamps is adjusted automatically according to
the ambient light.
Visual and acoustic collision warning
When you switch on the turn signals to
change lanes and a vehicle is detected in the
side monitoring range, you receive a visual
and acoustic collision warning. You then hear
a double warning tone and red warning
lamp :flashes. If the turn signal remains on,
detected vehicles are indicated by the flash-
ing of red warning lamp :.There are no fur-
ther warning tones.
Course-correcting brake application G
WARNING
Active Blind Spot Assist is only an aid
designed to assist driving. It is not a substitute
for attentive driving. Automatic braking by the
system may not always be sufficient to avoid
a collision. In such cases, you need to steer,
brake or accelerate yourself.
In very rare cases, the system may detect a
risk of collision where there is none and brake
in error near crash barriers or similar road
boundaries. Active Blind Spot Assist cannot
detect all traffic situations and road users. Ensure at all times that there is sufficient lat-
eral distance between you and other road
users or obstacles. You can, for example,
countersteer gently or depress the accelera-
tor pedal at any time to cancel inappropriate
braking action.
You are responsible for the vehicle's speed,
correct steering and for braking in good time.
Always adapt your driving style to suit the
prevailing road and weather conditions.
Always pay attention to traffic conditions and
your surroundings. Otherwise, you may fail to
recognise dangers in time, cause an accident
and injure yourself and others.
Example: vehicles with automatic transmission
If Active Blind Spot Assist detects a risk of a
lateral collision in the monitoring range, a
course-correcting brake application is carried
out. This is designed to help you avoid a col-
lision.
If a course-correcting brake application
occurs, red warning lamp
:flashes in the
exterior mirror and a dual warning tone
sounds. The display shown in the illustration
also appears in the multifunction display.
The course-correcting brake application is
available in the speed range between
30 km/h and 200 km/h. 216
Driving systemsDriving and parking
Page 220 of 389

Either no braking application, or a course-
correcting brake applicatio nadapted to the
driving situation occurs, if:
R there are vehicles or obstacles, e.g. crash
barriers, on both sides of your vehicle.
R a vehicle approaches too closely on the
side.
R you have adopted a sporty driving style with
high cornering speeds.
R you brake or accelerate decisively.
R a driving safety system intervenes, such as
ESP ®
or PRE-SAFE ®
Brake.
R ESP ®
is deactivated.
R a loss of tyre pressure or a defective tyre is
detected.
Activating Active Blind Spot Assist
X Make sure that the radar senso rsystem
(Y page 245) and Active Blind Spot Assist
(Y page 241) are activated in the on-board
computer.
X Tur nthe key to position 2in the ignition
lock.
Warning lamps :in the exterior mirrors
light up red for approximately
1.5 seconds and then turn yellow.
Towing atrailer
If you attach a trailer, make sure tha tyou have
correctly established the electrical connec-
tion. This can be accomplished by checking
the trailer lighting. Active Blind Spot Assist is
then deactivated. The indicator lamp lights up
yellow in the exterior mirrors and the ActiveBlind Spot Assist currently unavail‐
able See Owner's Manual message
appears in the multifunction display.
Active Lane Keeping Assist Important safety notes
G
WARNING
Active Lane Keeping Assist does not keep
your vehicle in its lane. It is only an aid and may detect the lane markings on the road
incorrectly or not at all.
The system may be impaired or may not func-
tion if:
R
there is poor visibility, e.g. due to inade-
quate illumination of the road surface,
snow, rain, fog or spray.
R there is glare, e.g. from oncoming traffic,
the sun, or reflection from other vehicles.
R the windscreen is dirty, fogged up or cov-
ered, for instance by a sticker, in the vicinity
of the camera.
R several or no lane markings for a single lane
are present.
R the lane markings are worn away, dark or
covered up, e.g. by dirt or snow.
R the distance to the vehicle in front is too
small and as a result the lane markings can-
not be recognised.
R the lane markings on the road are unclear,
e.g. near roadworks.
R the lane markings change quickly, e.g.
branch off, cross, or merge.
R the road is narrow and winding.
Active Lane Keeping Assist cannot detect
road and traffic conditions. It is not a substi-
tute for attentive driving. You are responsible
for the vehicle's speed, braking in good time,
and steering correctly. Always adapt your
driving style to suit the prevailing road and
weather conditions. Always pay attention to
traffic conditions and your surroundings. Oth-
erwise, you may fail to recognise dangers in
time, cause an accident and injure yourself
and others. Driving systems
217Driving and parking Z
Page 243 of 389
X
Press the abutton.
The multifunction display shows Speed
Limit Assist.
X Press the :button.
The curren tselection is displayed.
X To activate or deactivate: pressa.
If the Speed Limit Assist message function
is activated, a detected speed limit is auto-
matically displayed for five seconds. Other
items in the multifunction display are not
shown during this time.
If Speed Limit Assist is operational and the
message function is activated, the multifunc-
tion display shows the Äsymbol when the
ignition is switched on.
Showing the distance display X
Press the =or; button on the steer-
ing wheel to select the Assist. menu.
X Press the 9or: button to select
Distance display .
X Press the abutton.
The DISTRONIC PLUS distance display
appears in the multifunction display
(Y page 195).
If the Sensors deactivated message
appears, the radar sensor system is deacti-
vated.
X Check whether or not the radar sensor sys-
tem is permitted to be activated
(Y page 382).
X Switch on the radar sensor system
(Y page 245).
Deactivating/activating ESP ®G
WARNING
If you deactivate ESP ®
, ESP ®
no longer sta-
bilises the vehicle. There is an increased risk
of skidding and an accident.
Only deactivate ESP ®
in the situations descri-
bed in the following. For further information about ESP
®
, see
(Y page 67).
X Start the engine.
X Press the =or; button on the steer-
ing wheel to select the Assist. menu.
X Press the 9or: button to select
ESP .
X Press the abutton.
The curren tselection is displayed.
X To activate/deactivate: press thea
button again.
ESP ®
is deactivated if the åwarning lamp
in the instrument cluster lights up continu-
ously when the engine is running.
If the ä warning lamp and the åwarn-
ing lamp are lit continuously, ESP ®
is not
available due to a malfunction.
It may be best to deactivate ESP ®
in the fol-
lowing situations:
R when using snow chains
R in deep snow
R on sand or gravel
Observe the information on warning lamps
(Y page 278).
Observe the information on display messages
(Y page 250).
Activating/deactivating the PRE-SAFE ®
Brake PRE-SAFE
®
Brake is only available in vehicles
with DISTRONIC PLUS.
X Press the =or; button on the steer-
ing wheel to select the Assist. menu.
X Press the 9or: button to select
PRE-SAFE Brake .
X Press the abutton.
The curren tselection is displayed.
X To activate/deactivate: press thea
button again.
When PRE-SAFE ®
Brake is activated, the mul-
tifunction display shows the Äsymbol as 240
Menus and submenusOn-board computer and displays
Page 246 of 389
i
Vehicles for the United Kingdom: this
function is not available.
Selecting the permanent display function
You can determine whether the multifunction
display permanently shows yours peed or the
outside temperature.
X Press the =or; button on the steer-
ing wheel to select the Settings menu.
X Press the :or9 button to select the
Inst. cluster submenu.
X Press ato confirm.
X Press the :or9 button to select the
Permanent display: function.
You will see the selected setting: outsidetemperature or
Dig. speedo [mph] .
X Press the abutton to save the setting.
i Speed is displayed in mph.
i Vehicles for the United Kingdom :this
function is unavailable.
Lights Switching the Daytime driving lights on/
off
The Day lights function can only be
switched on with the engine turned off.
X Press the =or; button on the steer-
ing wheel to select the Settings menu.
X Press the :or9 button to select the
Light submenu.
X Press ato confirm.
X Press the :or9 button to select the
Day lights: function.
If the Day lights: function has been
switched on, the cone of light and the
W symbol in the multifunction display
are shown in red.
X Press the abutton to save the setting.
Further information on daytime driving lights
(Y page 123). Switching the Intelligent Light System
on/off
X
Press the =or; button on the steer-
ing wheel to select the Settings menu.
X Press the :or9 button to select the
Light submenu.
X Press ato confirm.
X Press the :or9 button to select the
Intell. Light System function.
If the Intell. Light System function has
been switched on, the cone of light and the
L symbol in the multifunction display
are shown in red.
X Press the abutton to save the setting.
When you activate Intell. Light System ,
you activate the following functions:
R motorway mode
R active light function
R cornering light function
R extended range foglamps
If you set the dipped-beamh eadlamps for
driving on the right/left, the multifunction
display shows the Intell. Light System:
system inoperative Inactive for
left-side traffic or
Intell. Light System: System inoperative Inactive
for right-side traffic (Y
page 243)
display message instead of the Intell. Light System function in the
Light sub-
menu.
Further information on the Intelligent Light
System (Y page 128).
Setting the dipped-beam headlamps for
driving on the left/right
X Press the =or; button on the steer-
ing wheel to select the Settings menu.
X Press the :or9 button to select the
Light submenu.
X Press ato confirm. Menus and submenus
243On-board computer and displays Z
Page 247 of 389
X
Press the :or9 button to select the
Dipped beams Setting for: function.
You will see the selected setting: Right-side traffic or
Left-side traffic .
X Press the abutton to save the setting.
If you change the setting, conversion does
not take place until the next time the vehi-
cle is stationary.
This function is only available on vehicles with
the Intelligent Light System.
You can use this function to switch between
symmetrical and asymmetrical dipped beam
(Y page 122).
If you set the dipped-beam headlamps for
driving on the right/left, then motorway
mode and the extended range foglamps are
unavailable.
Aq ualified specialist workshop can set the
dipped-beam headlamps for driving on the
right or left .
Switching Adaptive Highbeam Assis ton/
off
X Press the =or; button on the steer-
ing wheel to select the Settings menu.
X Press the :or9 button to select the
Light submenu.
X Press ato confirm.
X Press the :or9 button to select the
Adapt. main beam function.
If the Adapt. main beam function has
been switched on, the cone of light and the
_ symbol in the upper multifunction
display are shown in red.
X Press the abutton to save the setting.
For further information about Adaptive High-
beam Assist, see (Y page 130).
Activating/deactivating the surround
lighting and exterior lighting delayed
switch-off
X Press the =or; button on the steer-
ing wheel to select the Settings menu.
X Press the :or9 button to select the
Light submenu. X
Press ato confirm.
X Press the :or9 button to select the
Surround lighting function.
When the Surround lighting function is
activated, the light cone and the area
around the vehicle are displayed in red in
the multifunction display.
X Press the abutton to save the setting.
Deactivating delayed switch-off of the exte-
rior lighting temporarily:
X Before leaving the vehicle, turn the key to
position 0in the ignition lock.
X Turn the key to position 2in the ignition
lock.
The exterior lighting delayed switch-off is
deactivated.
Delayed switch-off of the exterior lighting is
reactivated the next time you start the
engine.
If you have activated the Surround light‐ ing function and the light switch is set to
Ã, the following functions are activated
when it is dark:
R surround lighting: the exterior lighting
remains lit for 40 seconds after unlocking
with the key. If you start the engine, the
surround lighting is switched off and auto-
matic headlamp mode is activated
(Y page 123).
R Exterior lighting delayed switch-off: the
exterior lighting remains lit for 60seconds
after the engine is switched off. If you close
all the doors and the boot lid, the exterior
lighting goes off after 5seconds.
i Depending on your vehicle's equipment,
when the surround lighting and delayed
switch-off exterior lighting are on, the fol-
lowing light up:
R side lamps
R foglamps
R dipped-beam headlamps
R daytime driving lights
R surround lighting in the exterior mirrors 244
Menus and submenusOn-board computer and displays
Page 248 of 389

Activating/deactivating the interior light-
ing delayed switch-off
If you activate the Lighting delayed sw.- off function, the interio
rlighting remains on
for 20seconds after you remove the key from
the ignition lock.
X Press the =or; button on the steer-
ing wheel to selec tthe Settings menu.
X Press the :or9 button to select the
Light submenu.
X Press ato confirm.
X Press the :or9 button to select the
Light. delay function.
When the Lighting delayed sw.-off function is activated, the vehicle interior is
displayed in red in the multifunction dis-
play.
X Press the abutton to save the setting.
Vehicle Setting permanent SPEEDTRONIC
X Press the =or; button on the steer-
ing wheel to select the Settings menu.
X Press the :or9 button to select the
Vehicle submenu.
X Press ato confirm.
X Press the :or9 button to select the
Limit speed (winter tyres): function.
You will see the current setting.
X Press ato confirm.
X Press the :or9 button to adjust
permanent SPEEDTRONIC in increments of
ten (230 km/h to
160 km/h ). The
Off set-
ting switches permanent SPEEDTRONIC
off.
X Press the abutton to store the entry.
For further information on permanent SPEED-
TRONIC (Y page 188). Switching the automatic locking feature
on/off
X
Press the =or; button on the steer-
ing wheel to select the Settings menu.
X Press the :or9 button to select the
Vehicle submenu.
X Press ato confirm.
X Press the :or9 button to select the
Auto. door locks function.
When the Automatic door locks func-
tion is activated, the vehicle doors are dis-
played in red in the multifunction display.
X Press the abutton to save the setting.
If you activate the Automatic door locks function, the vehicle is centrally locked above
a speed of around 15 km/h.
For further information on the automatic lock-
ing feature, see (Y
page 84).
Activating/deactivating the acoustic
locking confirmation
If you switch on the Acoustic Lock function,
an acoustic signal sounds when you lock the
vehicle.
X Press the =or; button on the steer-
ing wheel to select the Settings menu.
X Press the :or9 button to select the
Vehicle submenu.
X Press ato confirm.
X Press the :or9 button to select the
Acoustic Lock function.
If the Acoustic Lock function is activated,
the & symbol in the multifunction dis-
play lights up red.
X Press the abutton to save the setting.
Activating/deactivating the radar sensor
system
X Press the =or; button on the steer-
ing wheel to select the Settings menu.
X Press the :or9button to select the
Vehicle submenu.
X Press ato confirm. Menus and submenus
245On-board computer and displays Z
Page 249 of 389

X
Press the 9or: button to select
Radar sensor (See Owner's Man.): .
You will see the selected setting: on or
off .
X Press the abutton to save the setting.
i You must deactivate the radar sensor sys-
tem in certain countries and near radio
telescope facilities. For further informa-
tion, see (Y page 382).
When you are close to radio telescope facili-
ties, the radar sensor system will be deacti-
vated automatically.
The following systems are switched off when
the radar sensor system is deactivated:
R DISTRONIC PLUS (Y page 188)
R BAS PLUS (Y page 65)
R PRE-SAFE ®
Brake (Y page 69)
R Blind Spot Assist (Y page 210)
R Active Blind Spot Assist (Y page 214)
Heating Auxiliary heating departure time
G
WARNING
Exhaust fumes are produced when the auxili-
ary heating is in operation. Inhaling these
exhaust fumes can be poisonous. You should
therefore switch off the auxiliary heating in
confined spaces without an extraction sys-
tem, e.g. a garage. G
WARNING
When operating the auxiliary heating parts of
the vehicle can get very hot. Make sure that
the exhaust system does not under any cir-
cumstances come into contact with easily
ignitable material such as dry grass or fuels.
The material could otherwise ignite and set
the vehicle alight. Choose your parking spot
accordingly.
Operating the auxiliary heating is thus pro-
hibited at filling stations or when your vehicle
is being refuelled. You must therefore switch
off the auxiliary heating at filling stations. !
Operating the auxiliary heating/ventila-
tion draws on the vehicle battery. After you
have heated or ventilated the vehicle a
maximum of two times, drive for a longer
distance.
This function is only available on vehicles with
auxiliary heating (Y page 149).
In the Heating submenu, you can select a
stored departure time or change a departure
time.
The auxiliary heating timer function calcu-
lates the switch-on time according to the out-
side temperature so that the vehicle is pre-
heated by the departure time. When the
departure time is reached, the auxiliary heat-
ing continues to heat for a further five
minutes and then switches off. The auxiliary
heating adopts the THERMATIC or
THERMOTRONIC temperature setting.
You can switch off the auxiliary heating by
using the remote control or the auxiliary heat-
ing button on the centre console.
i Switch the auxiliary heating on regularly
once a month for about ten minutes.
Selecting the departure time or deactivat-
ing a selected departure time
X Press the =or; button on the steer-
ing wheel to select the Settings menu.
X Press the :or9 button to select the
Heating submenu.
X Press ato confirm.
You will see the selected setting.
X Press ato confirm.
X Press the :or9 button to select
one of the three departure times or Timer off (no timer active).
X Press ato confirm.
If a departure time is selected, the yellow
indicator lamp lights up on the auxiliary
heating button. 246
Menus and submenusOn-board computer and displays
Page 250 of 389
Changing the departure time
X
Press the =or; button on the steer-
ing wheel to selec tthe Settings menu.
X Press the :or9 button to select the
Heating submenu.
X Press ato confirm.
You will see the selected setting.
X Press ato confirm.
X Press the :or9 button to select A ,
B or
Change C .
X Press ato confirm.
You can now change the departure time.
X Press the =or; button to select the
display to be changed: hours, minutes.
X Press the :or9 button to set the
selected display.
X Press the abutton to store the entry.
The yellow indicator lamp on the auxiliary
heating button lights up.
Convenience Activating/deactivating the EASY-
ENTRY/EXIT feature
G
WARNING
The steering wheel moves when the EASY-
ENTRY/EXIT feature is active. There is a risk
of occupants becoming trapped. Before acti-
vating the EASY-ENTRY/EXIT feature, make
sure that nobody can become trapped.
Do not leave children unsupervised in the
vehicle, even if they are secured in a child
restraint system. The children could open the
driver's door and thereby unintentionally acti-
vate the EASY-ENTRY/EXIT feature and
become trapped.
X Press the =or; button on the steer-
ing wheel to select the Settings menu.
X Press the :or9 button to select the
Convenience submenu.
X Press ato confirm. X
Press the :or9 button to select the
Easy Entry/Exit: function.
If the Easy Entry/Exit function is activa-
ted, the vehicle steering wheel is displayed
in red in the multifunction display.
X Press the abutton to save the setting.
Further information on the EASY-ENTRY/EXIT
feature (Y page 116).
Switching the belt adjustment on/off
X Press the =or; button on the steer-
ing wheel to select the Settings menu.
X Press the :or9 button to select the
Convenience submenu.
X Press ato confirm.
X Press the :or9 button to select the
Belt adjustment function.
When the Belt adjustment function is
activated, the vehicle seat belt is displayed
in red in the multifunction display.
X Press the abutton to save the setting.
For further information on belt adjustment,
see (Y page 51).
Switching the fold in mirrors when lock-
ing function on/off
This function is only available on vehicles with
Memory Function (Y page 120).
When you activate the Auto. fold in func-
tion, the exterior mirrors are folded in when
the vehicle is locked. When you unlock the
vehicle and then open a door, the exterior
mirrors fold out again.
X Press the =or; button on the steer-
ing wheel to select the Settings menu.
X Press the :or9 button to select the
Convenience submenu.
X Press ato confirm.
X Press the :or9 button to select the
Auto. fold in function.
If the Auto. fold in function is activated,
the vehicle's exterior mirror is displayed in
red in the multifunction display.
X Press the abutton to save the setting. Menus and submenus
247On-board computer and displays Z