2012 MERCEDES-BENZ E-CLASS COUPE ECU
[x] Cancel search: ECUPage 291 of 389
up the preinstalled mobile phon
eholder
(see the separate Audio or COMAND Online
Operating Instructions). Stowage nets
G
WARNING
Only place lightweight items in the luggage
net. Do not use it to transport heavy, bulky,
sharp-edged or fragile objects. In the event of
an accident, the luggage net will not secure
the transported goods.
Luggage nets are located in the front-
passenger footwell and on the left-hand side
of the boot (Coupé) or left and right-hand
sides of the boot (Cabriolet). Through-loading facility in the rear
compartment
X
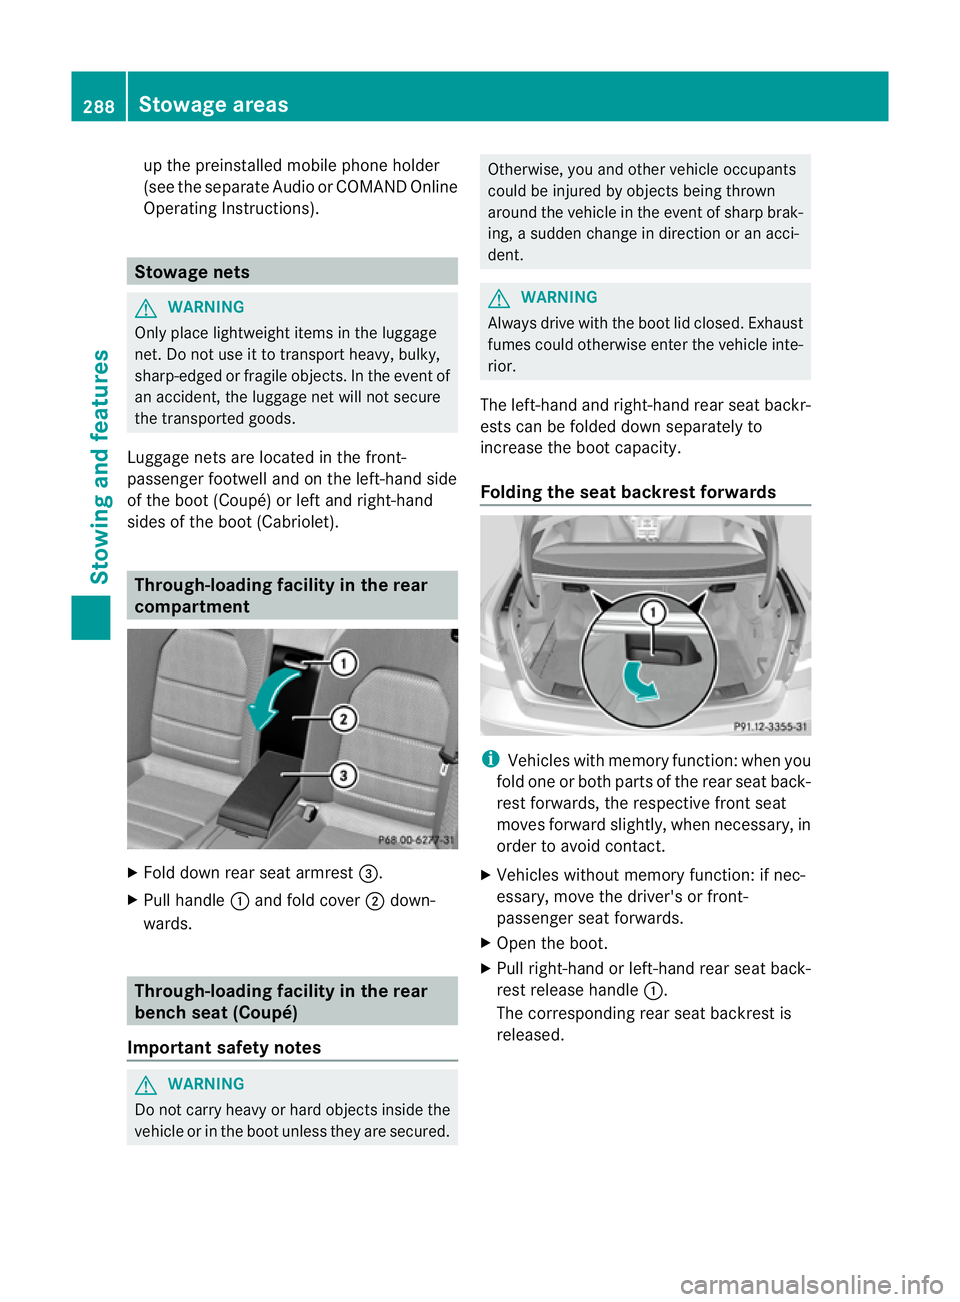
Fold down rear seat armrest =.
X Pull handle :and fold cover ;down-
wards. Through-loading facility in the rear
bench seat (Coupé)
Important safety notes G
WARNING
Do not carry heavy or hard objects inside the
vehicle or in the boot unless they are secured. Otherwise, you and other vehicle occupants
could be injured by object
sbeing thrown
around the vehicle in the event of sharp brak-
ing, a sudden change in direction or an acci-
dent. G
WARNING
Always drive with the boot lid closed. Exhaust
fumes could otherwise enter the vehicle inte-
rior.
The left-hand and right-hand rear seat backr-
ests can be folded down separately to
increase the boot capacity.
Folding the seat backrest forwards i
Vehicles with memory function :when you
fold one or both parts of the rear seat back-
rest forwards, the respective front seat
moves forward slightly, when necessary, in
order to avoid contact.
X Vehicles without memory function: if nec-
essary, move the driver's or front-
passenger seat forwards.
X Open the boot.
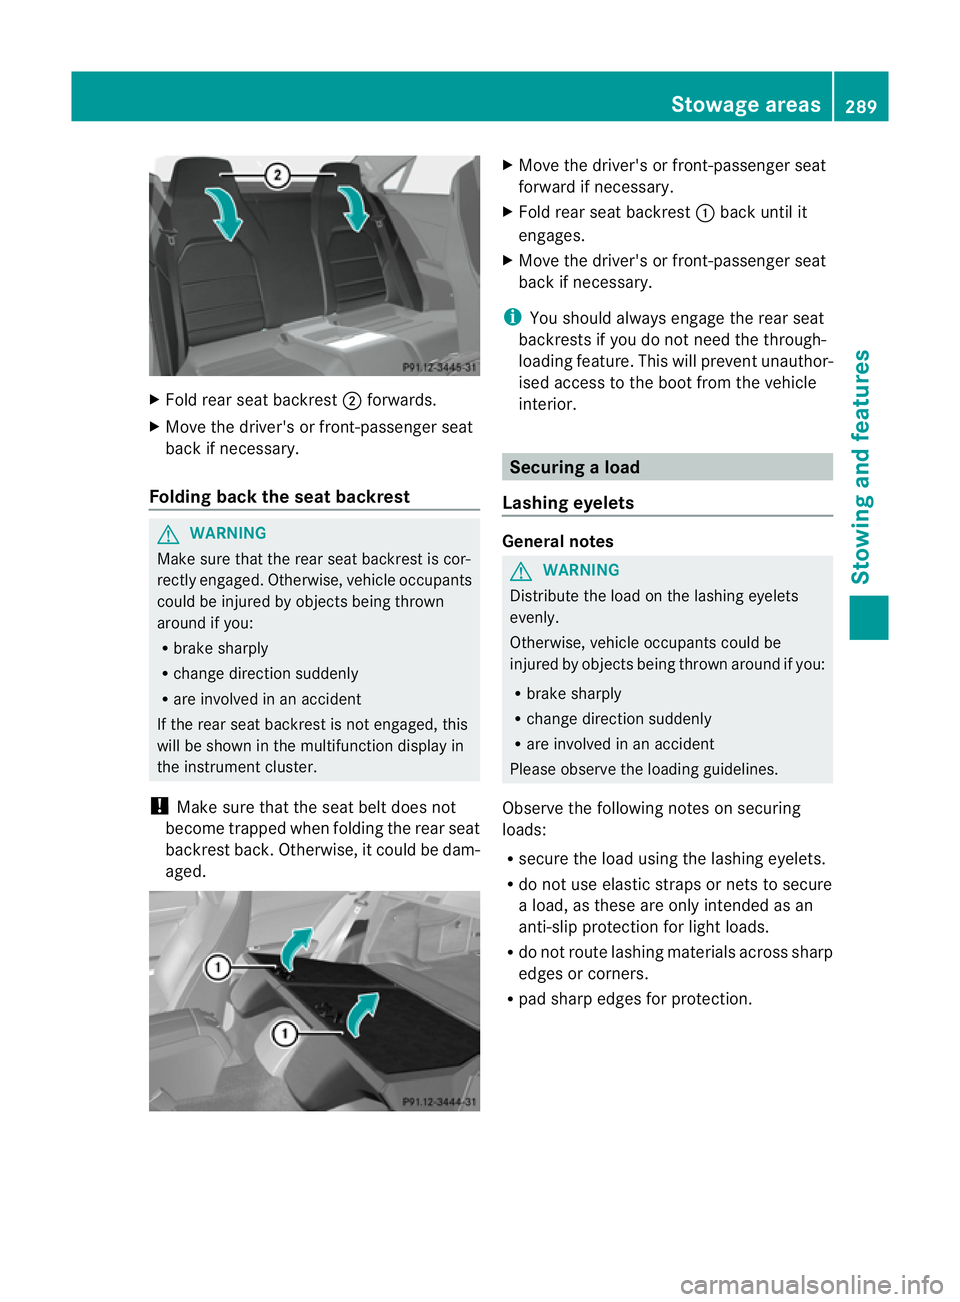
X Pull right-hand or left-hand rear seat back-
rest release handle :.
The corresponding rear seat backrest is
released. 288
Stowage areasStowing and features
Page 292 of 389
X
Fold rea rseat backrest ;forwards.
X Move the driver's or front-passenger seat
back if necessary.
Folding back the seat backrest G
WARNING
Make sure that the rear seat backrest is cor-
rectly engaged. Otherwise, vehicle occupants
could be injured by objects being thrown
around if you:
R brake sharply
R change direction suddenly
R are involved in an accident
If the rear seat backrest is not engaged, this
will be shown in the multifunction display in
the instrument cluster.
! Make sure that the seat belt does not
become trapped when folding the rear seat
backrest back. Otherwise, it could be dam-
aged. X
Move the driver's or front-passenger seat
forward if necessary.
X Fold rear seat backrest :back until it
engages.
X Move the driver's or front-passenger seat
back if necessary.
i You should always engage the rear seat
backrests if you do not need the through-
loading feature. This will preven tunauthor-
ised access to the boot from the vehicle
interior. Securing
aload
Lashing eyelets General notes
G
WARNING
Distribute the load on the lashing eyelets
evenly.
Otherwise, vehicle occupants could be
injured by objects being thrown around if you:
R brake sharply
R change directio nsuddenly
R are involved in an accident
Please observe the loading guidelines.
Observe the following notes on securing
loads:
R secure the load using the lashing eyelets.
R do no tuse elastic straps or nets to secure
a load, as these are only intended as an
anti-slip protection for light loads.
R do not route lashing materials across sharp
edges or corners.
R pad sharp edges for protection. Stowage areas
289Stowing and features Z
Page 293 of 389
Boot
Example
:Coupé
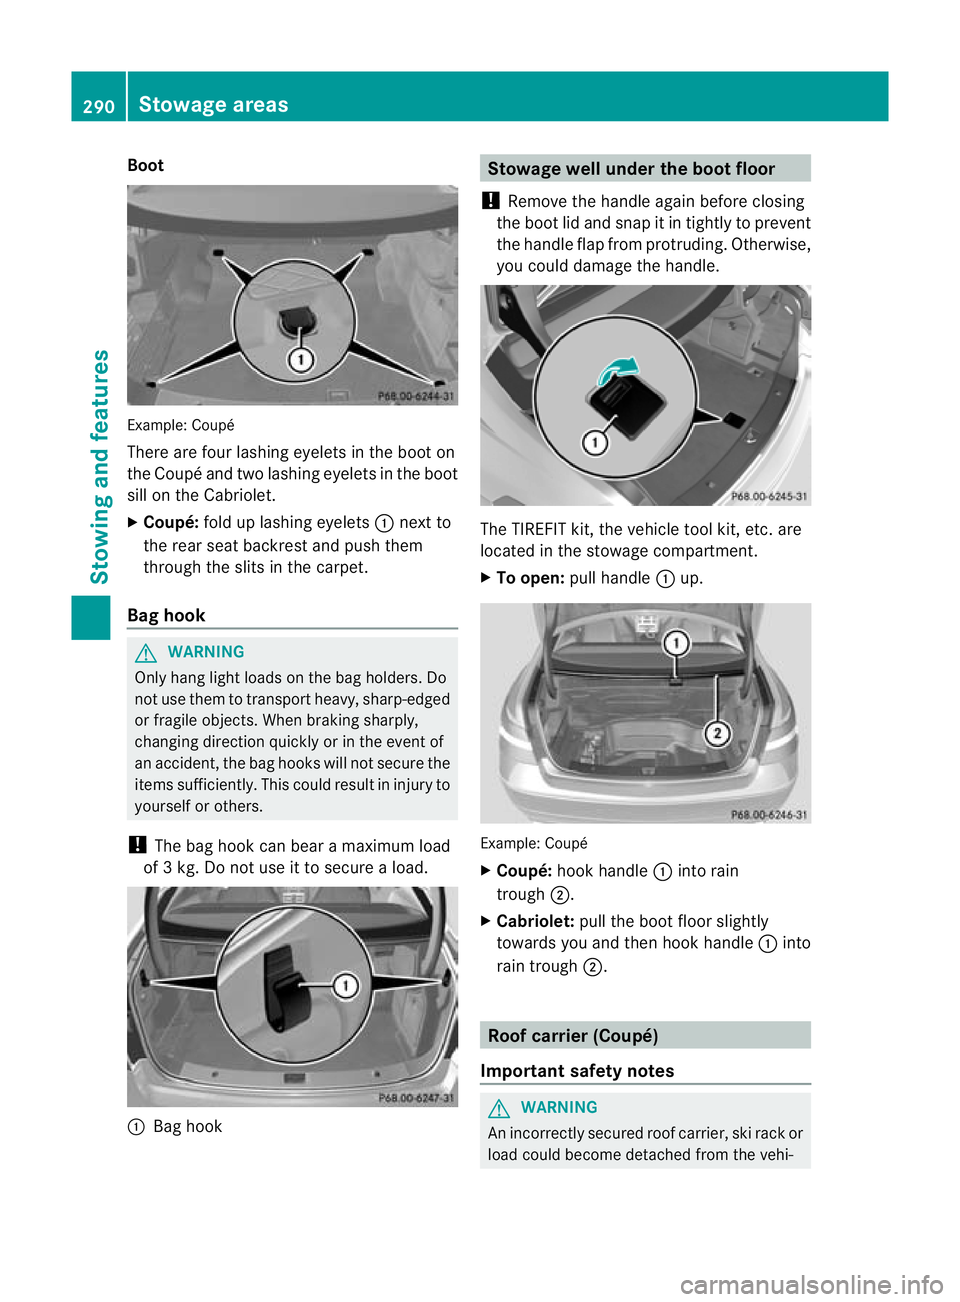
There are four lashing eyelets in the boot on
the Coupé and two lashing eyelets in the boot
sill on the Cabriolet.
X Coupé: fold up lashing eyelets :next to
the rear seat backrest and push them
through the slits in the carpet.
Bag hook G
WARNING
Only hang light loads on the bag holders. Do
not use them to transpor theavy, sharp-edged
or fragile objects. When braking sharply,
changing direction quickly or in the event of
an accident, the bag hooks will not secure the
items sufficiently. This could result in injury to
yourself or others.
! The bag hook can bear a maximum load
of 3 kg. Do not use it to secure a load. :
Bag hook Stowage well under the boot floor
! Remove the handle again before closing
the boot lid and snap it in tightly to prevent
the handle flap from protruding. Otherwise,
you could damage the handle. The TIREFIT kit, the vehicle tool kit,e
tc. are
located in the stowage compartment.
X To open: pull handle :up. Example: Coupé
X
Coupé: hook handle :into rain
trough ;.
X Cabriolet: pull the boot floo rslightly
towards you and the nhook handle :into
rain trough ;. Roof carrier (Coupé)
Important safety notes G
WARNING
An incorrectly secured roof carrier, ski rack or
load could become detached from the vehi- 290
Stowage areasStowing and features
Page 294 of 389
cle
.These objects might then be thrown
around, and could injure you or others or
cause an accident. Follow the roof carrier/ski
rack manufacturer's installation instructions
and special instructions for use.
The roof load raises the vehicle's centre of
gravity, thereby affecting vehicle handling.
You must always observe the maximum roof
load of 100 kg. Always adapt your driving style
to the prevailing road, traffic and weather
conditions and drive with particular care if the
roof is laden.
! Mercedes-Ben zrecommends that you
only use roof carriers that have been tested
and approved for Mercedes-Benz vehicles.
This helps to preven tdamage to the vehi-
cle.
Positio nthe load on the roof carrier in such
a way that the vehicle will not sustain dam-
age even when it is in motion.
Depending on the vehicle equipment,
ensure that when the roof carrier is fitted
you can:
R open the panorama sliding sunroof fully
R open the boot lid fully
! To avoid damaging or scratching the cov-
ers, do not use metallic or hard objects to
open them. Attaching the roof carrier Vehicles with a steel roof
Vehicles with a panorama sliding sunroof
X
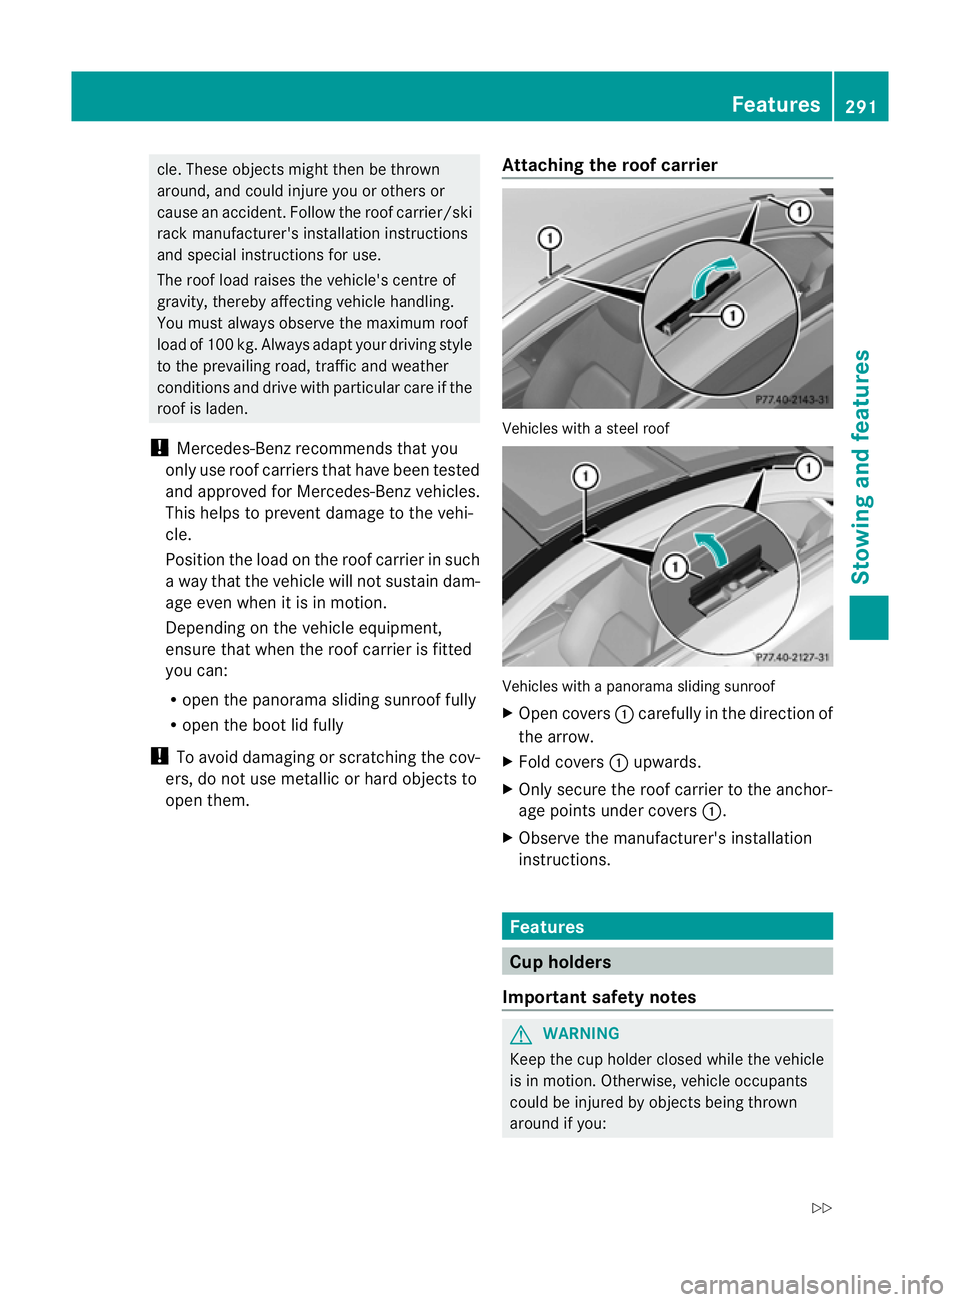
Open covers :carefully in the direction of
the arrow.
X Fold covers :upwards.
X Only secure the roof carrier to the anchor-
age points under covers :.
X Observe the manufacturer's installation
instructions. Features
Cup holders
Important safety notes G
WARNING
Keep the cup holder closed while the vehicle
is in motion. Otherwise, vehicle occupants
could be injured by objectsb eing thrown
around if you: Features
291Stowing and features
Z
Page 306 of 389
Australia
Country Radio type approval num-
ber
Frequency range (MHz)
AU (Aus-
tralia) 28 June
MHz: 27, 30, 40
,433, 868 NZ (New
Zealand) 20 March 06
MHz: 27, 30, 40, 433
Floormat on the driver's side
G
WARNING
Make sure that there is sufficient clearance
around the pedals whe nfloormats are used,
and that the floormats are properly secured.
The floormats must be correctly secured at all
times using the securing knob and retainers.
Before you drive off, chec kthe floormats and
secure them if necessary. Afloormat which is
not properly secured can slip and thereby
interfere with the movemen tofthe pedals.
Do not place floormats on top of one another. X
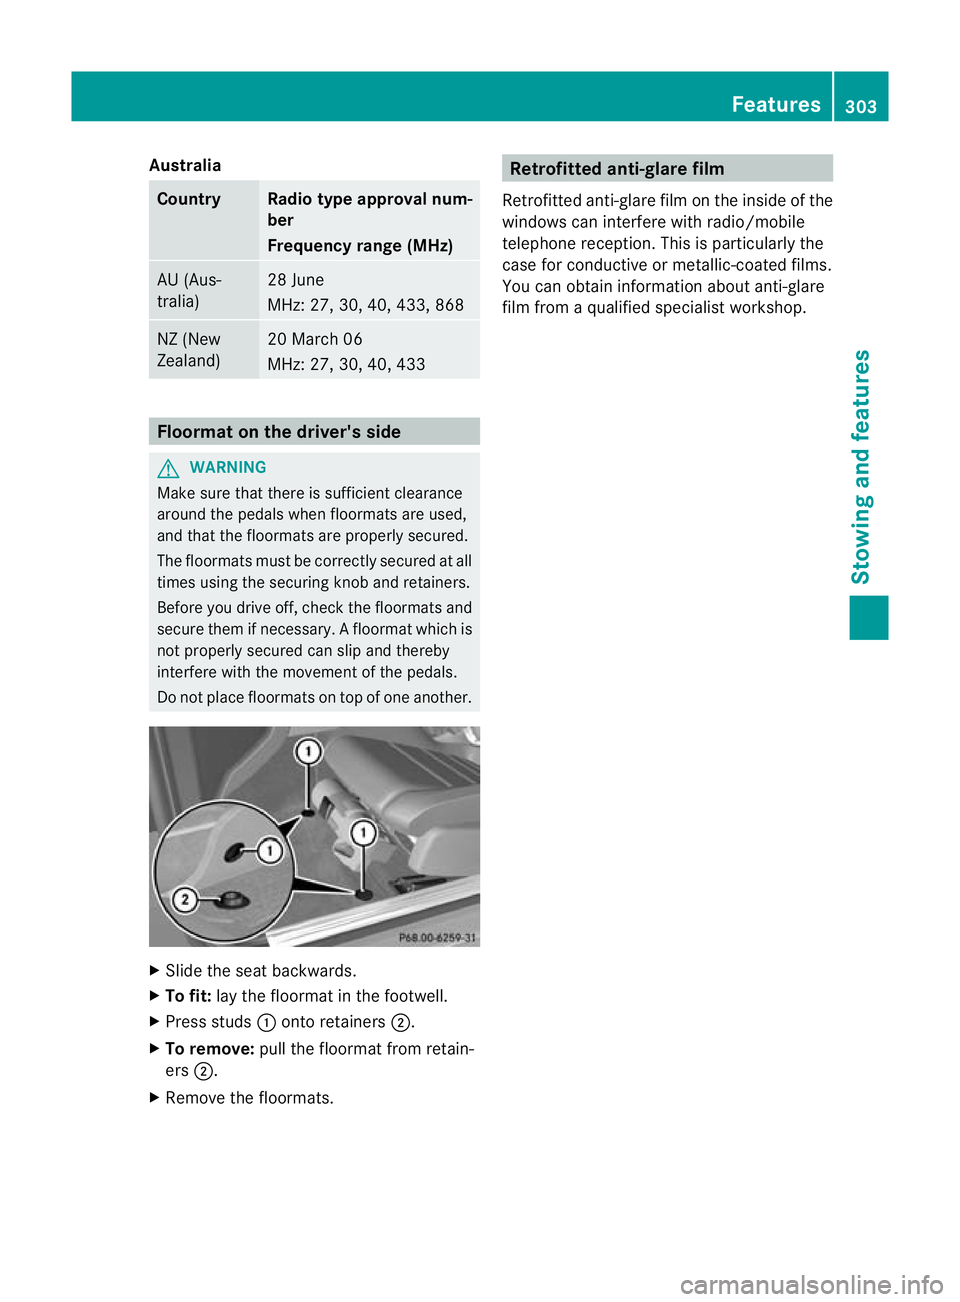
Slide the seat backwards.
X To fit: lay the floormat in the footwell.
X Press studs :onto retainers ;.
X To remove: pull the floormat from retain-
ers ;.
X Remove the floormats. Retrofitted anti-glare film
Retrofitted anti-glare film on the inside of the
windows can interfere with radio/mobile
telephone reception. This is particularly the
case for conductive or metallic-coated films.
You can obtain information about anti-glare
film from a qualified specialist workshop. Features
303Stowing and features Z
Page 312 of 389
Checking the oil level using the oil dip-
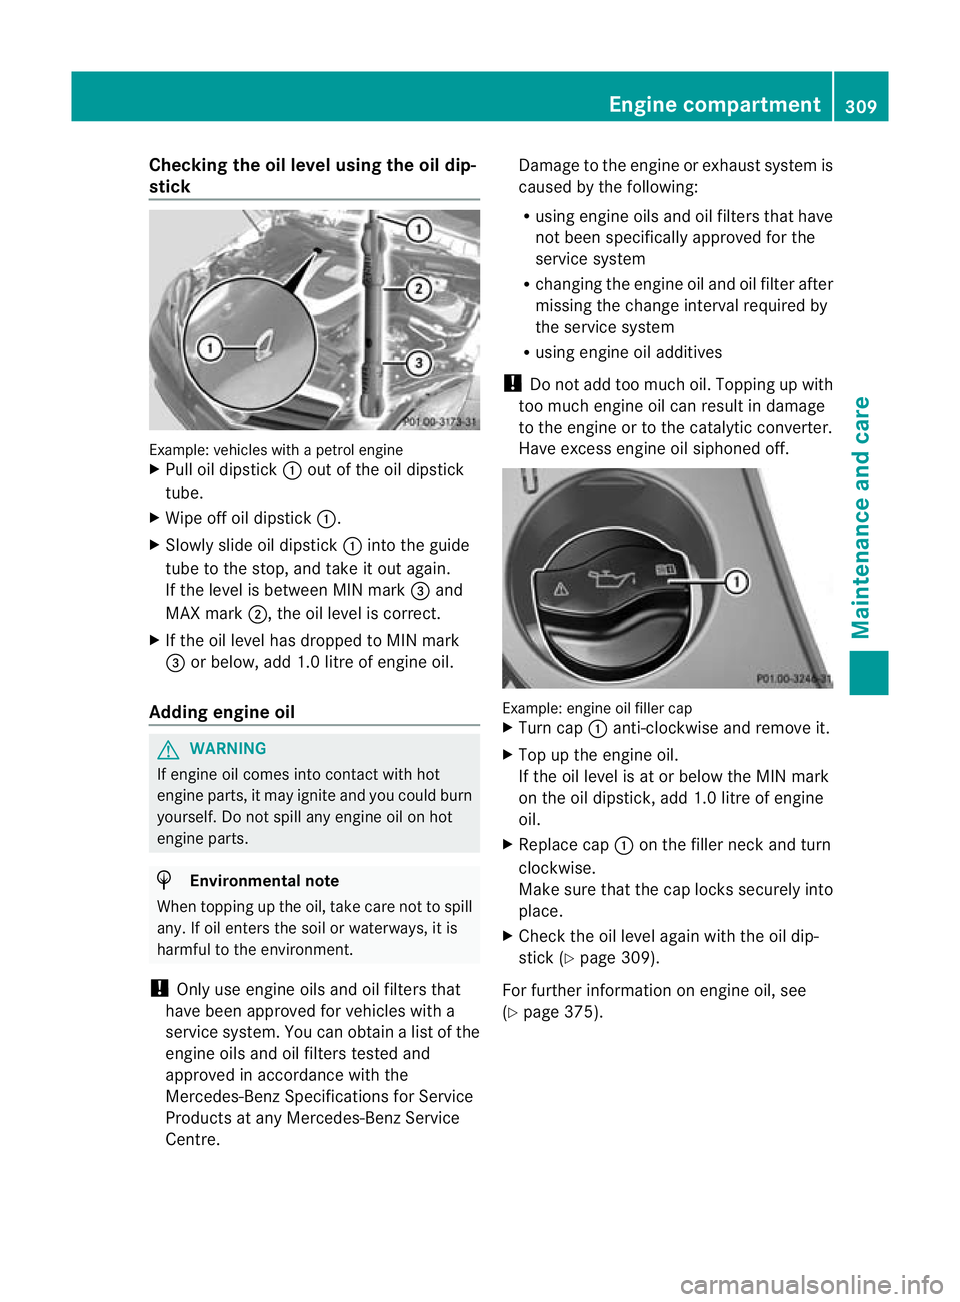
stick Example
:vehicles with a petrol engine
X Pull oil dipstick :out of the oil dipstick
tube.
X Wipe off oil dipstick :.
X Slowly slide oil dipstick :into the guide
tube to the stop, and take it out again.
If the level is between MIN mark =and
MAX mark ;, the oil level is correct.
X If the oil level has dropped to MIN mark
= or below, add 1.0 litre of engine oil.
Adding engine oil G
WARNING
If engine oil comes into contact with hot
engine parts, it may ignite and you could burn
yourself. Do not spill any engine oil on hot
engine parts. H
Environmental note
When topping up the oil, take care not to spill
any. If oil enters the soil or waterways, it is
harmful to the environment.
! Only use engine oils and oil filters that
have been approved for vehicles with a
service system. You can obtain a list of the
engine oils and oil filters tested and
approved in accordance with the
Mercedes-Benz Specifications for Service
Products at any Mercedes-Benz Service
Centre. Damage to the engine or exhaust system is
caused by the following:
R
using engine oils and oil filters that have
not been specifically approved for the
service system
R changing the engine oil and oil filter after
missing the change interval required by
the service system
R using engine oil additives
! Do not add too much oil. Topping up with
too much engine oil can result in damage
to the engine or to the catalytic converter.
Have excess engine oil siphoned off. Example: engine oil filler cap
X
Turn cap :anti-clockwise and remove it.
X Top up the engine oil.
If the oil level is at or below the MIN mark
on the oil dipstick, add 1.0 litre of engine
oil.
X Replace cap :on the filler neck and turn
clockwise.
Make sure that the cap locks securely into
place.
X Check the oil level again with the oil dip-
stick (Y page 309).
For further information on engine oil, see
(Y page 375). Engine compartment
309Maintenance and care Z
Page 319 of 389
!
Do not park up the vehicle for an extended
period straight after cleaning it, particularly
after having cleaned the wheels with wheel
cleaner. Wheel cleaners could cause
increased corrosion of the brake discs and
brake pads/linings. For this reason, you
should drive for a few minutes after clean-
ing. Braking heats the brake discs and the
brake pads/linings, thus drying them. The
vehicle can then be parked up.
Cleaning the windows G
WARNING
Switch off the windscreen wipers and remove
the key from the ignition lock before cleaning
the windscreen or the wiper blades. On vehi-
cles with KEYLESS-GO, press the Start/Stop
button repeatedly until all indicator lamps in
the instrument cluster have gone off. The
windscreen wipers could otherwise move and
injure you.
! Do not use dry cloths, abrasive products,
solvents or cleaning agents containing sol-
vents to clean the inside of the windows.
Do not touch the insides of the windows
with hard objects, e.g. an ice scraper or
ring. There is otherwise a risk of damaging
the windows.
! Cleant he water drainage channels of the
windscreen and the rear window at regular
intervals. Deposits such as leaves, petals
and pollen may under certain circumstan-
ces prevent water from draining away.T his
can lead to corrosion damage and damage
to electronic components.
X Cleant he inside and outside of the win-
dows with a damp cloth and a cleaning
agent that is recommended and approved
by Mercedes-Benz.
Cleaning the wiper blades G
WARNING
Switch off the windscreen wipers and remove
the key from the ignition lock before cleaning the windscreen or the wiper blades. On vehi-
cles with KEYLESS-GO, press the Start/Stop
button repeatedly until all indicator lamps in
the instrument cluster have gone off. The
windscreen wipers could otherwise move and
injure you.
! Do not pull on the wiper blade. Otherwise,
the wiper blade could be damaged.
! Do not clean wiper blades too often and
do not rub them too hard. Otherwise, the
graphite coating could be damaged. This
could cause wiper noise.
! Hold the wiper arm securely when folding
back. The windscreen could be damaged if
the wiper arm hits against it suddenly.
X Fold the wiper arms away from the wind-
screen.
X Carefully clean the wiper blades with a
damp cloth.
X Fold the windscreen wipers back again
before switching on the ignition.
Cleaning the exterior lighting !
Only use cleaning agents or cleaning
cloths that are suitable for plastic lenses.
Unsuitable cleaning agents or cleaning
cloths could scratch or damage the plastic
lenses of the exterior lighting.
X Cleant he plastic lenses of the exterior
lighting using a wet sponge and a mild
cleaning agent, e.g. Mercedes-Ben zcar
shampoo or cleaning cloths.
Mirror turn signal !
Only use cleaning agents or cleaning
cloths that are suitable for plastic lenses.
Unsuitable cleaning agents or cleaning
cloths could scratch or damage the plastic
lenses of the mirror tur nsignals.
X Clean the plasti clenses of the mirror turn
signals in the exterior mirror housing using
a wet sponge and mild cleaning agent, e.g. 316
CareMaintenance and care
Page 332 of 389
G
WARNING
For safety reasons, Mercedes-Benz recom-
mends that you only use batteries which have
been tested and approved for yourv ehicle by
Mercedes-Benz .These batteries provide
increased impact protection to prevent vehi-
cle occupants from suffering acid burns
should the battery be damaged in the event
of an accident.
To prevent acid burns, observe the following
safety notes when handling batteries:
R do not lean over the battery.
R do not place any metal objects on a battery.
Otherwise, you could cause a short circuit
and the battery's gas mixture could ignite.
R make sure that you do not create an elec-
trostatic charge, e.g. by wearing synthetic
clothing or as a result of friction on fabrics.
Therefore, you should not pull or slide the
battery over carpets or other synthetic
materials.
R never touch the battery first. To discharge
a possible electrostatic charge, step out of
the vehicle first and touch the bodywork.
R do not wipe the battery using a cloth. The
battery may explode as a result of electro-
static charge or due to flying sparks. H
Environmental note Batteries contain pollutants.
It is illegal to dispose of them
with the household rubbish.
They must be collected sep-
arately and disposed of in an
environmentally responsible
recycling system.
Dispose of batteries in an
environmentally responsible
manner. Take discharged
batteries to a qualified spe-
cialist workshop or to a col-
lection point for used batter-
ies.
! Have the battery checked regularly at a
qualified specialist workshop. Observe the service intervals in the Service
Booklet or contact a qualified specialist
workshop for more information.
! You should have all work involving the
battery carried out at aqualified specialist
workshop. In the exceptional case that it is
necessary for you to disconnect the battery
yourself, make sure that:
R you switch off the engine and remove the
key. On vehicles with KEYLESS-GO,
ensure that the ignition is switched off.
Chec kthat all the indicator lamps in the
instrument cluster are off. Otherwise,
electronic components, such as the
alternator, may be damaged.
R you first remove the negative terminal
clamp and then the positive terminal
clamp. Never swap the terminal clamps.
Otherwise, the vehicle's electronic sys-
tem may be damaged.
R in vehicles with automatic transmission,
the transmission is locked in position P
after disconnecting the battery. The vehi-
cle is secured against rolling away.Y ou
can then no longer move the vehicle.
The battery and the cover of the positive
terminal clamp must be fitted securely dur-
ing operation.
In order for the battery to achieve the maxi-
mum possible service life, it must always be
sufficiently charged.
The vehicle battery, like other batteries, can
discharge over time if you do not use the
vehicle. In such cases, have the battery dis-
connected at a qualified specialist workshop.
You can also charge the battery with a
charger recommended by Mercedes-Benz.
For more information, please contact a quali-
fied specialist workshop.
Have the battery charge checked more fre-
quently if you use the vehicle mainly for short
trips or if you leave it standing idle for a
lengthy period. Consult a qualified specialist
workshop if you wish to leave your vehicle
parked up for a long period of time. Battery (vehicle)
329Breakdown assistance Z