2012 MERCEDES-BENZ E-CLASS COUPE window
[x] Cancel search: windowPage 94 of 389

X
Touch recessed sensor surface :on the
door handle until the side windows and the
panorama sliding sunroof are fully closed.
i Make sure you only touch recessed sen-
sor surface :.
X Make sure that all the side windows and the
panorama sliding sunroof are closed.
On vehicles with a panorama sliding sunroof:
X Touch recessed sensor surface :on the
door handle again until the roller sunblind
of the panorama sliding sunroof closes.
X To interrupt convenience closing:
release recessed sensor surface :on the
door handle. Resetting the side windows
If a side window can no longer be closed fully,
you must reset it.
X Close all doors.
X Turn the key to position 1or 2in the ignition
lock.
X Pull the corresponding switch on the door
control panel until the side window is com-
pletely closed. (Y page 88)
X Hold the switch for an additional second. If the side window opens again slightly:
X
Immediately pull the corresponding switch
on the door control panel until the side win-
dow is completely closed (Y page 88).
X Hold the switch for an additional second.
X If the corresponding side window remains
closed after the button has been released,
the side window has been reset correctly.
If this is not the case, repeat the steps
above again. Side windows
91Opening and closing Z
Page 95 of 389
Problems with the side windows
G
WARNING
Closing the side windows with increased force or without the anti-entrapment feature could lead
to serious or even fatal injury. Make sure that nobody can become trapped when closing the side
windows. Problem Possible causes/consequences and
M Solutions
As
ide window cannot
be closed because it is
blocked by objects, e.g.
leaves in the window
guide. X
Remove the objects.
X Close the side window. As
ide window cannot
be closed and you can-
not see the cause. If a side window is obstructed during closing and reopens again
slightly:
X
Immediately after the window blocks, pull the corresponding
switch again until the side window has closed.
The side window is closed with increased force.
If a side window is obstructed again during closing and reopens
again slightly:
X Immediately after the window blocks, pull the corresponding
switch again until the side window has closed.
The side window is closed without the anti-entrapmen tfeature. Soft top (Cabriolet)
Important safety notes
G
WARNING
Only drive with the soft top fully open or
closed.
If the soft top does not open or close fully, the
soft-top hydraulics are depressurised and the
soft top is lowered:
R after about seven minutes if the ignition is
switched on
R immediately if the ignition is switched off
Aw arning tone sounds shortly beforehand.
The Top being opened message appears in
the multifunction display.
Loc kthe soft top again before driving on. Oth-
erwise, the unlocked soft top could open dur-
ing the journey and cause you to lose control of your vehicle. You or other persons could be
injured as a result.
! Never sit on the soft-top compartment
cover and do not store any heavy objects
on it. You will otherwise damage the soft
top and soft-top compartment cover of the
vehicle.
! When opening and closing the soft top,
make sure that:
R there is sufficient clearance above it, as
the soft top swings upwards
R the boot separator is closed.
R the boot is only loaded to below the boot
separator.
R the boot separator is not pushed up by
the load.
R the boot lid is closed. 92
Soft top (Cabriolet)Opening and closing
Page 96 of 389
R
no objects are on the soft-top compart-
ment cover
R the fabric is not dirty, wet or frozen.
You could otherwise damage the sof ttop,
boot and other parts of the vehicle.
i Make sure that the soft top is dry and
clean before closing it. Otherwise, water or
dirt could enter the vehicle interior or boot.
You can open or close the soft top:
R when the vehicle is stationary or
R when driving up to a speed of 40 km/h
If there is a strong head wind, it may not be
possible to close the soft top fully. In this
case, reduce speed or stop in order to close
the soft top fully.
For safety reasons, Mercedes-Benz recom-
mends that you only open or close the soft
top when the vehicle is stationary. Opening and closing with the soft-top
switch
Important safety notes G
WARNING
Make sure nobody can be trapped or injured
by moving parts, such as the soft-top linkage
or soft-top compartment cover, when opening
or closing the soft top.
Release the soft-top switch in the event of
danger. The soft-top mechanism stops imme-
diately. G
WARNING
If the vehicle speed exceeds 40km/h, the soft
top stops the opening or closing movement
and remains in that position. This could impair
your rear view. At high speeds the soft top
may be damaged.
Reduce your speed to below 40km/h or stop
the vehicle in accordanc ewith the traffic con-
ditions. Press the soft-top switch again in
order to open or close the soft top fully. Opening and closing X
Make sure that the boot separator is closed
(Y page 99).
X Close the boot lid.
X Turn the key to position 2in the ignition
lock.
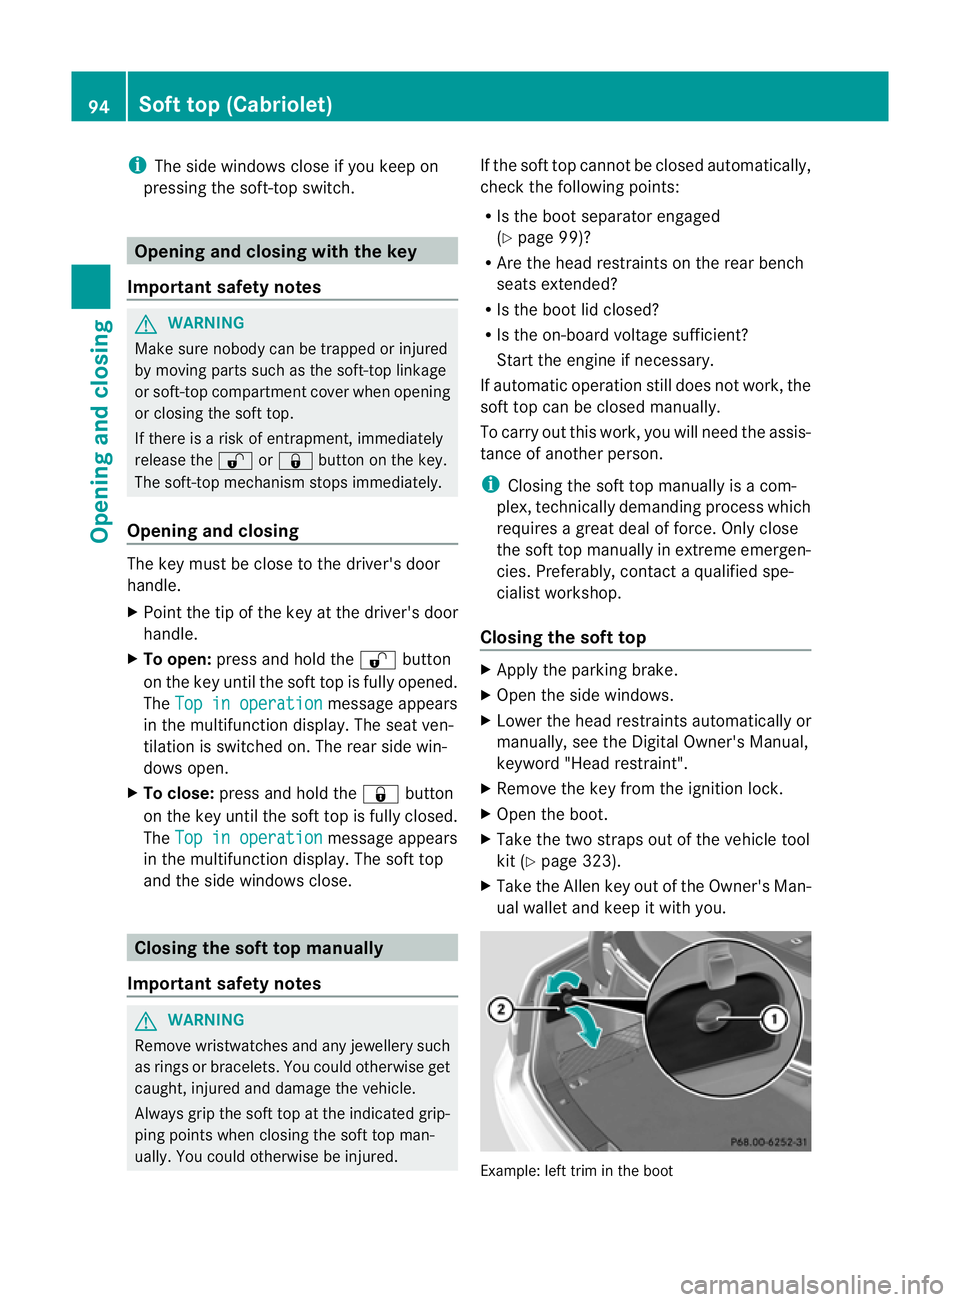
X Open the cover on the lower centre con-
sole. X
To open: pull soft-top switch :until the
entire soft top is stowed away in the boot.
The Top in operation message appears
in the multifunction display.
If, when opening, you drive at speeds above
40 km/h, the opening procedure is stop-
ped and you see the Open/close top completely message in the multifunction
display. In order to open the soft top fully,
reduce your speed again to below
40 km/h and pull the soft-top switch again.
i The side windows close if you keep on
pulling the soft-top switch.
X To close: press and hold soft-top
switch :until the soft top is fully closed.
The Top in operation message appears
in the multifunction display.
If, when closing, you drive at speeds above
40 km/h, the closing procedure is stopped
and you see the Open/close top com‐ pletely message in the multifunction dis-
play. In order to close the soft top fully,
reduce your speed again to below
40 km/h and push the soft-top switch
again. Soft top (Cabriolet)
93Opening and closing Z
Page 97 of 389
i
The side windows close if you keep on
pressing the soft-top switch. Opening and closing with the key
Important safety notes G
WARNING
Make sure nobody can be trapped or injured
by moving parts such as the soft-top linkage
or soft-top compartment cover when opening
or closing the soft top.
If there is a risk of entrapment, immediately
release the %or& button on the key.
The soft-top mechanism stops immediately.
Opening and closing The key must be close to the driver's door
handle.
X Point the tip of the key at the driver's door
handle.
X To open: press and hold the %button
on the key until the soft top is fully opened.
The Top in operation message appears
in the multifunction display .The seat ven-
tilation is switched on. The rear side win-
dows open.
X To close: press and hold the &button
on the key until the soft top is fully closed.
The Top in operation message appears
in the multifunction display. The soft top
and the side windows close. Closing the soft top manually
Important safety notes G
WARNING
Remove wristwatches and any jewellery such
as rings or bracelets. You could otherwise get
caught, injured and damage the vehicle.
Always grip the soft top at the indicated grip-
ping points when closing the soft top man-
ually. You could otherwise be injured. If the soft top cannot be closed automatically,
check the following points:
R
Is the boot separator engaged
(Y page 99)?
R Are the head restraints on the rear bench
seats extended?
R Is the boot lid closed?
R Is the on-board voltage sufficient?
Start the engine if necessary.
If automatic operation still does not work, the
soft top can be closed manually.
To carry out this work, you will need the assis-
tance of another person.
i Closing the soft top manually is a com-
plex, technically demanding process which
requires a great deal of force. Only close
the soft top manually in extreme emergen-
cies. Preferably, contact a qualified spe-
cialist workshop.
Closing the soft top X
Apply the parking brake.
X Open the side windows.
X Lower the head restraints automatically or
manually, see the Digital Owner's Manual,
keyword "Head restraint".
X Remove the key from the ignition lock.
X Open the boot.
X Take the two straps out of the vehicle tool
kit (Y page 323).
X Take the Allen key out of the Owner's Man-
ual wallet and keep it with you. Example: left trim in the boot94
Soft top (Cabriolet)Opening and closing
Page 107 of 389

Never leave children unsupervised in the vehi-
cle. Always take the key with you when leaving
the vehicle, even if you are only leaving it for
a short time.
! Only open the panorama sliding sunroof
if it is free of snow and ice. Otherwise, mal-
functions may occur.
Do not allow anything to protrude from the
sliding sunroof. Otherwise, the seals could
be damaged.
i Resonance noises can occur in addition
to the usual airflow noises when the sliding
sunroof is open. They are caused by minor
pressure fluctuations in the vehicle interior.
Change the position of the sliding sunroof
or open a side window slightly to reduce or
eliminate these noises.
In the following section, the term "sliding sun-
roof" refers to the panorama sliding sunroof. Operating the panorama sliding sun-
roof
Opening and closing Overhead control panel
:
To raise
; To open
= To close/lower
X Turn the key to position 1or 2in the ignition
lock.
X Press or pull the 3switch in the corre-
sponding direction. i
If you press the 3switch beyond the
point of resistance, an automatic opening/
closing process is started in the corre-
sponding direction. You can stop automatic
operationb y pressing again.
Rain-closing feature If the key is in position
0in the ignition lock
or if it is removed, the panorama sliding sun-
roof closes automatically:
R if it starts to rain
R at extreme outside temperatures
R after six hours
R if there is a malfunction in the powe rsupply
The panorama sliding sunroo fremains raised
at the rear in order to allow ventilation of the
vehicle interior.
i If the panorama sliding sunroof is obstruc-
ted while being closed by the rain-closing
feature, it opens again slightly. The rain-
closing feature is then deactivated.
The panorama sliding sunroof does not close
if:
R it is raised at the rear.
R it is blocked.
R no rain is falling on the area of the wind-
screen being monitored by the rain sensor,
e.g. because the vehicle is under a bridge
or in a carport. Operating the roller sunblind for the
panorama sliding sunroof
Important safety notes G
WARNING
Make sure that nobody can become trapped
as you open or close the roller sunblind.
The roller sunblind shields the vehicle interior
from sunlight. The roller sunblind can only be
opened and closed when the panorama slid-
ing sunroof is closed. 104
Sliding sunroof (Coupé)Opening and closing
Page 117 of 389
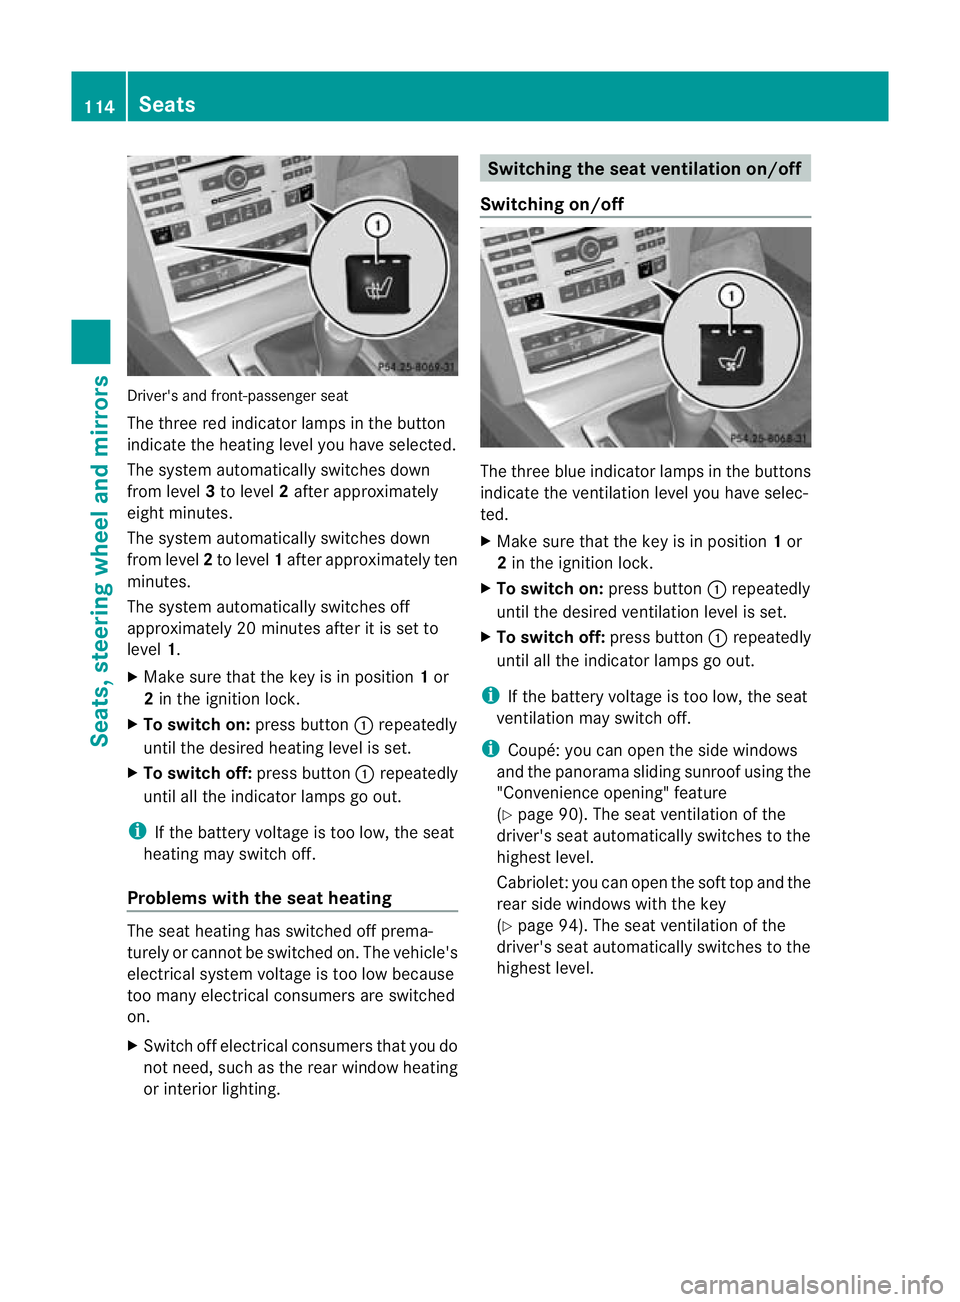
Driver's and front-passenge
rseat
The three red indicato rlamps in the button
indicate the heating level you have selected.
The system automatically switches down
from level 3to level 2after approximately
eigh tminutes.
The system automatically switches down
fro ml evel 2to level 1after approximately ten
minutes.
The system automatically switches off
approximately 20 minutes after it is set to
level 1.
X Make sure that the key is in position 1or
2 in the ignition lock.
X To switch on: press button:repeatedly
until the desired heating level is set.
X To switch off: press button:repeatedly
until all the indicator lamps go out.
i If the battery voltage is too low, the seat
heating may switch off.
Problems with the seat heating The seat heating has switched off prema-
turely or cannot be switched on. The vehicle's
electrical system voltage is too low because
too many electrical consumers are switched
on.
X Switch off electrical consumers that you do
not need, such as the rear window heating
or interior lighting. Switching the seat ventilation on/off
Switching on/off The three blue indicator lamps in the buttons
indicate the ventilation level you have selec-
ted.
X
Make sure that the key is in position 1or
2 in the ignition lock.
X To switch on: press button:repeatedly
until the desired ventilation level is set.
X To switch off: press button:repeatedly
until all the indicator lamps go out.
i If the battery voltage is too low, the seat
ventilation may switch off.
i Coupé: you can open the side windows
and the panorama sliding sunroof using the
"Convenience opening" feature
(Y page 90). The seat ventilation of the
driver's seat automatically switches to the
highest level.
Cabriolet: you can open the soft top and the
rear side windows with the key
(Y page 94). The seat ventilation of the
driver's seat automatically switches to the
highest level. 114
SeatsSeats, steering wheel and mirrors
Page 118 of 389
Problems with the seat ventilation
The seat ventilation has switched off prema-
turely or cannot be switched on. The vehicle's
electrical system voltage is too low because
too many electrical consumers are switched
on.
X Switch off electrical consumers that you do
not need, such as the rear window heating
or interior lighting. AIRSCARF (Cabriolet)
G
WARNING
Very hot air can flow out of the AIRSCARF
vents in the head restraints when AIRSCARF
is in operation. This can cause burns on unpro-
tected skin near the AIRSCARF vents. Lower
the heating output in good time, when neces-
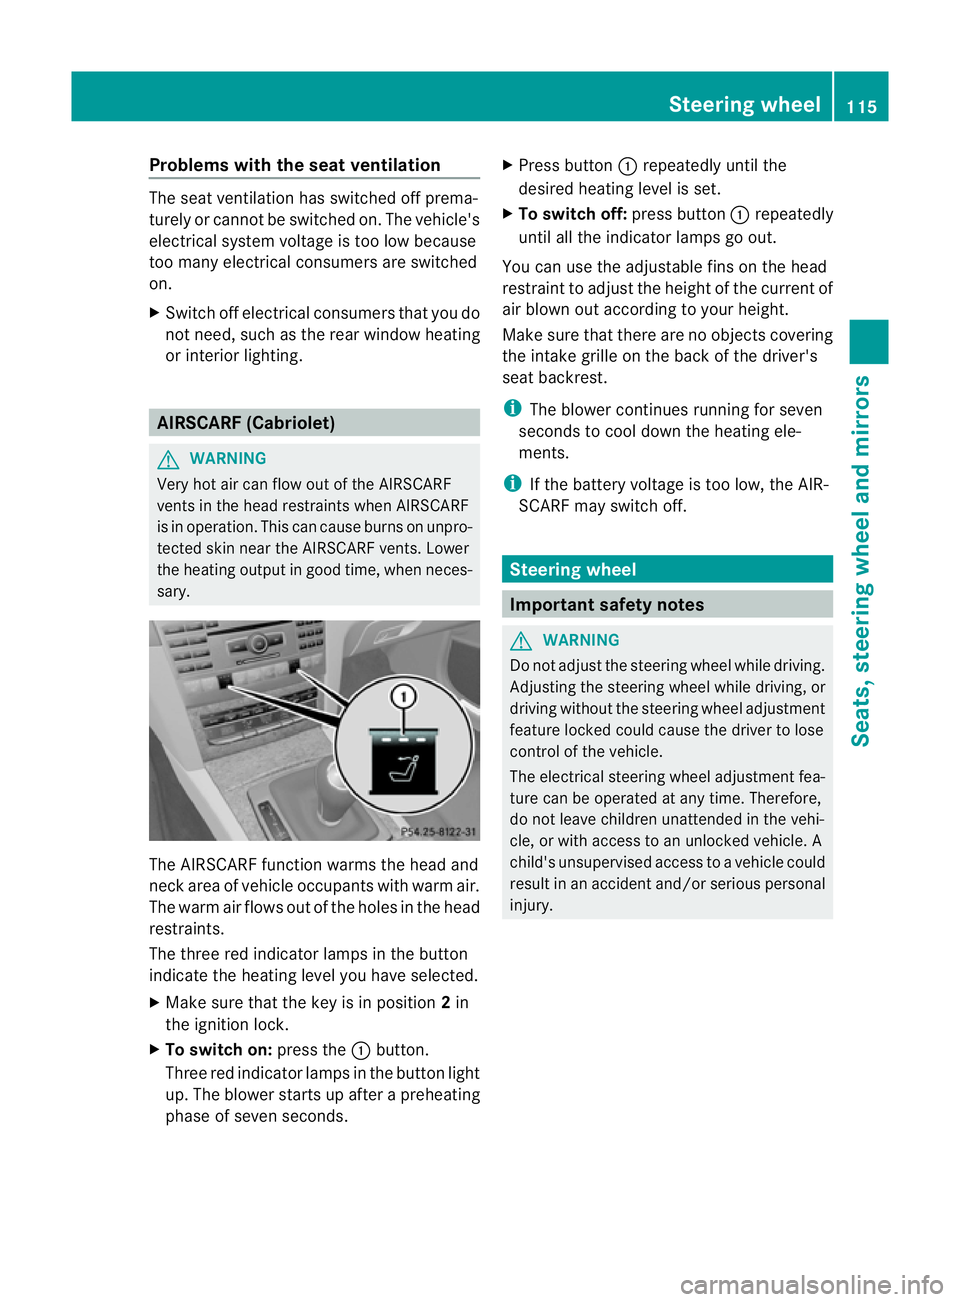
sary. The AIRSCARF function warms the head and
neck area of vehicle occupants with warm air.
The warm air flows out of the holes in the head
restraints.
The three red indicator lamps in the button
indicate the heating level you have selected.
X Make sure that the key is in position 2in
the ignition lock.
X To switch on: press the:button.
Three red indicator lamps in the button light
up. The blower starts up after a preheating
phase of seven seconds. X
Press button :repeatedly until the
desired heating level is set.
X To switch off: press button:repeatedly
until all the indicator lamps go out.
You can use the adjustable fins on the head
restraint to adjust the height of the current of
air blown out according to your height.
Make sure that there are no objects covering
the intake grille on the back of the driver's
seat backrest.
i The blower continues running for seven
seconds to cool down the heating ele-
ments.
i If the battery voltage is too low, the AIR-
SCARF may switch off. Steering wheel
Important safety notes
G
WARNING
Do not adjust the steering wheel while driving.
Adjusting the steering wheel while driving, or
driving without the steering wheel adjustment
feature locked could cause the driver to lose
control of the vehicle.
The electrical steering wheel adjustment fea-
ture can be operated at any time. Therefore,
do not leave children unattended in the vehi-
cle, or with access to an unlocked vehicle. A
child's unsupervised access to a vehicle could
result in an accident and/or serious personal
injury. Steering wheel
115Seats, steering wheel and mirrors Z
Page 121 of 389
X
Make sure that the key is in position 1or
2 in the ignition lock.
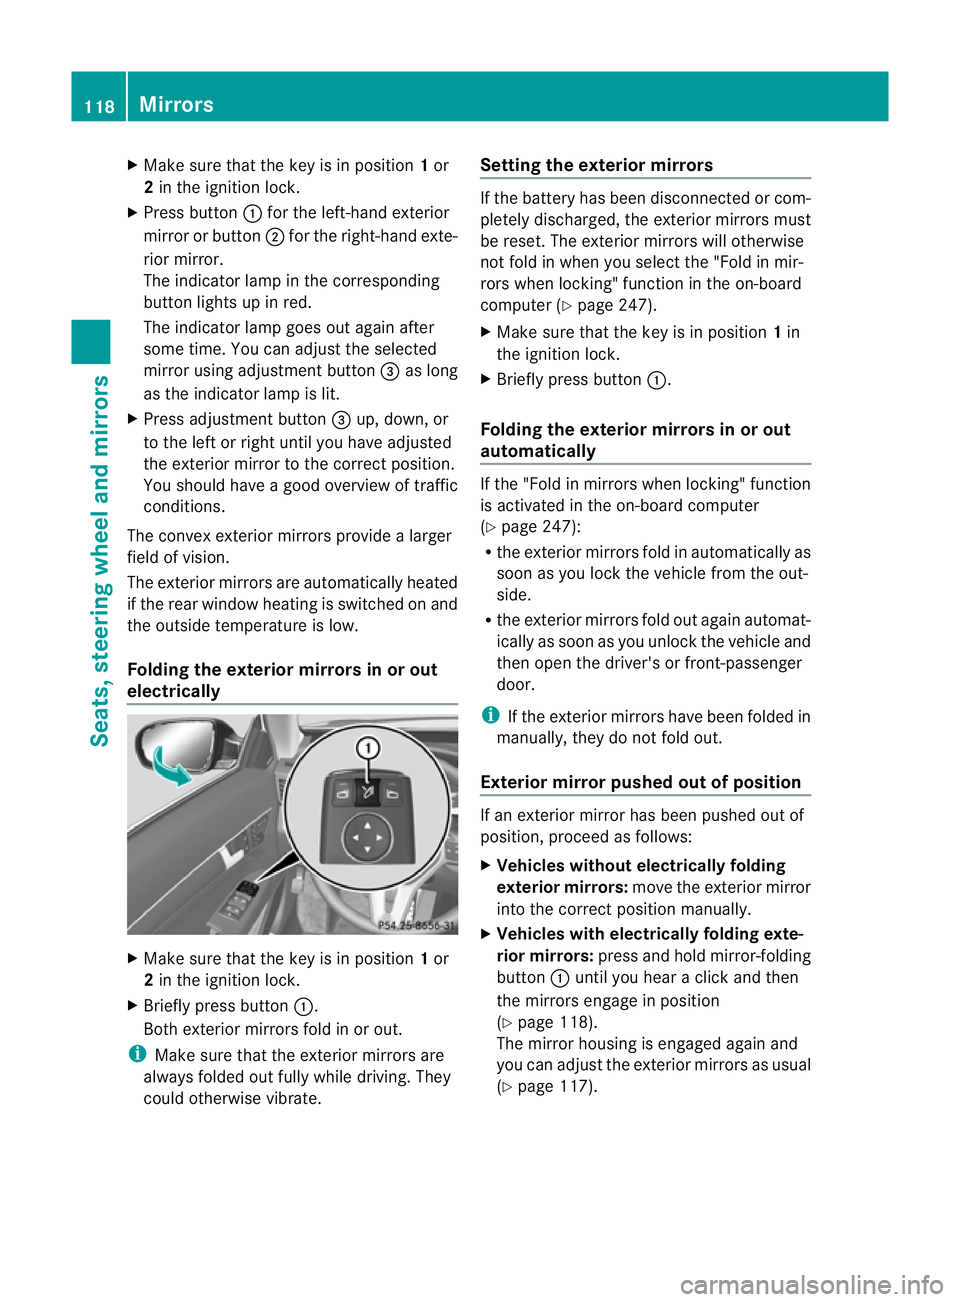
X Press button :for the left-hand exterior
mirror or button ;for the right-hand exte-
rior mirror.
The indicator lamp in the corresponding
button lights up in red.
The indicator lamp goes out again after
some time. You can adjust the selected
mirror using adjustment button =as long
as the indicator lamp is lit.
X Press adjustment button =up, down, or
to the left or right until you have adjusted
the exterior mirror to the correct position.
You should have a good overview of traffic
conditions.
The convex exterior mirrors provide a larger
field of vision.
The exterior mirrors are automatically heated
if the rear window heating is switched on and
the outside temperature is low.
Folding the exterior mirrors in or out
electrically X
Make sure that the key is in position 1or
2 in the ignition lock.
X Briefly press button :.
Both exterior mirrors fold in or out.
i Make sure that the exterior mirrors are
always folded out fully while driving. They
could otherwise vibrate. Setting the exterior mirrors If the battery has been disconnected or com-
pletely discharged, the exterior mirrors must
be reset. The exterior mirrors will otherwise
not fold in when you select the "Fold in mir-
rors when locking" function in the on-board
computer (Y
page 247).
X Make sure that the key is in position 1in
the ignition lock.
X Briefly press button :.
Folding the exterior mirrors in or out
automatically If the "Fold in mirrors when locking" function
is activated in the on-board computer
(Y
page 247):
R the exterior mirrors fold in automatically as
soon as you lock the vehicle from the out-
side.
R the exterior mirrors fold out again automat-
ically as soon as you unlock the vehicle and
then open the driver's or front-passenger
door.
i If the exterior mirrors have been folded in
manually, they do not fold out.
Exterior mirror pushed out of position If an exterior mirror has been pushed out of
position, proceed as follows:
X
Vehicles without electrically folding
exterior mirrors: move the exterior mirror
into the correct position manually.
X Vehicles with electrically folding exte-
rior mirrors: press and hold mirror-folding
button :until you hear a click and then
the mirrors engage in position
(Y page 118).
The mirror housing is engaged again and
you can adjust the exterior mirrors as usual
(Y page 117). 118
MirrorsSeats, steering wheel and mirrors