2012 MERCEDES-BENZ E-CLASS COUPE warning light
[x] Cancel search: warning lightPage 82 of 389

Battery of the key
Important safety notes G
WARNING
Batteries are toxic and contain caustic sub-
stances. For this reason, keep batteries ou tof
the reach of children.
If a battery has been swallowed, visit a doctor
immediately. H
Environmental note Batteries contain pollutants.
It is illegal to dispose of them
with the household rubbish.
They must be collected sep-
arately and disposed of in an
environmentally responsible
recycling system.
Dispose of batteries in an
environmentally responsible
manner. Take discharged
batteries to a qualified spe-
cialist workshop or to a col-
lectio npoint for used batter-
ies.
Mercedes-Benz recommends that you have
the batteries replaced at a qualified specialist
workshop.
Checking the battery X
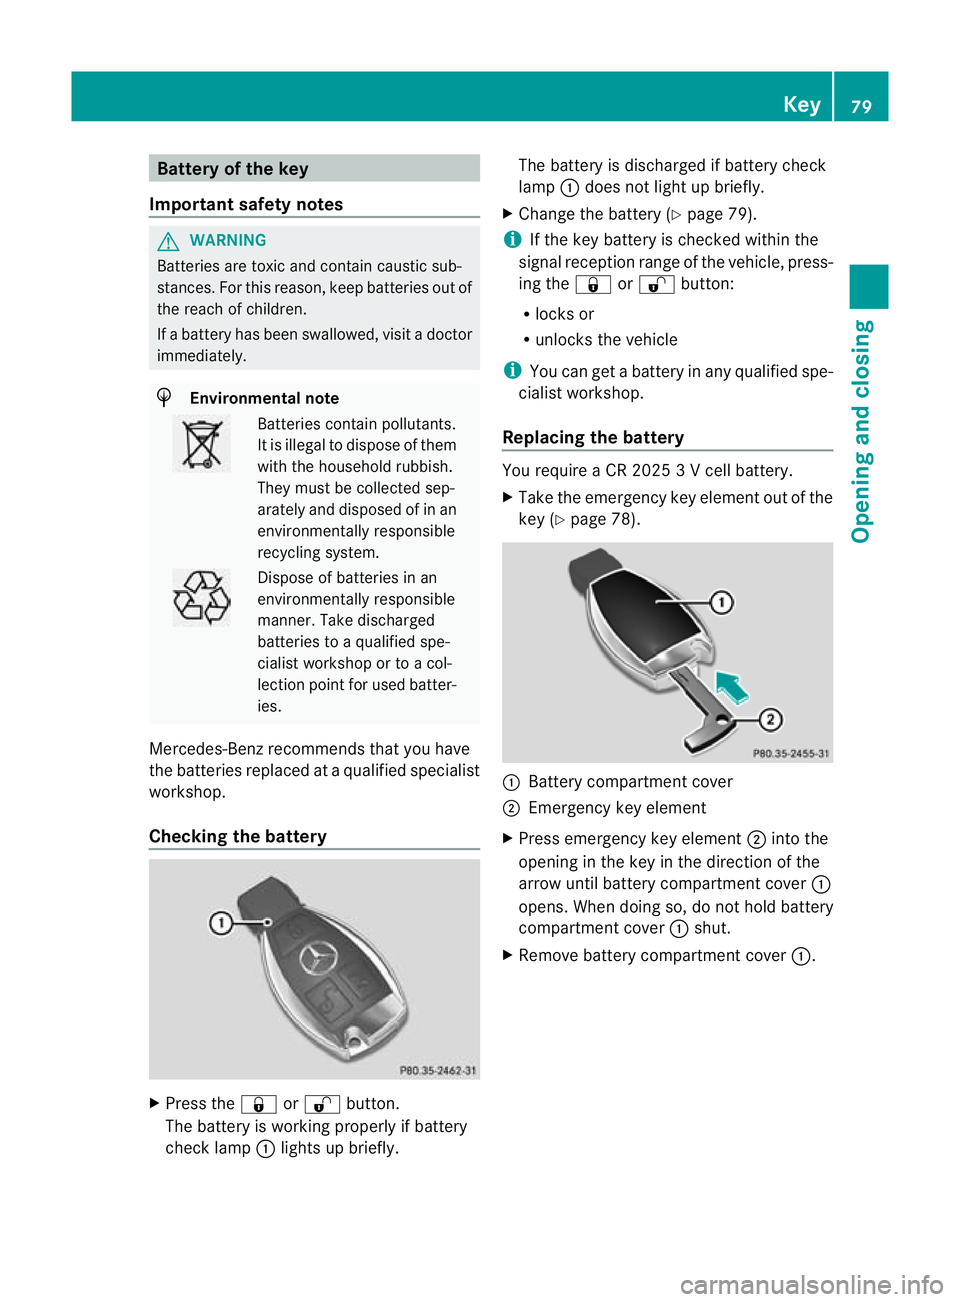
Press the &or% button.
The battery is working properly if battery
check lamp :lights up briefly. The battery is discharged if battery check
lamp
:does not light up briefly.
X Change the battery (Y page 79).
i If the key battery is checked within the
signal reception range of the vehicle, press-
ing the &or% button:
R locks or
R unlocks the vehicle
i You can get a battery in any qualified spe-
cialist workshop.
Replacing the battery You require a CR 2025 3 V cell battery.
X
Take the emergency key element out of the
key (Y page 78). :
Battery compartment cover
; Emergency key element
X Press emergency key element ;into the
opening in the key in the direction of the
arrow until battery compartment cover :
opens. When doing so, do not hold battery
compartment cover :shut.
X Remove battery compartment cover :. Key
79Opening and closing Z
Page 85 of 389

Problem Possible causes/consequences and
M Solutions
You have lost the emer-
gency key element. X
Report the loss immediately to the vehicle insurers.
X If necessary, have the locks changed as well. The engine cannot be
started using the key. the on-board voltage is too low.
X
Switch off non-essential consumers, e.g. seat heating or interior
lighting, and try to start the engine again.
If this does not work:
X Check the starter battery and charge it if necessary
(Y page 330).
or
X Jump-start the vehicle (Y page 331).
or
X Consult a qualified specialist workshop. Only vehicles without a
DIRECT SELECT lever:
The engine cannot be
started using the key. The steering lock is mechanically blocked.
X
Remove the key and reinsert it into the ignition lock. While doing
this, turn the steering wheel in both directions. The engine cannot be
started using KEYLESS-
GO. The key is in the
vehicle. Ad
oor is open. Therefore, the key cannot be detected as easily.
X Close the door and try to start the vehicle again. There is interference from a powerful source of radio waves.
X
Start your vehicle with the key in the ignition lock. Doors
Important safety notes
G
WARNING
Only for the United Kingdom: if the vehicle
has been locked with the key or with KEY-
LESS-GO, the double lock function is activa-
ted as standard. It is then not possible to open
the doors from inside the vehicle.
Therefore, do not leave any people behind in
the vehicle, particularly children, elderly peo-
ple or people requiring special assistance. As
a result, they may not be able to free them-
selves in the event of an emergency. They
could be seriously or even fatally injured by
prolonged exposure to extremely high or low
temperatures, for example. In this case, res- cuing people from outside the vehicle is diffi-
cult.
Deactivate the interior motion sensor before
you lock the vehicle. The doors can then be
opened from the inside after the vehicle has
been locked from the outside.
G
WARNING
If children are left unsupervised in the vehicle,
they could:
R open a door from inside the vehicle at any
time, even if it has been locked
R start the vehicle using akey which has been
left in the vehicle
R release the parking brake 82
DoorsOpening and closing
Page 95 of 389

Problems with the side windows
G
WARNING
Closing the side windows with increased force or without the anti-entrapment feature could lead
to serious or even fatal injury. Make sure that nobody can become trapped when closing the side
windows. Problem Possible causes/consequences and
M Solutions
As
ide window cannot
be closed because it is
blocked by objects, e.g.
leaves in the window
guide. X
Remove the objects.
X Close the side window. As
ide window cannot
be closed and you can-
not see the cause. If a side window is obstructed during closing and reopens again
slightly:
X
Immediately after the window blocks, pull the corresponding
switch again until the side window has closed.
The side window is closed with increased force.
If a side window is obstructed again during closing and reopens
again slightly:
X Immediately after the window blocks, pull the corresponding
switch again until the side window has closed.
The side window is closed without the anti-entrapmen tfeature. Soft top (Cabriolet)
Important safety notes
G
WARNING
Only drive with the soft top fully open or
closed.
If the soft top does not open or close fully, the
soft-top hydraulics are depressurised and the
soft top is lowered:
R after about seven minutes if the ignition is
switched on
R immediately if the ignition is switched off
Aw arning tone sounds shortly beforehand.
The Top being opened message appears in
the multifunction display.
Loc kthe soft top again before driving on. Oth-
erwise, the unlocked soft top could open dur-
ing the journey and cause you to lose control of your vehicle. You or other persons could be
injured as a result.
! Never sit on the soft-top compartment
cover and do not store any heavy objects
on it. You will otherwise damage the soft
top and soft-top compartment cover of the
vehicle.
! When opening and closing the soft top,
make sure that:
R there is sufficient clearance above it, as
the soft top swings upwards
R the boot separator is closed.
R the boot is only loaded to below the boot
separator.
R the boot separator is not pushed up by
the load.
R the boot lid is closed. 92
Soft top (Cabriolet)Opening and closing
Page 107 of 389

Never leave children unsupervised in the vehi-
cle. Always take the key with you when leaving
the vehicle, even if you are only leaving it for
a short time.
! Only open the panorama sliding sunroof
if it is free of snow and ice. Otherwise, mal-
functions may occur.
Do not allow anything to protrude from the
sliding sunroof. Otherwise, the seals could
be damaged.
i Resonance noises can occur in addition
to the usual airflow noises when the sliding
sunroof is open. They are caused by minor
pressure fluctuations in the vehicle interior.
Change the position of the sliding sunroof
or open a side window slightly to reduce or
eliminate these noises.
In the following section, the term "sliding sun-
roof" refers to the panorama sliding sunroof. Operating the panorama sliding sun-
roof
Opening and closing Overhead control panel
:
To raise
; To open
= To close/lower
X Turn the key to position 1or 2in the ignition
lock.
X Press or pull the 3switch in the corre-
sponding direction. i
If you press the 3switch beyond the
point of resistance, an automatic opening/
closing process is started in the corre-
sponding direction. You can stop automatic
operationb y pressing again.
Rain-closing feature If the key is in position
0in the ignition lock
or if it is removed, the panorama sliding sun-
roof closes automatically:
R if it starts to rain
R at extreme outside temperatures
R after six hours
R if there is a malfunction in the powe rsupply
The panorama sliding sunroo fremains raised
at the rear in order to allow ventilation of the
vehicle interior.
i If the panorama sliding sunroof is obstruc-
ted while being closed by the rain-closing
feature, it opens again slightly. The rain-
closing feature is then deactivated.
The panorama sliding sunroof does not close
if:
R it is raised at the rear.
R it is blocked.
R no rain is falling on the area of the wind-
screen being monitored by the rain sensor,
e.g. because the vehicle is under a bridge
or in a carport. Operating the roller sunblind for the
panorama sliding sunroof
Important safety notes G
WARNING
Make sure that nobody can become trapped
as you open or close the roller sunblind.
The roller sunblind shields the vehicle interior
from sunlight. The roller sunblind can only be
opened and closed when the panorama slid-
ing sunroof is closed. 104
Sliding sunroof (Coupé)Opening and closing
Page 109 of 389

Problems with the sliding sunroof
G
WARNING
You could be severely or even fatally injured when closing the sliding sunroof with increased
closing force or if the anti-entrapment feature is deactivated. Make sure that nobody can become
trapped when closing the sliding sunroof.
In the following section, the term "sliding sunroof" refers to the panorama sliding sunroof. Problem Possible causes/consequences and
M Solutions
The sliding sunroof can-
not be closed and you
cannot see the cause. If the sliding sunroof is obstructed during closing and reopens
again slightly:
X
Immediately after the sliding sunroof blocks, pull the 3
switch in the overhead control panel down to the point of resist-
ance and hold it until the sliding sunroof is closed.
The sliding sunroof is closed with increased force.
If the sliding sunroof is obstructed again during closing and
reopens again slightly:
X Immediately after the sliding sunroof blocks, pull the 3
switch in the overhead control panel down to the point of resist-
ance and hold it until the sliding sunroof is closed.
The sliding sunroof is closed without the anti-entrapment fea-
ture. 106
Sliding sunroof (Coupé)Opening and closing
Page 118 of 389

Problems with the seat ventilation
The seat ventilation has switched off prema-
turely or cannot be switched on. The vehicle's
electrical system voltage is too low because
too many electrical consumers are switched
on.
X Switch off electrical consumers that you do
not need, such as the rear window heating
or interior lighting. AIRSCARF (Cabriolet)
G
WARNING
Very hot air can flow out of the AIRSCARF
vents in the head restraints when AIRSCARF
is in operation. This can cause burns on unpro-
tected skin near the AIRSCARF vents. Lower
the heating output in good time, when neces-
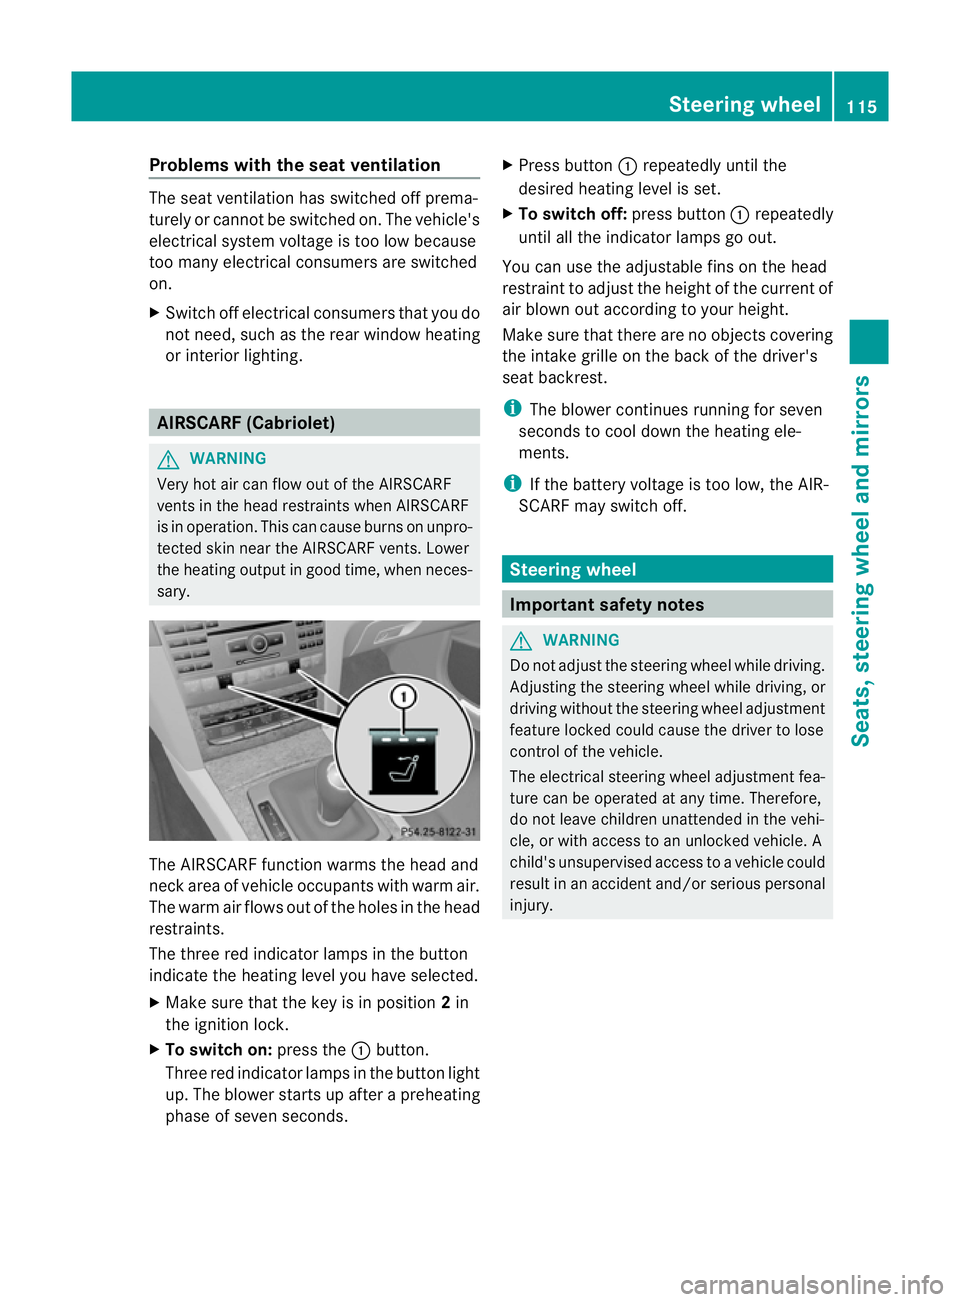
sary. The AIRSCARF function warms the head and
neck area of vehicle occupants with warm air.
The warm air flows out of the holes in the head
restraints.
The three red indicator lamps in the button
indicate the heating level you have selected.
X Make sure that the key is in position 2in
the ignition lock.
X To switch on: press the:button.
Three red indicator lamps in the button light
up. The blower starts up after a preheating
phase of seven seconds. X
Press button :repeatedly until the
desired heating level is set.
X To switch off: press button:repeatedly
until all the indicator lamps go out.
You can use the adjustable fins on the head
restraint to adjust the height of the current of
air blown out according to your height.
Make sure that there are no objects covering
the intake grille on the back of the driver's
seat backrest.
i The blower continues running for seven
seconds to cool down the heating ele-
ments.
i If the battery voltage is too low, the AIR-
SCARF may switch off. Steering wheel
Important safety notes
G
WARNING
Do not adjust the steering wheel while driving.
Adjusting the steering wheel while driving, or
driving without the steering wheel adjustment
feature locked could cause the driver to lose
control of the vehicle.
The electrical steering wheel adjustment fea-
ture can be operated at any time. Therefore,
do not leave children unattended in the vehi-
cle, or with access to an unlocked vehicle. A
child's unsupervised access to a vehicle could
result in an accident and/or serious personal
injury. Steering wheel
115Seats, steering wheel and mirrors Z
Page 122 of 389

Automatic anti-dazzle mirrors
G
WARNING
If inciden tlight fro mheadlamps is prevented
from striking the sensor in the rear-view mir-
ror, for instance, by luggage piled too high in
the vehicle, the mirror's automatic anti-dazzle
function will not operate.
Incident light could then blind you. This may
distract you from the traffic conditions and,
as a result, you may cause an accident.
The rear-view mirror and the exterior mirror
on the driver's side automatically go into anti-
dazzle mode if the following conditions are
met simultaneously:
R the ignition is switched on and
R inciden tlight fro mheadlamps strikes the
sensor in the rear-view mirror.
If reverse gear is engaged, the mirrors do not
go into anti-dazzle mode. Parking position for the exterior mir-
ror on the front-passenger side
Setting and storing the parking position Using reverse gear
You can set the front-passenger side exterior
mirror so that you can see the rear wheel on
that side as soon as you engage reverse gear.
You can store this position. X
Make sure that the vehicle is stationary and
that the key is in position 2in the ignition
lock.
X Press button ;for the exterior mirror on
the front-passenger side.
X Engage reverse gear.
The exterior mirror on the front-passenger
side moves to the preset parking position.
X Use adjustment button =to adjust the
exterior mirror to a position that allows you
to see the rear wheel and the kerb.
The parking position is stored.
i If you shift the transmission to another
position, the exterior mirror on the front-
passenger side returns to the driving posi-
tion.
Using the memory button
You can set the front-passenger side exterior
mirror so that you can see the rear wheel on
that side as soon as you engage reverse gear.
This setting can be stored using memory but-
ton M?.
X Make sure that the key is in position 2in
the ignition lock.
X With the exterior mirror on the front-
passenger side activated, use adjustment
button =to adjust the exterior mirror. In
the exterior mirror, the rear wheel and the
kerb should be visible.
X Press memory button M? and one of the
arrows on adjustment button =within
three seconds.
The parking position is stored if the exterior
mirror does not move.
X If the mirror moves out of position, repeat
the steps. Mirrors
119Seats, steering wheel and mirrors Z
Page 126 of 389

R
combination switch (Y page 126)
R on-board compute r(Ypage 243)
Light switch Operation
1W
Left-hand parking lamps
2X Right-hand parking lamps
3T Side lamps, licence plate and instru-
ment cluster lighting
4Ã Automatic headlamp mode, control-
led by the light sensor
5L Dipped-beam/main-beam head-
lamps
BR Rear foglamp
CN Foglamps (only vehicles with front
foglamps).
If you hear a warning tone when you leave the
vehicle, the lights may still be switched on.
X Turn the light switch to Ã.
The exterior lighting (except the side lamps/
parking lamps) switches off automatically if
you:
R remove the key from the ignition lock
R open the driver's door with the key in posi-
tion 0
Automatic headlamp mode G
WARNING
If the light switch is set to Ãand it is foggy,
snowing or there is poor visibility, the dipped-
beam headlamps will not come on automati- cally. This could endanger you and others. In
such situations turn the light switch to
L.
The automatic headlamp feature is only an
aid. The driver is responsible for the vehicle's
lighting at all times. 1W
Left-hand parking lamps
2X Right-hand parking lamps
3T Side lamps, licence plate and instru-
ment cluster lighting
4Ã Automatic headlamp mode, control-
led by the light sensor
5L Dipped-beam/main-beam head-
lamps
BR Rear foglamp
CN Foglamps (only vehicles with front
foglamps).
à is the preferred light switch setting. The
light setting is automatically selected accord-
ing to the brightness of the ambient light
(exception :poor visibility due to weather con-
ditions such as fog, snow or spray):
R Key in position 1in the ignition lock: the
side lamps are switched on or off automat-
ically depending on the brightness of the
ambient light.
R With the engine running: if you have acti-
vated the daytime driving lights function via
the on-board computer, the daytime driving
lights or the dipped-beam headlamps and
side lamps are switched on or off automat-
ically depending on the brightness of the
ambient light. Exterior lighting
123Lights and windscreen wipers Z