2012 MERCEDES-BENZ E-CLASS COUPE steering
[x] Cancel search: steeringPage 119 of 389
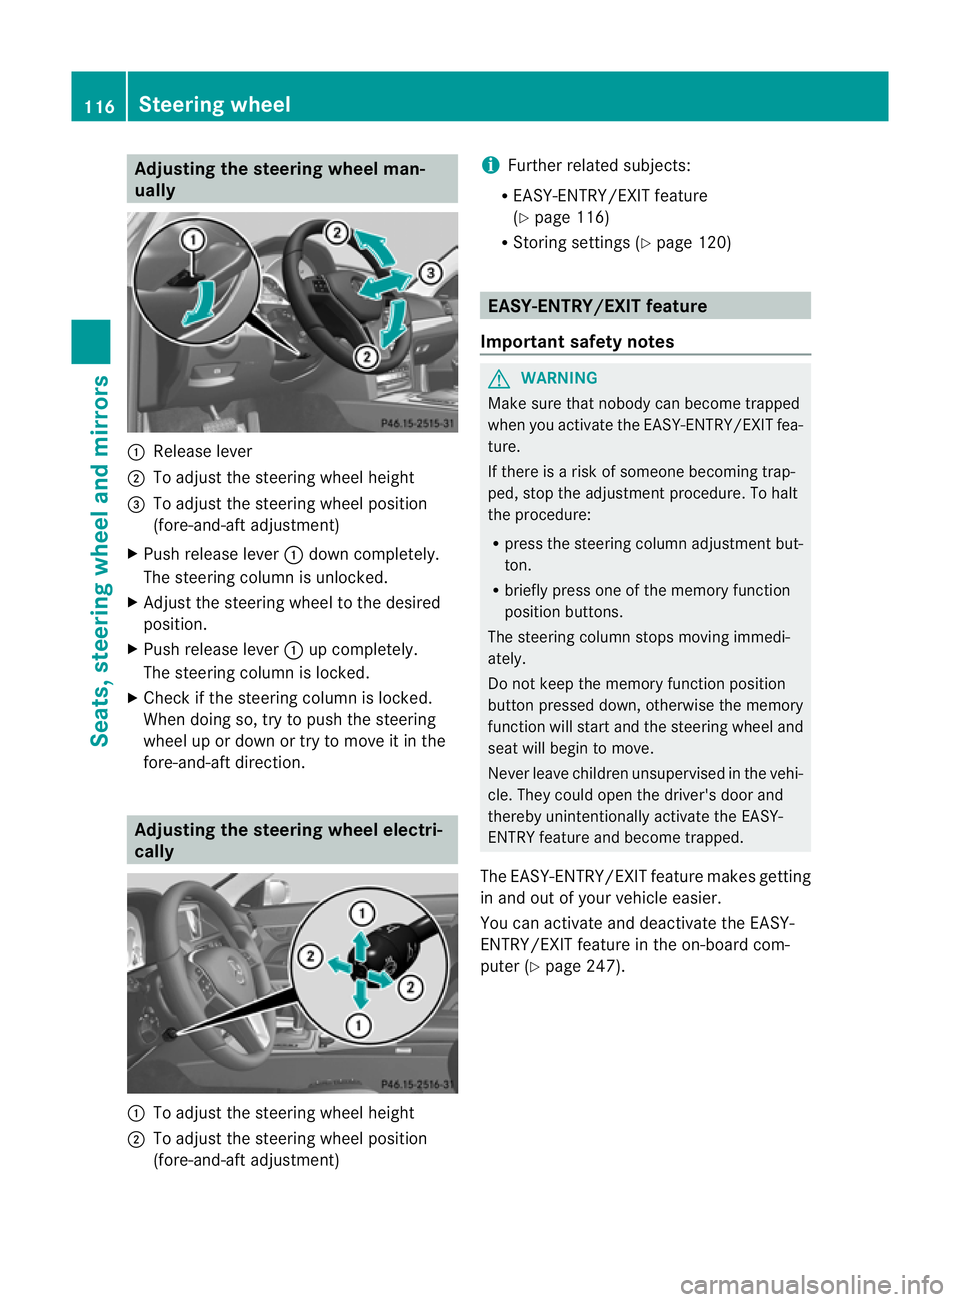
Adjusting the steering wheel man-
ually :
Release lever
; To adjust the steering wheel height
= To adjust the steering wheel position
(fore-and-aft adjustment)
X Push release lever :down completely.
The steering column is unlocked.
X Adjus tthe steering wheel to the desired
position.
X Push release lever :up completely.
The steering column is locked.
X Check if the steering column is locked.
When doing so, try to push the steering
wheel up or down or try to move it in the
fore-and-aft direction. Adjusting the steering wheel electri-
cally
:
To adjust the steering wheel height
; To adjust the steering wheel position
(fore-and-aft adjustment) i
Further related subjects:
R EASY-ENTRY/EXIT feature
(Y page 116)
R Storing settings (Y page 120) EASY-ENTRY/EXIT feature
Important safety notes G
WARNING
Make sure that nobody can become trapped
when you activate the EASY-ENTRY/EXIT fea-
ture.
If there is a risk of someone becoming trap-
ped, stop the adjustment procedure. To halt
the procedure:
R press the steering column adjustment but-
ton.
R briefly press one of the memory function
position buttons.
The steering column stops moving immedi-
ately.
Do not keep the memory function position
button pressed down, otherwise the memory
function will start and the steering wheel and
seat will begin to move.
Never leave children unsupervised in the vehi-
cle. They could open the driver's door and
thereby unintentionally activate the EASY-
ENTRY feature and become trapped.
The EASY-ENTRY/EXIT feature makes getting
in and out of your vehicle easier.
You can activate and deactivate the EASY-
ENTRY/EXIT feature in the on-board com-
puter (Y page 247). 116
Steering wheelSeats, steering wheel and mirrors
Page 120 of 389
Position of the steering wheel when the
EASY-ENTRY/EXIT featurei s activeThe steering wheel tilts upwards if you:
R
remove the key from the ignition lock
R open the driver's door and KEYLESS-GO is
in position 1
R open the driver's door and the key is in
position 0or 1in the ignition lock
i The steering wheel only moves upwards if
it has not already reached the upper end
stop.
Position of the steering wheel for driv-
ing The steering wheel is moved to the previously
set position if:
R the driver's door is closed and
R you insert the key into the ignition lock
or
R you press the Start/Stop button once on
vehicles with KEYLESS-GO.
If you close the driver's door with the key
inserted into the ignition lock, the steering
wheel is automatically moved to the previ-
ously set position.
The last position of the steering wheel is
stored when you switch off the ignition or
when you store the setting with the memory
function (Y page 120).
Crash-responsive EASY-EXIT feature If the crash-responsive EASY-EXIT feature is
triggered in an accident, the steering column
will move upwards when the driver's door is
opened. This occurs irrespective of the posi-
tion of the key in the ignition lock. This makes
it easier to exit the vehicle and rescue the
occupants.
The crash-responsive EASY-EXIT feature is
only operational if the EASY-EXIT/ENTRY fea-
ture is activated in the on-board computer. Mirrors
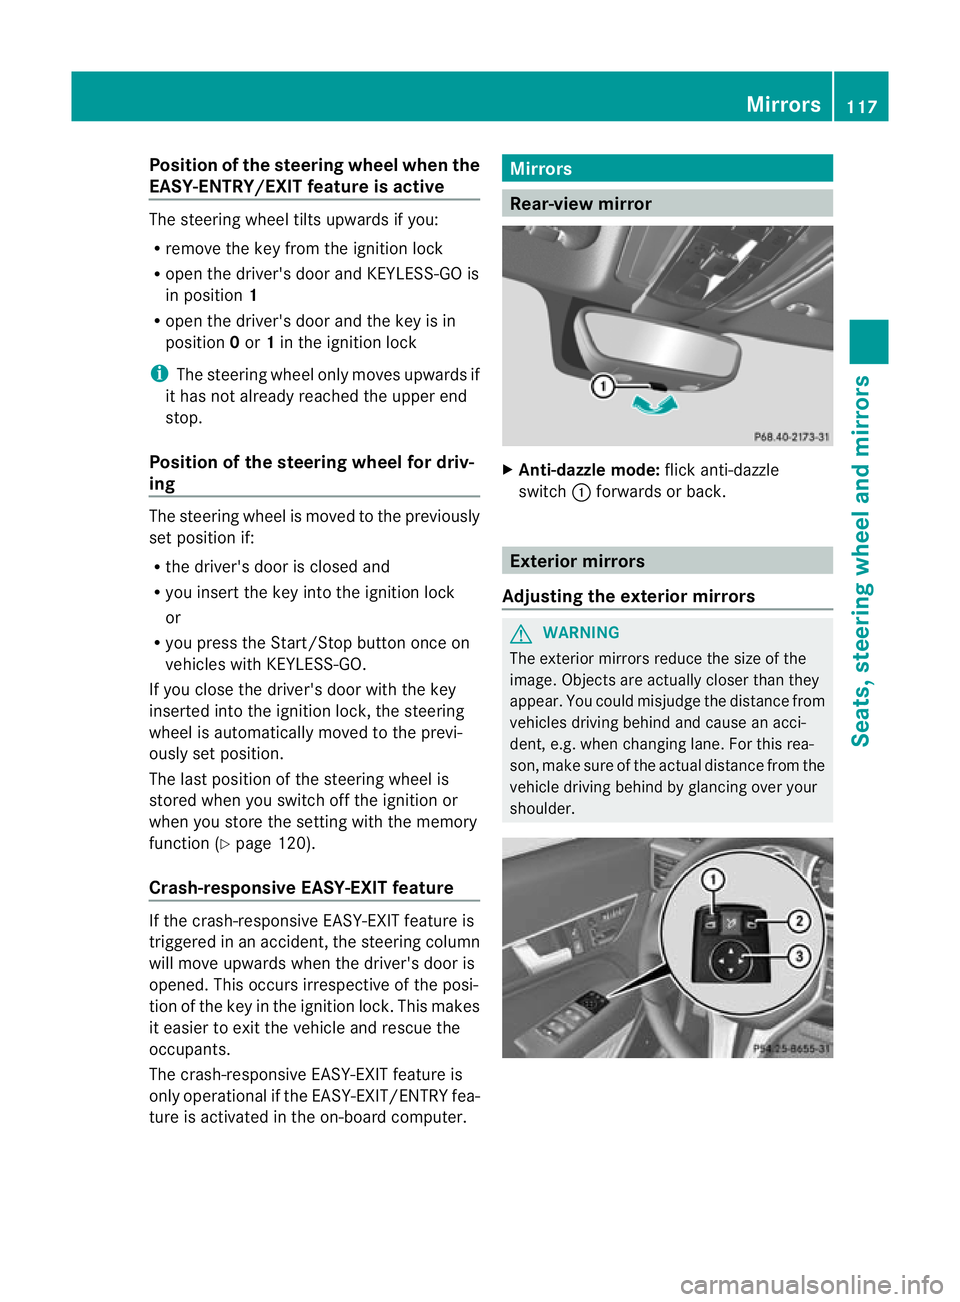
Rear-view mirror
X
Anti-dazzle mode: flick anti-dazzle
switch :forwards or back. Exterior mirrors
Adjusting the exterior mirrors G
WARNING
The exterior mirrors reduce the size of the
image. Objects are actually closer than they
appear. You could misjudge the distance from
vehicles driving behind and cause an acci-
dent, e.g. when changin glane. For this rea-
son, make sure of the actual distance from the
vehicle driving behind by glancing ove ryour
shoulder. Mirrors
117Seats, steering wheel and mirrors Z
Page 121 of 389
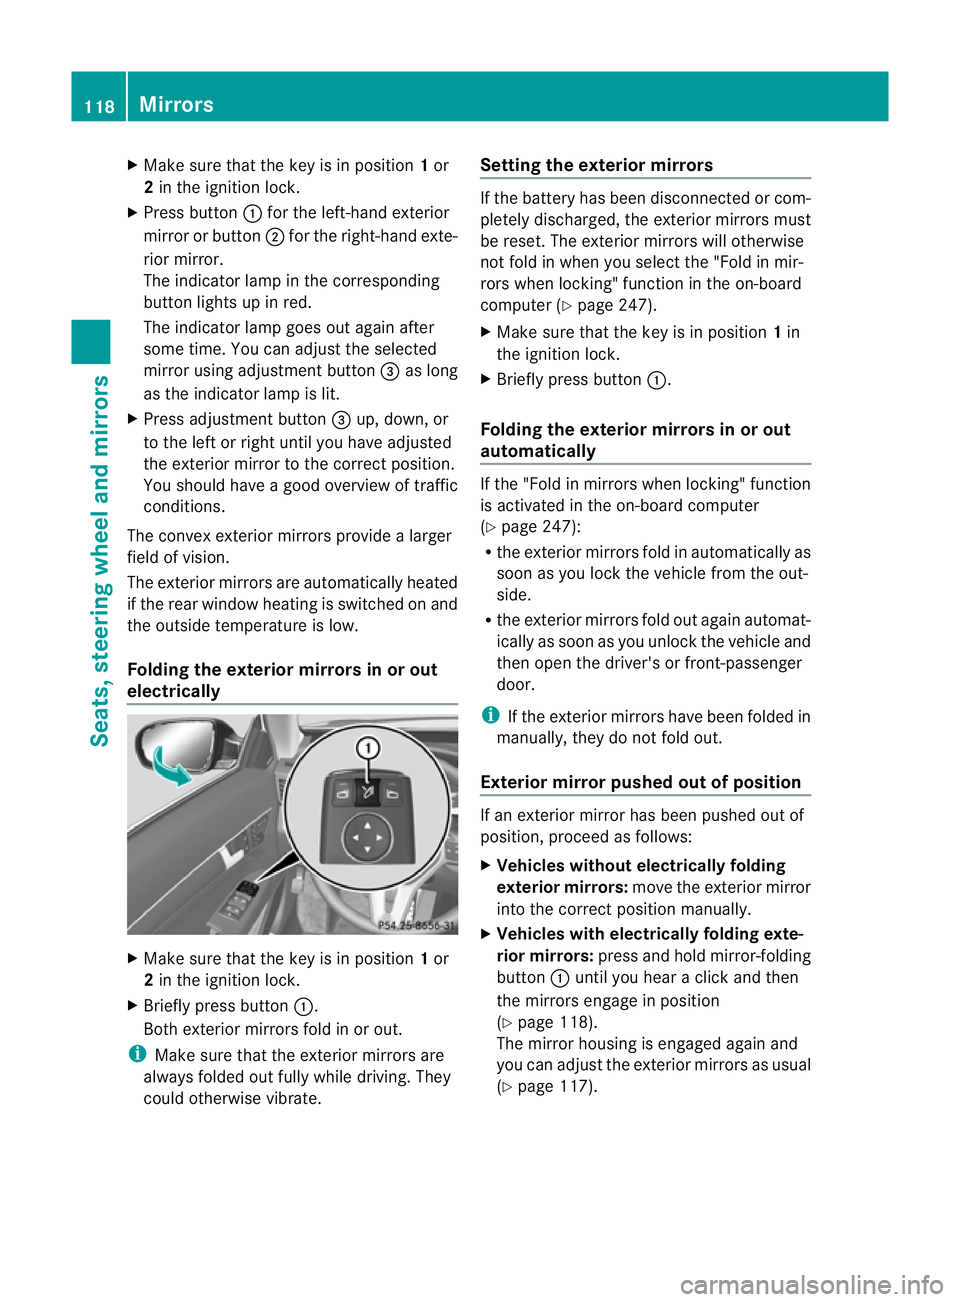
X
Make sure that the key is in position 1or
2 in the ignition lock.
X Press button :for the left-hand exterior
mirror or button ;for the right-hand exte-
rior mirror.
The indicator lamp in the corresponding
button lights up in red.
The indicator lamp goes out again after
some time. You can adjust the selected
mirror using adjustment button =as long
as the indicator lamp is lit.
X Press adjustment button =up, down, or
to the left or right until you have adjusted
the exterior mirror to the correct position.
You should have a good overview of traffic
conditions.
The convex exterior mirrors provide a larger
field of vision.
The exterior mirrors are automatically heated
if the rear window heating is switched on and
the outside temperature is low.
Folding the exterior mirrors in or out
electrically X
Make sure that the key is in position 1or
2 in the ignition lock.
X Briefly press button :.
Both exterior mirrors fold in or out.
i Make sure that the exterior mirrors are
always folded out fully while driving. They
could otherwise vibrate. Setting the exterior mirrors If the battery has been disconnected or com-
pletely discharged, the exterior mirrors must
be reset. The exterior mirrors will otherwise
not fold in when you select the "Fold in mir-
rors when locking" function in the on-board
computer (Y
page 247).
X Make sure that the key is in position 1in
the ignition lock.
X Briefly press button :.
Folding the exterior mirrors in or out
automatically If the "Fold in mirrors when locking" function
is activated in the on-board computer
(Y
page 247):
R the exterior mirrors fold in automatically as
soon as you lock the vehicle from the out-
side.
R the exterior mirrors fold out again automat-
ically as soon as you unlock the vehicle and
then open the driver's or front-passenger
door.
i If the exterior mirrors have been folded in
manually, they do not fold out.
Exterior mirror pushed out of position If an exterior mirror has been pushed out of
position, proceed as follows:
X
Vehicles without electrically folding
exterior mirrors: move the exterior mirror
into the correct position manually.
X Vehicles with electrically folding exte-
rior mirrors: press and hold mirror-folding
button :until you hear a click and then
the mirrors engage in position
(Y page 118).
The mirror housing is engaged again and
you can adjust the exterior mirrors as usual
(Y page 117). 118
MirrorsSeats, steering wheel and mirrors
Page 122 of 389

Automatic anti-dazzle mirrors
G
WARNING
If inciden tlight fro mheadlamps is prevented
from striking the sensor in the rear-view mir-
ror, for instance, by luggage piled too high in
the vehicle, the mirror's automatic anti-dazzle
function will not operate.
Incident light could then blind you. This may
distract you from the traffic conditions and,
as a result, you may cause an accident.
The rear-view mirror and the exterior mirror
on the driver's side automatically go into anti-
dazzle mode if the following conditions are
met simultaneously:
R the ignition is switched on and
R inciden tlight fro mheadlamps strikes the
sensor in the rear-view mirror.
If reverse gear is engaged, the mirrors do not
go into anti-dazzle mode. Parking position for the exterior mir-
ror on the front-passenger side
Setting and storing the parking position Using reverse gear
You can set the front-passenger side exterior
mirror so that you can see the rear wheel on
that side as soon as you engage reverse gear.
You can store this position. X
Make sure that the vehicle is stationary and
that the key is in position 2in the ignition
lock.
X Press button ;for the exterior mirror on
the front-passenger side.
X Engage reverse gear.
The exterior mirror on the front-passenger
side moves to the preset parking position.
X Use adjustment button =to adjust the
exterior mirror to a position that allows you
to see the rear wheel and the kerb.
The parking position is stored.
i If you shift the transmission to another
position, the exterior mirror on the front-
passenger side returns to the driving posi-
tion.
Using the memory button
You can set the front-passenger side exterior
mirror so that you can see the rear wheel on
that side as soon as you engage reverse gear.
This setting can be stored using memory but-
ton M?.
X Make sure that the key is in position 2in
the ignition lock.
X With the exterior mirror on the front-
passenger side activated, use adjustment
button =to adjust the exterior mirror. In
the exterior mirror, the rear wheel and the
kerb should be visible.
X Press memory button M? and one of the
arrows on adjustment button =within
three seconds.
The parking position is stored if the exterior
mirror does not move.
X If the mirror moves out of position, repeat
the steps. Mirrors
119Seats, steering wheel and mirrors Z
Page 123 of 389
Calling up
astore dparking position set-
ting X
Tur nthe key to position 2in the ignition
lock.
X Adjust the exterior mirror on the front-
passenger side using button ;.
X Engage reverse gear.
The exterior mirror on the front-passenger
side moves to the stored parking position.
The exterior mirror on the front-passenger
side moves back to its original position:
R as soon as you exceed a speed of
15 km/h
R if you press button :for the exterior mir-
ror on the driver's side Memory function
Storing settings
G
WARNING
Only use the memory function on the driver's
side when the vehicle is stationary. You could
otherwise be distracted from the traffic con-
ditions by the steering wheel and seat moving
of their own accord, and as a result, cause an
accident. G
WARNING
The memory function can still be used when
the key has been removed. For this reason,
children should never be left unsupervised in
the vehicle. They could otherwise become
trapped when adjusting the seat or the steer-
ing wheel.
With the memory function, you can store up
to three different settings, e.g. for three dif-
ferent people. The following settings are stored as a single
memory preset:
R
position of the seat, backrest and head
restraint
R driver's side: steering wheel position
R driver's side: position of the exterior mir-
rors on the driver's and front-passenger
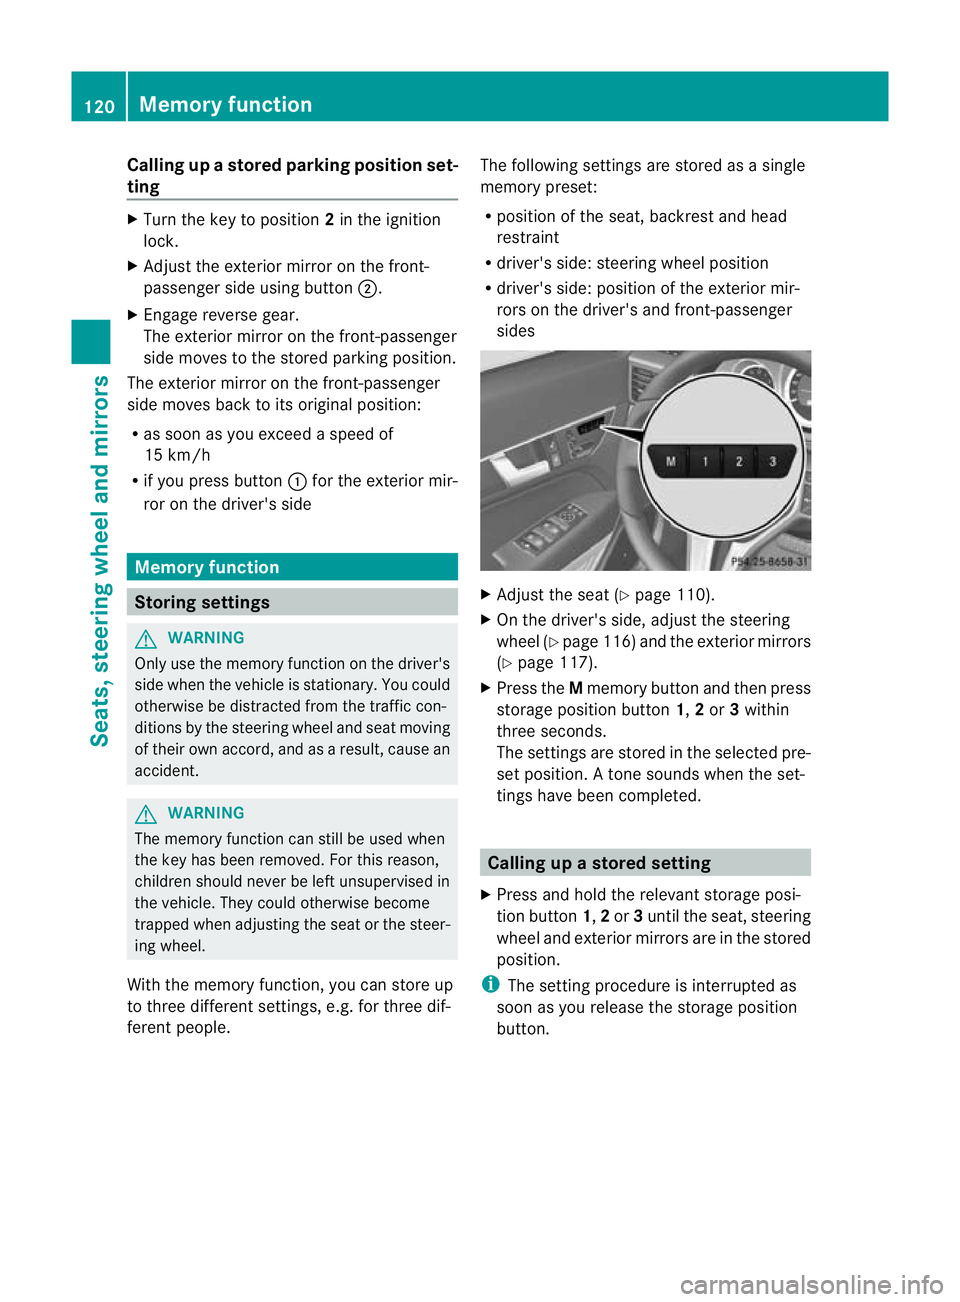
sides X
Adjust the seat (Y page 110).
X On the driver's side, adjust the steering
wheel (Y page 116) and the exterior mirrors
(Y page 117).
X Press the Mmemory button and then press
storage position button 1,2or 3within
three seconds.
The settings are stored in the selected pre-
set position. Atone sounds when the set-
tings have been completed. Calling up
astore dsetting
X Press and hold the relevant storage posi-
tio nb utton 1,2or 3until the seat, steering
wheel and exterio rmirrors are in the stored
position.
i The setting procedure is interrupted as
soon as you release the storage position
button. 120
Memory functionSeats, steering wheel and mirrors
Page 131 of 389
only the turn signal lamp on the corre-
sponding side of the vehicle will flash.
X To switch off the hazard warning
lamps: press button :.
The hazard warning lamps automatically
switch on if:
R an airbag is deployed.
R the vehicle decelerates rapidly from a
speed of more than 70 km/ha nd comes to
a standstill.
The hazard warning lamps switch off auto-
matically if the vehicle reaches a speed of
over 10 km/h again after a full brake appli-
cation.
i The hazard warning lamps still operate if
the ignition is switched off. Headlamp cleaning system
The headlamps are cleaned automatically if
the "Wipe with washe rfluid" function is oper-
ated five times (Y page 135) while the lights
are on and the engine is running. When you
switch off the ignition, the automatic head-
lamp cleaning system is reset and counting is
resumed from 0. Intelligent Light System
General notes The Intelligent Light System is a system that
adjusts the headlamps automatically to suit
the prevailing driving and weathe
rconditions.
It offers advanced functions for improved illu-
mination of the road surface, e.g. depending
on the vehicle speed or weather conditions.
The system includes the active light function,
cornering light function, motorway mode and
extended range foglamps. The system is only
active when it is dark.
You can activate or deactivate the "Intelligent
Light System" using the on-board computer
(Y page 243). Active light function
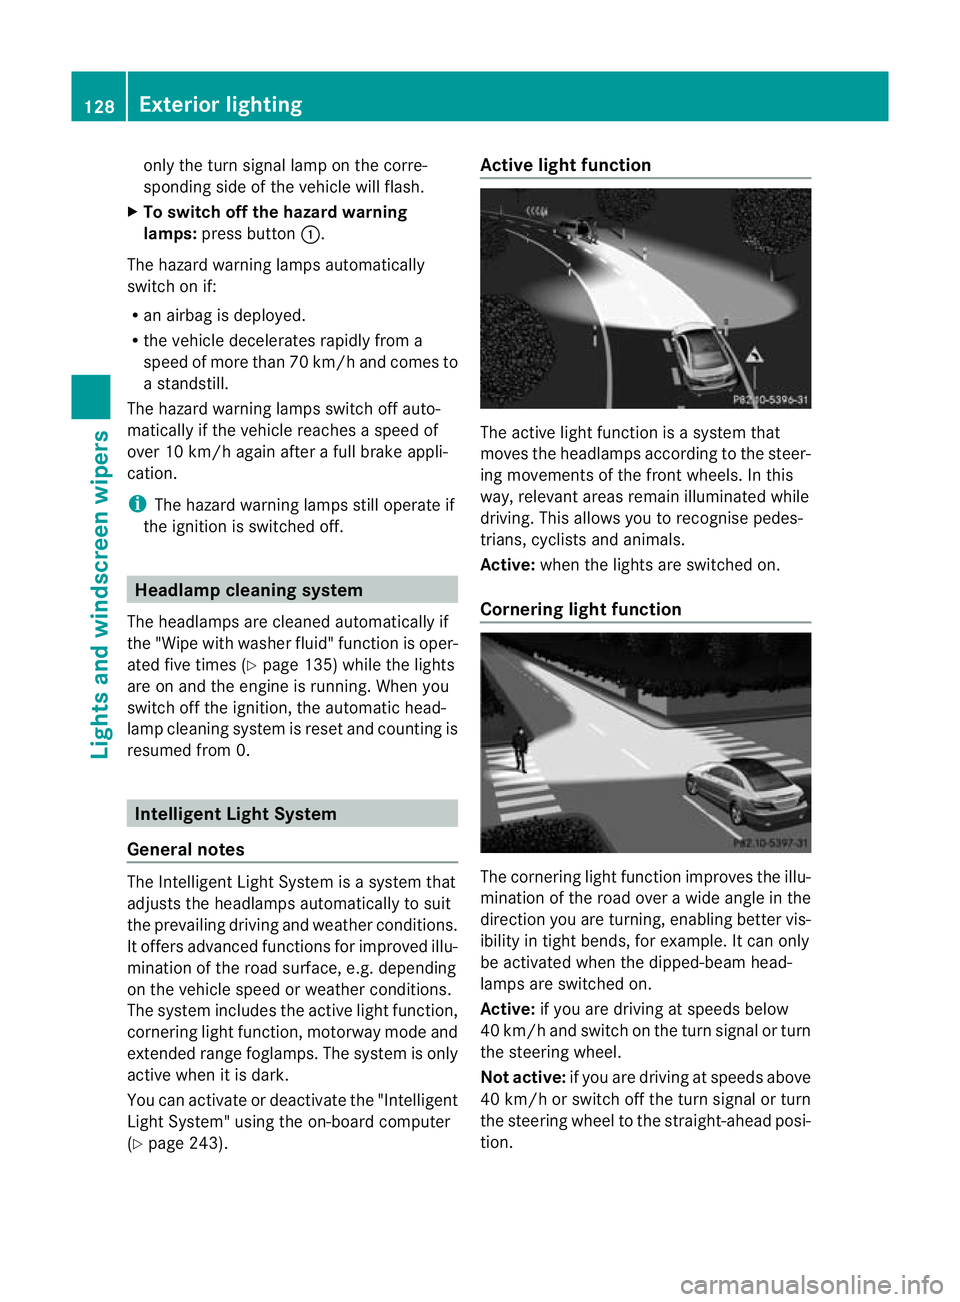
The active light function is a system that
moves the headlamps according to the steer-
ing movements of the front wheels. In this
way, relevant areas remain illuminated while
driving. This allows you to recognise pedes-
trians, cyclists and animals.
Active: when the lights are switched on.
Cornering light function The cornering light function improves the illu-
mination of the road over a wide angle in the
direction you are turning, enabling better vis-
ibility in tight bends, for example. It can only
be activated when the dipped-beam head-
lamps are switched on.
Active:
if you are driving at speeds below
40 km/ha nd switch on the tur nsignal or turn
the steering wheel.
Not active: if you are driving at speeds above
40 km/h or switch off the turn signal or turn
the steering wheel to the straight-ahead posi-
tion. 128
Exterior lightingLights and windscreen wipers
Page 132 of 389

The cornering lamp may remain lit for a short
time, but is automatically switched off after
no more than three minutes.
Motorway mode Active:
if you are driving at aspeed above
110 km/ hand do not make any large steering
movements for at least 1000 m or if you are
driving at a spee dabove 130 km/h.
Not active: if you are driving at speeds below
80 km/h following activation.
Extended range foglamps The extended range foglamps reduce the
glare experienced by the driver and improve
the illumination of the edge of the carriage-
way.
Active: if you are driving at speeds below
70 km/ hand you switch on the rea rfoglamp.
Not active: if, following activation, you are
driving at speeds above 100 km/h or if you
switch off the rear foglamp. Adaptive Highbeam Assist
Important safety notes G
WARNING
Adaptive Highbeam Assist is only an aid
designed to assist driving. The driver is
responsible for adjusting the vehicle's lighting
to the prevailing light, vision and traffic con-
ditions.
The system may be impaired or deactivated:
R if there is poor visibility, e.g. due to snow,
rain, fog or spray
R if the area of the windscreen around the
optical sensor is dirty, misted up or covered
up, e.g. by a sticker
The system may not recognise the following
road users:
R road users that have no lighting, e.g. pedes-
trians
R road users that have poor lighting, e.g.
cyclists
R road users whose lighting is not clearly visi-
ble, e.g. road users behind a crash barrier
R on rare occasions: road users that have
lights that may be recognised too late or not
at all
The automatic main-beam headlamps will not
be deactivated, or they may be activated
despite road users travelling in front of or
approaching the vehicle.
Thus, you could cause an accident and injure
yourself and others. Always observe traffic
conditions and, if necessary, dip the lights
manually. Exterior lighting
129Lights and windscreen wipers Z
Page 161 of 389
Useful information
i This Owner's Manual describes all mod-
els, series and optional equipment for your
vehicle that were available at the time of
going to press. National variations are pos-
sible. Note that your vehicle may not be
equipped with all of the functions descri-
bed. This is also the case for systems and
functions relevant to safety.
i Read the information on qualified special-
ist workshops: (Y page 23). Running-in notes
Important safety notes
New and replaced brake pads and discs only
reach their optimum braking effec tafter sev-
eral hundred kilometres of driving. Compen-
sate for this by applying greater force to the
brake pedal. The first 1,500 km
If you treat the engine with sufficient care
from the very start, you will be rewarded with
excellent performance for the remainder of
the engine's life.
R Drive at varying vehicle speeds and engine
speeds for the first 1,500 km.
R Avoid overstraining the vehicle during this
period, e.g. driving at full throttle.
R Change gea ringood time, before the rev
counter needle is Ôof the way to the red
area of the rev counter.
R Do not shift down a gear manually in order
to brake.
Vehicles with automatic transmission:
R Try to avoid depressing the accelerator
pedal beyond the point of resistance (kick-
down).
R The shift ranges 3,2or 1should only be
engaged when driving slowly, e.g. when
driving in mountainous terrain. After 1500 km, you may gradually accelerate
the vehicle to full road and engine speeds.
i
You should also observe these notes on
running in if the engine or parts of the drive
train on your vehicle have been replaced. Driving
Important safety notes
G
WARNING
Objects in the driver's footwell can restric tthe
pedal travel or obstruct adepressed pedal.
The operating and road safety of the vehicle
is jeopardised. There is a risk of an accident.
Make sure that all objects in the vehicle are
stowed correctly, and that they cannot enter
the driver's footwell. Fit the floormats
securely and as specified in order to ensure
sufficien tclearance for the pedals. Do not use
loose floormats. G
WARNING
Unsuitable footwear can hinde rcorrect usage
of the pedals, e.g.:
R shoes with thick soles
R shoes with high heels
R slippers
There is a risk of an accident.
Wear suitable footwear to ensure correct
usage of the pedals. G
WARNING
If you switch off the ignition while driving,
safety-relevant functions are only available
with limitations, or not at all. This could affect,
for example, the power steering and the brake
boosting effect .You will require considerably
more effort to steer and brake. There is a risk
of an accident.
Do not switch off the ignition while driving. 158
DrivingDriving and parking