2012 MERCEDES-BENZ E-CLASS COUPE belt
[x] Cancel search: beltPage 103 of 389
X
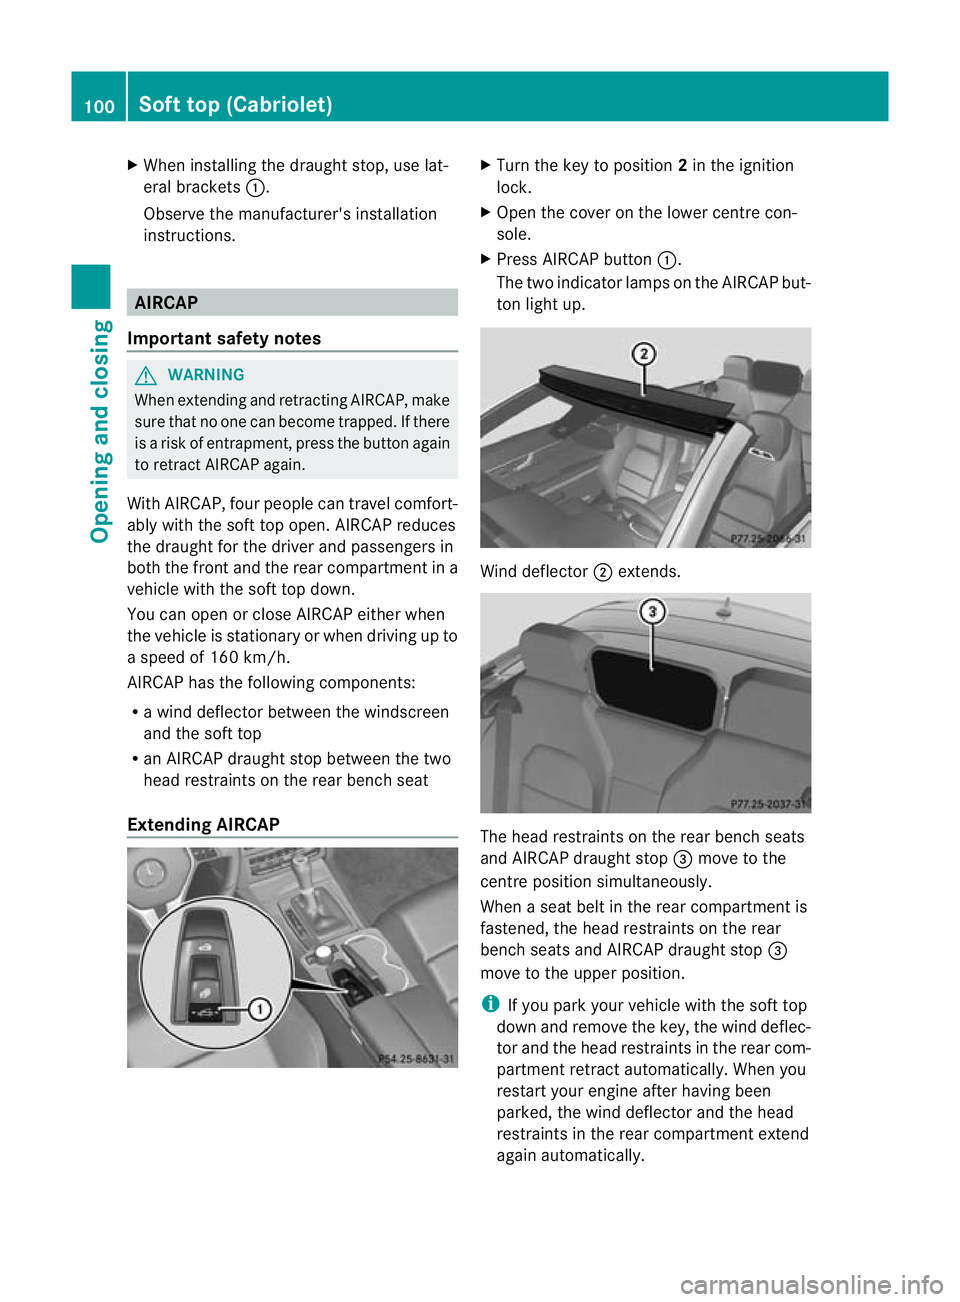
When installing the draught stop, use lat-
eral brackets :.
Observe the manufacturer's installation
instructions. AIRCAP
Important safety notes G
WARNING
When extending and retracting AIRCAP, make
sure that no one can become trapped. If there
is a risk of entrapment, press the button again
to retract AIRCAP again.
With AIRCAP, four people can travel comfort-
ably with the soft top open. AIRCAP reduces
the draught for the driver and passengers in
both the front and the rear compartment in a
vehicle with the soft top down.
You can open or close AIRCAP either when
the vehicle is stationary or when driving up to
a speed of 160 km/h.
AIRCAP has the following components:
R a wind deflector between the windscreen
and the soft top
R an AIRCAP draught stop between the two
head restraints on the rear bench seat
Extending AIRCAP X
Turn the key to position 2in the ignition
lock.
X Open the cover on the lower centre con-
sole.
X Press AIRCAP button :.
The two indicato rlamps on the AIRCAP but-
to nl ight up. Wind deflector
;extends. The head restraints on the rear bench seats
and AIRCAP draught stop
=move to the
centre position simultaneously.
When a seat belt in the rear compartment is
fastened, the head restraints on the rear
bench seats and AIRCAP draught stop =
move to the upper position.
i If you park your vehicle with the soft top
down and remove the key, the wind deflec-
tor and the head restraints in the rear com-
partment retract automatically. When you
restart your engine after having been
parked, the wind deflector and the head
restraints in the rear compartment extend
again automatically. 100
Soft top (Cabriolet)Opening and closing
Page 104 of 389
i
AIRCAP cannot be extended or retracted
if the vehicle speed exceeds 160 km/h.
Retracting AIRCAP X
Turn the key to position 2in the ignition
lock.
X Open the cover on the lower centre con-
sole.
X Press AIRCAP button :.
The two indicator lamps on the AIRCAP but-
ton go out. Wind deflector ;retracts.
The head restraints on the rea rbench seats
and AIRCAP draught stop =move to the
lower position simultaneously.
i If there are passengers wearing seat belts
in the rear compartment, the head
restraints on the rear bench seats and the
AIRCAP draught stop remain in the upper
position.
Retracting the head restraints on the
rear bench seats from the driver's seat To improve the rear view, you can retract the
head restraints on the rear bench seats indi-
vidually (Y page 111). The wind deflector
remains in its current position. Fitting/removing the AIRCAP draught
stop
Preparation You will need a
4mmAllen key to fit/remove
the AIRCAP draught stop.
Before fitting or removing the AIRCAP draught
stop:
X Turn the key to position 2in the ignition
lock.
X Open the folding roof fully (Y page 93).
X Extend the head restraints in the rear com-
partment fully (Y page 111). Removing
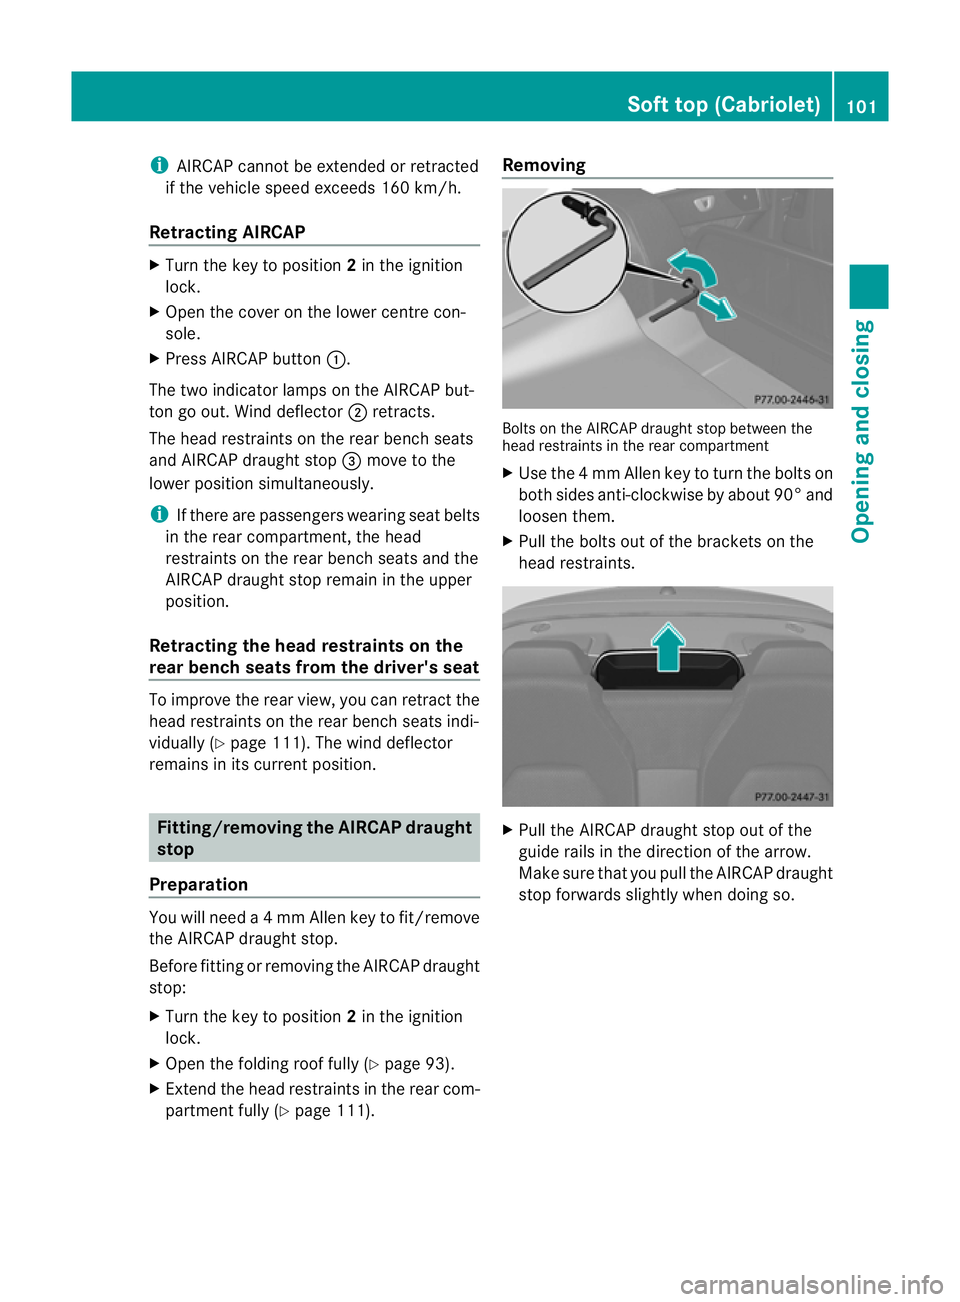
Bolts on the AIRCAP draught stop between the
head restraints in the rear compartment
X
Use the 4mmAllen key to tur nthe bolts on
both sides anti-clockwise by about 90° and
loosen them.
X Pull the bolts out of the brackets on the
head restraints. X
Pull the AIRCAP draught stop out of the
guide rails in the direction of the arrow.
Make sure that you pull the AIRCAP draught
stop forwards slightly when doing so. Soft top (Cabriolet)
101Opening and closing Z
Page 106 of 389
Problems with the soft top
Problem Possible causes/consequences and
M Solutions
The soft top will not
open or close. The ignition is not switched on.
X
Make sure that the key is in position 2in the ignition lock. The boot lid is open.
X
Close the boot lid (Y page 99). The boot separator is not closed.
X
Close the boot separator (Y page 99). The roll bars have been deployed.
X Visit a qualified specialist workshop. The head restraints in the rear compartment do not retract auto-
matically.
X
Lower the head restraints in the rear compartmen tmanually,
see the Digital Owner's Manual, keyword "Head restraint". The soft-top mechanism or control system is defective.
X
Close the sof ttop manually if necessary (Y page 94).
X Visit a qualified specialist workshop. The soft top has been opened and closed several times in a row.
The soft-top drive has been deactivated automatically for safety
reasons.
You can open and close the soft top again after approximately ten
minutes.
X Switch off the ignition and turn it back on.
X Repeat the opening or closing procedure. Sliding sunroof (Coupé)
Important safety notes
G
WARNING
Make sure that nobody can become trapped
when opening and closing the sliding sunroof.
If there is a risk of entrapment, release the
switch immediately. During automatic opera-
tion, push the switch briefly in any direction
to stop the sliding sunroof. G
WARNING
The glass in the panorama sunroof could
break in an accident .Ifyou are not wearing a
seat belt, there is a risk that you could be
thrown through the opening in the event of the
vehicle overturning. Therefore, always wear a
seat belt to reduce the risk of injuries. G
WARNING
Children could injure themselves if they oper-
ate the sliding sunroof. Sliding sunroof (Coupé)
103Opening and closing
Z
Page 111 of 389
Useful information
i This Owner's Manual describes all mod-
els, series and optional equipment for your
vehicle that were available at the time of
going to press. National variations are pos-
sible. Note that your vehicle may not be
equipped with all of the functions descri-
bed. This is also the case for systems and
functions relevant to safety.
i Read the information on qualified special-
ist workshops: (Y page 23). Correct driver's seat position
X
Observe the safety guidelines on seat
adjustment (Y page 109).
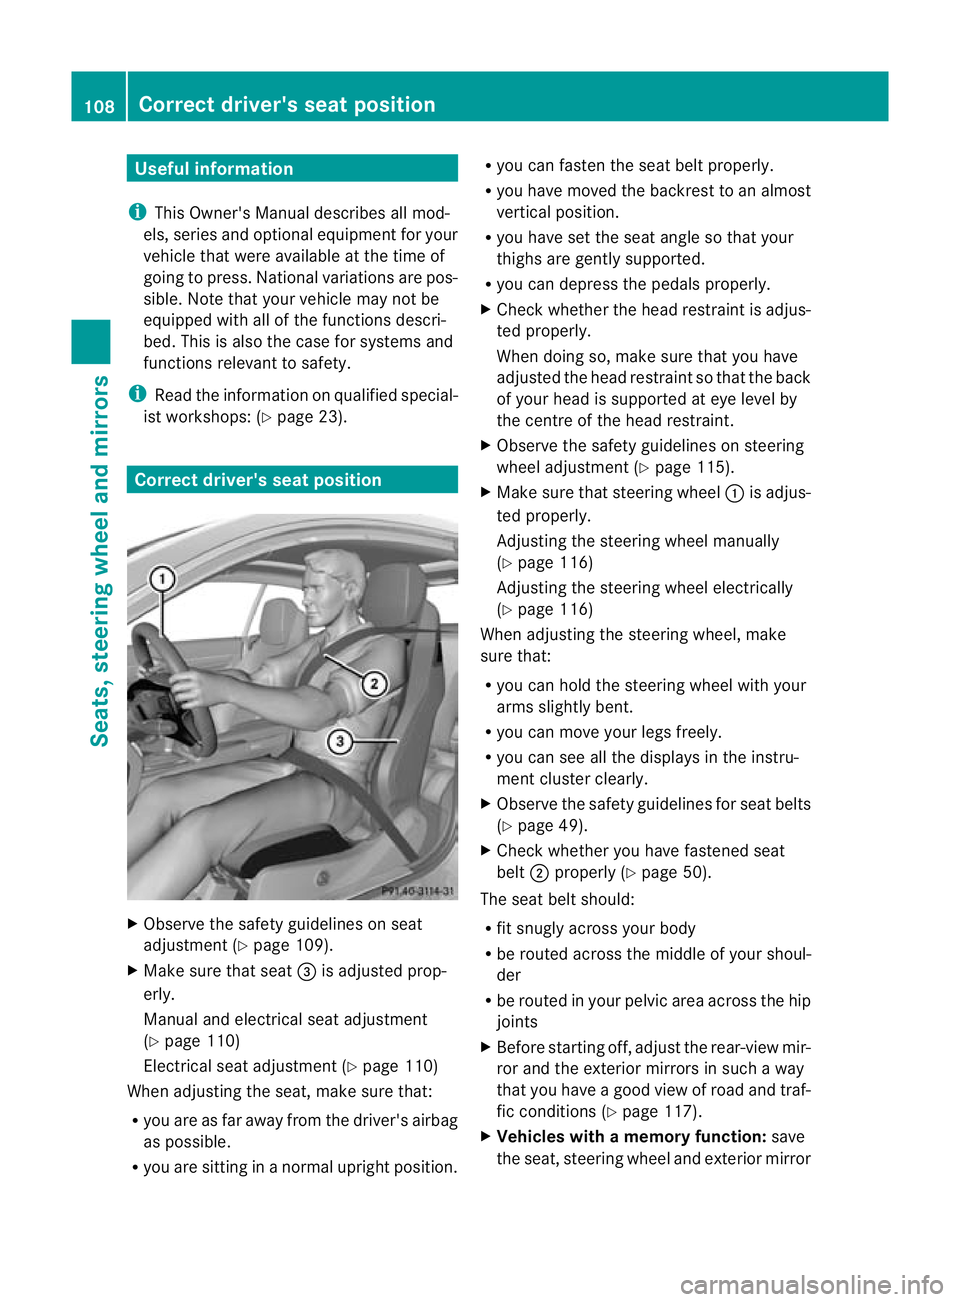
X Make sure that seat =is adjusted prop-
erly.
Manual and electrical seat adjustment
(Y page 110)
Electrical seat adjustment (Y page 110)
When adjusting the seat, make sure that:
R you are as far away from the driver's airbag
as possible.
R you are sitting in a normal upright position. R
you can fasten the seat belt properly.
R you have moved the backrest to an almost
vertical position.
R you have set the seat angle so that your
thighs are gently supported.
R you can depress the pedals properly.
X Check whether the head restraint is adjus-
ted properly.
When doing so, make sure that you have
adjusted the head restraint so that the back
of your head is supported at eye level by
the centre of the head restraint.
X Observe the safety guidelines on steering
wheel adjustment (Y page 115).
X Make sure that steering wheel :is adjus-
ted properly.
Adjusting the steering wheel manually
(Y page 116)
Adjusting the steering wheel electrically
(Y page 116)
When adjusting the steering wheel, make
sure that:
R you can hold the steering wheel with your
arms slightly bent.
R you can move your legs freely.
R you can see all the displays in the instru-
ment cluster clearly.
X Observe the safety guidelines for seat belts
(Y page 49).
X Check whether you have fastened seat
belt ;properly (Y page 50).
The seat belt should:
R fit snugly across your body
R be routed across the middle of your shoul-
der
R be routed in your pelvic area across the hip
joints
X Before starting off, adjust the rear-view mir-
ror and the exterior mirrors in such a way
that you have a good view of road and traf-
fic conditions (Y page 117).
X Vehicles with a memory function: save
the seat, steering wheel and exterior mirror 108
Correct driver's seat positionSeats, steering wheel and mirrors
Page 112 of 389
settings with the memory function
(Y
page 120). Seats
Important safety notes
G
WARNING
The seats can still be adjusted when there is
no key in the ignition lock. For this reason,
children should never be left unsupervised in
the vehicle. They could adjust the seats and
become trapped. G
WARNING
Only adjust the driver's seat when the vehicle
is stationary. You will otherwise be distracted
from the road and traffic conditions and you
could lose control of the vehicle as a result of
the seat moving. This could cause an acci-
dent. G
WARNING
If you adjust the seat height carelessly, you or
others could be trapped and thereby injured.
Children in particular could unintentionally
press the buttons to electrically adjust the
seats and become trapped.
Take care that:
R while moving the seats, your hands do not
get under the lever assembly of the seat
adjustment system.
R children in the vehicle do not slide their
hands under the levers. G
WARNING
Make sure that nobody can become trapped
when adjusting the seats.
Observe the notes on airbags.
Secure children as recommended; see the
"Children in the vehicle" section. G
WARNING
Make sure that the back of your head is sup-
ported at eye level by the central area of the head restraint. If your head is not supported
correctly by the head restraint, you could suf-
fer a severe neck injury in the event of an
accident. Never drive if the head restraints are
not engaged and set correctly.
G
WARNING
As eat belt can only offer its intended degree
of protection when the backrest is almost ver-
tical and the occupant is sitting upright. Avoid
seat positions that do not allow the seat belt
to be routed correctly. Adjust the backrest so
that it is as upright as possible. Never travel
with the backrest reclined too far backwards.
You could otherwise be seriously or even
fatally injured in the event of an accident or
sudden braking.
! To avoid damage to the seats and the seat
heating, observe the following information:
R do not spill any liquids on the seats. If
liquid is spilled on the seats, dry them as
soon as possible.
R if the seat covers are damp or wet, do not
switch on the seat heating. The seat
heating should also not be used to dry
the seats.
R clean the seat covers as recommended;
see the "Interior care" section.
R do not transport heavy loads on the
seats. Do not place sharp objects on the
seat cushions, e.g. knives, nails or tools.
The seats should only be occupied by
passengers, if possible.
R when the seat heating is in operation, do
not cover the seats with insulating mate-
rials, e.g. blankets, coats, bags, seat cov-
ers, child seats or booster seats.
! To avoid damage to the seats and the seat
heating, observe the following information:
R do not spill any liquids on the seats. If
liquid is spilled on the seats, dry them as
soon as possible.
R if the seat covers are damp or wet, do not
switch on the seat heating. The seat Seats
109Seats, steering wheel and mirrors Z
Page 114 of 389
i
Vehicles with memory function: when the
seat is moved forwards or backwards, the
headresti s moved up or down automati-
cally. Adjusting the head restraints
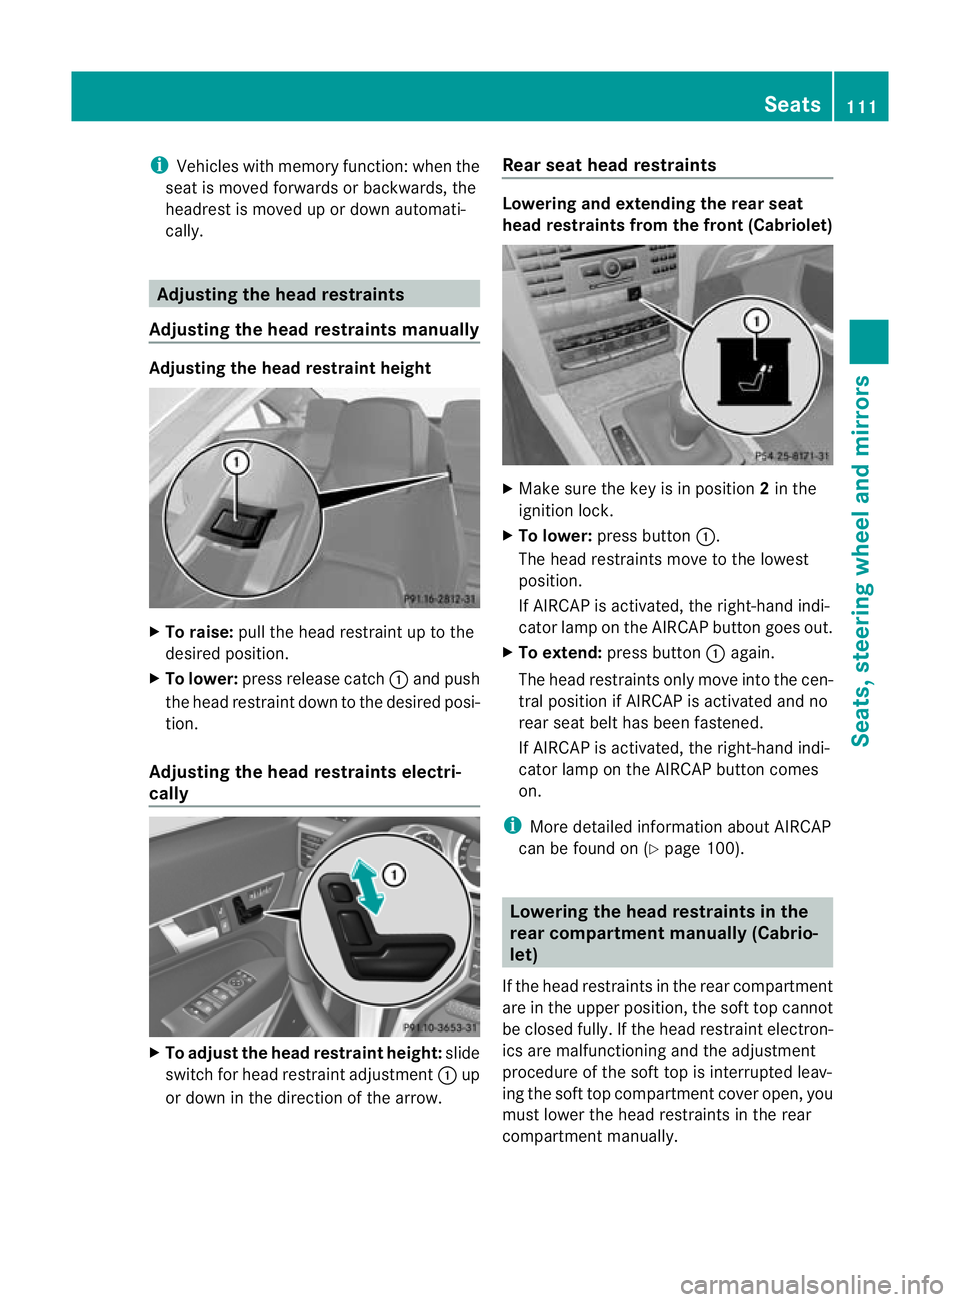
Adjusting the head restraints manually Adjusting the head restraint height
X
To raise: pull the head restraint up to the
desired position.
X To lower: press release catch :and push
the head restraint down to the desired posi-
tion.
Adjusting the head restraints electri-
cally X
To adjust the head restraint height: slide
switch for head restraint adjustment :up
or down in the direction of the arrow. Rear seat head restraints Lowering and extending the rear seat
head restraints from the front (Cabriolet)
X
Make sure the key is in position 2in the
ignition lock.
X To lower: press button :.
The head restraints move to the lowest
position.
If AIRCAP is activated, the right-hand indi-
cator lamp on the AIRCAP button goes out.
X To extend: press button :again.
The head restraints only move into the cen-
tral position if AIRCAP is activated and no
rear seat belt has been fastened.
If AIRCAP is activated, the right-hand indi-
cator lamp on the AIRCAP button comes
on.
i More detailed information aboutA IRCAP
can be found on (Y page 100). Lowering the head restraints in the
rear compartment manually (Cabrio-
let)
If the head restraints in the rear compartment
are in the upper position, the soft top cannot
be closed fully. If the head restraint electron-
ics are malfunctioning and the adjustment
procedure of the soft top is interrupted leav-
ing the soft top compartment cover open, you
must lowert he head restraints in the rear
compartmentm anually. Seats
111Seats, steering wheel and mirrors Z
Page 166 of 389
Automatic engine switch-off
Method of operation
The ECO start/stop function is operational
and the
¤symbol is displayed in green in
the multifunction display, if:
R the indicator lamp in th eECO butto nis lit
green.
R the vehicle is stationary.
R the outside temperature is within the com-
fort range.
R the engine is at normal operating temper-
ature.
R the set temperature for the vehicle interior
has been reached.
R the battery is sufficiently charged.
R the system detects that the windscreen is
not misted up when the air-conditioning
system is switched on.
R the bonnet is closed.
R the driver's door is closed and the driver's
seat belt is fastened.
If not all conditions for automatic engine
switch-off are fulfilled, the ¤symbol is
shown in yellow.
i All vehicle systems remain active during
automatic engine switch-off.
i The engine can be switched off automat-
ically a maximum of four times (first stop
and three subsequent stops) in succession.
The ¤ symbol is shown in yellow in the
multifunction display after the engine has
been started automatically for the fourth
time. When the ¤symbol is shown in
green in the multifunction display, auto-
matic engine switch-off is againp ossible.
i During automatic engine switch-off, the
climate control system only operates at a
reduced capacity. If you require full climate
control capacity, the ECO start/stop func-
tion can be deactivated by pressing the
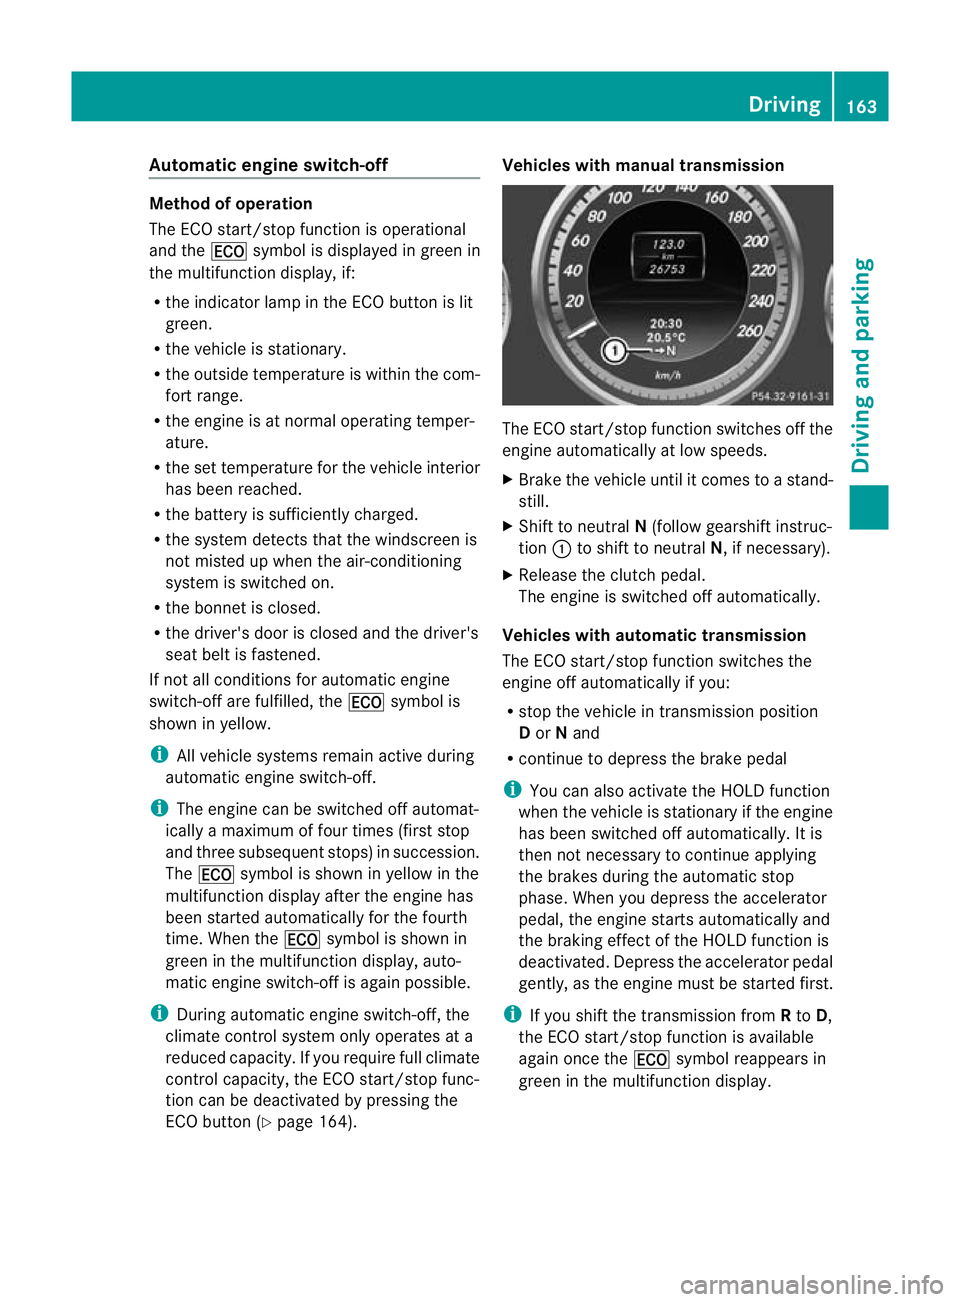
ECO button (Y page 164). Vehicles with manual transmission
The ECO start/stop function switches off the
engine automatically at low speeds.
X
Brake the vehicle until it comes to a stand-
still.
X Shift to neutral N(follow gearshift instruc-
tion :to shift to neutral N, if necessary).
X Release the clutch pedal.
The engine is switched off automatically.
Vehicles with automatic transmission
The ECO start/stop function switches the
engine off automatically if you:
R stop the vehicle in transmission position
D or Nand
R continue to depress the brake pedal
i You can also activate the HOLD function
when the vehicle is stationary if the engine
has been switched off automatically. It is
then not necessary to continue applying
the brakes during the automatic stop
phase. When you depress the accelerator
pedal, the engine starts automatically and
the braking effect of the HOLD function is
deactivated. Depress the accelerator pedal
gently, as the engine must be started first.
i If you shift the transmission from Rto D,
the ECO start/stop function is available
again once the ¤symbol reappears in
green in the multifunction display. Driving
163Driving and parking Z
Page 167 of 389

Automatic engine start
General notes
The engine is started automatically if:
R
you switch off the ECO start/stop function
by pressing the ECO button.
R you engage reverse gear R.
R the vehicle starts to roll.
R the brake system requires this.
R the temperature in the vehicle interior devi-
ates from the set range.
R the system detects moisture on the wind-
scree nwhen the air-conditioning system is
switched on.
R the battery's charge status is too low.
R you unfasten your seat belt or open the
driver's door
Vehicles with manual transmission
! Only engage gear when the clutch pedal
is depressed.
The engine is started automatically if you:
R fully depress the clutch pedal.
R depress the accelerator pedal.
Vehicles with automatic transmission
The engine is started automatically if you:
R release the brake pedal when HOLD is not
activated and the transmission is in posi-
tion Dor N
R depress the accelerator pedal
R move the transmission out of position P.
i Shifting the transmission to position P
does not start the engine. Deactivating/activating the ECO start/
stop function ECO button
X
To switch off: press the:button.
Indicator lamp ;on button :and the
¤ symbol in the multifunction display go
out.
X To switch on: press the:button.
Indicator lamp ;lights up. If all conditions
for automatic engine switch-off
(Y page 163) are fulfilled, the ¤symbol
is shown in green in the multifunction dis-
play.
If not all conditions for automatic engine
switch-off (Y page 163) are fulfilled, the
¤ symbol is shown in yellow in the mul-
tifunction display. If this is the case, the
ECO start/stop function is not available.
i If indicator lamp ;is off, the ECO start/
stop function has been deactivated man-
ually or as the result of a malfunction. The
engine will then not be switched off auto-
matically when the vehicle stops.
i Every time you switch on the engine using
the key or the Start/Stop button, the ECO
start/stop function is activated. 164
DrivingDriving and parking