2012 MERCEDES-BENZ E-CLASS COUPE wipers
[x] Cancel search: wipersPage 138 of 389

X
Pull out bulb holder ;.
X Take the bulb out of bulb holder ;.
X Inser tthe new bulb into bulb holder ;.
X Insert bulb holder ;.
X Align housing cover :and turn it clock-
wise until it engages.
Turn signal lamp (halogen headlamps) Due to their location, have the bulbs in the
left-hand headlamp changed at a qualified
specialist workshop
X Switch off the lights.
X Open the bonnet.
X Turn bulb holder :anti-clockwise and pull
it out.
X Turn the bulb anti-clockwise, applying
slight pressure, and remove it from bulb
holder :.
X Insert the new bulb into bulb holder :and
turn it clockwise.
X Insert bulb holder :into the lamp and turn
it clockwise. Windscreen wipers
Switching the windscreen wipers on/
off G
WARNING
The windscreen will not longer be wiped prop-
erly if the wiper blades are worn. This could
prevent you from observing the traffic condi- tions, thereby causing an accident. Replace
the wiper blades twice a year, ideally in spring
and autumn.
! Do not operate the windscreen wipers
when the windscreen is dry, as this could
damage the wiper blades. Moreover, dust
that has collected on the windscreen can
scratch the glass if wiping takes place when
the windscreen is dry.
If it is necessary to switch on the wind-
screen wipers in dry weather conditions,
always operate them using washer fluid.
! If the windscreen wipers leave smears on
the windscreen after the vehicle has been
washed in an automatic car wash, this may
be due to wax or other residue. Cleant he
windscreen with washer fluid after an auto-
matic car wash.
! Intermittent wiping with rain sensor: due
to optical influences and the windscreen
becoming dirty in dry weather conditions,
the windscreen wipers may be activated
inadvertently. This could damage the wind-
screen wiper blades or scratch the wind-
screen.
For this reason, you should always switch
off the windscreen wipers in dry weather. Combination switch
1
$ Windscreen wipers off
2 Ä Intermittent wipe, low (rain sensor
set to low sensitivity)
3 Å Intermittent wipe, high (rain sensor
set to high sensitivity) Windscreen wipers
135Lights and windscreen wipers Z
Page 139 of 389

4
° Continuous wipe, slow
5 ¯ Continuous wipe, fast
B í Single wipe/ îTo wipe the
windscree nusing washer fluid
X Turn the key to position 1or 2in the ignition
lock.
X Turn the combination switch to the corre-
sponding position.
In the ÄorÅ position, the appropriate
wiping frequency is set automatically accord-
ing to the intensity of the rain. In the Å
position, the rain sensor is more sensitive
than in the Äposition, causing the wind-
screen wipers to wipe more frequently. Replacing the wiper blades
Important safety notes G
WARNING
The wiper arms could start moving and cause
an injury if you leave the windscreen wipers
switched on.
Remove the key from the ignition lock before
replacing the wiper blades.
! Never open the bonnet if a windscreen
wiper arm has been folded away from the
windscreen.
Never fold a windscreen wiper arm without
a wiper blade back onto the windscreen.
Hold the windscreen wiper arm firmly when
you change the wiper blade.Ify ou release
the windscreen wiper arm without a wiper
blade and it falls onto the windscreen, the
windscreen may be damaged by the force
of the impact.
Mercedes-Benz recommends that you have
the wiper blades changed at aqualified
specialist workshop.
! To avoid damaging the windscree nwiper
blades, make sure that you touch only the
wiper arm of the windscreen wiper. Replacing the wiper blades Removing the wiper blades
X
Remove the key from the ignition lock or
tur nthe key to position 0(KEYLESS-GO).
X Fold the wiper arm away from the wind-
screen until it engages. X
Firmly press release knob :and pull the
wiper blade upwards from the wiper arm in
the direction of the arrow.
Fitting the wiper blades
X Position the new wiper blade in the retainer
on the wiper arm and slide it into place in
the opposite direction to the arrow.
The wiper blade audibly engages.
X Make sure that wiper blade is seated cor-
rectly.
X Fold the wiper arm back onto the wind-
screen. Problems with the windscreen wipers
The windscreen wipers are obstructed X
For safety reasons, you should remove the
key from the ignition lock.
or
X Switch off the engine using the Start/Stop
button and open the driver's door.
X Remove the cause of the obstruction.
X Switch the windscreen wipers back on. 136
Windscreen wipersLights and windscreen wipers
Page 140 of 389

The windscreen wipers are inoperative
The windscree
nwiper drive is malfunctioning.
X Selec tanothe rwiper speed on the combi-
nation switch.
X Have the windscreen wipers checked at a
qualified specialist workshop. Windscreen wipers
137Lights and windscreen wipers Z
Page 162 of 389
G
WARNING
If the parking brake has not been fully
released when driving, the parking brake can:
R overheat and cause a fire
R lose its hold function.
There is a risk of fire and an accident. Release
the parking brake fully before driving off.
! Warm up the engine quickly. Do not use
the engine's full performance until it has
reached operating temperature.
Only set the automatic transmission to the
respective drive positions when the vehicle
is stationary.
Where possible, avoid spinning the drive
wheels when pulling away on slippery
roads. Otherwise, you could damage the
drive train. Keyp
ositions
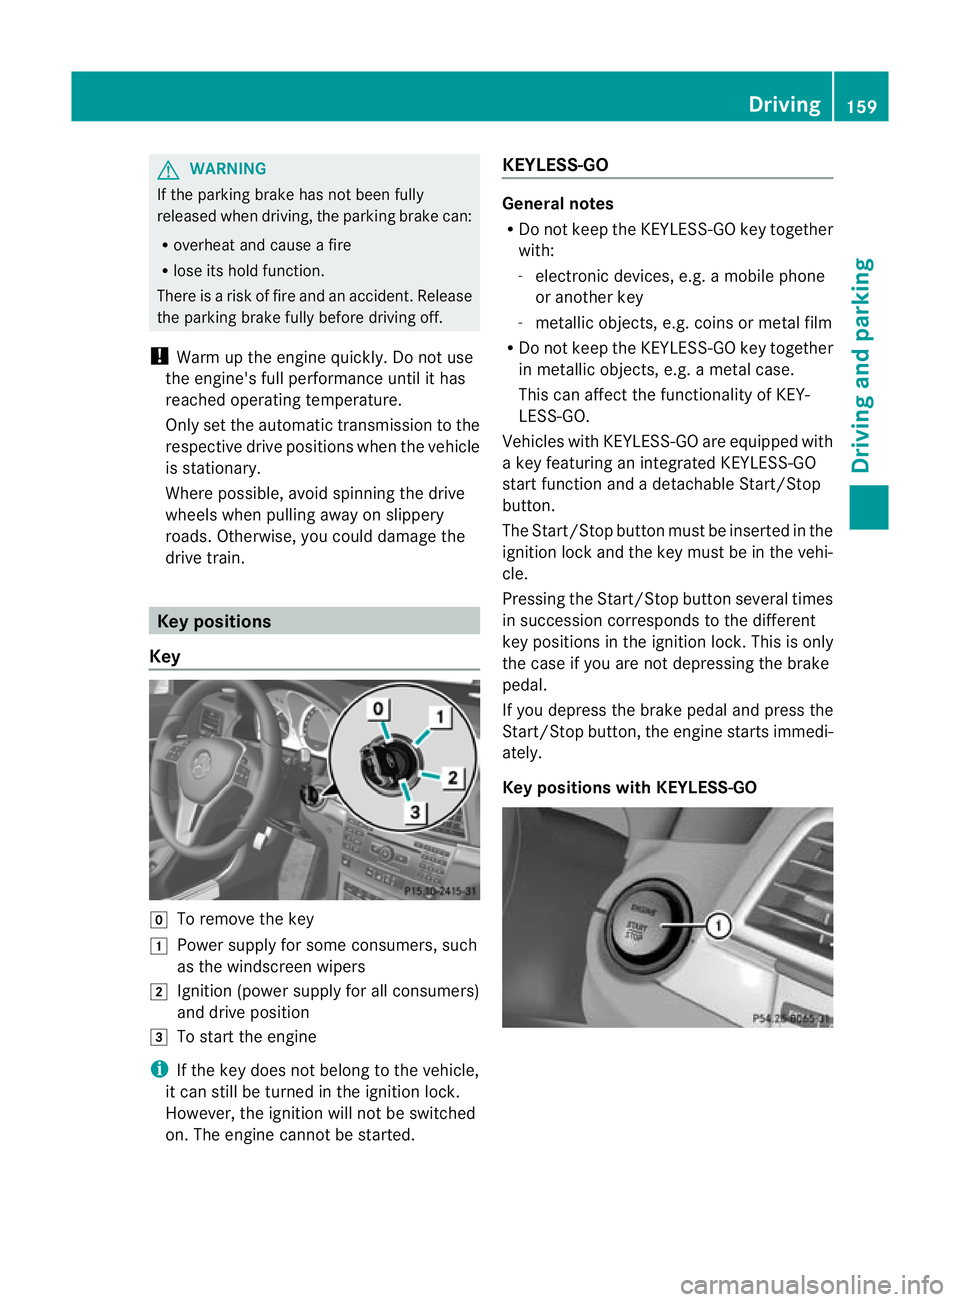
Key g
To remove the key
1 Power supply for some consumers, such
as the windscreen wipers
2 Ignitio n(power supply for all consumers)
and drive position
3 To start the engine
i If the key does not belong to the vehicle,
it can still be turned in the ignition lock.
However, the ignition will not be switched
on. The engine cannot be started. KEYLESS-GO General notes
R
Do not keep the KEYLESS-GO key together
with:
-electronic devices, e.g. a mobile phone
or another key
- metallic objects, e.g. coins or metal film
R Do not keep the KEYLESS-GO key together
in metallic objects, e.g. a metal case.
This can affect the functionality of KEY-
LESS-GO.
Vehicles with KEYLESS-GO are equipped with
a key featuring an integrated KEYLESS-GO
start function and a detachable Start/Stop
button.
The Start/Stop button must be inserted in the
ignition lock and the key must be in the vehi-
cle.
Pressing the Start/Stop button several times
in succession corresponds to the different
key positions in the ignition lock .This is only
the case if you are not depressing the brake
pedal.
If you depress the brake pedal and press the
Start/Stop button, the engine starts immedi-
ately.
Key positions with KEYLESS-GO Driving
159Driving and parking Z
Page 163 of 389
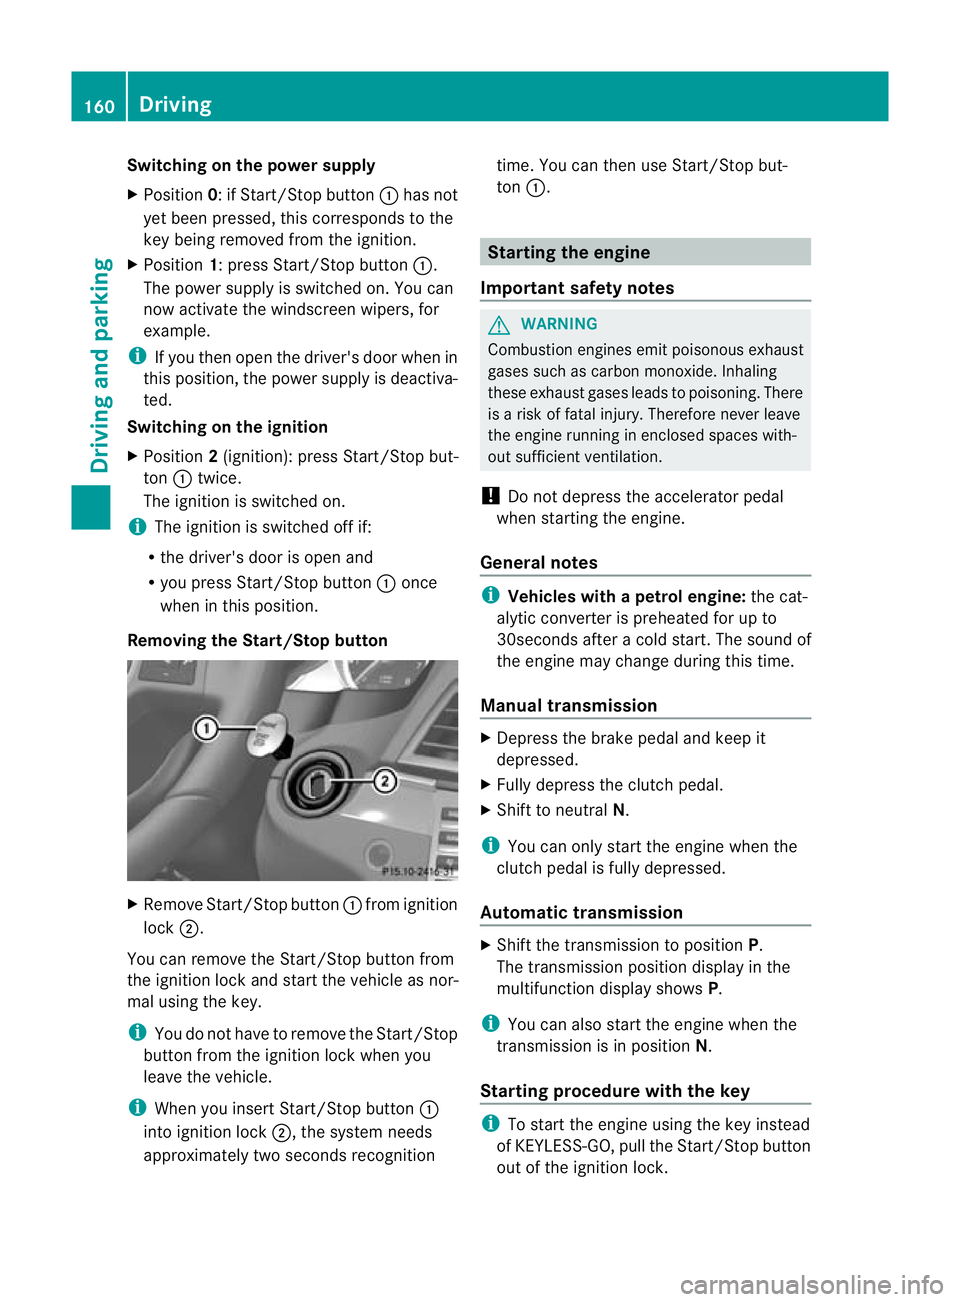
Switching on the power supply
X Position 0: if Start/Stop button :has not
yet been pressed, this corresponds to the
key being removed from the ignition.
X Position 1: press Start/Stop button :.
The power supply is switched on. You can
now activate the windscreen wipers, for
example.
i If you then open the driver's door when in
this position, the power supply is deactiva-
ted.
Switching on the ignition
X Position 2(ignition): press Start/Stop but-
ton :twice.
The ignition is switched on.
i The ignition is switched off if:
R the driver's door is open and
R you press Start/Stop button :once
when in this position.
Removing the Start/Stop button X
Remove Start/Stop button :from ignition
lock ;.
You can remove the Start/Stop button from
the ignition lock and start the vehicle as nor-
mal using the key.
i You do not have to remove the Start/Stop
button from the ignition lock when you
leave the vehicle.
i When you insert Start/Stop button :
into ignition lock ;, the system needs
approximately two seconds recognition time. You can then use Start/Stop but-
ton
:. Starting the engine
Important safety notes G
WARNING
Combustion engines emit poisonous exhaust
gases such as carbon monoxide. Inhaling
these exhaust gases leads to poisoning. There
is a risk of fatal injury. Therefore never leave
the engine running in enclosed spaces with-
out sufficient ventilation.
! Do not depress the accelerator pedal
when starting the engine.
General notes i
Vehicles with apetrol engine: the cat-
alytic converter is preheated for up to
30seconds after a cold start .The sound of
the engine may change during this time.
Manual transmission X
Depress the brake pedal and keep it
depressed.
X Fully depress the clutch pedal.
X Shift to neutral N.
i You can only start the engine when the
clutch pedal is fully depressed.
Automatic transmission X
Shift the transmission to position P.
The transmission position displayint he
multifunction display shows P.
i You can also start the engine when the
transmission is in position N.
Starting procedure with the key i
To start the engine using the key instead
of KEYLESS-GO, pull the Start/Stop button
out of the ignition lock. 160
DrivingDriving and parking
Page 310 of 389
X
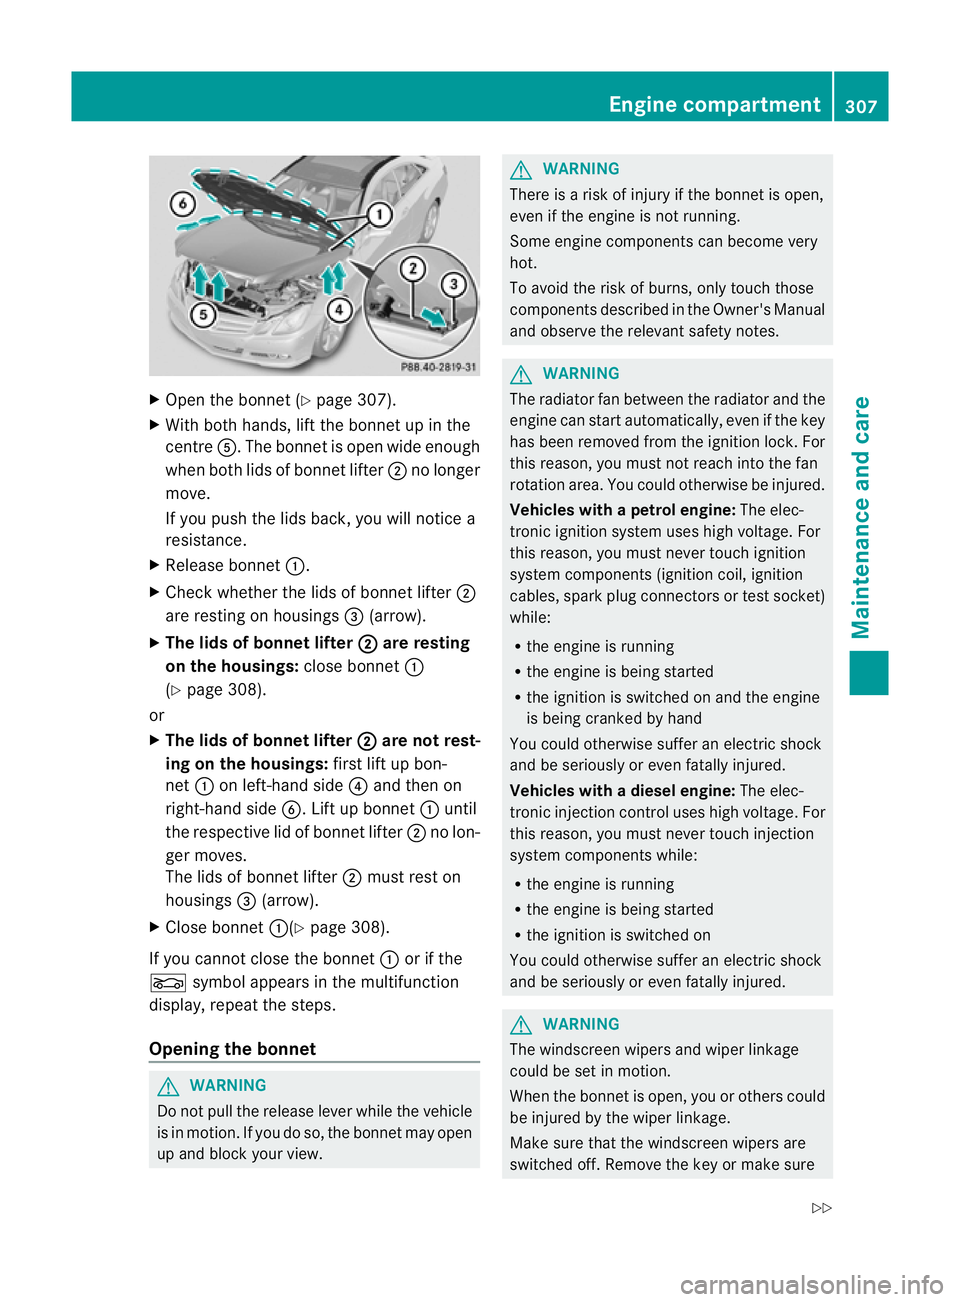
Open the bonnet (Y page 307).
X With both hands, lift the bonnet up in the
centre A.The bonnet is open wide enough
when both lids of bonnet lifter ;no longer
move.
If you push the lids back, you will notice a
resistance.
X Release bonnet :.
X Check whether the lids of bonnet lifter ;
are resting on housings =(arrow).
X The lids of bonnet lifter ; are resting
on the housings: close bonnet:
(Y page 308).
or
X The lids of bonnet lifter ; are not rest-
ing on the housings: first lift up bon-
net :on left-hand side ?and then on
right-hand side B. Lift up bonnet :until
the respective lid of bonnet lifter ;no lon-
ger moves.
The lids of bonnet lifter ;must rest on
housings =(arrow).
X Close bonnet :(Ypage 308).
If you cannot close the bonnet :or if the
L symbol appears in the multifunction
display, repeat the steps.
Opening the bonnet G
WARNING
Do not pull the release lever while the vehicle
is in motion. If you do so, the bonnet may open
up and block your view. G
WARNING
There is a risk of injury if the bonnet is open,
even if the engine is not running.
Some engine components can become very
hot.
To avoid the risk of burns, only touch those
components described in the Owner's Manual
and observe the relevant safety notes. G
WARNING
The radiator fan between the radiator and the
engine can start automatically, even if the key
has been removed from the ignition lock. For
this reason, you must not reach into the fan
rotation area. You could otherwise be injured.
Vehicles with apetrol engine: The elec-
tronic ignitio nsystem uses high voltage. For
this reason, you mus tnever touch ignition
system components (ignition coil, ignition
cables, spark plug connectors or test socket)
while:
R the engine is running
R the engine is being started
R the ignition is switched on and the engine
is being cranked by hand
You could otherwise suffer an electric shock
and be seriously or even fatally injured.
Vehicles with adiesel engine: The elec-
tronic injection control uses high voltage. For
this reason, you must never touch injection
system components while:
R the engine is running
R the engine is being started
R the ignition is switched on
You could otherwise suffer an electric shock
and be seriously or even fatally injured. G
WARNING
The windscreen wipers and wiper linkage
could be set in motion.
When the bonnet is open, you or others could
be injured by the wiper linkage.
Make sure that the windscreen wipers are
switched off. Remove the key or make sure Engine compartment
307Maintenance and care
Z
Page 311 of 389
tha
tno ignition position has been selected
with KEYLESS-GO. All indicator lamps must be
off in the instrument panel.
! Make sure that the windscreen wipers are
not folded away from the windscreen. Oth-
erwise, you could damage the windscreen
wipers or the bonnet. X
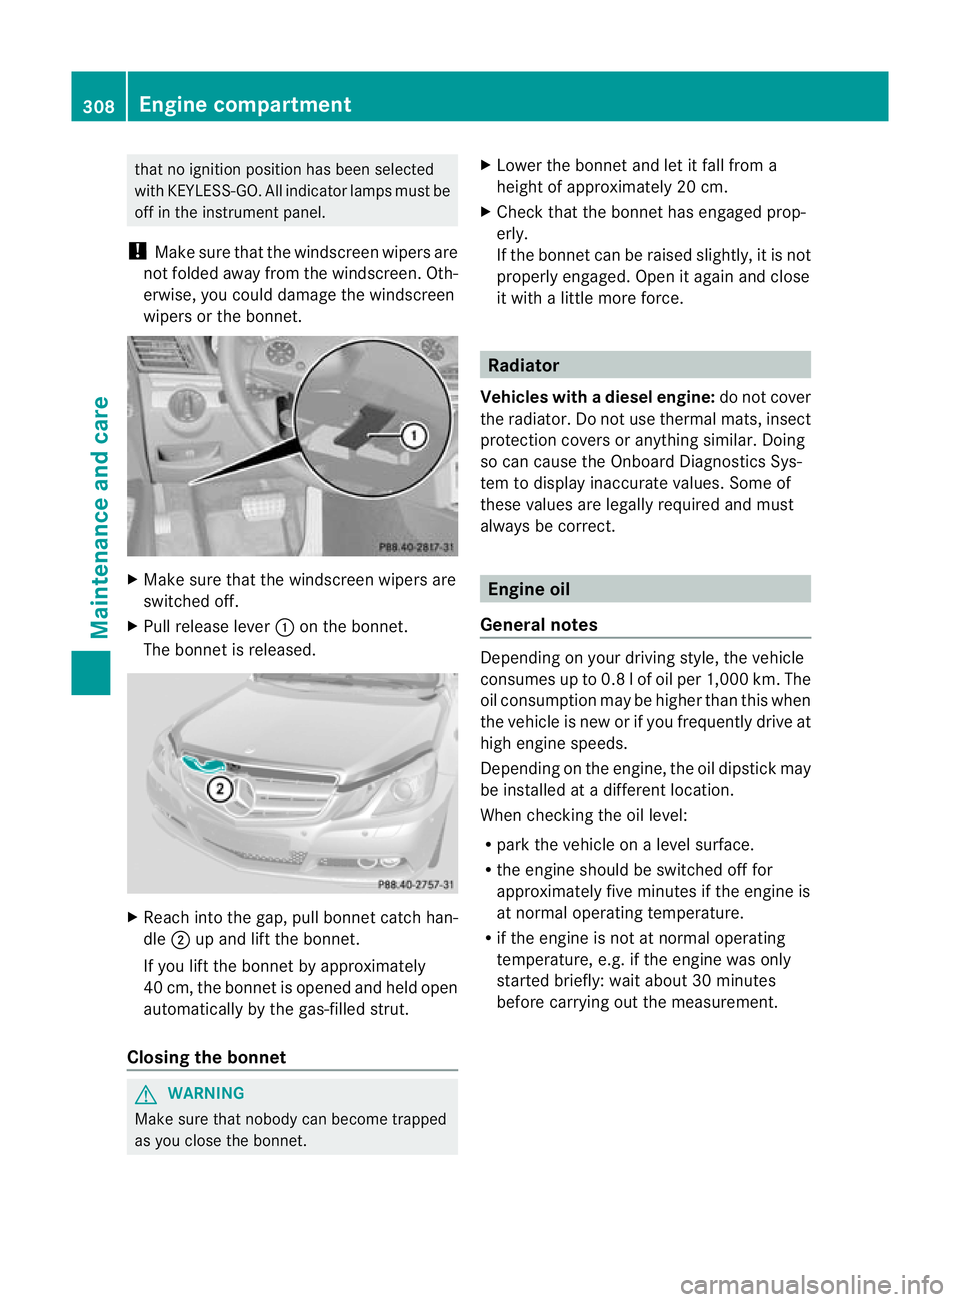
Make sure that the windscreen wipers are
switched off.
X Pull release lever :on the bonnet.
The bonnet is released. X
Reach into the gap, pull bonnet catch han-
dle ;up and lift the bonnet.
If you lift the bonnet by approximately
40 cm, the bonnet is opened and held open
automatically by the gas-filled strut.
Closing the bonnet G
WARNING
Make sure that nobody can become trapped
as you close the bonnet. X
Lower the bonnet and let it fall from a
height of approximately 20 cm.
X Check that the bonnet has engaged prop-
erly.
If the bonnet can be raised slightly, it is not
properly engaged. Open it again and close
it with a little more force. Radiator
Vehicles with adiesel engine: do not cover
the radiator .Do not use thermal mats, insect
protection covers or anything similar. Doing
so can cause the Onboard Diagnostics Sys-
tem to display inaccurate values. Some of
these values are legally required and must
always be correct. Engine oil
General notes Depending on your driving style, the vehicle
consumes up to 0.8 l of oil per 1,000 km. The
oil consumption may be higher than this when
the vehicle is new or if you frequently drive at
high engine speeds.
Depending on the engine, the oil dipstick may
be installed at a different location.
When checking the oil level:
R park the vehicle on a level surface.
R the engine should be switched off for
approximately five minutes if the engine is
at normal operating temperature.
R if the engine is not at normal operating
temperature, e.g. if the engine was only
started briefly: wait about 30 minutes
before carrying out the measurement. 308
Engine compartmentMaintenance and care
Page 319 of 389
!
Do not park up the vehicle for an extended
period straight after cleaning it, particularly
after having cleaned the wheels with wheel
cleaner. Wheel cleaners could cause
increased corrosion of the brake discs and
brake pads/linings. For this reason, you
should drive for a few minutes after clean-
ing. Braking heats the brake discs and the
brake pads/linings, thus drying them. The
vehicle can then be parked up.
Cleaning the windows G
WARNING
Switch off the windscreen wipers and remove
the key from the ignition lock before cleaning
the windscreen or the wiper blades. On vehi-
cles with KEYLESS-GO, press the Start/Stop
button repeatedly until all indicator lamps in
the instrument cluster have gone off. The
windscreen wipers could otherwise move and
injure you.
! Do not use dry cloths, abrasive products,
solvents or cleaning agents containing sol-
vents to clean the inside of the windows.
Do not touch the insides of the windows
with hard objects, e.g. an ice scraper or
ring. There is otherwise a risk of damaging
the windows.
! Cleant he water drainage channels of the
windscreen and the rear window at regular
intervals. Deposits such as leaves, petals
and pollen may under certain circumstan-
ces prevent water from draining away.T his
can lead to corrosion damage and damage
to electronic components.
X Cleant he inside and outside of the win-
dows with a damp cloth and a cleaning
agent that is recommended and approved
by Mercedes-Benz.
Cleaning the wiper blades G
WARNING
Switch off the windscreen wipers and remove
the key from the ignition lock before cleaning the windscreen or the wiper blades. On vehi-
cles with KEYLESS-GO, press the Start/Stop
button repeatedly until all indicator lamps in
the instrument cluster have gone off. The
windscreen wipers could otherwise move and
injure you.
! Do not pull on the wiper blade. Otherwise,
the wiper blade could be damaged.
! Do not clean wiper blades too often and
do not rub them too hard. Otherwise, the
graphite coating could be damaged. This
could cause wiper noise.
! Hold the wiper arm securely when folding
back. The windscreen could be damaged if
the wiper arm hits against it suddenly.
X Fold the wiper arms away from the wind-
screen.
X Carefully clean the wiper blades with a
damp cloth.
X Fold the windscreen wipers back again
before switching on the ignition.
Cleaning the exterior lighting !
Only use cleaning agents or cleaning
cloths that are suitable for plastic lenses.
Unsuitable cleaning agents or cleaning
cloths could scratch or damage the plastic
lenses of the exterior lighting.
X Cleant he plastic lenses of the exterior
lighting using a wet sponge and a mild
cleaning agent, e.g. Mercedes-Ben zcar
shampoo or cleaning cloths.
Mirror turn signal !
Only use cleaning agents or cleaning
cloths that are suitable for plastic lenses.
Unsuitable cleaning agents or cleaning
cloths could scratch or damage the plastic
lenses of the mirror tur nsignals.
X Clean the plasti clenses of the mirror turn
signals in the exterior mirror housing using
a wet sponge and mild cleaning agent, e.g. 316
CareMaintenance and care