2012 MERCEDES-BENZ E-CLASS COUPE phone
[x] Cancel search: phonePage 290 of 389
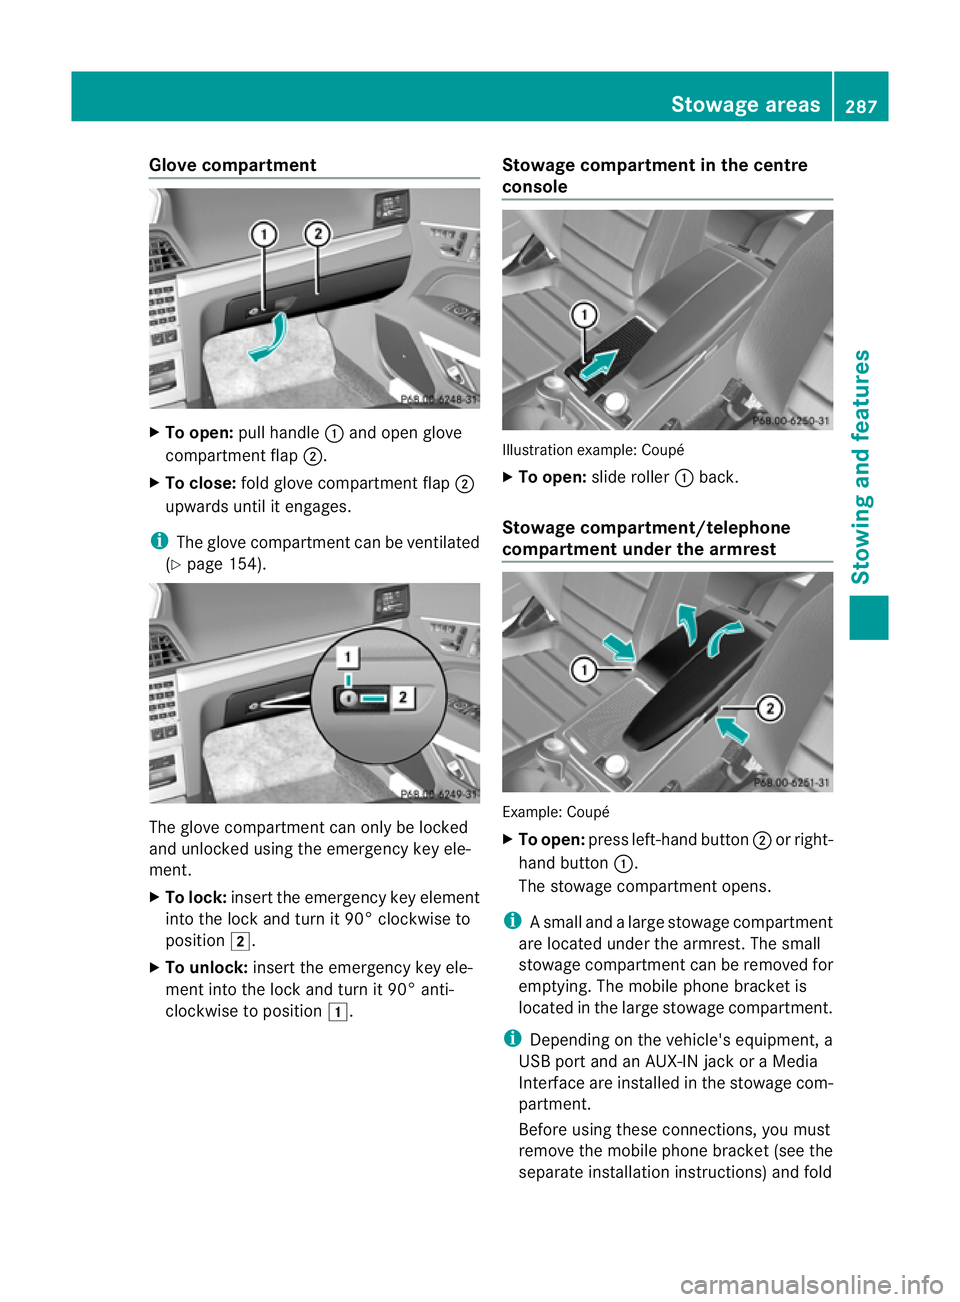
Glove compartment
X
To open: pull handle :and open glove
compartment flap ;.
X To close: fold glove compartment flap ;
upwards until it engages.
i The glove compartment can be ventilated
(Y page 154). The glove compartment can only be locked
and unlocked using the emergency key ele-
ment.
X To lock: insert the emergency key element
into the lock and turn it 90° clockwise to
position 2.
X To unlock: insert the emergency key ele-
ment into the lock and turn it 90° anti-
clockwise to position 1. Stowage compartment in the centre
console Illustration example: Coupé
X
To open: slide roller :back.
Stowage compartment/telephone
compartment under the armrest Example: Coupé
X
To open: press left-hand button ;or right-
hand button :.
The stowage compartment opens.
i Asmall and a large stowage compartment
are located under the armrest. The small
stowage compartment can be removed for
emptying. The mobile phone bracket is
located in the large stowage compartment.
i Depending on the vehicle's equipment, a
USB port and an AUX-IN jack or a Media
Interface are installed in the stowage com-
partment.
Before using these connections, you must
remove the mobile phone bracket (see the
separate installation instructions) and fold Stowage areas
287Stowing and features Z
Page 298 of 389
X
Turn the key to position 2in the ignition
lock (Y page 159).
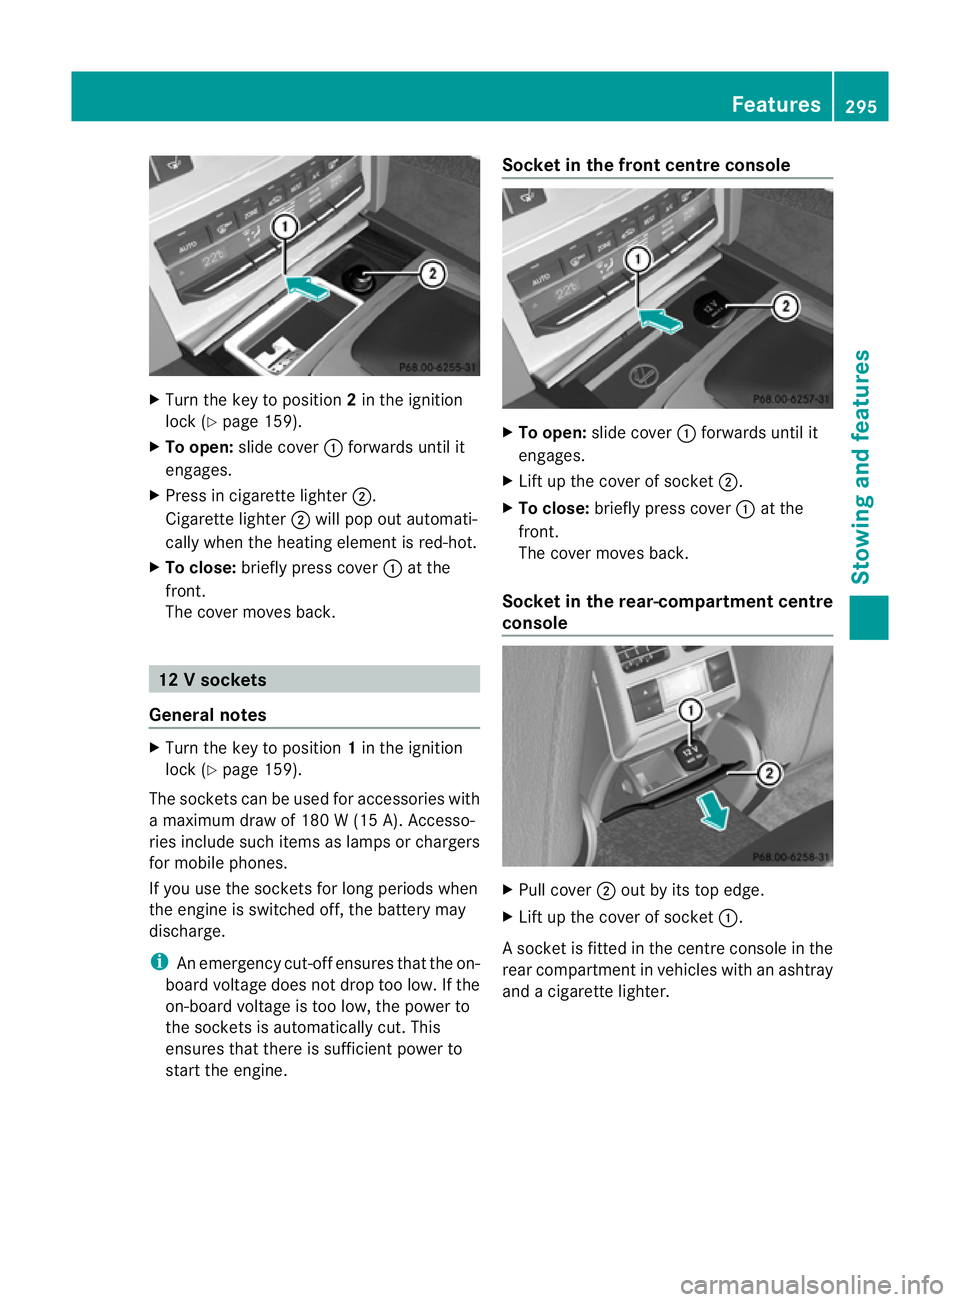
X To open: slide cover :forwards until it
engages.
X Press in cigarette lighter ;.
Cigarette lighter ;will pop out automati-
cally when the heating element is red-hot.
X To close: briefly press cover :at the
front.
The cover moves back. 12
Vsockets
General notes X
Turn the key to position 1in the ignition
lock (Y page 159).
The sockets can be used for accessories with
a maximum draw of 180 W (15 A). Accesso-
ries include such items as lamps or chargers
for mobile phones.
If you use the sockets for long periods when
the engine is switched off ,the battery may
discharge.
i An emergency cut-offe nsures thatthe on-
board voltage does not drop too low. If the
on-board voltage is too low, the power to
the sockets is automatically cut. This
ensures that there is sufficient power to
start the engine. Socket in the front centre console
X
To open: slide cover :forwards until it
engages.
X Lift up the cover of socket ;.
X To close: briefly press cover :at the
front.
The cover moves back.
Socket in the rear-compartment centre
console X
Pull cover ;out by its top edge.
X Lift up the cover of socket :.
As ocket is fitted in the centre console in the
rear compartment in vehicles with an ashtray
and a cigarette lighter. Features
295Stowing and features Z
Page 299 of 389
Mobile phone
Important safety notes G
WARNING
Observe the legal requirements of the country
in which you are currently driving regarding
operating mobile communications equipment
in a vehicle.
If it is permitted by law to operate communi-
cations equipment while the vehicle is in
motion, you must only do so if the traffic sit-
uation permits. Otherwise, you could be dis-
tracted from the traffic conditions, cause an
accident and injure yourself and others.
Two-way radios and fax equipment used with-
out low-reflectio nexterior aerials can inter-
fere with the vehicle's electronics and thereby
jeopardise the operating safety of the vehicle
and your safety .Therefore, you must only use
this equipment if it is correctly connected to
a separate reflection-free exterior aerial. G
WARNING
Excessive levels of electromagnetic radiation
may cause damage to your health and the
health of others. Using an exterior aerial takes
into account current scientific discussions
relating to the possible health risk posed by
electromagnetic fields.
Mercedes-Ben zrecommends the use of an
approved exterior aerial. This ensures:
R optimal mobile phone reception quality in
the vehicle
R mutual influences between the vehicle
electronics and mobile phones are mini-
mised
An exterior aerial has the following advan-
tages:
R it conducts the electromagnetic fields gen-
erated by a wireless device to the exterior.
R the field strength in the vehicle interior is
lower than in a vehicle that does not have
an exterior aerial. i
There are various mobile phone brackets
that may be fitted in your vehicle; in some
cases, these are country-specific.
i You can connect a Bluetooth ®
-capable
mobile phone with Audio 20, Audio 50 or
COMAND Online via the Bluetooth ®
inter-
face. This also applies if your vehicle is
equipped with convenience telephony.
More information on suitable mobile phones,
mobile phone brackets and on connecting
Bluetooth ®
-capable mobile phones with
Audio 20, Audio 50 or COMAND Online can
be obtained:
R at your Mercedes-Benz Service Centre
R on the Internet at http://www.mercedes-
benz.com/connect
i The functions and services available when
you use the phone depend on your mobile
phone model and service provider.
Using amobile phone If the mobile phone is inserted in the mobile
phone bracket, you can speak to the person
you are calling using the hands-free system.
X
Open the telephone compartment
(Y page 287).
X Place the mobile phone bracket into the
pre-installed fitting (see the separate
installation instructions for the mobile
phone fitting).
X Inser tthe mobile phone into the mobile
phone bracket (see the separate installa-
tion instructions for the mobile phone fit-
ting).
i On some mobile phone brackets, you first
have to connect the mobile phone via Blue-
tooth ®
to the mobile phone bracket (see
the separate operating instructions for the
mobile phone bracket).
If this is the case, the mobile phone does
not have to be inserted into the bracket for
you to be able to use the telephone func- 296
FeaturesStowing and features
Page 300 of 389
tions. However, the charging function and
aerial functio nare not available.
Operating the mobile phone You can operate the telephone using the
6 and~ buttons on the multifunction
steering wheel. You can operate other mobile
phone functions via the on-board computer
(Y page 238).
When you remove the key from the ignition
lock, the mobile phone stays switched on.
However, you can no longer use the hands-
free system.
If you have an active call and would like to
take the key out of the ignition lock, first
remove the mobile phone from the bracket.
i When using a bracket connected to the
mobile phone via Bluetooth ®
and you wish
to proceed with a call:
Switch to private mode before removing
the key from the ignitio nlock. Otherwise, it
may take up to 20 seconds, before the
mobile phone separates from the system.
Only then can the telephone call continue.
Information on the necessary steps for set-
ting up "private mode" can be found in the
separate mobile phone operating instruc-
tions.
i Not all mobile phones support "private
mode".
Mobile telephone bracket in the stow-
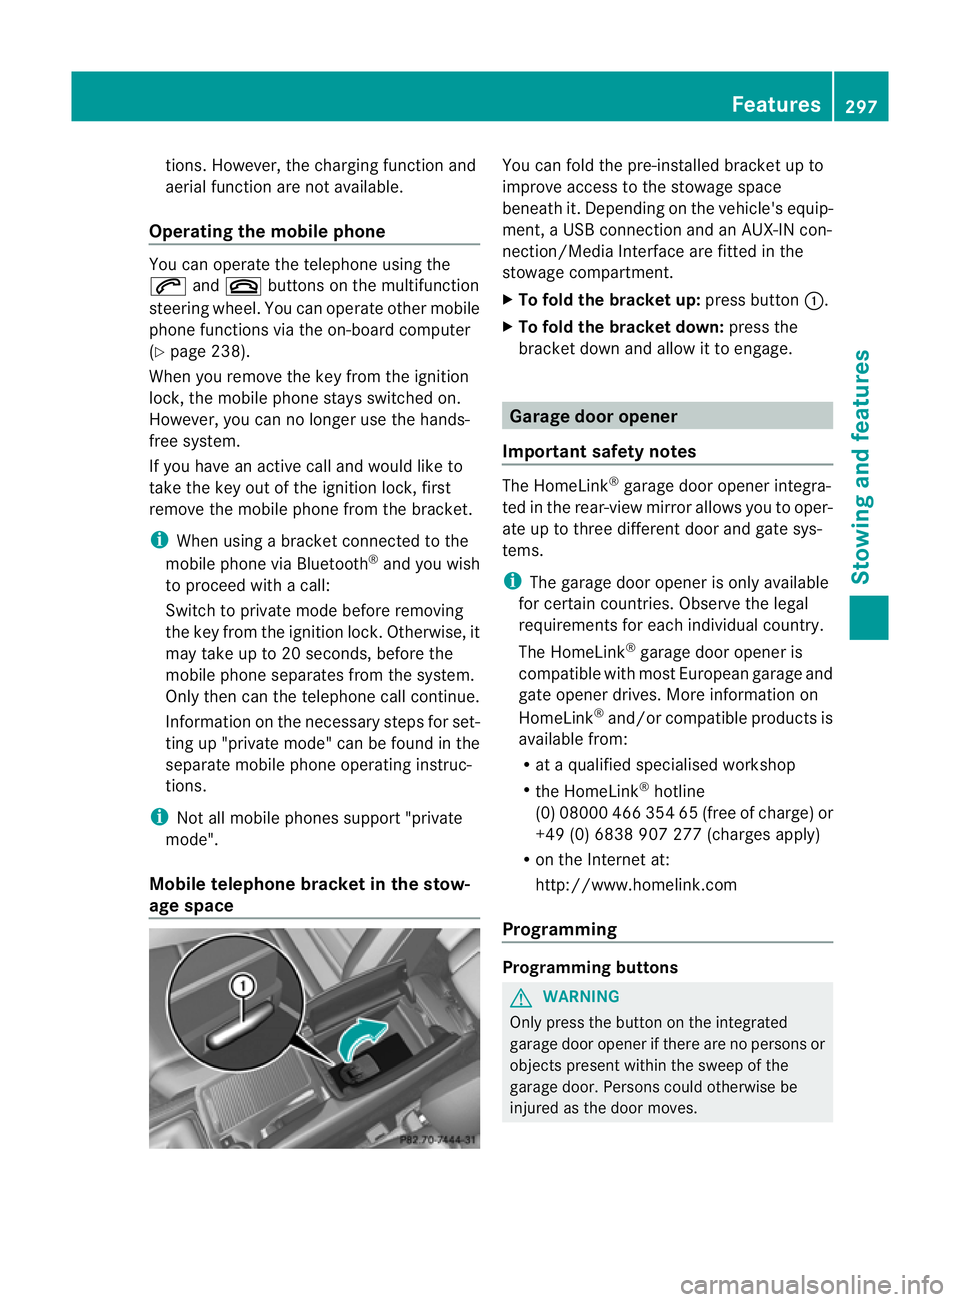
age space You can fold the pre-installed bracket up to
improve access to the stowage space
beneath it. Depending on the vehicle's equip-
ment, a USB connection and an AUX-IN con-
nection/Media Interface are fitted in the
stowage compartment.
X
To fold the bracket up: press button:.
X To fold the bracket down: press the
bracket down and allow it to engage. Garage door opener
Important safety notes The HomeLink
®
garage door opener integra-
ted in the rear-view mirror allows you to oper-
ate up to three different door and gate sys-
tems.
i The garage door opener is only available
for certain countries. Observe the legal
requirements for each individual country.
The HomeLink ®
garage door opener is
compatible with most European garage and
gate opener drives. More information on
HomeLink ®
and/or compatible products is
available from:
R at a qualified specialised workshop
R the HomeLink ®
hotline
(0) 08000 466 354 65 (free of charge) or
+49 (0) 6838 907 277 (charges apply)
R on the Internet at:
http://www.homelink.com
Programming Programming buttons
G
WARNING
Only press the button on the integrated
garage door opener if there are no persons or
objects present within the sweep of the
garage door. Persons could otherwise be
injured as the door moves. Features
297Stowing and features Z
Page 306 of 389
Australia
Country Radio type approval num-
ber
Frequency range (MHz)
AU (Aus-
tralia) 28 June
MHz: 27, 30, 40
,433, 868 NZ (New
Zealand) 20 March 06
MHz: 27, 30, 40, 433
Floormat on the driver's side
G
WARNING
Make sure that there is sufficient clearance
around the pedals whe nfloormats are used,
and that the floormats are properly secured.
The floormats must be correctly secured at all
times using the securing knob and retainers.
Before you drive off, chec kthe floormats and
secure them if necessary. Afloormat which is
not properly secured can slip and thereby
interfere with the movemen tofthe pedals.
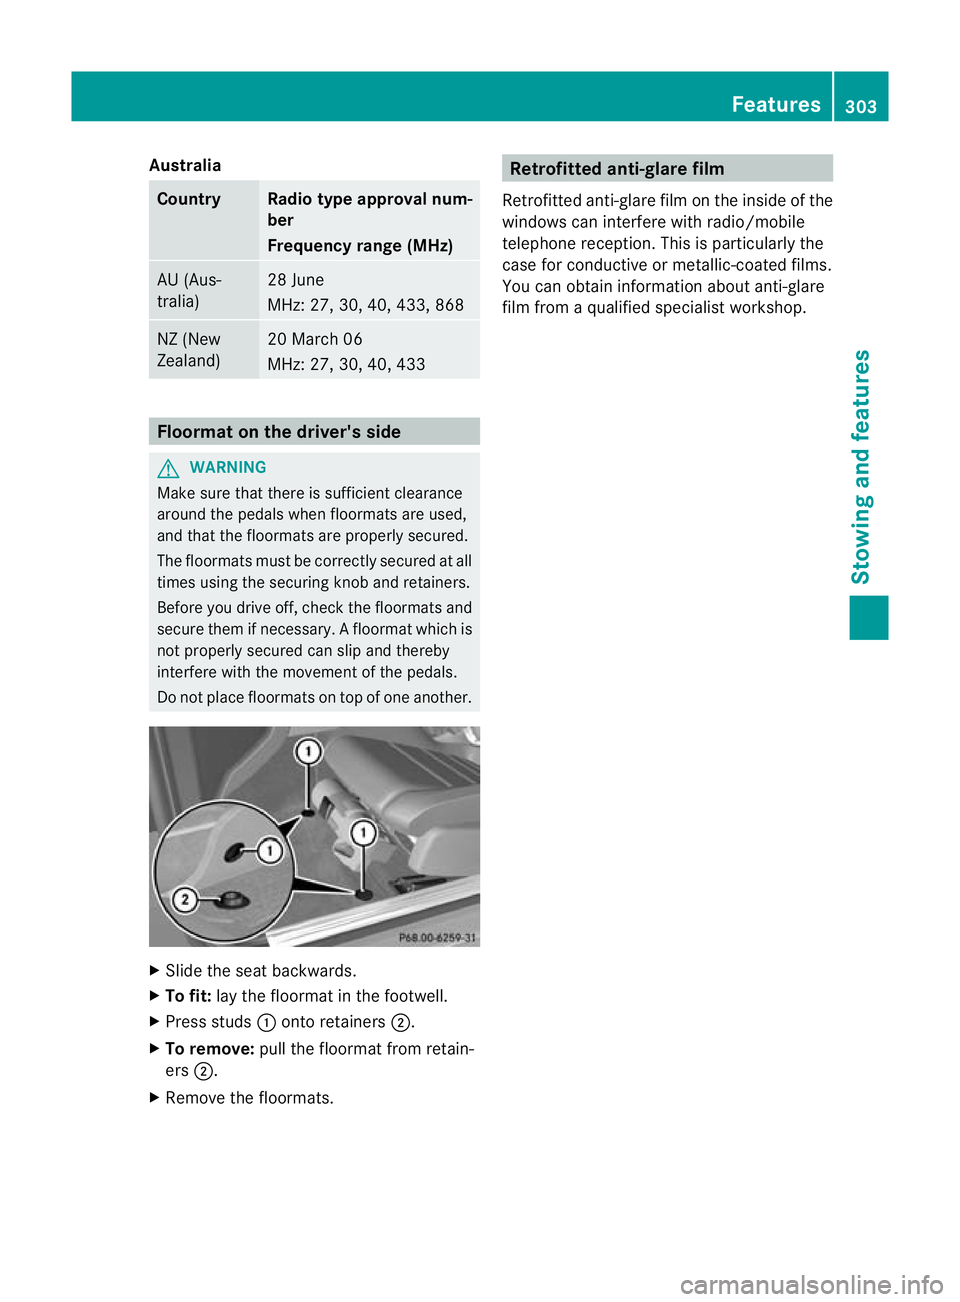
Do not place floormats on top of one another. X
Slide the seat backwards.
X To fit: lay the floormat in the footwell.
X Press studs :onto retainers ;.
X To remove: pull the floormat from retain-
ers ;.
X Remove the floormats. Retrofitted anti-glare film
Retrofitted anti-glare film on the inside of the
windows can interfere with radio/mobile
telephone reception. This is particularly the
case for conductive or metallic-coated films.
You can obtain information about anti-glare
film from a qualified specialist workshop. Features
303Stowing and features Z
Page 312 of 389
Checking the oil level using the oil dip-
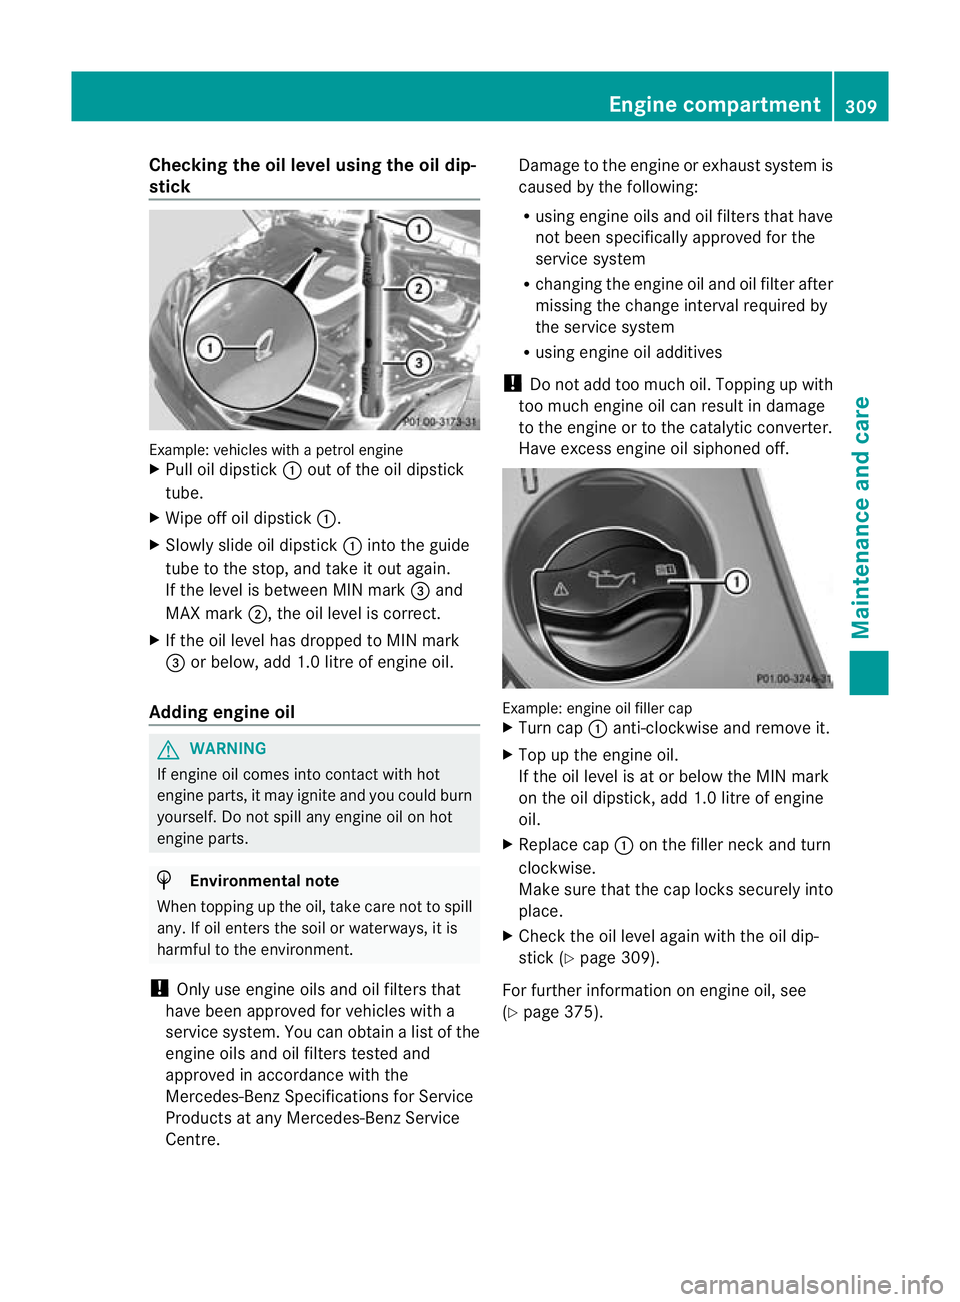
stick Example
:vehicles with a petrol engine
X Pull oil dipstick :out of the oil dipstick
tube.
X Wipe off oil dipstick :.
X Slowly slide oil dipstick :into the guide
tube to the stop, and take it out again.
If the level is between MIN mark =and
MAX mark ;, the oil level is correct.
X If the oil level has dropped to MIN mark
= or below, add 1.0 litre of engine oil.
Adding engine oil G
WARNING
If engine oil comes into contact with hot
engine parts, it may ignite and you could burn
yourself. Do not spill any engine oil on hot
engine parts. H
Environmental note
When topping up the oil, take care not to spill
any. If oil enters the soil or waterways, it is
harmful to the environment.
! Only use engine oils and oil filters that
have been approved for vehicles with a
service system. You can obtain a list of the
engine oils and oil filters tested and
approved in accordance with the
Mercedes-Benz Specifications for Service
Products at any Mercedes-Benz Service
Centre. Damage to the engine or exhaust system is
caused by the following:
R
using engine oils and oil filters that have
not been specifically approved for the
service system
R changing the engine oil and oil filter after
missing the change interval required by
the service system
R using engine oil additives
! Do not add too much oil. Topping up with
too much engine oil can result in damage
to the engine or to the catalytic converter.
Have excess engine oil siphoned off. Example: engine oil filler cap
X
Turn cap :anti-clockwise and remove it.
X Top up the engine oil.
If the oil level is at or below the MIN mark
on the oil dipstick, add 1.0 litre of engine
oil.
X Replace cap :on the filler neck and turn
clockwise.
Make sure that the cap locks securely into
place.
X Check the oil level again with the oil dip-
stick (Y page 309).
For further information on engine oil, see
(Y page 375). Engine compartment
309Maintenance and care Z
Page 315 of 389
tio
nc an be obtained at a qualified specialist
workshop, e.g .aMercedes-Benz Service
Centre.
Driving abroad
An extensive Mercedes-Benz Service network
is also available in other countries. The
Service Hotline's current telephone numbers
for use when you are abroad are to be found
in the "Mercedes-Benz Service24h" section
of the Service Booklet. Care
General Notes
H
Environmental note
Dispose of empty packaging and cleaning
cloths in an environmentally responsible man-
ner.
! For cleaning your vehicle, do not use any
of the following:
R dry, rough or hard cloths
R abrasive cleaning agents
R solvents
R cleaning agents containing solvents
Do not scrub.
Do not touch the surfaces or protective
films with hard objects, e.g. a ring or ice
scraper. You could otherwise scratch or
damage the surfaces and protective film.
! Do not park up the vehicle for an extended
period straight after cleaning it, particularly
after having cleaned the wheels with wheel
cleaner. Wheel cleaners could cause
increased corrosion of the brake discs and
brake pads/linings. For this reason, you
should drive for a few minutes after clean-
ing. Braking heats the brake discs and the
brake pads/linings, thus drying them. The
vehicle can then be parked up.
Regular care of your vehicle is a condition for
retaining the quality in the long term. Use care products and cleaning agents rec-
ommended and approved by Mercedes-Benz. Washing the vehicle and cleaning the
paintwork
Automatic car wash G
WARNING
Braking efficiency is reduced after washing
the vehicle. This could cause an accident. For
this reason, following a car wash, drive with
particular care until the brakes are dry. G
WARNING
The vehicle is braked when the HOLD function
or DISTRONIC PLUS is activated. Therefore,
deactivate the HOLD function and DISTRONIC
PLUS before the vehicle is washed in an auto-
matic car wash.
! Preferably use car washes with adjustable
high-pressure jets for pre-washing. This
corresponds with the specifications for
cabriolet programmes. In car washes that
use high water pressures, there is a risk
that a small amount of water may leak into
the vehicle.
! Cabriolet: do not treat the vehicle with
hot wax under any circumstances.
! Cabriolet: pull the key out of the ignition
lock when washing the vehicle. This
ensures that the wind deflector on the
windscreen is retracted. The wind deflector
may otherwise be damaged.
! Make sure that:
R the side windows and sliding sunroof or
soft top are closed completely.
R the blower for the ventilation/heating is
switched off (OFF button is depressed).
R the windscreen wiper switch is at posi-
tion 0.
The vehicle could otherwise be damaged. 312
CareMaintenance and care
Page 331 of 389
X
To reduce the tyre pressure: depress
pressure release button Enext to pres-
sure gauge F.
X If the tyre pressure is correct, unscrew the
fille rhose from the valve of the repaired
tyre.
X Screw the valve cap onto the valve of the
repaired tyre.
X Pull the tyre sealant bottle out of the tyre
inflation compressor.
The filler hose stays on the tyre sealant
bottle.
X Stow the tyre sealant bottle, the tyre infla-
tion compressor and the warning triangle.
X Drive to the nearest qualified specialist
workshop and have the tyre changed there.
X Have the tyre sealant bottle replaced as
soon as possible at a qualified specialist
workshop.
X Have the tyre sealant bottle replaced every
four years at a qualified specialist work-
shop.
i In your vehicle, you will find a sticker with
the Mercedes-Benz Service24h telephone
number, e.g. on the B-pillar on the driver's
side. Battery (vehicle)
Important safety notes
Work on the battery, e.g. removing or instal-
ling, requires specialist knowledge and the
use of special tools. Therefore, always have
work on the battery carried out at a qualified
specialist workshop. G
WARNING
Work carried out incorrectly on the battery
can, for example, lead to a short circuit and
damage your vehicle's electronic system. This
can disrupt driving safety systems such as
ABS (anti-lock braking system) or ESP ®
(Elec-
tronic Stability Program). R
If ABS malfunctions, the wheels can lock
during braking. This limits the steerability
of the vehicle when braking and the braking
distance may increase. There is a risk of
accident.
R If ESP ®
malfunctions, the vehicle will not be
stabilised if it starts to skid or a wheel starts
to spin. There is a risk of accident.
You should therefore have all work involving
the battery carried out at a qualified specialist
workshop. G
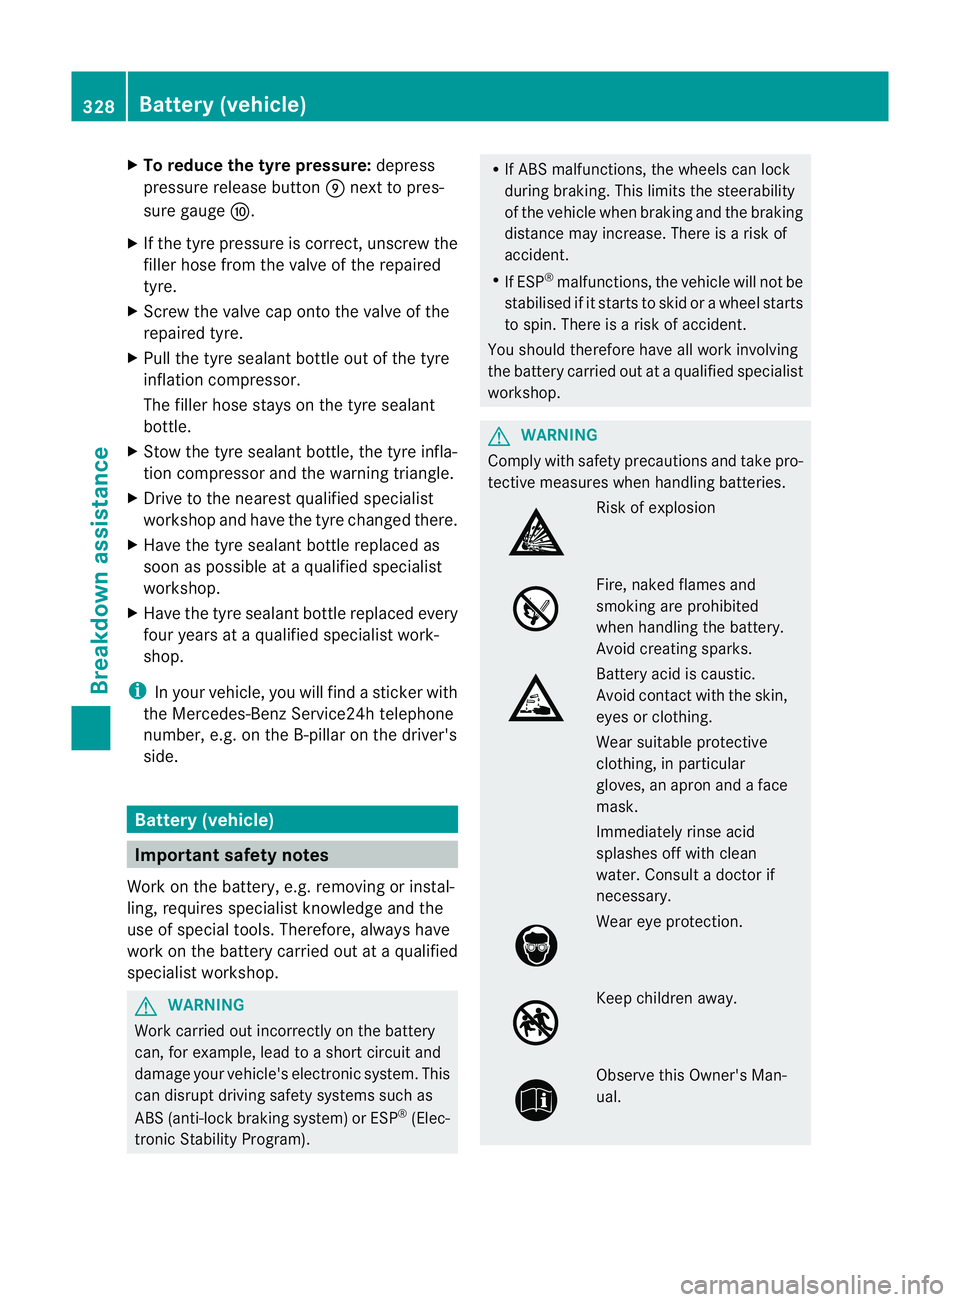
WARNING
Comply with safety precautions and take pro-
tective measures when handling batteries. Risk of explosion
Fire, naked flames and
smoking are prohibited
when handling the battery.
Avoid creating sparks.
Battery acid is caustic.
Avoid contact with the skin,
eyes or clothing.
Wear suitable protective
clothing, in particular
gloves, an apron and a face
mask.
Immediately rinse acid
splashes off with clean
water. Consult a doctor if
necessary.
Wear eye protection.
Keep children away.
Observe this Owner's Man-
ual.328
Battery (vehicle)Breakdown assistance