2012 MERCEDES-BENZ E-CLASS COUPE instrument cluster
[x] Cancel search: instrument clusterPage 128 of 389

X
Press the Nbutton.
The green Nindicator lamp in the instru-
ment cluster lights up.
X To switch off the front foglamps: press
the N button.
The green Nindicator lamp in the instru-
ment cluster goes out.
Only vehicles with frontf oglamps are equip-
ped with the "Foglamp" function; information
on the foglamp function for vehicles with
Intelligent Light System (Y page 129).
Rear foglamp 1W
Left-hand parking lamps
2X Right-hand parking lamps
3T Side lamps, licence plate and instru-
ment cluster lighting
4Ã Automatic headlamp mode, control-
led by the light sensor
5L Dipped-beam/main-beam head-
lamps
BR Rear foglamp
CN Foglamps (only vehicles with front
foglamps).
The rear foglamp improves visibility of your
vehicle for the traffic behind in the event of
heavy fog. Please take note of the country-
specific regulations for the use of rear fog-
lamps.
X To switch on the rear foglamp: turn the
key in the ignition lock to position 2or start
the engine.
X Turn the light switch to LorÃ. X
Press the Rbutton.
The yellow Rindicator lamp in the
instrument cluster lights up.
X To switch off the rear foglamp: press the
R button.
The yellow Rindicator lamp in the
instrument cluster goes out.
Side lamps
! If the battery has been excessively dis-
charged, the side lamps or parking lamps
are automatically switched off to enable
the next engine start.A lways park your
vehicle safely and sufficiently lit according
to legal standards. Avoid the continuous
use of the Tside lamps for several
hours. If possible, switch on the Xright
or the Wleft parking lamp. 1W
Left-hand parking lamps
2X Right-hand parking lamps
3T Side lamps, licence plate and instru-
mentcluster lighting
4Ã Automatic headlamp mode, control-
led by the light sensor
5L Dipped-beam/main-beam head-
lamps
BR Rear foglamp
CN Foglamps (only vehicles with front
foglamps).
X To switch on: turn light switch to T.
The green Tindicator lamp in the instru-
men tcluster lights up. Exterior lighting
125Lights and windscreen wipers Z
Page 133 of 389

You can use this function to set the head-
lamps to change betwee
ndipped beam and
main beam automatically. The system recog-
nises vehicles with their lights on, either
approaching fro mthe opposite direction or
travelling in front of your vehicle, and conse-
quently switches the headlamps from main
beam to dipped beam.
The system automatically adapts the dipped-
beam headlamp range depending on the dis-
tance to the other vehicle. Once the system
no longer detects any other vehicles, it reac-
tivates the main-beam headlamps.
The system's optical sensor is located behind
the windscreen near the overhead control
panel. Switching Adaptive Highbeam Assist
on/off :
Main-beam headlamps
; Turn signal, right
= Headlamp flasher
? Turn signal, left
X To activate: activate the Adaptive High-
beam Assist function using the on-board
computer (Y page 244).
X Turn the light switch to Ã.
X Press the combination switch beyond the
pressure point in the direction of
arrow :.
The _ indicator lamp in the multifunc-
tion display lights up if it is dark and the
light sensor activates the dipped-beam
headlamps.
If you are driving at speeds above
45 km/h:
the headlamp range is set automatically
depending on the distance between the
vehicle and other road users.
If you are driving at speeds above
55 km/h and no other road users are rec-
ognised:
the main-beam headlamps are switched on
automatically .The K indicator lamp in
the instrumentc luster also lights up.
If you are driving at speeds below
45 km/h or other road users are recog-
nised or the roads are adequately lit:
the main-beam headlamps are switched off
automatically. The Kindicator lamp in
the instrumen tcluster goes out. The _130
Exterior lightingLights and windscreen wipers
Page 134 of 389

indicator lamp in the multifunction display
remains lit.
X To deactivate: move the combination
switch back to its normal position.
The _ indicator lamp in the instrument
cluster goes out. Headlamps misted up on the inside
The headlamps may mist up on the inside if
there is high atmospheric humidity.
X Switch on the lights and drive off.
The level of moisture diminishes, depend-
ing on the length of the journey and the
weathe rconditions (humidity and temper-
ature).
If the level of moisture does not diminish:
X Have the headlamps checked at a qualified
specialist workshop. Interior lighting
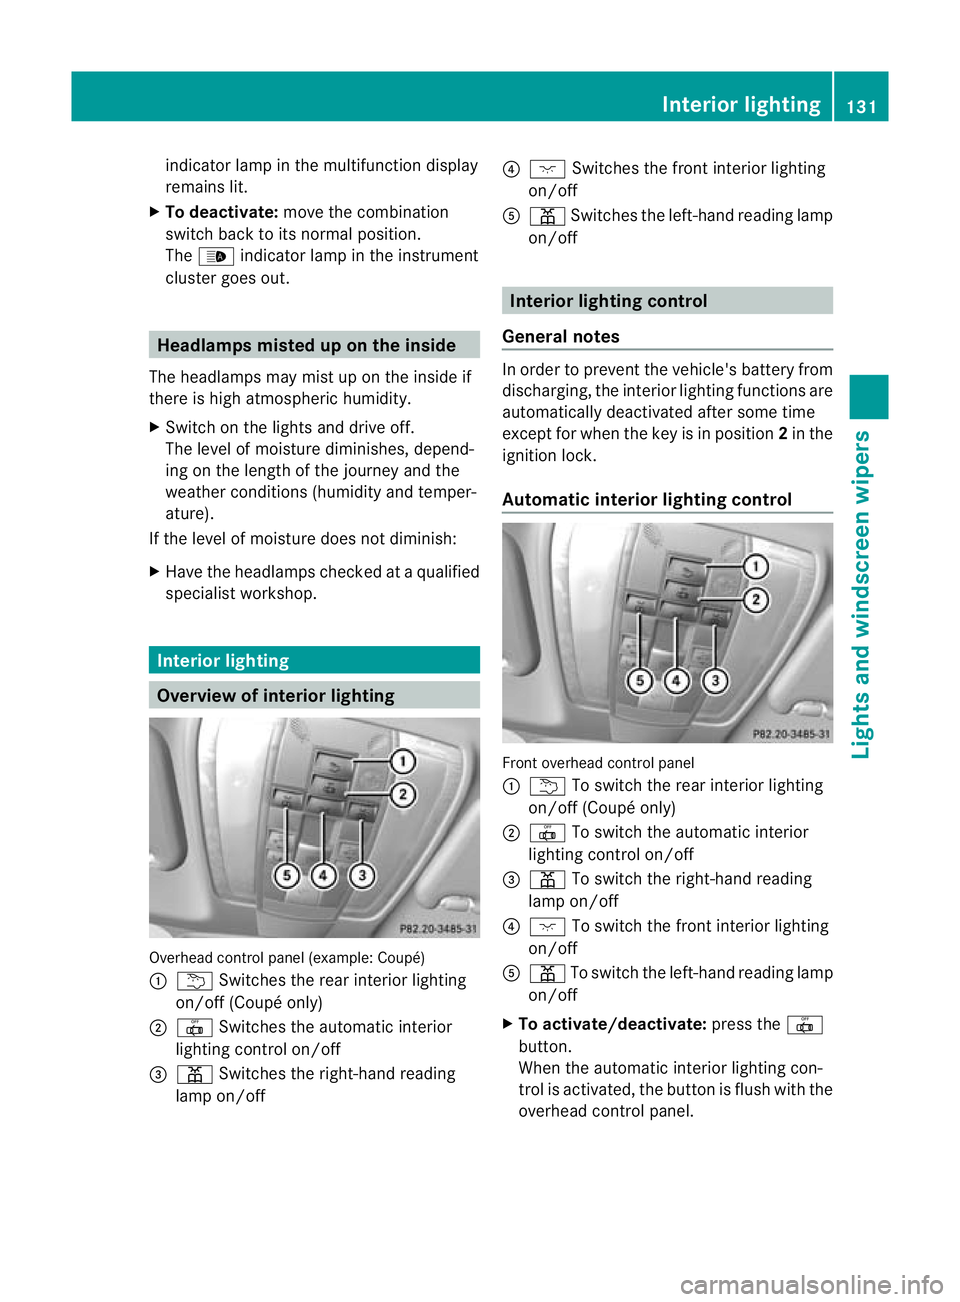
Overview of interior lighting
Overhead control panel (example: Coupé)
:
u Switches the rear interior lighting
on/off( Coupé only)
; | Switches the automatic interior
lighting control on/off
= p Switches the right-hand reading
lamp on/off ?
c Switches the front interior lighting
on/off
A p Switches the left-hand reading lamp
on/off Interior lighting control
General notes In order to preven
tthe vehicle's battery from
discharging, the interior lighting functions are
automatically deactivated after some time
except for when the key is in position 2in the
ignition lock.
Automatic interior lighting control Front overhead control panel
:
u To switch the rear interior lighting
on/off (Coupé only)
; | To switch the automatic interior
lighting control on/off
= p To switch the right-hand reading
lamp on/off
? c To switch the front interior lighting
on/off
A p To switch the left-hand reading lamp
on/off
X To activate/deactivate: press the|
button.
When the automatic interior lighting con-
trol is activated, the button is flush with the
overhead control panel. Interior lighting
131Lights and windscreen wipers Z
Page 177 of 389

G
WARNING
Avoid contact with fuels.
It is hazardous to yourh ealth if your skin
comes into direct contact with fuels or you
breathe in fuel vapours. G
WARNING
Do not use petrol to refuel a diesel tank .Never
mix diesel with petrol. Doing so could damage
the fuel system and the engine. The vehicle
could also catch fire.
! Do not use petrol to refuel vehicles with a
diesel engine. Do not use diesel to refuel
vehicles with a petrol engine. Even small
amounts of the wrong fuel result in damage
to the fuel system and the engine.
! Do not switch on the ignition if you acci-
dentally refuel with the wrong fuel. Other-
wise, the fuel will enter the fuel lines. Notify
a qualified specialist workshop and have
the fuel tank and fuel lines drained com-
pletely.
! Overfilling the fuel tank could damage the
fuel system.
! Take care not to spill any fuel on painted
surfaces. You could otherwise damage the
paintwork.
! Use a filter when adding fuel from a fuel
can. The fuel lines and/or the diesel injec-
tion system could otherwise be blocked by
particles from the fuel can.
Further information on fuel and on fuel grades
can be found in the "Fuel" section
(Y page 372). Refuelling
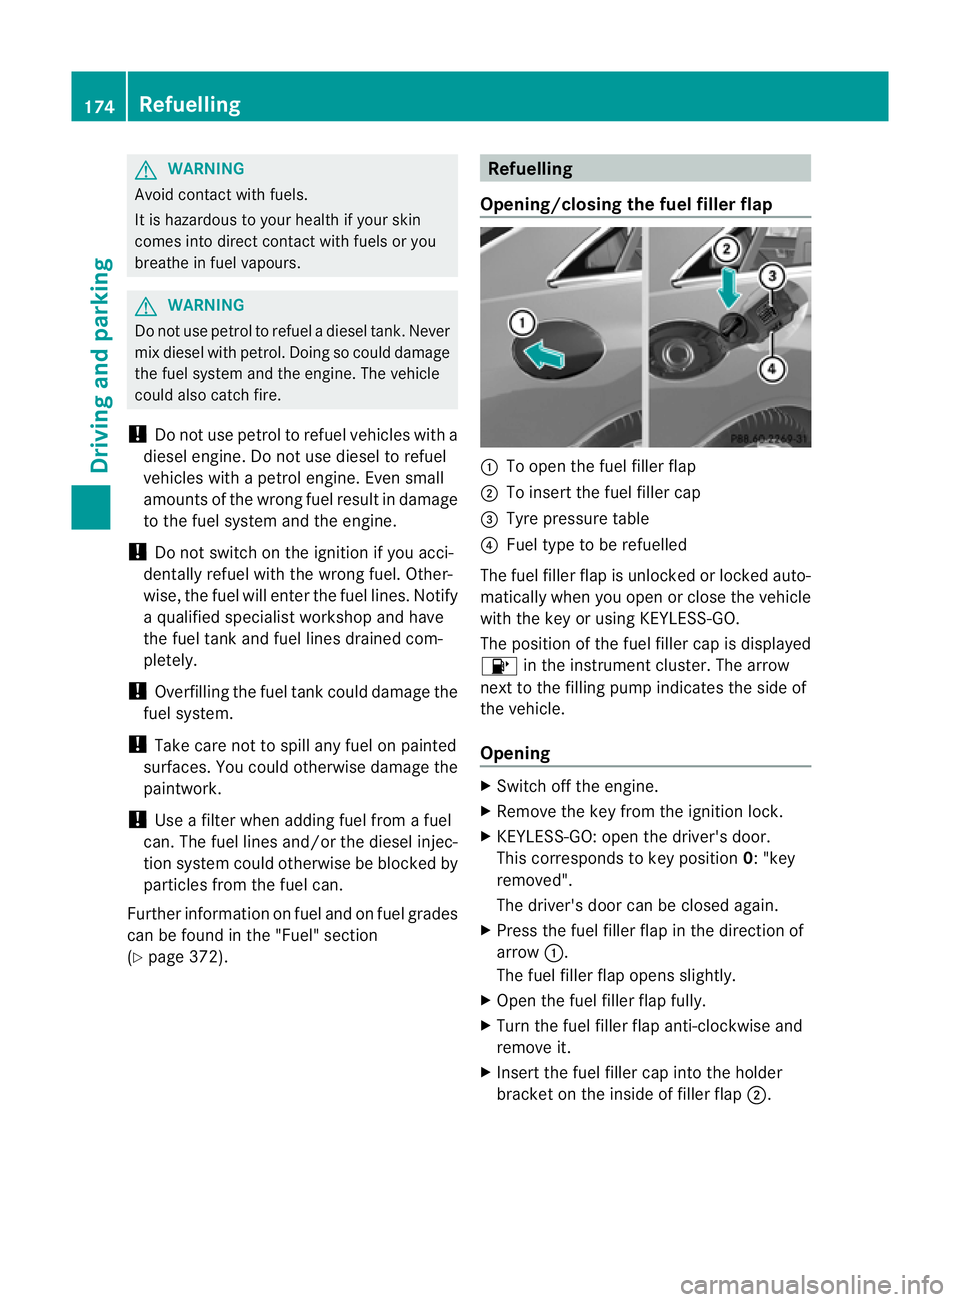
Opening/closing the fuel filler flap :
To open the fuel filler flap
; To insert the fuel filler cap
= Tyre pressure table
? Fuel type to be refuelled
The fuel filler flap is unlocked or locked auto-
matically when you open or close the vehicle
with the key or using KEYLESS-GO.
The position of the fuel filler cap is displayed
8 in the instrument cluster. The arrow
nextt o the filling pump indicates the side of
the vehicle.
Opening X
Switch off the engine.
X Remove the key from the ignition lock.
X KEYLESS-GO: open the driver's door.
This corresponds to key position 0: "key
removed".
The driver's door can be closed again.
X Press the fuel filler flap in the direction of
arrow :.
The fuel filler flap opens slightly.
X Open the fuel filler flap fully.
X Turn the fuel filler flap anti-clockwise and
remove it.
X Insert the fuel filler cap into the holder
bracket on the inside of filler flap ;.174
RefuellingDriving and parking
Page 181 of 389

Switching off the engine
Vehicles with manual transmission X
Shift to either first gear or reverse gear R.
X Turn the key to position 0in the ignition
lock and remove it.
The immobiliser is activated.
X Firmly depress the parking brake.
Vehicles with automatic transmission X
Firmly depress the parking brake.
X Shift the transmission to position P.
Using the key
X Turn the key to position 0in the ignition
lock and remove it.
The immobiliser is activated.
i The key can only be removed if the trans-
mission is in position P.
Using KEYLESS-GO
X Press the Start/Stop button (Y page 159).
The engine stops and all the indicator
lamps in the instrumen tcluster go out.
i When the driver's door is closed, this cor-
responds to key position 1. When the driv-
er's door is open, this corresponds to key
position 0, i.e. key removed.
i The engine can be turned off while the
vehicle is in motion by pressing and holding
the Start/Stop button for about three sec-
onds .This function operates independently
of the ECO start/stop automatic engine
switch-off function. Parking brake
G
WARNING
If you must brake the vehicle with the parking
brake, the braking distance is considerably
longer and the wheels could lock. This increa-
ses the risk of skidding and an accident.
Only use the parking brake to brake the vehi-
cle when the service brake is faulty. Do not apply the parking brake too firmly. If the
wheels lock, release the parking brake until
the wheels begin turning again. G
WARNING
If you leave children unattended in the vehi-
cle, they could set the vehicle in motion by,
for example:
R releasing the parking brake
R shifting an automatic transmission out of
parking position P
R shifting a manual transmission into neutral
R starting the engine
They could also operate vehicle equipment.
There is a risk of an accident and injury.
When leaving the vehicle, always take the key
with you and lock the vehicle. Never leave
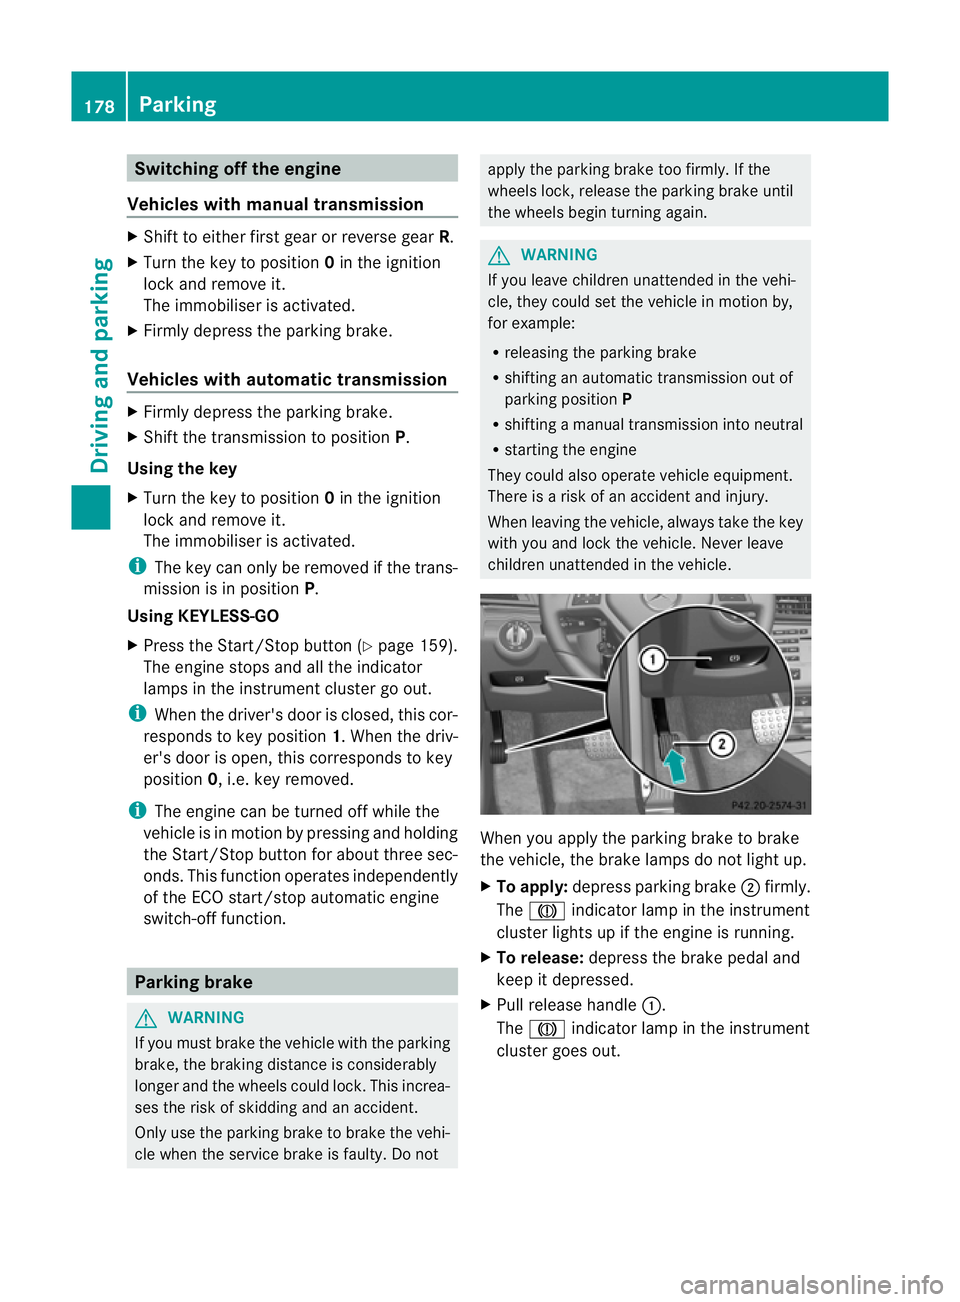
children unattended in the vehicle. When you apply the parking brake to brake
the vehicle, the brake lamps do not light up.
X
To apply: depress parking brake ;firmly.
The J indicator lamp in the instrument
cluster lights up if the engine is running.
X To release: depress the brake pedal and
keep it depressed.
X Pull release handle :.
The J indicator lamp in the instrument
cluster goes out. 178
ParkingDriving and parking
Page 192 of 389

G
WARNING
DISTRONIC PLUS cannot take account of road
and traffic conditions. If DISTRONIC does not
recognise or no longer recognises the vehicle
in front, do not activate DISTRONIC or, if it is
already active, deactivate it. This is especially
the case:
R before corners
R on filter lanes
R when changing to a lane with faster moving
traffic
R in comple xdriving situations or where lanes
are diverted, e.g. at roadworks on a motor-
way
DISTRONIC PLUS otherwise maintains the
current speed set by you or accelerates up to
the set speed.
DISTRONIC PLUS cannot take account of
weather conditions. Deactivate, or do not
activate, DISTRONIC PLUS:
R if the roads are slippery, snow-covered or
icy. The wheels could lose their grip when
braking or accelerating. The vehicle could
start to skid.
R if the sensors are dirty or there is poor vis-
ibility, e.g. due to snow, rain or fog. Dis-
tance control may be impaired.
Always pay attention to traffic conditions
even when DISTRONIC PLUS is activated.
Otherwise, you may fail to recognise dangers
in time, cause an accident and injure yourself
and others. G
WARNING
DISTRONIC PLUS brakes yourv ehicle up to a
maximum of 4 m/s 2
depending on its speed.
This corresponds to approximately 40% of
your vehicle's maximum braking power. You
must also apply the brakes yourself if this
braking power is not sufficient.
If DISTRONIC PLUS detects a risk of collision
with avehicle in front, an intermittent warning
tone sounds. In addition, the ·distance
warning lamp in the instrument cluster lights
up. Brake to avoid a collision. General notes DISTRONIC PLUS regulates the speed and
automatically helps you maintain the dis-
tance to the vehicle detected in front. DIS-
TRONIC PLUS brakes automatically so that
the set speed is not exceeded.
On long and steep downhill gradients, espe-
cially if the vehicle is laden or towing a trailer,
you must select shift range
1,2or 3in good
time. By doing so, you will make use of the
braking effec tofthe engine. This relieves the
load on the brake system and prevents the
brakes from overheating and wearing too
quickly.
If DISTRONIC PLUS detects a slower-moving
vehicle in front, your vehicle is braked in order
to maintain the preset distance to the vehicle
in front.
If you want DISTRONIC PLUS to assist you,
the radar sensor system must be activated
(Y page 245) and operational.
The radar sensor system is switched off auto-
matically in the vicinity of radio telescope
facilities (Y page 382).
If there is no vehicle in front, DISTRONIC
PLUS operates in the same way as cruise
control in the speed range between
30 km/h and 200 km/h. If avehicle is driving
in front of you, DISTRONIC operates in the
speed range between 0km/h and
200 km/h.
Do not use DISTRONIC PLUS on roads with
steep gradients. Driving systems
189Driving and parking Z
Page 194 of 389

DISTRONIC PLU
Sswitches off and you will
hear a tone.
i If you do not fully release the accelerator
pedal, the DISTRONIC PLUS suspended message appears in the multifunction dis-
play. The set distance to a slower moving
vehicle in front will then not be maintained.
You will be driving at the speed you deter-
mine by the position of the accelerator
pedal.
Activating when driving towards asta-
tionary vehicle
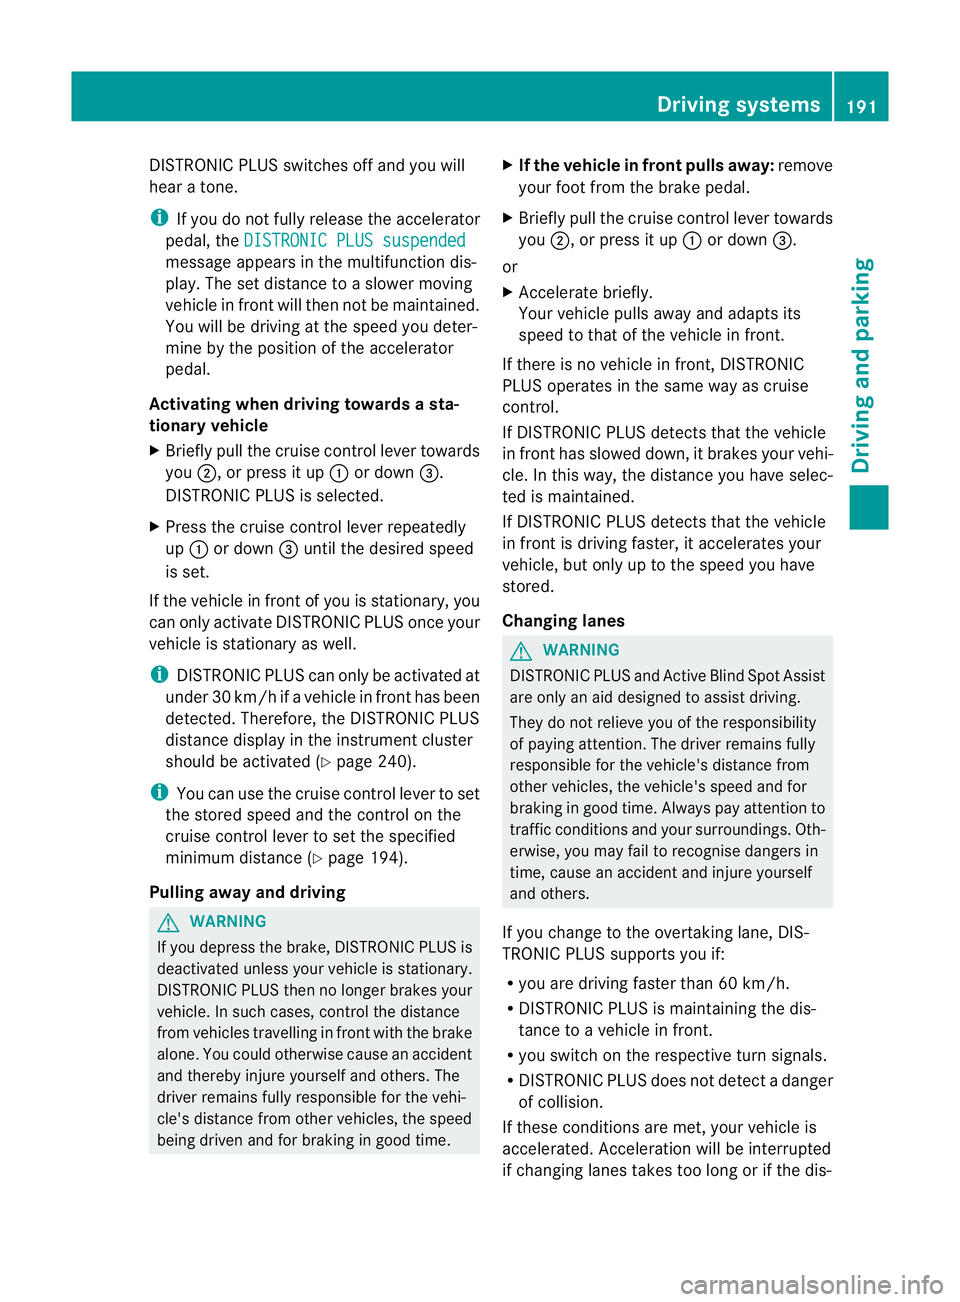
X Briefly pull the cruise control lever towards
you ;, or press it up :or down =.
DISTRONIC PLU Sis selected.
X Press the cruise control lever repeatedly
up : or down =until the desired speed
is set.
If the vehicle in front of you is stationary, you
can only activate DISTRONIC PLUS once your
vehicle is stationary as well.
i DISTRONIC PLUS can only be activated at
under 30 km/h if a vehicle in front has been
detected. Therefore, the DISTRONIC PLUS
distance display in the instrument cluster
should be activated (Y page 240).
i You can use the cruise control lever to set
the stored speed and the control on the
cruise control lever to set the specified
minimum distance (Y page 194).
Pulling away and driving G
WARNING
If you depress the brake, DISTRONIC PLUS is
deactivated unless your vehicle is stationary.
DISTRONIC PLUS then no longer brakes your
vehicle. In such cases, control the distance
from vehicles travelling in front with the brake
alone. You could otherwise cause an accident
and thereby injure yourselfa nd others. The
driver remains fully responsible for the vehi-
cle's distance from othe rvehicles, the speed
being driven and for braking in good time. X
If the vehicle in front pulls away: remove
your foot from the brake pedal.
X Briefly pull the cruise control lever towards
you ;, or press it up :or down =.
or
X Accelerate briefly.
Your vehicle pulls away and adapts its
speed to that of the vehicle in front.
If there is no vehicle in front, DISTRONIC
PLUS operates in the same way as cruise
control.
If DISTRONIC PLUS detects that the vehicle
in fron thas slowed down ,itbrakes yourv ehi-
cle. In this way, the distance you have selec-
ted is maintained.
If DISTRONIC PLUS detects that the vehicle
in fron tis driving faster, it accelerates your
vehicle, but only up to the speed you have
stored.
Changing lanes G
WARNING
DISTRONIC PLUS and Active Blind Spot Assist
are only an aid designed to assist driving.
They do not relieve you of the responsibility
of paying attention. The driver remains fully
responsible for the vehicle's distance from
other vehicles, the vehicle's speed and for
braking in good time. Always pay attention to
traffic conditions and your surroundings. Oth-
erwise, you may fail to recognise dangers in
time, cause an accident and injure yourself
and others.
If you change to the overtaking lane, DIS-
TRONIC PLUS supports you if:
R you are driving faster than 60 km/h.
R DISTRONIC PLUS is maintaining the dis-
tance to a vehicle in front.
R you switch on the respective turn signals.
R DISTRONIC PLUS does not detect a danger
of collision.
If these conditions are met, your vehicle is
accelerated. Acceleration will be interrupted
if changing lanes takes too long or if the dis- Driving systems
191Driving and parking Z
Page 207 of 389

G
WARNING
Make sure that no persons or animals are in
the manoeuvring range. Otherwise, they
could be injured.
! If unavoidable, you should drive over
obstacles such as kerbs slowly and not at
a sharp angle .Otherwise, you may damage
the wheels or tyres.
Parking Guidance is an electroni cparking aid
with ultrasound. Ultrasound is used to meas-
ure the road on both sides of the vehicle .A
suitable parking space is indicated by the
parking symbol. You receive steering instruc-
tions when parking. You may also use PARK-
TRONIC (Y page 200).
When PARKTRONIC is deactivated, Parking
Guidance is also unavailable.
Use Parking Guidance for parking spaces:
R that are parallel to the direction of travel
R that are on straight roads, not bends
R that are on the same level as the road, i.e.
not on the pavement, for example. Parking
Guidance may not detect flat kerbs
Parking tips:
R on narrow roads, drive as closely as possi-
ble past the parking space.
R parking spaces that are littered, overgrown
or partially occupied by trailer drawbars
might be identified incorrectly or not at all.
R snowfall or heavy rain may lead to a parking
space being measured inaccurately.
R pay attention to the PARKTRONIC
(Y page 201) warning messages during the
parking procedure.
R when transporting a load which protrudes
from your vehicle, you must not use Parking
Guidance.
R never use Parking Guidance with snow
chains or an emergency spare wheel fitted. R
make sure that the tyre pressures are
always correct.T his hasadirec teffect on
the steering instructions.
R the way you rvehicle is positioned in the
parking space after parkin gis dependent
on various factors. These include the posi-
tion and shape of the vehicles parked in
front and behind it and the conditions of the
location. In some cases, Parking Guidance
may guide you too far or not far enough into
a parking space. In some cases, it may also
lead you across or onto the kerb. If neces-
sary, cancel the parking procedure with
Parking Guidance.
Detecting parking spaces Example: vehicles with automatic transmission
:
Detected parking space on the left
; Parking symbol
= Detected parking space on the right
Parking Guidance is automatically activated
when you drive forwards. The system is
operational at speeds of up to approximately
35 km/h. While in operation, the system inde-
pendently locates and measures parking
spaces on both sides of the vehicle. When
driving at speeds below 30 km/h, you will see
parking symbol ;as a status indicator in the
instrument cluster.
When a parking space has been detected, an
arrow towards the right =or the left :also
appears. Parking Guidance only displays
parking spaces on the front-passenger side
as standard. Parking spaces on the driver's
side are displayed as soon as the turn signal
on the driver's side is activated. To park on
the driver's side, you must leave the driver's
side turn signal switched on until you have
engaged reverse gear. 204
Driving systemsDriving and parking