2012 MERCEDES-BENZ E-CLASS COUPE child seat
[x] Cancel search: child seatPage 65 of 389
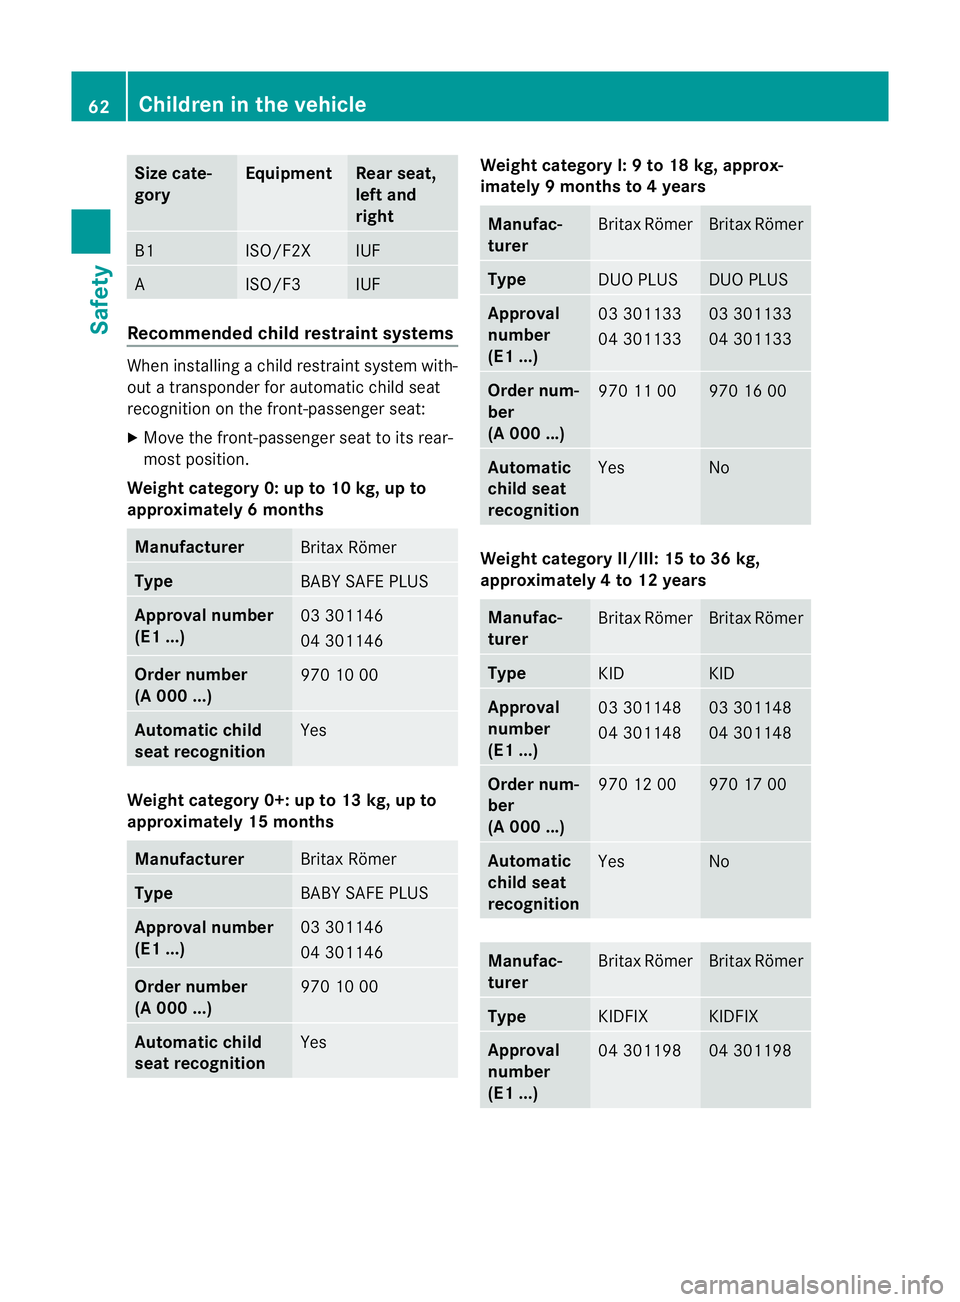
Size cate-
gory Equipment Rear seat,
left and
right
B1 ISO/F2X IUF
A ISO/F3 IUF
Recommended child restraint systems
When installing a child restraint system with-
out a transponder for automatic child seat
recognition on the front-passenger seat:
X
Move the front-passenger seat to its rear-
most position.
Weight category 0: up to 10 kg, up to
approximately 6 months Manufacturer
Britax Römer
Type
BABY SAFE PLUS
Approval number
(E1 ...)
03 301146
04 301146
Order number
(A 000 ...)
970 10 00
Automatic child
seat recognition
Yes
Weight category 0+: up to 13 kg, up to
approximately 15 months
Manufacturer
Britax Römer
Type
BABY SAFE PLUS
Approval number
(E1 ...)
03 301146
04 301146
Order number
(A 000 ...)
970 10 00
Automatic child
seat recognition
Yes Weight category I: 9 to 18 kg, approx-
imately 9 months to 4 years
Manufac-
turer
Britax Römer Britax Römer
Type
DUO PLUS DUO PLUS
Approval
number
(E1 ...)
03 301133
04 301133 03 301133
04 301133
Order num-
ber
(A 000 ...)
970 11 00 970 16 00
Automatic
child seat
recognition
Yes No
Weight category II/III: 15 to 36 kg,
approximately 4 to 12 years
Manufac-
turer
Britax Römer Britax Römer
Type
KID KID
Approval
number
(E1 ...)
03 301148
04 301148 03 301148
04 301148
Order num-
ber
(A 000 ...)
970 12 00 970 17 00
Automatic
child seat
recognition
Yes No
Manufac-
turer
Britax Römer Britax Römer
Type
KIDFIX KIDFIX
Approval
number
(E1 ...)
04 301198 04 30119862
Children in the vehicleSafety
Page 66 of 389
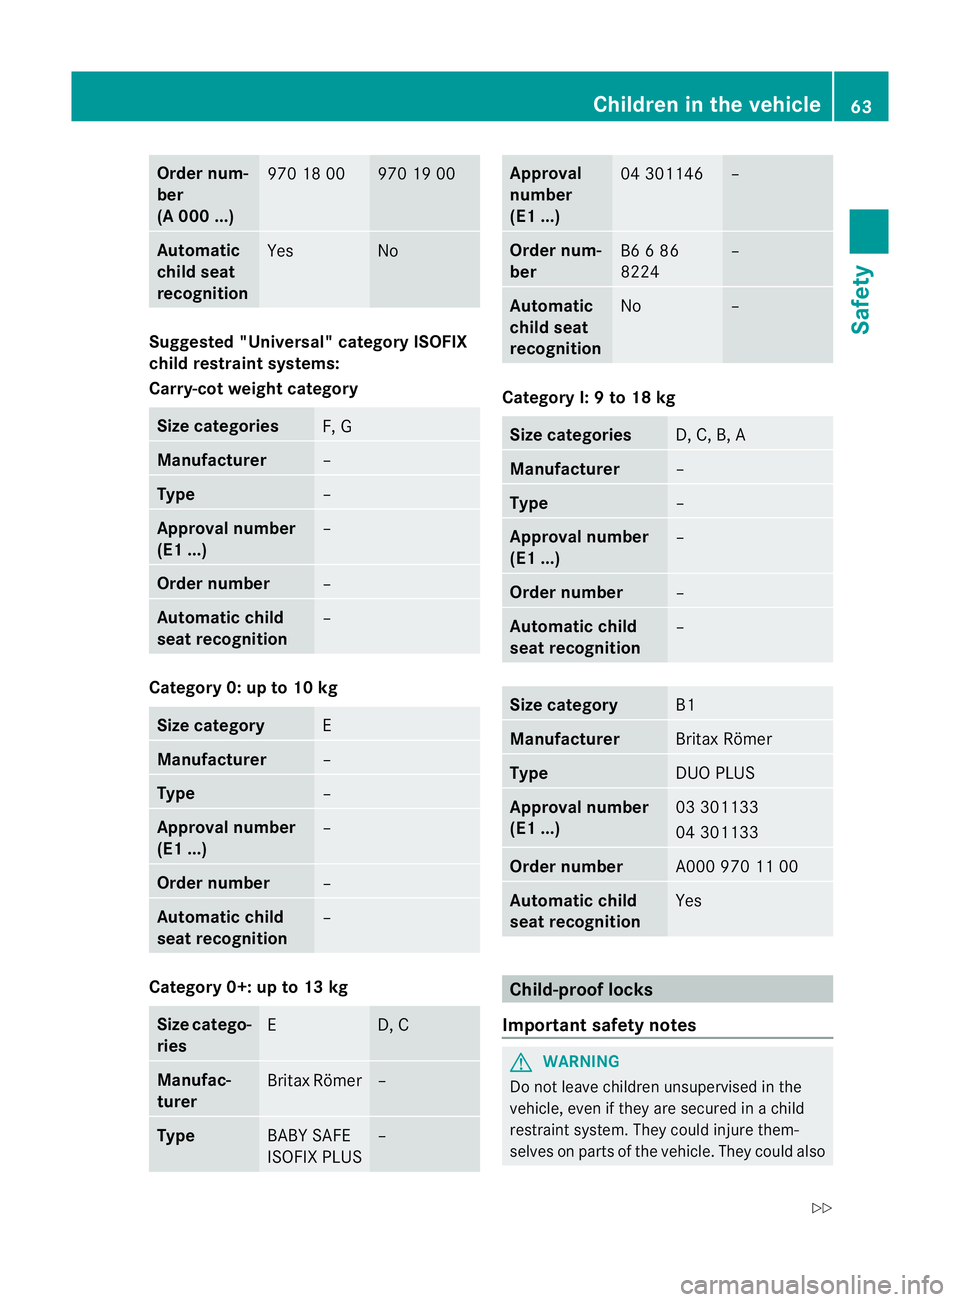
Order num-
ber
(A 000 ...)
970 18 00 970 19 00
Automatic
child seat
recognition
Yes No
Suggested "Universal" category ISOFIX
child restraint systems:
Carry-cot weight category
Size categories
F, G
Manufacturer
–
Type
–
Approval number
(E1 ...)
–
Order number
–
Automatic child
seat recognition
–
Category 0: up to 10 kg
Size category
E
Manufacturer
–
Type
–
Approval number
(E1 ...)
–
Order number
–
Automatic child
seat recognition
–
Category 0+: up to 13 kg
Size catego-
ries
E D, C
Manufac-
turer
Britax Römer –
Type
BABY SAFE
ISOFIX PLUS – Approval
number
(E1 ...)
04 301146 –
Order num-
ber
B6 6 86
8224 –
Automatic
child seat
recognition
No –
Category I: 9 to 18 kg
Size categories
D, C, B, A
Manufacturer
–
Type
–
Approval number
(E1 ...)
–
Order number
–
Automatic child
seat recognition
–
Size category
B1
Manufacturer
Britax Römer
Type
DUO PLUS
Approval number
(E1 ...)
03 301133
04 301133
Order number
A000 970 11 00
Automatic child
seat recognition
Yes
Child-proof locks
Important safety notes G
WARNING
Do not leave children unsupervised in the
vehicle, even if they are secured in a child
restraint system. They could injure them-
selves on parts of the vehicle. They could also Children in the vehicle
63Safety
Z
Page 85 of 389

Problem Possible causes/consequences and
M Solutions
You have lost the emer-
gency key element. X
Report the loss immediately to the vehicle insurers.
X If necessary, have the locks changed as well. The engine cannot be
started using the key. the on-board voltage is too low.
X
Switch off non-essential consumers, e.g. seat heating or interior
lighting, and try to start the engine again.
If this does not work:
X Check the starter battery and charge it if necessary
(Y page 330).
or
X Jump-start the vehicle (Y page 331).
or
X Consult a qualified specialist workshop. Only vehicles without a
DIRECT SELECT lever:
The engine cannot be
started using the key. The steering lock is mechanically blocked.
X
Remove the key and reinsert it into the ignition lock. While doing
this, turn the steering wheel in both directions. The engine cannot be
started using KEYLESS-
GO. The key is in the
vehicle. Ad
oor is open. Therefore, the key cannot be detected as easily.
X Close the door and try to start the vehicle again. There is interference from a powerful source of radio waves.
X
Start your vehicle with the key in the ignition lock. Doors
Important safety notes
G
WARNING
Only for the United Kingdom: if the vehicle
has been locked with the key or with KEY-
LESS-GO, the double lock function is activa-
ted as standard. It is then not possible to open
the doors from inside the vehicle.
Therefore, do not leave any people behind in
the vehicle, particularly children, elderly peo-
ple or people requiring special assistance. As
a result, they may not be able to free them-
selves in the event of an emergency. They
could be seriously or even fatally injured by
prolonged exposure to extremely high or low
temperatures, for example. In this case, res- cuing people from outside the vehicle is diffi-
cult.
Deactivate the interior motion sensor before
you lock the vehicle. The doors can then be
opened from the inside after the vehicle has
been locked from the outside.
G
WARNING
If children are left unsupervised in the vehicle,
they could:
R open a door from inside the vehicle at any
time, even if it has been locked
R start the vehicle using akey which has been
left in the vehicle
R release the parking brake 82
DoorsOpening and closing
Page 89 of 389

X
Pull the boot lid down using recess :.
X If necessary, lock the vehicle with
the & button on the key (Y page 77) or
with KEYLESS-GO (Y page 77).
i If a KEYLESS-GO key is detected in the
boot, the boot lid cannot be locked. It then
opens again. Opening automatically from outside
Important safety notes G
WARNING
Only for the United Kingdom: if the vehicle
has been locked with the key or with KEY-
LESS-GO, the double lock function is activa-
ted as standard. It is then not possible to open
the doors from inside the vehicle.
Therefore, do not leave any people behind in
the vehicle, particularly children, elderly peo-
ple or people requiring special assistance. As
a result, they may not be able to free them-
selves in the event of an emergency. They
could be seriously or even fatally injured by
prolonged exposure to extremely high or low
temperatures, for example. In this case, res-
cuing people from outside the vehicle is diffi-
cult.
Deactivate the interior motion sensor before
you lock the vehicle. The doors can then be
opened from the inside after the vehicle has
been locked from the outside. !
The boot lid swings upwards when
opened. Therefore, make sure that there is
sufficient clearance above the boot lid.
i Opening dimensions of the boot lid
(Y page 378).
To open You can unlock and open the boot lid simul-
taneously with the key.
X Press and hold the Fbutton on the key
until the boot lid opens. Opening automatically from inside
General notes i
Opening dimensions of the boot lid
(Y page 378).
To open X
To open: pull remote operating switch for
boot lid :until the boot lid opens.
You can open the boot lid from the driver's
seat when the vehicle is stationary and
unlocked. Locking the boot separately
The separate boot locking function is only
available in certain countries.
You can lock the boot separately. If you then
unlock the vehicle centrally, the boot remains
locked and cannot be opened. 86
BootOpening and closing
Page 106 of 389
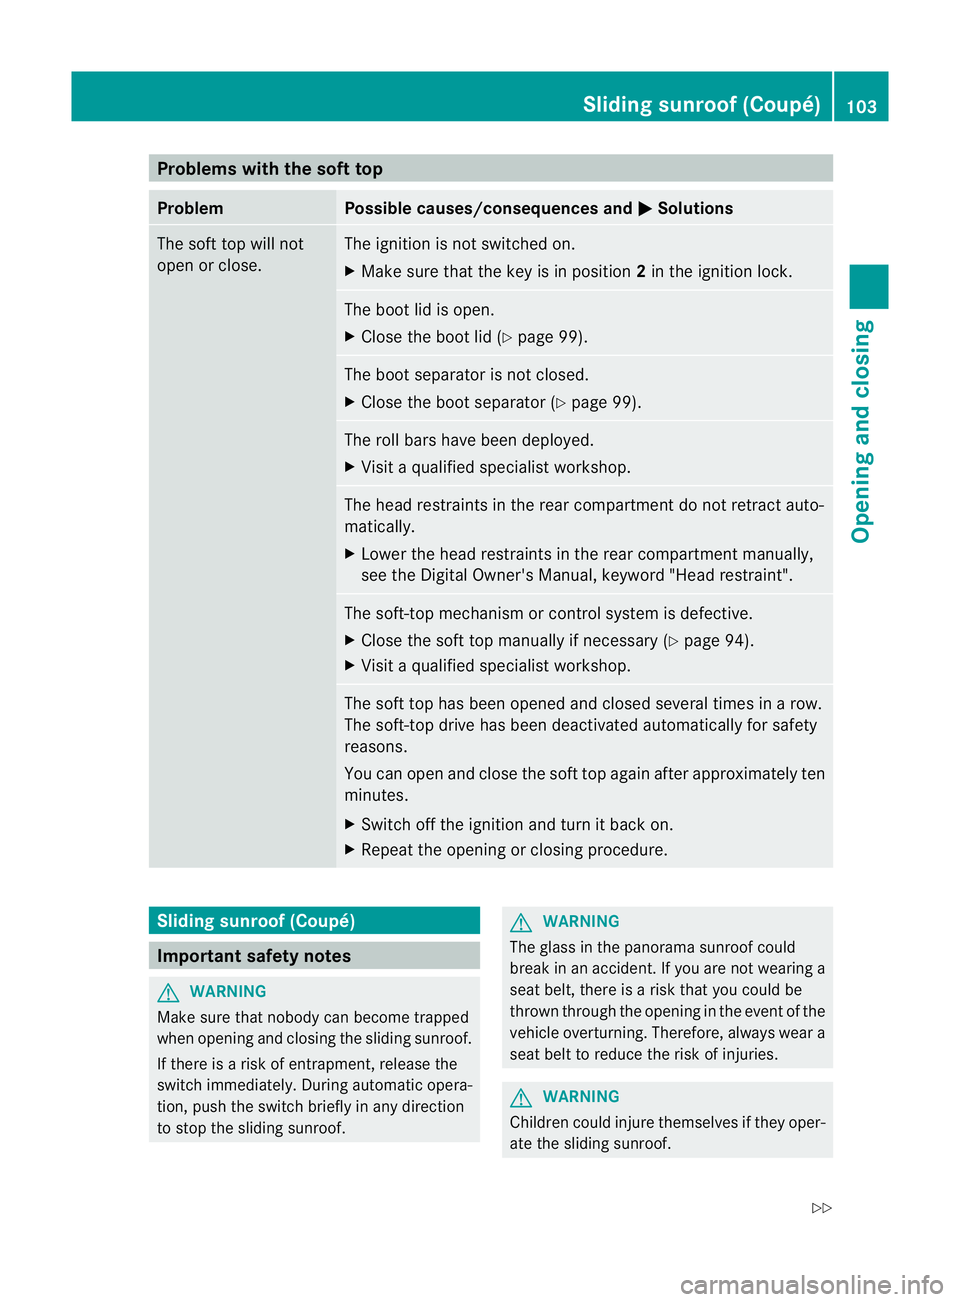
Problems with the soft top
Problem Possible causes/consequences and
M Solutions
The soft top will not
open or close. The ignition is not switched on.
X
Make sure that the key is in position 2in the ignition lock. The boot lid is open.
X
Close the boot lid (Y page 99). The boot separator is not closed.
X
Close the boot separator (Y page 99). The roll bars have been deployed.
X Visit a qualified specialist workshop. The head restraints in the rear compartment do not retract auto-
matically.
X
Lower the head restraints in the rear compartmen tmanually,
see the Digital Owner's Manual, keyword "Head restraint". The soft-top mechanism or control system is defective.
X
Close the sof ttop manually if necessary (Y page 94).
X Visit a qualified specialist workshop. The soft top has been opened and closed several times in a row.
The soft-top drive has been deactivated automatically for safety
reasons.
You can open and close the soft top again after approximately ten
minutes.
X Switch off the ignition and turn it back on.
X Repeat the opening or closing procedure. Sliding sunroof (Coupé)
Important safety notes
G
WARNING
Make sure that nobody can become trapped
when opening and closing the sliding sunroof.
If there is a risk of entrapment, release the
switch immediately. During automatic opera-
tion, push the switch briefly in any direction
to stop the sliding sunroof. G
WARNING
The glass in the panorama sunroof could
break in an accident .Ifyou are not wearing a
seat belt, there is a risk that you could be
thrown through the opening in the event of the
vehicle overturning. Therefore, always wear a
seat belt to reduce the risk of injuries. G
WARNING
Children could injure themselves if they oper-
ate the sliding sunroof. Sliding sunroof (Coupé)
103Opening and closing
Z
Page 112 of 389
settings with the memory function
(Y
page 120). Seats
Important safety notes
G
WARNING
The seats can still be adjusted when there is
no key in the ignition lock. For this reason,
children should never be left unsupervised in
the vehicle. They could adjust the seats and
become trapped. G
WARNING
Only adjust the driver's seat when the vehicle
is stationary. You will otherwise be distracted
from the road and traffic conditions and you
could lose control of the vehicle as a result of
the seat moving. This could cause an acci-
dent. G
WARNING
If you adjust the seat height carelessly, you or
others could be trapped and thereby injured.
Children in particular could unintentionally
press the buttons to electrically adjust the
seats and become trapped.
Take care that:
R while moving the seats, your hands do not
get under the lever assembly of the seat
adjustment system.
R children in the vehicle do not slide their
hands under the levers. G
WARNING
Make sure that nobody can become trapped
when adjusting the seats.
Observe the notes on airbags.
Secure children as recommended; see the
"Children in the vehicle" section. G
WARNING
Make sure that the back of your head is sup-
ported at eye level by the central area of the head restraint. If your head is not supported
correctly by the head restraint, you could suf-
fer a severe neck injury in the event of an
accident. Never drive if the head restraints are
not engaged and set correctly.
G
WARNING
As eat belt can only offer its intended degree
of protection when the backrest is almost ver-
tical and the occupant is sitting upright. Avoid
seat positions that do not allow the seat belt
to be routed correctly. Adjust the backrest so
that it is as upright as possible. Never travel
with the backrest reclined too far backwards.
You could otherwise be seriously or even
fatally injured in the event of an accident or
sudden braking.
! To avoid damage to the seats and the seat
heating, observe the following information:
R do not spill any liquids on the seats. If
liquid is spilled on the seats, dry them as
soon as possible.
R if the seat covers are damp or wet, do not
switch on the seat heating. The seat
heating should also not be used to dry
the seats.
R clean the seat covers as recommended;
see the "Interior care" section.
R do not transport heavy loads on the
seats. Do not place sharp objects on the
seat cushions, e.g. knives, nails or tools.
The seats should only be occupied by
passengers, if possible.
R when the seat heating is in operation, do
not cover the seats with insulating mate-
rials, e.g. blankets, coats, bags, seat cov-
ers, child seats or booster seats.
! To avoid damage to the seats and the seat
heating, observe the following information:
R do not spill any liquids on the seats. If
liquid is spilled on the seats, dry them as
soon as possible.
R if the seat covers are damp or wet, do not
switch on the seat heating. The seat Seats
109Seats, steering wheel and mirrors Z
Page 113 of 389

heating should also not be used to dry
the seats.
R clean the seat covers as recommended;
see "Interior care".
R do not transport heavy loads on the
seats. Do not place sharp objects on the
seat cushions, e.g. knives, nails or tools.
The seats should only be occupied by
passengers, if possible.
R when the seat heating is in operation, do
not cover the seats with insulating mate-
rials, e.g. blankets, coats, bags, seat cov-
ers, child seats or booster seats.
! Make sure that there are no objects in the
footwell or behind the seats when moving
the seat back. There is a risk that the seats
and/or the objects could be damaged.
i The head restraints in the front seats are
fitted with the NECK-PRO system
(Y page 47). For this reason, it is not pos-
sible to remove the head restraints from
the front seats.
For more information, contact a qualified
specialist workshop.
i Further related subjects:
R Through-loading feature in the rear
bench seat (Coupé) (folding the rear
bench seat forward) (Y page 288)Adjusting the seats manually and
electrically
:
Backrest angle
; Seat height =
Seat cushion angle
? Seat fore-and-aft adjustment
Seat fore-and-aft adjustment:
X Lift handle ?and slide the seat forwards
or backwards.
X Release lever ?again.
Make sure that you hear the seat engage in
position.
Seat cushion angle:
X Turn handwheel =in the desired direction. Adjusting the seats electrically
:
Head restraint height
; Seat cushion angle
= Seat height
? Seat fore-and-aft adjustment
A Backrest angle
i Vehicles with memory function: if PRE-
SAFE ®
has been triggered, the front-
passenger seat will be moved to a better
position if it was previously in an unfavour-
able position.
i You can store the seat settings using the
memory function (Y page 120).
i Vehicles with the through-loading feature
and memory function: if you fold down a
rear seat backrest, the respective front
seat is moved forwards slightly if neces-
sary. 110
SeatsSeats, steering wheel and mirrors
Page 118 of 389
Problems with the seat ventilation
The seat ventilation has switched off prema-
turely or cannot be switched on. The vehicle's
electrical system voltage is too low because
too many electrical consumers are switched
on.
X Switch off electrical consumers that you do
not need, such as the rear window heating
or interior lighting. AIRSCARF (Cabriolet)
G
WARNING
Very hot air can flow out of the AIRSCARF
vents in the head restraints when AIRSCARF
is in operation. This can cause burns on unpro-
tected skin near the AIRSCARF vents. Lower
the heating output in good time, when neces-
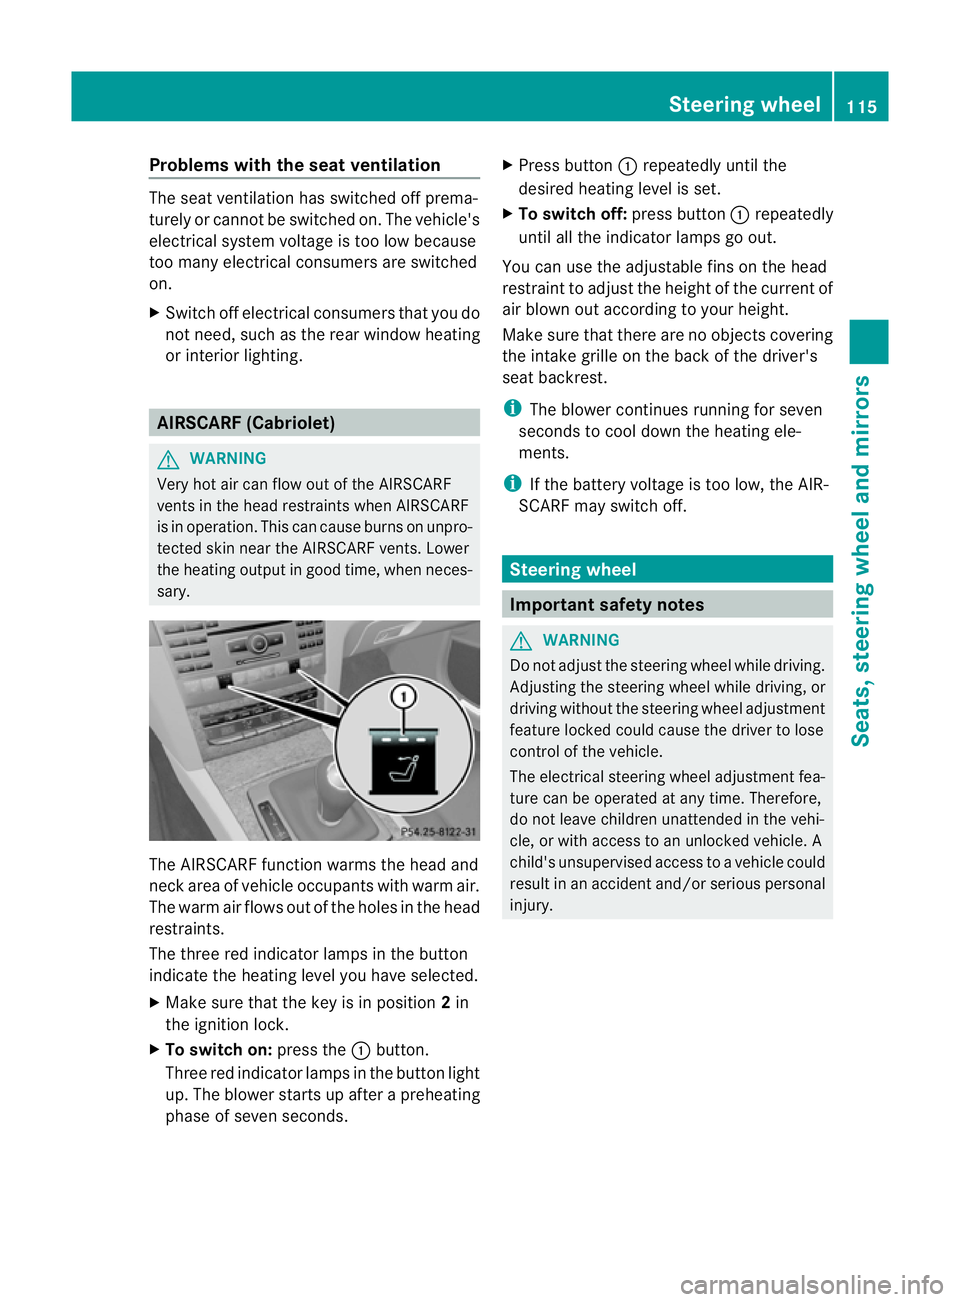
sary. The AIRSCARF function warms the head and
neck area of vehicle occupants with warm air.
The warm air flows out of the holes in the head
restraints.
The three red indicator lamps in the button
indicate the heating level you have selected.
X Make sure that the key is in position 2in
the ignition lock.
X To switch on: press the:button.
Three red indicator lamps in the button light
up. The blower starts up after a preheating
phase of seven seconds. X
Press button :repeatedly until the
desired heating level is set.
X To switch off: press button:repeatedly
until all the indicator lamps go out.
You can use the adjustable fins on the head
restraint to adjust the height of the current of
air blown out according to your height.
Make sure that there are no objects covering
the intake grille on the back of the driver's
seat backrest.
i The blower continues running for seven
seconds to cool down the heating ele-
ments.
i If the battery voltage is too low, the AIR-
SCARF may switch off. Steering wheel
Important safety notes
G
WARNING
Do not adjust the steering wheel while driving.
Adjusting the steering wheel while driving, or
driving without the steering wheel adjustment
feature locked could cause the driver to lose
control of the vehicle.
The electrical steering wheel adjustment fea-
ture can be operated at any time. Therefore,
do not leave children unattended in the vehi-
cle, or with access to an unlocked vehicle. A
child's unsupervised access to a vehicle could
result in an accident and/or serious personal
injury. Steering wheel
115Seats, steering wheel and mirrors Z