2012 MERCEDES-BENZ E-CLASS COUPE engine oil
[x] Cancel search: engine oilPage 310 of 389
X
Open the bonnet (Y page 307).
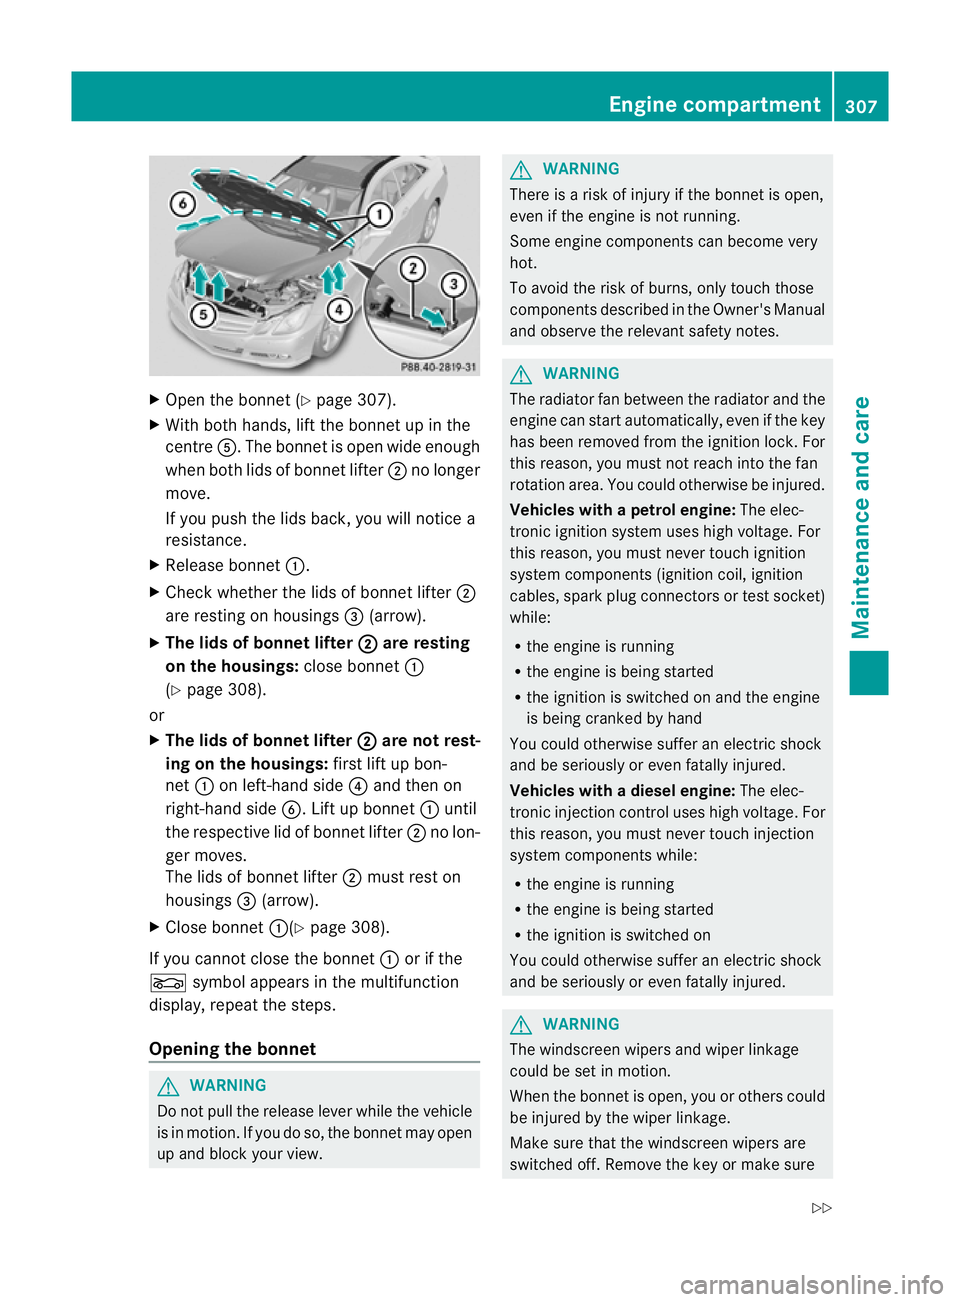
X With both hands, lift the bonnet up in the
centre A.The bonnet is open wide enough
when both lids of bonnet lifter ;no longer
move.
If you push the lids back, you will notice a
resistance.
X Release bonnet :.
X Check whether the lids of bonnet lifter ;
are resting on housings =(arrow).
X The lids of bonnet lifter ; are resting
on the housings: close bonnet:
(Y page 308).
or
X The lids of bonnet lifter ; are not rest-
ing on the housings: first lift up bon-
net :on left-hand side ?and then on
right-hand side B. Lift up bonnet :until
the respective lid of bonnet lifter ;no lon-
ger moves.
The lids of bonnet lifter ;must rest on
housings =(arrow).
X Close bonnet :(Ypage 308).
If you cannot close the bonnet :or if the
L symbol appears in the multifunction
display, repeat the steps.
Opening the bonnet G
WARNING
Do not pull the release lever while the vehicle
is in motion. If you do so, the bonnet may open
up and block your view. G
WARNING
There is a risk of injury if the bonnet is open,
even if the engine is not running.
Some engine components can become very
hot.
To avoid the risk of burns, only touch those
components described in the Owner's Manual
and observe the relevant safety notes. G
WARNING
The radiator fan between the radiator and the
engine can start automatically, even if the key
has been removed from the ignition lock. For
this reason, you must not reach into the fan
rotation area. You could otherwise be injured.
Vehicles with apetrol engine: The elec-
tronic ignitio nsystem uses high voltage. For
this reason, you mus tnever touch ignition
system components (ignition coil, ignition
cables, spark plug connectors or test socket)
while:
R the engine is running
R the engine is being started
R the ignition is switched on and the engine
is being cranked by hand
You could otherwise suffer an electric shock
and be seriously or even fatally injured.
Vehicles with adiesel engine: The elec-
tronic injection control uses high voltage. For
this reason, you must never touch injection
system components while:
R the engine is running
R the engine is being started
R the ignition is switched on
You could otherwise suffer an electric shock
and be seriously or even fatally injured. G
WARNING
The windscreen wipers and wiper linkage
could be set in motion.
When the bonnet is open, you or others could
be injured by the wiper linkage.
Make sure that the windscreen wipers are
switched off. Remove the key or make sure Engine compartment
307Maintenance and care
Z
Page 311 of 389
tha
tno ignition position has been selected
with KEYLESS-GO. All indicator lamps must be
off in the instrument panel.
! Make sure that the windscreen wipers are
not folded away from the windscreen. Oth-
erwise, you could damage the windscreen
wipers or the bonnet. X
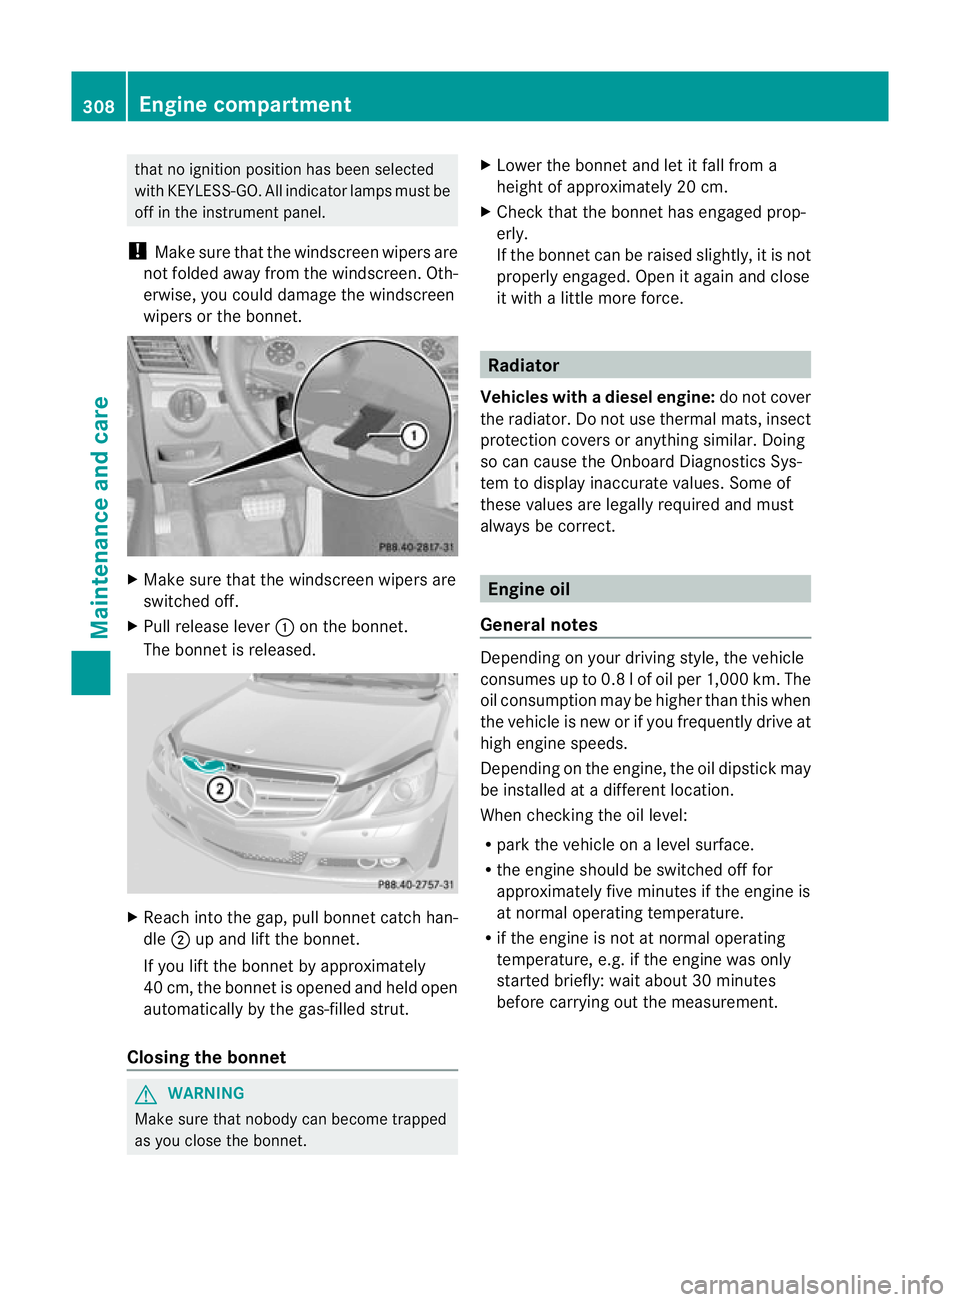
Make sure that the windscreen wipers are
switched off.
X Pull release lever :on the bonnet.
The bonnet is released. X
Reach into the gap, pull bonnet catch han-
dle ;up and lift the bonnet.
If you lift the bonnet by approximately
40 cm, the bonnet is opened and held open
automatically by the gas-filled strut.
Closing the bonnet G
WARNING
Make sure that nobody can become trapped
as you close the bonnet. X
Lower the bonnet and let it fall from a
height of approximately 20 cm.
X Check that the bonnet has engaged prop-
erly.
If the bonnet can be raised slightly, it is not
properly engaged. Open it again and close
it with a little more force. Radiator
Vehicles with adiesel engine: do not cover
the radiator .Do not use thermal mats, insect
protection covers or anything similar. Doing
so can cause the Onboard Diagnostics Sys-
tem to display inaccurate values. Some of
these values are legally required and must
always be correct. Engine oil
General notes Depending on your driving style, the vehicle
consumes up to 0.8 l of oil per 1,000 km. The
oil consumption may be higher than this when
the vehicle is new or if you frequently drive at
high engine speeds.
Depending on the engine, the oil dipstick may
be installed at a different location.
When checking the oil level:
R park the vehicle on a level surface.
R the engine should be switched off for
approximately five minutes if the engine is
at normal operating temperature.
R if the engine is not at normal operating
temperature, e.g. if the engine was only
started briefly: wait about 30 minutes
before carrying out the measurement. 308
Engine compartmentMaintenance and care
Page 312 of 389
Checking the oil level using the oil dip-
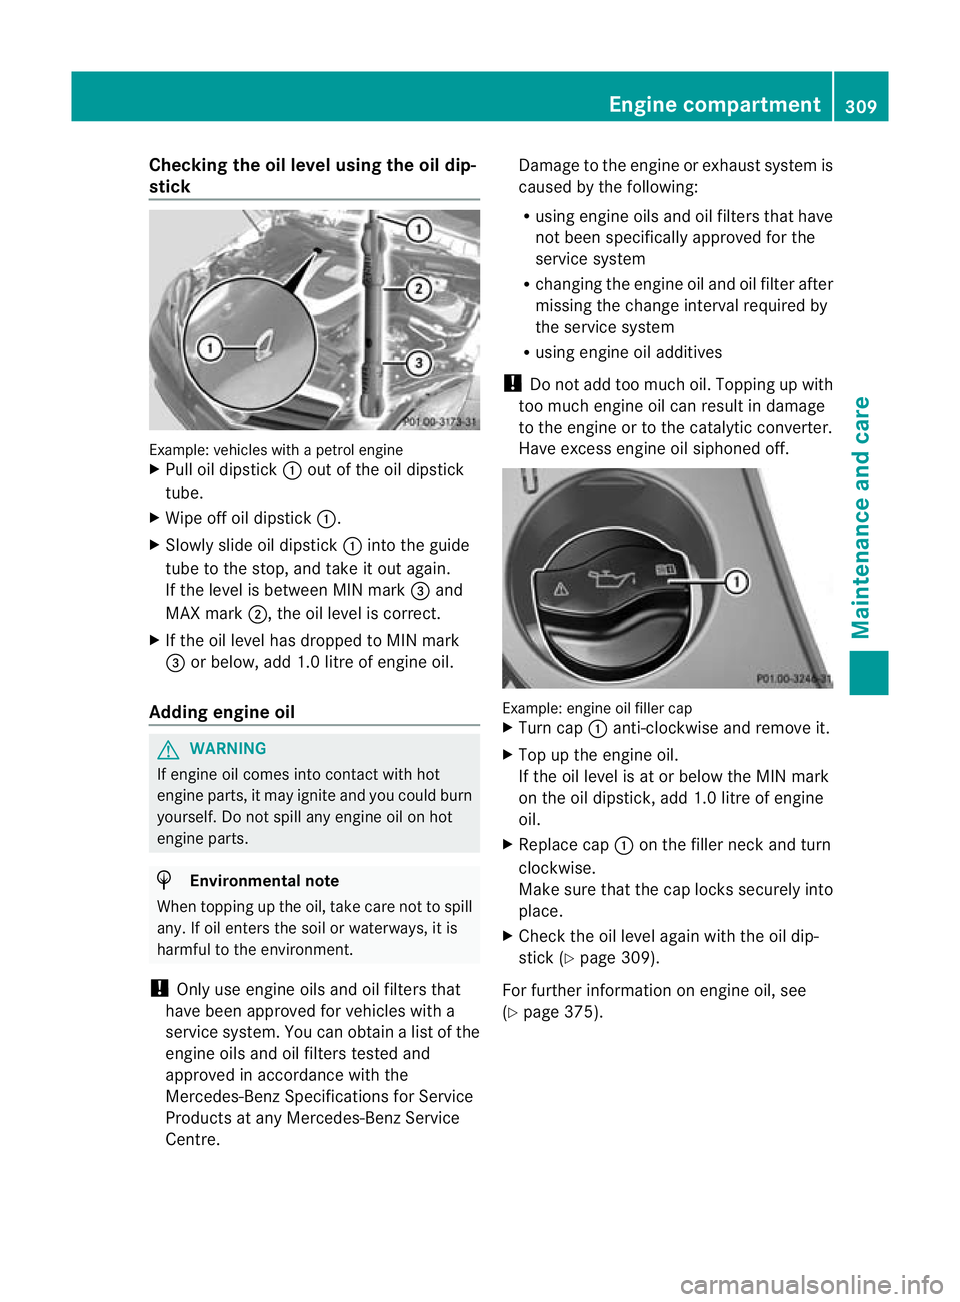
stick Example
:vehicles with a petrol engine
X Pull oil dipstick :out of the oil dipstick
tube.
X Wipe off oil dipstick :.
X Slowly slide oil dipstick :into the guide
tube to the stop, and take it out again.
If the level is between MIN mark =and
MAX mark ;, the oil level is correct.
X If the oil level has dropped to MIN mark
= or below, add 1.0 litre of engine oil.
Adding engine oil G
WARNING
If engine oil comes into contact with hot
engine parts, it may ignite and you could burn
yourself. Do not spill any engine oil on hot
engine parts. H
Environmental note
When topping up the oil, take care not to spill
any. If oil enters the soil or waterways, it is
harmful to the environment.
! Only use engine oils and oil filters that
have been approved for vehicles with a
service system. You can obtain a list of the
engine oils and oil filters tested and
approved in accordance with the
Mercedes-Benz Specifications for Service
Products at any Mercedes-Benz Service
Centre. Damage to the engine or exhaust system is
caused by the following:
R
using engine oils and oil filters that have
not been specifically approved for the
service system
R changing the engine oil and oil filter after
missing the change interval required by
the service system
R using engine oil additives
! Do not add too much oil. Topping up with
too much engine oil can result in damage
to the engine or to the catalytic converter.
Have excess engine oil siphoned off. Example: engine oil filler cap
X
Turn cap :anti-clockwise and remove it.
X Top up the engine oil.
If the oil level is at or below the MIN mark
on the oil dipstick, add 1.0 litre of engine
oil.
X Replace cap :on the filler neck and turn
clockwise.
Make sure that the cap locks securely into
place.
X Check the oil level again with the oil dip-
stick (Y page 309).
For further information on engine oil, see
(Y page 375). Engine compartment
309Maintenance and care Z
Page 314 of 389
Service
ASSYST PLUS
Service messages The ASSYST PLUS service interval display
informs you of the next service due date.
Information on the type of service and service
intervals (see separate Service Booklet).
You can obtain further information from a
Mercedes-Benz Service Centre.
i The ASSYST PLUS service interval display
does not show any information on the
engine oil level. Observe the notes on the
engine oil level (Y page 308).
The multifunction display shows a service
message for a few seconds, e.g.:
Next service A in .. days Service A due
Service A overdue by ... days
The letter indicates which service is due.
Astands for a minor service and
B for a major
service. A number or another letter may be
displayed after the letter. This figure indicates
any necessary additional maintenance work
to be performed.
If you notify a qualified specialist workshop of
this display, you will receive a statementon
the associated costs.
The ASSYST PLU Sservice interval display
does not take into accoun tany periods of
time during which the battery is disconnec-
ted.
Maintaining the time-dependent service
schedule:
X Note down the service due date displayed
in the multifunctio ndisplay before discon-
necting the battery.
or
X After reconnecting the battery, subtract
the battery disconnection periods fro mthe
service date shown on the display. Hiding
aservice message X
Press the %ora button on the steer-
ing wheel.
Displaying service messages X
Switch the ignitio non.
X Press the =or; button on the steer-
ing wheel to select the Serv. menu.
X Press the 9or: button to select the
ASSYST PLUS submenu and confirm with
a.
The service due date appears in the multi-
functio ndisplay.
Information about Service Resetting the ASSYST PLUS service inter-
val display
!
If the ASSYST PLUS service interval dis-
play has been inadvertently reset, this set-
ting can be corrected at a qualified special-
ist workshop.
Have service work carried out as described
in the Service Booklet. This may otherwise
lead to increased wear and damage to the
major assemblies or the vehicle.
Aq ualified specialist workshop, e.g. a
Mercedes-Ben zService Centre, will reset the
ASSYST PLUS service interval display after
the service work has been carried out. You
can also obtain further information on main-
tenance work, for example.
Special service requirements
Arduous operating conditions or increased
loads on the vehicle will require some service
work to be performed more often than for a
vehicle in normal use. Such arduous condi-
tions include regular city driving with frequent
intermediate stops and use in mountainous
terrain or on poor road surfaces.
For example, if the vehicle is used under ardu-
ous operating conditions, have air filters,
engine oil and oil filters changed frequently
and chec kthe wheels often.F urther informa- Service
311Maintenance and care Z
Page 349 of 389
Changing
awheel Flat tyre
You can find information on wha tto do in the
event of a flat tyre in the "Breakdown assis-
tance" section (Y page 324). You will also find
information on driving with MOExtended
tyres in the event of a flat tyre.
You can find information on what to do in the
event of a flat tyre in the "Breakdown assis-
tance" section (Y page 324). You will also find
information on driving with MOExtended
tyres in the event of a flat tyre. Interchanging the wheels
G
WARNING
Interchanging the front and rear wheels may
severely impair the driving characteristics if
the wheels or tyres have different dimensions.
The wheel brakes or suspension components
may also be damaged. There is a risk of acci-
dent.
Interchange front and rear wheels only if the
wheels and tyres are of the same dimensions.
Interchanging the front and rear wheels of
differing dimensions can render the general
operating permit invalid.
Observe the instructions and safety notes in
the "Fitting a wheel" section (Y page 346).
The wear patterns on the front and rear tyres
differ, depending on the operating conditions.
Interchange the wheels before a clear wear
pattern has formed on the tyres. Front tyres
typically wear more on the shoulders and the
rear tyres in the centre.
On vehicles that have the same size front and
rear wheels, you can interchange the wheels
every 5000km to 10,000 km depending on
the degree of tyre wear. Maintain the direc-
tion of tyre rotation.
Clean the contact surfaces of the wheel and
the brake disc thoroughly every time a wheel
is interchanged. Check the tyre pressure and, if necessary, restart the tyre pressure loss
warning system. Direction of rotation
Tyres with a specified direction of rotation
have additional benefits, e.g. if there is a risk
of aquaplaning. You will only gain these ben-
efits if the correct direction of rotation is
observed.
An arrow on the sidewall of the tyre indicates
its correct direction of rotation. Storing wheels
Store wheels that are not being used in a cool,
dry and preferably dark place. Protec tthe
tyres against oil, grease, petrol and diesel. Cleaning the wheels
G
WARNING
The water jet of circular-jet nozzles (dirt grind-
ers) can cause damage not visible from the
outside to tyres or chassis components. Com-
ponents damaged in this way can unexpect-
edly fail. There is a risk of an accident.
Do not use high-pressure cleaners with circu-
lar-jet nozzles to clean the vehicle. Have dam-
aged tyres or chassis components replaced
immediately. Fitting
awheel
Preparing the vehicle X
Stop the vehicle on solid, non-slippery and
level ground.
X Apply the parking brake.
X Bring the front wheels into the straight-
ahead position.
X Shift the transmission to position P.
X Switch off the engine. 346
Changing
awheelWheels and tyres
Page 375 of 389

H
Environmental note
Dispose of service products in an environ-
mentally-responsible manner.
Service products include the following:
R fuels (e.g .petrol, diesel)
R lubricants (e.g. engine oil, transmission oil)
R coolant
R brake fluid
R windscreen washer fluid
R climate control system refrigerant
Components and service products must be
matched. Mercedes-Benz recommends that
you use products tested and approved by
Mercedes-Benz. They are listed in this
Mercedes-BenzO wner's Manual in the appro-
priate section.
You can identify service products approved
by Mercedes-Ben zby the following inscrip-
tions on the container:
R MB-Freigabe (e.g. MB-Freigabe 229.51)
R MB Approval (e.g. MB Approval 229.51)
Other designations or recommendations indi-
cate a level of quality or a specification in
accordance with an MB Sheet Number (e.g.
MB 229.5). The yhave no tnecessarily been
approved by Mercedes-Benz.
Further information can be obtained from any
Mercedes-Benz Service Centre or on the
Internet at http://bevo.mercedes-benz.com. Fuel
Important safety notes G
WARNING
Fuel is highly flammable. Fire, naked flames
and smoking are therefore prohibited when
handling fuels.
Switch off the engine and the auxiliary heating
before refuelling. G
WARNING
Avoid contact with fuels. It is hazardous to your health if your skin
comes into direct contact with fuels or you
breathe in fuel vapours.
Tank capacity Model Total capa-
city All models
66.0 l
Model Of which
reserve fuel All models
Approx-
imately 8.0 l Petrol (EN 228, E DIN 51626-1)
Fuel grade
!
Do no tuse diesel to refuel vehicles with a
petrol engine. Even asmall quantity of die-
sel will damage the fuel injection system.
! Only refuel using unleaded petrol with at
least 95 RON/85 MON that conforms to
European standard EN 228 or E DIN
51626-1 or an equivalent specification.
Fuel with this specification may contain up
to 10 % ethanol.
! Do not use the following:
R E85 (petrol with 85 % ethanol)
R E100 (100 %ethanol)
R M15 (petrol with 15 % methanol)
R M85 (petrol with 85 % methanol)
R M100 (100 % methanol)
R Petrol with metallic additives
R Diesel
Do not mix these fuels with petrol, and do
not use any additives. This can otherwise
lead to engine damage. This does not
include cleaning additives for the removal
and prevention of residue build-up. Only
cleaning additives recommended by
Mercedes-Benzs hould be added to petrol,372
Service products and capacitiesTechnical data
Page 377 of 389
!
When refuelling, only use diesel fuel that
conforms to the European standard EN 590
or is of equivalent quality. Fuel that does
not conform to EN 590 can lead to
increased wear as well as damage to the
engine and exhaust system.
! Do not use the following:
R marine diesel
R heating oil
R bio-diesel
R vegetable oil
R petrol
R paraffin
R kerosene
Do not mix such fuels with diesel fuel and
do not use any special additives. This can
otherwise lead to engine damage.T his
does not include flow improver additives.
For further information, see "Flow improv-
ers".
! Vehicles with adiesel particle filter: in
countries outside the EU, only refuel with
low-sulphur Euro diesel with a sulphur con-
ten tunde r50p pm; otherwise the emission
control system could be damaged.
! Vehicles without adiesel particle fil-
ter: in countries where only diesel fuel with
a high sulphur conten tis available, you will
need to carry out your vehicle's oil change
at shorter intervals. More information
aboutt he interval for oil change can be
obtained from any qualified specialist
workshop.
Usually you will find information about the
fuel grade on the pump. If you cannot find the
label on the petrol pump, ask the filling sta-
tion staff.
Information on refuelling (Y page 174).
Low outside temperatures
In winter months, diesel fuel with an improved
cold flow quality is available. In Europe, the
EN 590 standard defines various climate-
dependent temperature categories. Malfunc- tions can be avoided by refuelling with diesel
fuel that corresponds to the climatic specifi-
cations outlined in EN 590. At unusually low
outside temperatures, it is possible that the
flow characteristics of the diesel fuel could be
insufficient
.Accordingly, diesel fuel from
warmer areas may not be suitable for opera-
tion in colder climati cconditions.
i Further information on country-specific
fuel properties can be obtained from oil
companies, e.g. at filling stations.
Flow improvers
To improve the low-temperature resistance of
diesel fuel, a flow improver can be attached.
The effectiveness of a flow improver is not
guaranteed for every fuel.
Only use flow improvers tested and approved
by Mercedes-Benz. During use, please
observe the information on operation.
Correct dosage and sufficient mixing are deci-
sive in improving low-temperature resistance
with the flow improver. Overdosage can
potentially even decrease low-temperature
resistance and must therefore be avoided.
Follow the manufacturer's guidelines on dos-
age.
Mix the additive into the diesel in good time,
before the flow characteristics of the diesel
become insufficient. Otherwise, malfunctions
can arise through heating the fuel system,
e.g. through parking in a heated garage.
More information about recommended flow
improvers can be obtained from any qualified
specialist workshop.
Fuel consumption information H
Environmental note
CO 2(carbon dioxide) is the gas which scien-
tists believe to be principally responsible for
global warming (the greenhouse effect). Your
vehicle's CO 2emissions are directly related to
fuel consumption and therefore depend on: 374
Service products and capacitiesTechnical data
Page 378 of 389

R
efficien tuse of the fuel by the engine
R driving style
R other non-technical factors, such as envi-
ronmental influences or road conditions
You can minimise your vehicle's CO 2emis-
sions by driving carefully and having it serv-
iced regularly.
The vehicle will use more fuel than usual in
the following situations:
R at very low outside temperatures
R in urban traffic
R on short journeys
R in mountainous terrain
R when towing a trailer
i Only for certain countries: you can find
the current consumption and emission val-
ues of your vehicle in the COC documents
(EU CERTIFICATE OF CONFORMITY). These
documents are delivered with your vehicle.
The consumption figures were in each case
based on the currently applicable version:
R for vehicles that comply with standards
up to and including the EURO 4standard,
in accordance with EU Directive
80/1268/EEC
R for vehicles tha tcomply with or exceed
the EURO 5standard, in accordance with
Regulation (EC )No. 715/2007
Deviations from these values may occur
under normal operating conditions. Engine oil
General notes The quality of the engine oil is decisive for the
function and service life of an engine. After
extensive tests, Mercedes-Benz approves
engine oils that correspond to the current
technical standard.
Therefore, only Mercedes-Benz approved
engine oils may be used in Mercedes-Benz
engines. Further information on tested and approved
engine oils can be obtained from any
Mercedes-Benz Service Centre. Mercedes-
Benz recommends that you have the oil
change carried out at a qualified specialist
workshop. Mercedes-Benz approval is indica-
ted on the oil container by the inscription "MB
Approval" and the corresponding designa-
tion, e.g. MB Approval 229.51.
You can call up an overview of approved
engine oils on the Internet at:
http://bevo.mercedes-benz.com by enter-
ing the designation, e.g. 229.5.
The table shows which engine oils have been
approved for your vehicle. Petrol engines MB Approval
E 200 BlueEFFICIENCY
E 250 BlueEFFICIENCY
229.3, 229.5,
229.51
E 300 BlueEFFICIENCY
E 350 BlueEFFICIENCY
229.3, 229.5
E 500 BlueEFFICIENCY
229.5
Diesel engines with
diesel particle filter MB Approval
E 220 CDI BlueEFFI-
CIENCY
E 250 CDI BlueEFFI-
CIENCY
E 350 CDI BlueEFFI-
CIENCY
228.51,
229.31, 229.51
i
If the engine oils listed in the table are not
available, you may add the following engine
oils until the next oil change:
R vehicles with a petrol engine: MB
Approval 229.1 229.3 or ACEA A3
R diesel engines: MB Approval 229.1,
229.3, 229.5 or ACEA C3
This may only be topped up once, and the
quantity must not be greater than 1.0 l. Service products and capacities
375Technical data Z