2012 MERCEDES-BENZ E-CLASS COUPE light
[x] Cancel search: lightPage 319 of 389
!
Do not park up the vehicle for an extended
period straight after cleaning it, particularly
after having cleaned the wheels with wheel
cleaner. Wheel cleaners could cause
increased corrosion of the brake discs and
brake pads/linings. For this reason, you
should drive for a few minutes after clean-
ing. Braking heats the brake discs and the
brake pads/linings, thus drying them. The
vehicle can then be parked up.
Cleaning the windows G
WARNING
Switch off the windscreen wipers and remove
the key from the ignition lock before cleaning
the windscreen or the wiper blades. On vehi-
cles with KEYLESS-GO, press the Start/Stop
button repeatedly until all indicator lamps in
the instrument cluster have gone off. The
windscreen wipers could otherwise move and
injure you.
! Do not use dry cloths, abrasive products,
solvents or cleaning agents containing sol-
vents to clean the inside of the windows.
Do not touch the insides of the windows
with hard objects, e.g. an ice scraper or
ring. There is otherwise a risk of damaging
the windows.
! Cleant he water drainage channels of the
windscreen and the rear window at regular
intervals. Deposits such as leaves, petals
and pollen may under certain circumstan-
ces prevent water from draining away.T his
can lead to corrosion damage and damage
to electronic components.
X Cleant he inside and outside of the win-
dows with a damp cloth and a cleaning
agent that is recommended and approved
by Mercedes-Benz.
Cleaning the wiper blades G
WARNING
Switch off the windscreen wipers and remove
the key from the ignition lock before cleaning the windscreen or the wiper blades. On vehi-
cles with KEYLESS-GO, press the Start/Stop
button repeatedly until all indicator lamps in
the instrument cluster have gone off. The
windscreen wipers could otherwise move and
injure you.
! Do not pull on the wiper blade. Otherwise,
the wiper blade could be damaged.
! Do not clean wiper blades too often and
do not rub them too hard. Otherwise, the
graphite coating could be damaged. This
could cause wiper noise.
! Hold the wiper arm securely when folding
back. The windscreen could be damaged if
the wiper arm hits against it suddenly.
X Fold the wiper arms away from the wind-
screen.
X Carefully clean the wiper blades with a
damp cloth.
X Fold the windscreen wipers back again
before switching on the ignition.
Cleaning the exterior lighting !
Only use cleaning agents or cleaning
cloths that are suitable for plastic lenses.
Unsuitable cleaning agents or cleaning
cloths could scratch or damage the plastic
lenses of the exterior lighting.
X Cleant he plastic lenses of the exterior
lighting using a wet sponge and a mild
cleaning agent, e.g. Mercedes-Ben zcar
shampoo or cleaning cloths.
Mirror turn signal !
Only use cleaning agents or cleaning
cloths that are suitable for plastic lenses.
Unsuitable cleaning agents or cleaning
cloths could scratch or damage the plastic
lenses of the mirror tur nsignals.
X Clean the plasti clenses of the mirror turn
signals in the exterior mirror housing using
a wet sponge and mild cleaning agent, e.g. 316
CareMaintenance and care
Page 321 of 389

X
After cleaning, lightly oil or grease ball cou-
pling :.
X Check tha tthe vehicle's trailer tow hitch is
working properly.
i You can also have the maintenance work
on the ball coupling and the trailer tow hitch
carried out by a qualified specialist work-
shop. Interior care
Cleaning the display !
For cleaning, do not use any of the fol-
lowing:
R alcohol-based thinner or petrol
R abrasive cleaning agents
R commercially-available household clean-
ing agents
These may damage the display surface. Do
not put pressure on the display surface
when cleaning. This could lead to irrepara-
ble damage to the display.
X Before cleaning the display, make sure that
it is switched off and has cooled down.
X Cleant he display surface using a commer-
cially available microfibre cloth and TFT/
LCD display cleaner.
X Dry the display surface using a dry micro-
fibre cloth.
Cleaning the plastic trim G
WARNING
When cleaning the steering wheel boss and
dashboard, do not use cockpit sprays or
cleaning agents containing solvents. Cleaning
agents containing solvents cause the surface
to become porous, and as aresult plastic
parts may break away and be thrown around
the interior when an airbag is deployed, which
may result in severe injuries. !
Do not affix the following to plastic surfa-
ces:
R stickers
R films
R scented oil bottles or similar items
You could otherwise damage the plastic.
! Do not allow cosmetics, insect repellent
or sunscreen to come in contact with the
plastic trim .This maintains the high-quality
look of the surfaces.
X Wipe the plastic trim with a damp, lint-free
cloth, e.g. a microfibre cloth.
X Heavy soiling: use car care and cleaning
products recommended and approved by
Mercedes-Benz.
The surface may change colour tempora-
rily. Wait until the surface is dry again.
Cleaning the steering wheel and gear or
selector lever X
Thoroughly wipe with a damp cloth or use
leather care agents that have been recom-
mended and approved by Mercedes-Benz.
Cleaning wooden trim and trim ele-
ments !
Do not use solvent-based cleaning agents
such as tar remover, wheel cleaners, pol-
ishes or waxes. There is otherwise a risk of
damaging the surface.
X Wipe the wooden trim and trim elements
with a damp, lint-free cloth, e.g. a microfi-
bre cloth.
X Heavy soiling: use car care and cleaning
products recommended and approved by
Mercedes-Benz.
Cleaning the seat covers !
Observe the following when cleaning:
R clean genuine leather covers carefully
with a damp cloth and then wipe the cov-
ers down with a dry cloth. Make sure that 318
CareMaintenance and care
Page 322 of 389
the leather does not becom
esoaked. It
may otherwise become rough and
cracked. Only use leather care agents
that have been tested and approved by
Mercedes-Benz. You can obtain these
from a qualified specialist workshop.
R clean artificial leather covers with a cloth
moistened with a solution containing
1%detergen t(e.g. washing-up liquid).
R clean cloth covers with a microfibre cloth
moistened with a solution containing
1%detergen t(e.g. washing-up liquid).
Rub carefully, and always wipe entire
seat sections to avoid leaving visible
lines. Leave the seat to dry afterwards.
Cleaning results depend on the type of
dirt and how long it has been there.
R clean DINAMICA covers with a damp
cloth. Make sure that you wipe entire
seat sections to avoid leaving visible
lines.
! Do not use microfibre cloths to clean gen-
uine leather, artificial leather or DINAMICA
covers. If used often, these can damage the
cover.
i Note that regular care is essential to
make sure that the appearance and com-
fort of the covers are retained over time.
Cleaning the seat belts !
Do not clean the seat belts using chemical
cleaning agents .Do not dry the seat belts
at temperatures above 80 † or in direct
sunlight.
X Use clean, lukewarm water and soap solu-
tion.
Cleaning the roof lining and carpets X
Roof lining: if it is very dirty, use a soft
brush or dry shampoo.
X Carpets: use the carpet and textile clean-
ing agents recommended and approved by
Mercedes-Benz. Care
319Maintenance and care Z
Page 340 of 389

!
When closing the cover, make sure that it
is lying correctly on the fuse box. Moisture
seeping in or dirt could otherwise impair
the operation of the fuses. X
To open: pull out cover :slightly at the
bottom in the direction of arrow =.
X Pull cover :outwards in the direction of
arrow ;and remove it.
X To close: clip in cover :on the front of
the dashboard.
X Fold cover :inwards until it engages. Fuse box in the engine compartment
G
WARNING
Make sure that the windscreen wipers are
turned off and the key is pulled out of the igni-
tion lock before you open the cover of the fuse
box. Otherwise, the windscreen wipers and
the wiper rods above the cover could be set
in motion. This could lead to you or others
being injured by the wiper rods.
! Make sure that no moisture can enter the
fuse box when the cover is open.
! When closing the cover, make sure that it
is lying correctly on the fuse box. Moisture
seeping in or dirt could otherwise impair
the operation of the fuses.
X Make sure that the windscreen wipers are
switched off.
X Open the bonnet. X
Remove any existing moisture from the
fuse box using a dry cloth.
X To open: take lines ;from the guides.
X Move aside lines ;.Route the lines behind
connection =to do this.
X Open clamps :.
X Remove the fuse box cover forwards.
X To close: check whether the rubber seal is
lying correctly in the cover.
X Insert the cover at the rear of the fuse box
into the retainer.
X Fold down cover and close clamps :.
X Secure lines ;in the guides.
X Close the bonnet. Fuse box in the boot
! Make sure that no moisture can enter the
fuse box when the cover is open.
! When closing the cover, make sure that it
is lying correctly on the fuse box. Moisture
seeping in or dirt could otherwise impair
the operation of the fuses.
X Open the boot lid. Electrical fuses
337Breakdown assistance Z
Page 347 of 389
R
Check the tyre for foreign objects.
R Chec kwhether the wheel is losing air or the
valve is leaking.
If you are unable to rectify the damage, con-
tact a qualified specialist workshop. H
Environmental note
Check the tyre pressure regularly, at least
every 14 days.
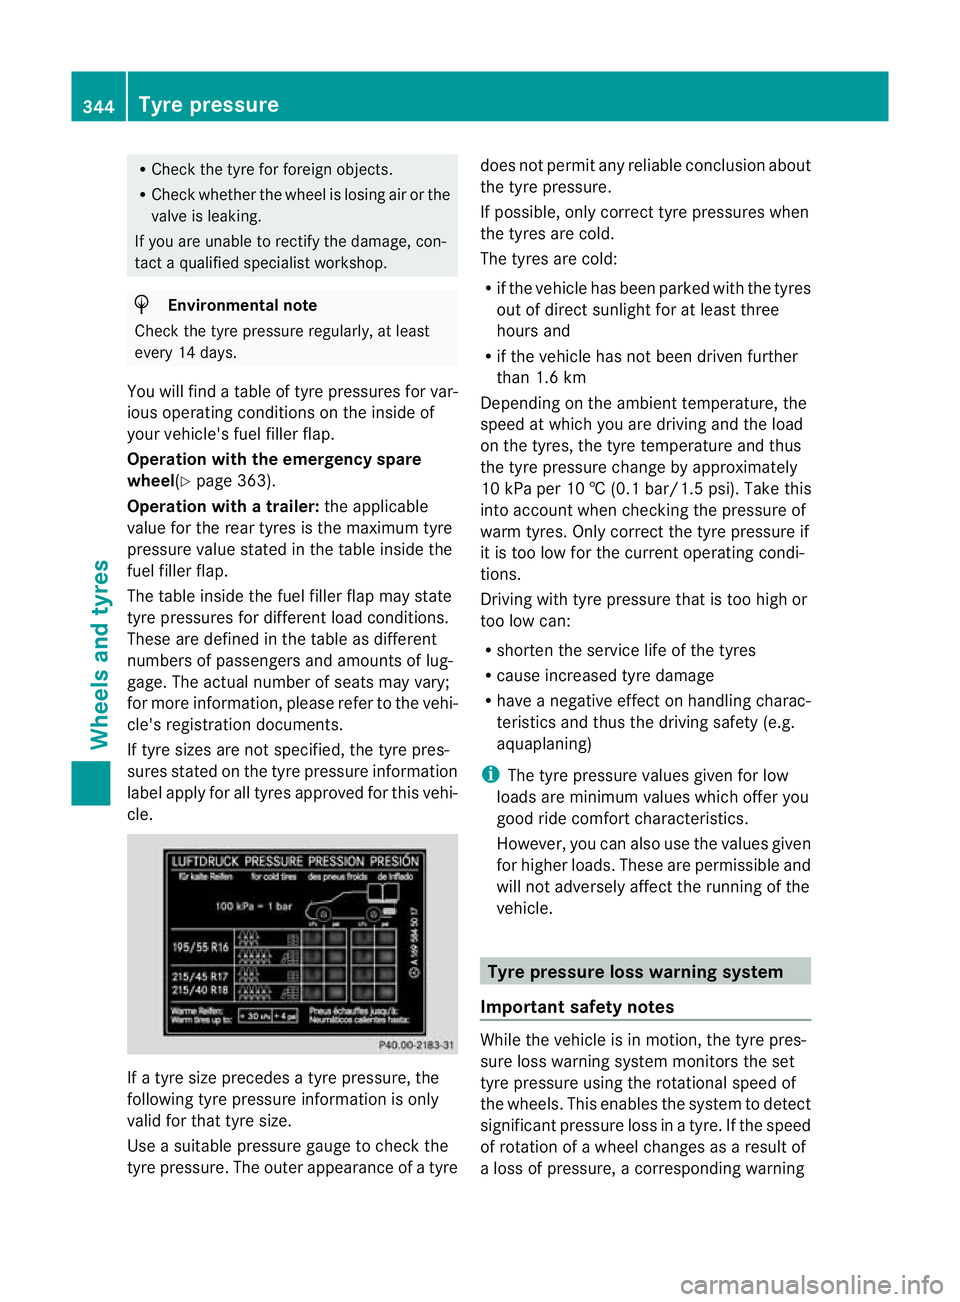
You will find a table of tyre pressures for var-
ious operating conditions on the inside of
your vehicle's fuel filler flap.
Operation with the emergency spare
wheel(Y page 363).
Operation with a trailer: the applicable
value for the rear tyres is the maximum tyre
pressure value stated in the table inside the
fuel filler flap.
The table inside the fuel filler flap may state
tyre pressures for different load conditions.
These are defined in the table as different
numbers of passengers and amounts of lug-
gage. The actual number of seats may vary;
for more information, please refer to the vehi-
cle's registration documents.
If tyre sizes are not specified, the tyre pres-
sures stated on the tyre pressure information
label apply for all tyres approved for this vehi-
cle. If a tyre size precedes a tyre pressure, the
following tyre pressure information is only
valid for that tyre size.
Use a suitable pressure gauge to check the
tyre pressure. The outer appearance of a tyre does not permit any reliable conclusion about
the tyre pressure.
If possible, only correct tyre pressures when
the tyres are cold.
The tyres are cold:
R
if the vehicle has been parked with the tyres
out of direct sunlight for at least three
hours and
R if the vehicle has not been driven further
than 1.6 km
Depending on the ambient temperature, the
speed at which you are driving and the load
on the tyres, the tyre temperature and thus
the tyre pressure change by approximately
10 kPa per 10 † (0.1 ba r/1.5 psi). Take this
into account whe nchecking the pressure of
warm tyres. Only correct the tyre pressure if
it is too low for the current operating condi-
tions.
Driving with tyre pressure that is too high or
too low can:
R shorten the service life of the tyres
R cause increased tyre damage
R have a negative effect on handling charac-
teristics and thus the driving safety (e.g.
aquaplaning)
i The tyre pressure values given for low
loads are minimum values which offer you
good ride comfort characteristics.
However, you can also use the values given
for higher loads. These are permissible and
will not adversely affect the running of the
vehicle. Tyre pressure loss warning system
Important safety notes While the vehicle is in motion, the tyre pres-
sure loss warning system monitors the set
tyre pressure using the rotational speed of
the wheels. This enables the system to detect
significant pressure loss in a tyre. If the speed
of rotation of a wheel changes as a result of
a loss of pressure, a corresponding warning344
Tyre pressureWheels and tyres
Page 350 of 389
X
Vehicles withou tKEYLESS-GO: remove
the key from the ignition lock.
X Vehicles with KEYLESS-GO: open the
driver's door.
The on-board electronics have status 0,
which is the same as the key having been
removed.
X Vehicles with KEYLESS-GO: remove the
Start/Stop button from the ignition lock
(Y page 159).
X If included in the vehicle equipment,
remove the tyre-change tool kit from the
vehicle.
X Secure the vehicle to prevent it from rolling
away.
i Apart from certain country-specific varia-
tions, the vehicles are no tequipped with a
tyre-change tool kit .Some tools for chang-
ing a wheel are specific to the vehicle. For
more information on which tools are
required to perform a wheel change on your
vehicle, consult a qualified specialist work-
shop.
Necessary wheel-changing tools can
include, for example:
R jack
R wheel chock
R wheel wrench
Securing the vehicle against rolling
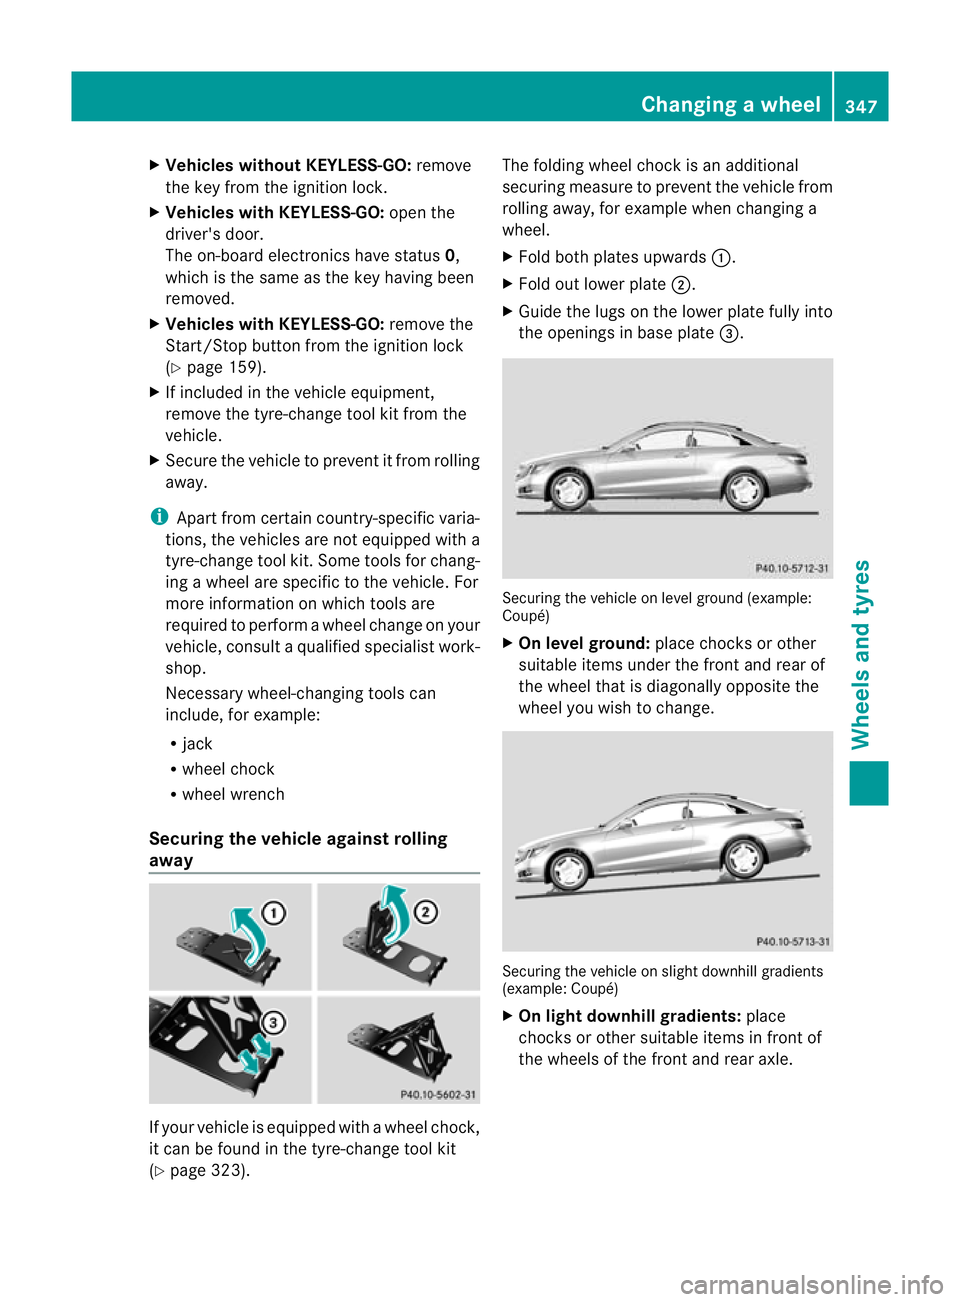
away If your vehicle is equipped with a wheel chock,
it can be found in the tyre-change tool kit
(Y page 323). The folding wheel chock is an additional
securing measure to prevent the vehicle from
rolling away, for example when changing a
wheel.
X
Fold both plates upwards :.
X Fold out lower plate ;.
X Guide the lugs on the lower plate fully into
the openings in base plate =. Securing the vehicle on level ground (example:
Coupé)
X
On level ground: place chocks or other
suitable items under the front and rear of
the wheel that is diagonally opposite the
wheel you wish to change. Securing the vehicle on slight downhill gradients
(example: Coupé)
X
On light downhill gradients: place
chocks or other suitable items in front of
the wheels of the front and rear axle. Changing
awheel
347Wheels and tyres Z
Page 355 of 389
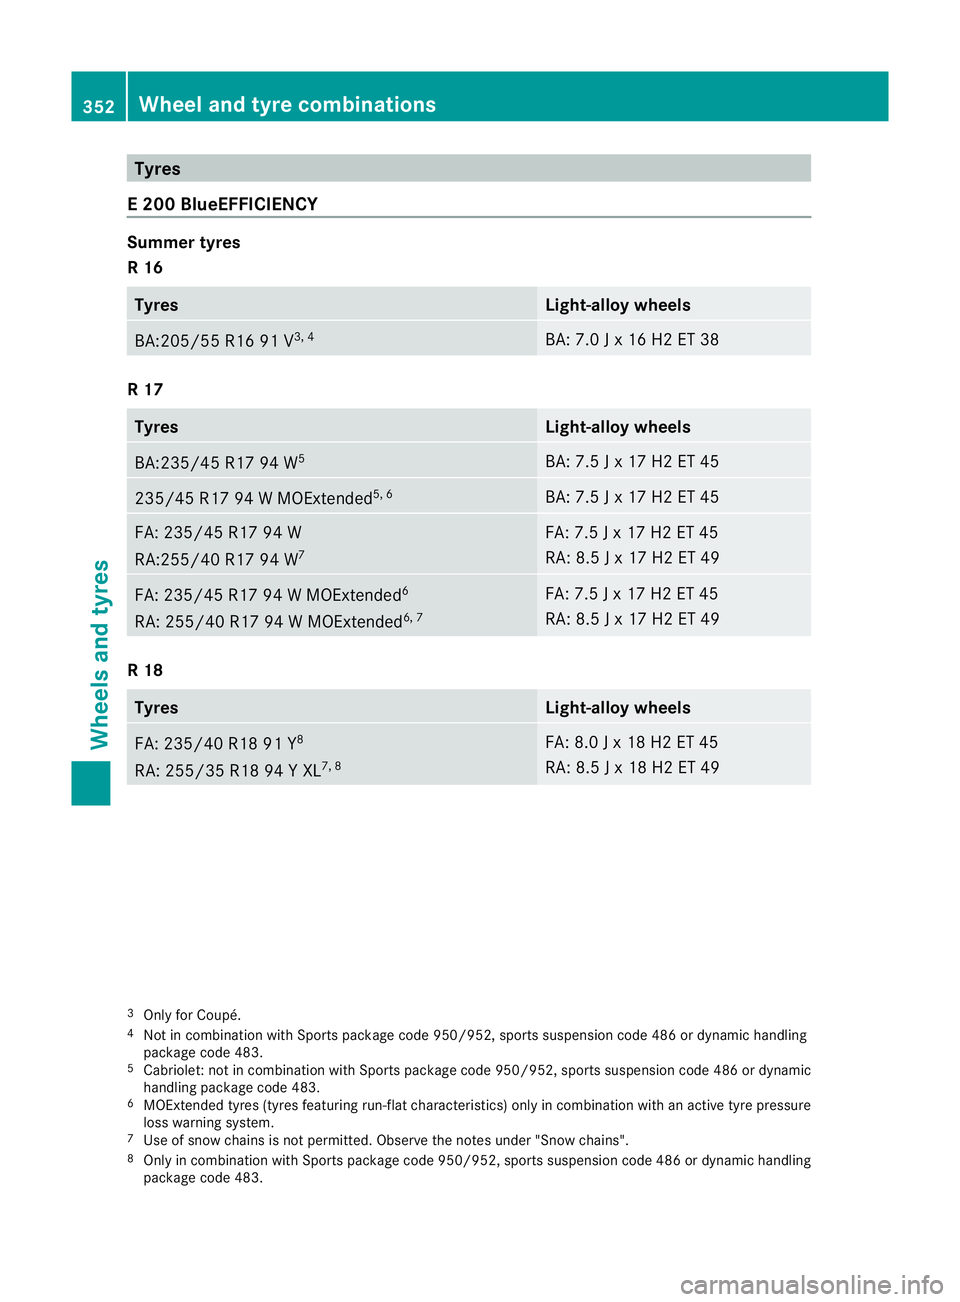
Tyres
E 200 BlueEFFICIENCY Summer tyres
R 16 Tyres Light-alloy wheels
BA:205/5
5 R16 91 V 3, 4 BA: 7.0 J x 16 H2 ET 38
R 17
Tyres Light-allo
ywheels BA:235/45 R17 94 W
5 BA: 7.5 J x 17 H2 ET 45
235/45 R17 94 W MOExtended
5, 6 BA: 7.5 J x 17 H2 ET 45
FA: 235/45 R17 94 W
RA:255/40 R17 94 W
7 FA: 7.5 J x 17 H2 ET 45
RA: 8.5 J x 17 H2 ET 49
FA: 235/45 R17 94 W MOExtended
6
RA: 255/40 R17 94 W MOExtended 6, 7 FA: 7.5 J x 17 H2 ET 45
RA: 8.5 J x 17 H2 ET 49
R 18
Tyres Light-alloy wheels
FA: 235/40 R18 91 Y
8
RA: 255/35 R18 94 Y XL 7, 8 FA: 8.0 J x 18 H2 ET 45
RA: 8.5 J x 18 H2 ET 49
3
Only for Coupé.
4 Not in combination with Sports package code 950/952, sports suspension code 486 or dynamic handling
package code 483.
5 Cabriolet: not in combination with Sports package code 950/952, sports suspension code 486 or dynamic
handling package code 483.
6 MOExtended tyres (tyres featuring run-fla tcharacteristics) only in combination with an active tyre pressure
loss warning system.
7 Use of snow chains is not permitted. Observe the notes under "Snow chains".
8 Only in combination with Sports package code 950/952, sports suspension code 486 or dynamic handling
package code 483. 352
Wheel and tyre combinationsWheels and tyres
Page 356 of 389
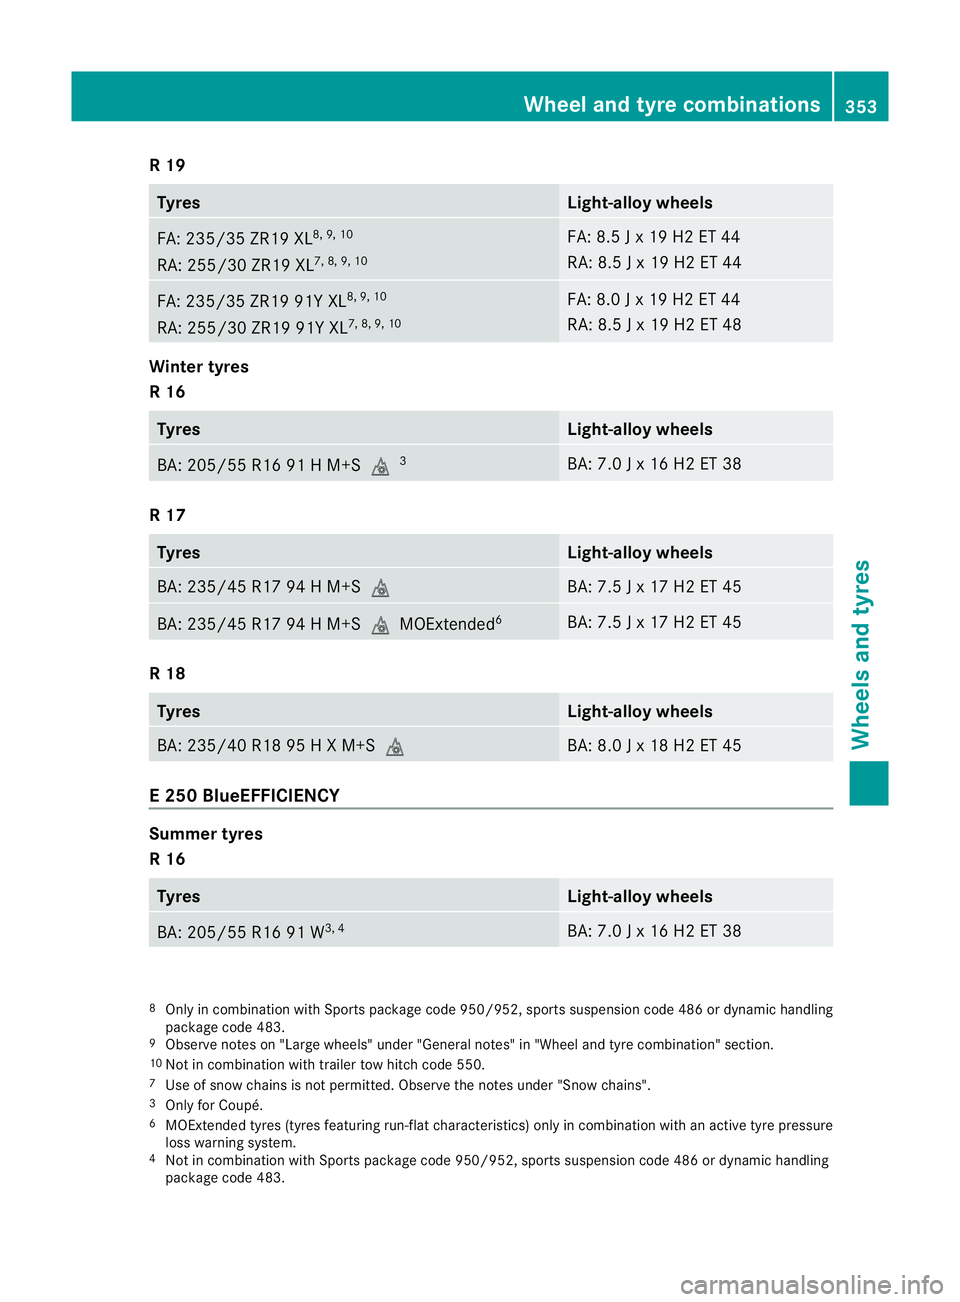
R 19
Tyres Light-allo
ywheels FA: 235/35 ZR19 XL
8, 9, 10
RA: 255/30 ZR19 XL 7, 8, 9, 10 FA: 8.5 J x 19 H2 ET 44
RA: 8.5 J x 19 H2 ET 44
FA: 235/35 ZR19 91Y XL
8, 9, 10
RA: 255/30 ZR19 91Y XL 7, 8, 9, 10 FA: 8.0 J x 19 H2 ET 44
RA: 8.5 J x 19 H2 ET 48
Winter tyres
R 16
Tyres Light-alloy wheels
BA: 205/55 R16 91 H M+S
i3 BA: 7.0 J x 16 H2 ET 38
R 17
Tyres Light-alloy wheels
BA: 235/45 R17 94 H M+S
i BA: 7.5 J x 17 H2 ET 45
BA: 235/45 R17 94 H M+S
iMOExtended6 BA: 7.5 J x 17 H2 ET 45
R 18
Tyres Light-alloy wheels
BA: 235/40 R18 95 H X M+S
i BA: 8.0 J x 18 H2 ET 45
E 250 BlueEFFICIENCY
Summer tyres
R 16
Tyres Light-alloy wheels
BA: 205/55 R16 91 W
3, 4 BA: 7.0 J x 16 H2 ET 38
8
Only in combination with Sports package code 950/952, sports suspension code 486 or dynamic handling
package code 483.
9 Observe notes on "Large wheels" under "General notes" in "Wheel and tyre combination" section.
10 Not in combination with trailer tow hitch code 550.
7 Use of snow chains is not permitted. Observe the notes under "Snow chains".
3 Only for Coupé.
6 MOExtended tyres (tyres featuring run-fla tcharacteristics) only in combination with an active tyre pressure
loss warning system.
4 Not in combination with Sports package code 950/952, sports suspension code 486 or dynamic handling
package code 483. Wheel and tyre combinations
353Wheels and tyres Z