2012 MERCEDES-BENZ E-CLASS COUPE light
[x] Cancel search: lightPage 219 of 389
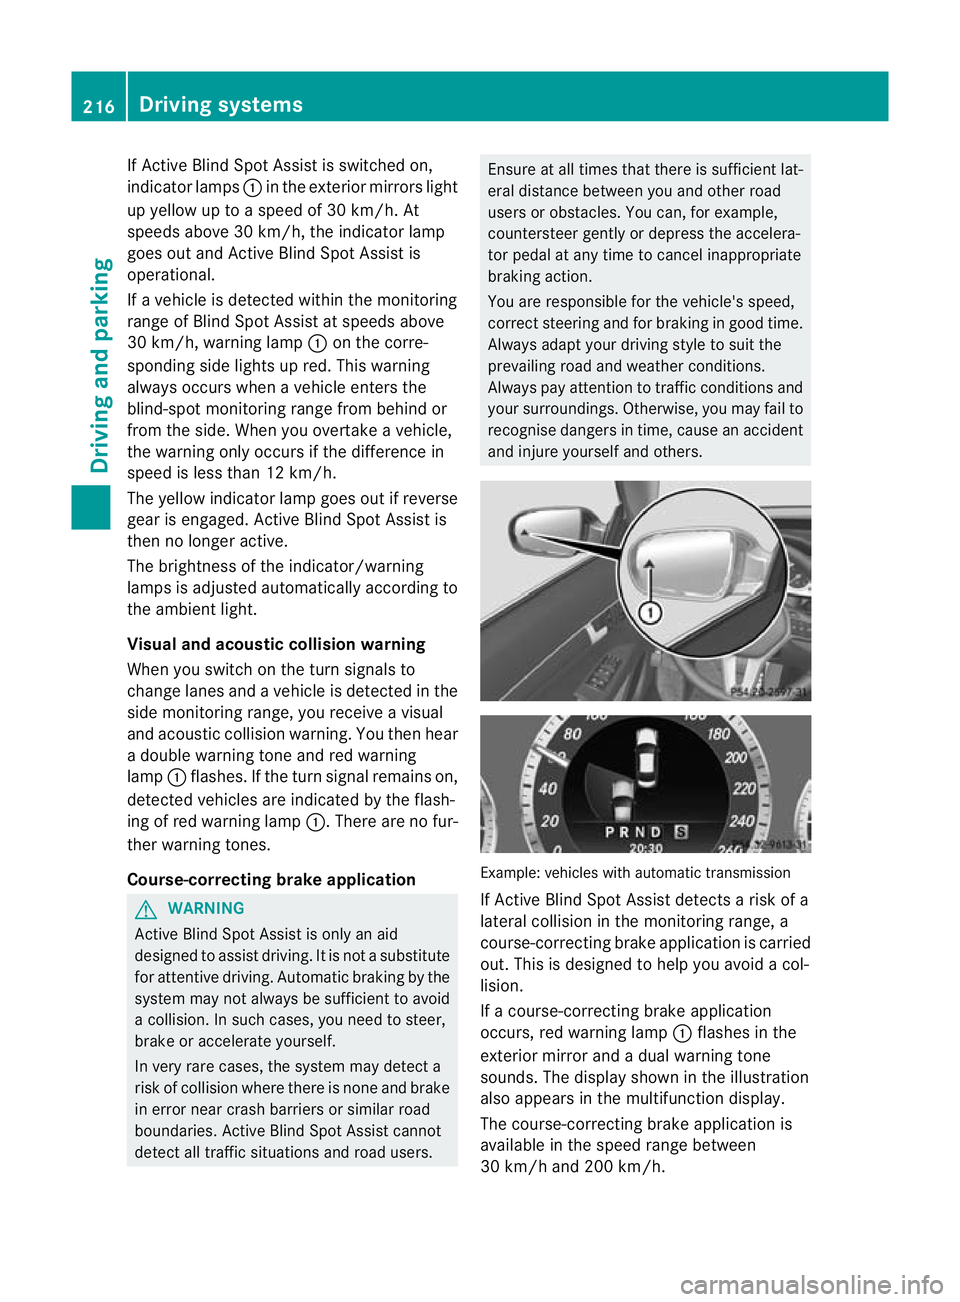
If Active Blind Spot Assist is switched on,
indicator lamps :in the exterior mirrors light
up yellow up to a speed of 30 km/h. At
speeds above 30 km/h, the indicator lamp
goes out and Active Blind Spot Assist is
operational.
If a vehicle is detected within the monitoring
range of Blind Spot Assist at speeds above
30 km/h, warning lamp :on the corre-
sponding side lights up red. This warning
always occurs when a vehicle enters the
blind-spot monitoring range from behind or
from the side. When you overtake a vehicle,
the warning only occurs if the difference in
speed is less than 12 km/h.
The yellow indicator lamp goes out if reverse
gear is engaged. Active Blind Spot Assist is
then no longer active.
The brightness of the indicator/warning
lamps is adjusted automatically according to
the ambient light.
Visual and acoustic collision warning
When you switch on the turn signals to
change lanes and a vehicle is detected in the
side monitoring range, you receive a visual
and acoustic collision warning. You then hear
a double warning tone and red warning
lamp :flashes. If the turn signal remains on,
detected vehicles are indicated by the flash-
ing of red warning lamp :.There are no fur-
ther warning tones.
Course-correcting brake application G
WARNING
Active Blind Spot Assist is only an aid
designed to assist driving. It is not a substitute
for attentive driving. Automatic braking by the
system may not always be sufficient to avoid
a collision. In such cases, you need to steer,
brake or accelerate yourself.
In very rare cases, the system may detect a
risk of collision where there is none and brake
in error near crash barriers or similar road
boundaries. Active Blind Spot Assist cannot
detect all traffic situations and road users. Ensure at all times that there is sufficient lat-
eral distance between you and other road
users or obstacles. You can, for example,
countersteer gently or depress the accelera-
tor pedal at any time to cancel inappropriate
braking action.
You are responsible for the vehicle's speed,
correct steering and for braking in good time.
Always adapt your driving style to suit the
prevailing road and weather conditions.
Always pay attention to traffic conditions and
your surroundings. Otherwise, you may fail to
recognise dangers in time, cause an accident
and injure yourself and others.
Example: vehicles with automatic transmission
If Active Blind Spot Assist detects a risk of a
lateral collision in the monitoring range, a
course-correcting brake application is carried
out. This is designed to help you avoid a col-
lision.
If a course-correcting brake application
occurs, red warning lamp
:flashes in the
exterior mirror and a dual warning tone
sounds. The display shown in the illustration
also appears in the multifunction display.
The course-correcting brake application is
available in the speed range between
30 km/h and 200 km/h. 216
Driving systemsDriving and parking
Page 220 of 389

Either no braking application, or a course-
correcting brake applicatio nadapted to the
driving situation occurs, if:
R there are vehicles or obstacles, e.g. crash
barriers, on both sides of your vehicle.
R a vehicle approaches too closely on the
side.
R you have adopted a sporty driving style with
high cornering speeds.
R you brake or accelerate decisively.
R a driving safety system intervenes, such as
ESP ®
or PRE-SAFE ®
Brake.
R ESP ®
is deactivated.
R a loss of tyre pressure or a defective tyre is
detected.
Activating Active Blind Spot Assist
X Make sure that the radar senso rsystem
(Y page 245) and Active Blind Spot Assist
(Y page 241) are activated in the on-board
computer.
X Tur nthe key to position 2in the ignition
lock.
Warning lamps :in the exterior mirrors
light up red for approximately
1.5 seconds and then turn yellow.
Towing atrailer
If you attach a trailer, make sure tha tyou have
correctly established the electrical connec-
tion. This can be accomplished by checking
the trailer lighting. Active Blind Spot Assist is
then deactivated. The indicator lamp lights up
yellow in the exterior mirrors and the ActiveBlind Spot Assist currently unavail‐
able See Owner's Manual message
appears in the multifunction display.
Active Lane Keeping Assist Important safety notes
G
WARNING
Active Lane Keeping Assist does not keep
your vehicle in its lane. It is only an aid and may detect the lane markings on the road
incorrectly or not at all.
The system may be impaired or may not func-
tion if:
R
there is poor visibility, e.g. due to inade-
quate illumination of the road surface,
snow, rain, fog or spray.
R there is glare, e.g. from oncoming traffic,
the sun, or reflection from other vehicles.
R the windscreen is dirty, fogged up or cov-
ered, for instance by a sticker, in the vicinity
of the camera.
R several or no lane markings for a single lane
are present.
R the lane markings are worn away, dark or
covered up, e.g. by dirt or snow.
R the distance to the vehicle in front is too
small and as a result the lane markings can-
not be recognised.
R the lane markings on the road are unclear,
e.g. near roadworks.
R the lane markings change quickly, e.g.
branch off, cross, or merge.
R the road is narrow and winding.
Active Lane Keeping Assist cannot detect
road and traffic conditions. It is not a substi-
tute for attentive driving. You are responsible
for the vehicle's speed, braking in good time,
and steering correctly. Always adapt your
driving style to suit the prevailing road and
weather conditions. Always pay attention to
traffic conditions and your surroundings. Oth-
erwise, you may fail to recognise dangers in
time, cause an accident and injure yourself
and others. Driving systems
217Driving and parking Z
Page 222 of 389
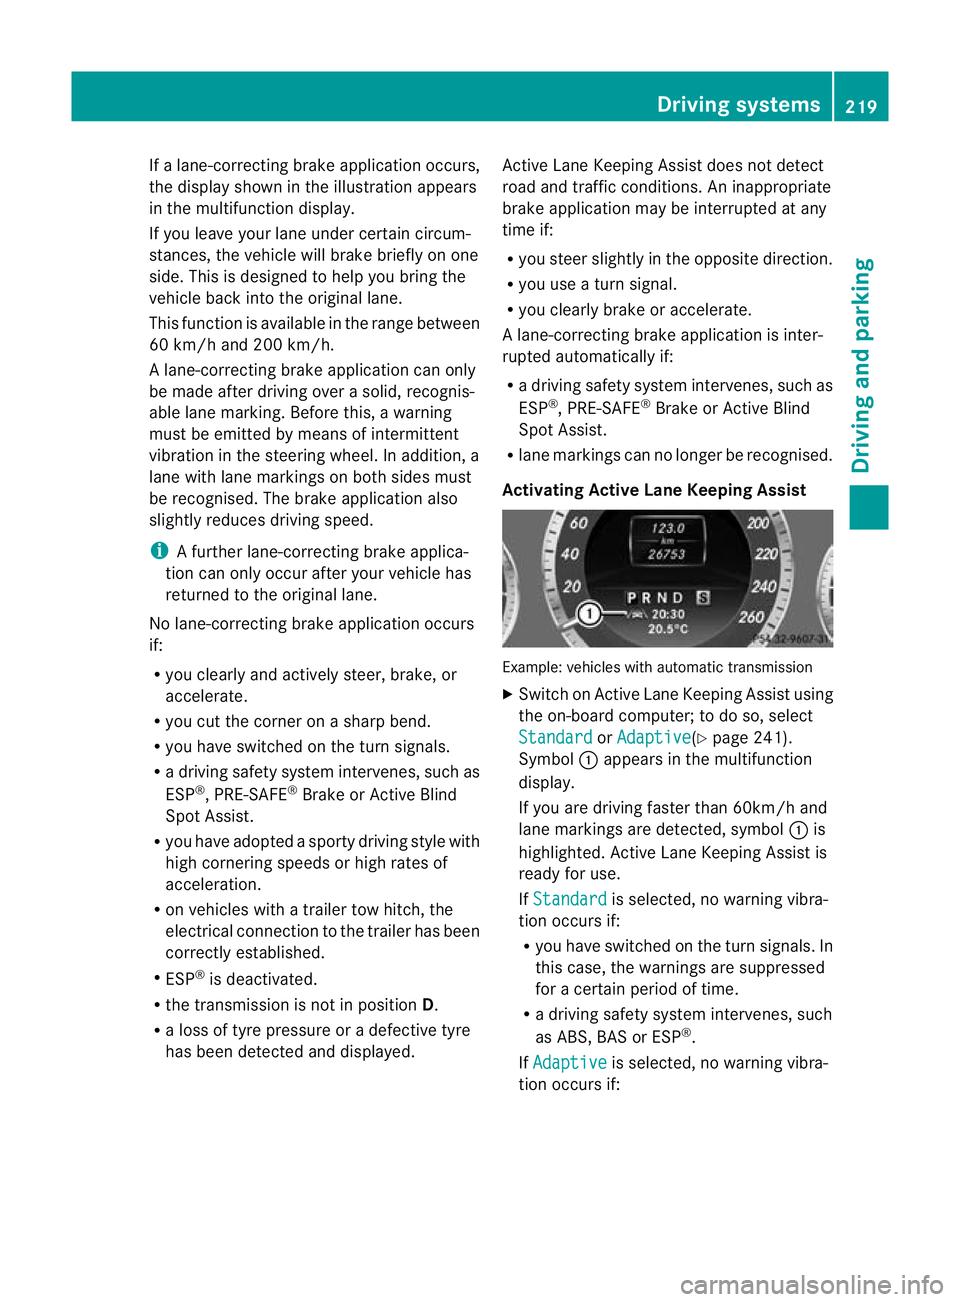
If a lane-correcting brake application occurs,
the display shown in the illustration appears
in the multifunction display.
If you leave your lane under certain circum-
stances, the vehicle will brake briefly on one
side. This is designed to help you bring the
vehicle back into the original lane.
This function is available in the range between
60 km/h and 200 km/h.
A lane-correcting brake application can only
be made after driving over a solid, recognis-
able lane marking. Before this, a warning
must be emitted by means of intermittent
vibration in the steering wheel. In addition, a
lane with lane markings on both sides must
be recognised. The brake application also
slightly reduces driving speed.
i A further lane-correcting brake applica-
tion can only occur after your vehicle has
returned to the original lane.
No lane-correcting brake application occurs
if:
R you clearly and actively steer, brake, or
accelerate.
R you cut the corner on a sharp bend.
R you have switched on the turn signals.
R a driving safety system intervenes, such as
ESP ®
, PRE-SAFE ®
Brake or Active Blind
Spot Assist.
R you have adopted a sporty driving style with
high cornering speeds or high rates of
acceleration.
R on vehicles with a traile rtow hitch, the
electrical connection to the trailer has been
correctly established.
R ESP ®
is deactivated.
R the transmission is not in position D.
R a loss of tyre pressure or a defective tyre
has been detected and displayed. Active Lane Keeping Assist does not detect
road and traffic conditions. An inappropriate
brake application may be interrupted at any
time if:
R
you steer slightly in the opposite direction.
R you use a turn signal.
R you clearly brake or accelerate.
Al ane-correcting brake applicatio nis inter-
rupted automatically if:
R a driving safety system intervenes, such as
ESP ®
, PRE-SAFE ®
Brake or Active Blind
Spot Assist.
R lane markings can no longer be recognised.
Activating Active Lane Keeping Assist Example: vehicles with automatic transmission
X
Switch on Active Lane Keeping Assist using
the on-board computer; to do so, select
Standard or
Adaptive (Y
page 241).
Symbol :appears in the multifunction
display.
If you are driving faster than 60km/h and
lane markings are detected, symbol :is
highlighted. Active Lane Keeping Assist is
ready for use.
If Standard is selected, no warning vibra-
tion occurs if:
R you have switched on the turn signals. In
this case, the warnings are suppressed
for a certain period of time.
R a driving safety system intervenes, such
as ABS, BAS or ESP ®
.
If Adaptive is selected, no warning vibra-
tion occurs if: Driving systems
219Driving and parking Z
Page 223 of 389

R
you have switched on the tur nsignals .In
this case, the warnings ar esuppressed
for a certain period of time.
R a driving safety system intervenes, such
as ABS, BAS or ESP ®
.
R you accelerate hard, e.g. kickdown.
R you brake hard.
R you steer actively, e.g. swerve to avoid
an obstacle or change lane quickly.
R you cut the corner on a sharp bend.
Towing atrailer
If you attach a trailer, make sure tha tyou have
correctly established the electrical connec-
tion. This can be accomplished by checking
the trailer lighting. Towing
atrailer Important safety notes
G
WARNING
The braking syste mcan overheat if you leave
your foo tonthe brake pedal while driving.
This increases the braking distance and could
even cause the braking system to fail. There
is a risk of an accident.
Never use the brake pedal as a footrest.Do
not simultaneously depress both the brake
pedal and the accelerato rpedal while driving. G
WARNING
You could lose control of the vehicle/trailer
combination if it begins to swerve. The vehi-
cle/trailer combination could even overturn.
There is a risk of an accident.
On no account should you attempt to
straighten out the vehicle/trailer combina-
tion by increasing speed. Decrease your
speed and do not countersteer. Brake if nec-
essary. G
WARNING
If you exceed the permissible noseweight
while carrying a load, the carrier system could detach from the vehicle and fall on the road.
There is a risk of an accident and injury.
Always maintain the permissible noseweight
when carrying loads. G
WARNING
If the ball coupling is not correctly engaged, it
could detach while driving and fall on the road.
There is a risk of an accident and injury.
Engage the ball coupling as described. G
WARNING
If the ball coupling is not correctly engaged,
the trailer can detach. There is a risk of an
accident.
Always engage the ball coupling as described.
! Depressing the brake pedal constantly
results in excessive and premature wear to
the brake pads.
You can use carrier systems, e.g. bicycle
racks or load-bearing implements, on the ball
coupling. The maximum noseweight of
75 kg applies when using carrier systems on
the ball coupling.
When reversing the vehicle towards the
trailer, make sure there is nobody between
the trailer and the vehicle.
Couple and uncouple the trailer carefully. If
you do not couple the trailer to the towing
vehicle correctly, the trailer could become
detached.
Make sure that the following values are not
exceeded:
R the permissible trailer drawbar noseweight
R the permissible trailer load
R the permissible rear axle load of the towing
vehicle
R the maximum permissible gross vehicle
weight of both the towing vehicle and the
trailer
You will find the applicable permissible val-
ues, which must not be exceeded, in the vehi-
cle documents. 220
Towing
atrailerDriving an d parking
Page 226 of 389

X
Pull the ball coupling in the direction of the
arrow until it engages in a vertical position.
Indicator lamp =goes out. The power
socket folds down automatically.
The multifunction display shows the
Trailer hitch Check lock mech. dis-
play message until the ball coupling is
engaged.
X Remove the protective covering from the
ball coupling and store it in a safe place.
X Make sure that the ball of the ball coupling
is clean and greased. Coupling up a trailer
G
WARNING
If you uncouple a trailer with an engaged over-
run brake, you could trap your hand between
the vehicle and the trailer drawbar. This poses
a risk of injury.
Do not uncouple a trailer with an engaged
overrun brake.
X Make sure that the transmission is in posi-
tion P.
X Apply the parking brake.
X Position the trailer level behind the vehicle.
X Couple up the trailer.
X Establish the electrical connection
between the vehicle and the trailer.
X Check that the trailer lighting system is
working. Uncoupling
atrailer G
WARNING
If you uncouple a trailer with an engaged over-
ru nb rake, you could trap yourh and between
the vehicle and the trailer drawbar .This poses
a risk of injury.
Do not uncouple a trailer with an engaged
overrun brake. G
WARNING
Vehicles with level control:
If you disconnectt he trailer cable, the vehicle
is lowered. This can cause you or others to
become trapped between the vehicle body
and tyres, or underneath the vehicle. This
poses a risk of injury.
Make sure that no-one is in the immediate
vicinity of the wheel arch or underneath the
vehicle when disconnecting the trailer cable.
! Do not disconnect a trailer with an
engaged overrun brake. Otherwise, your
vehicle could be damaged by the rebound-
ing of the overrun brake.
X Make sure that the transmission is in posi-
tion P.
X Apply the parking brake.
X Secure the trailer against rolling away.
X Remove the trailer cable and decouple the
trailer. Folding in the ball coupling
G
WARNING
If you release the ball coupling or it does not
engage correctly when folding in, it will swing
out. Within pivoting range of the ball coupling,
there is an increased risk of an accident and
injury.
Only release the ball coupling if the pivoting
range is unobstructed. Always make sure that
the ball coupling engages when folding in. Towing
atrailer
223Driving an d parking Z
Page 228 of 389
the current has fallen below the minimum
of 50 mA.
To ensure reliable operatio nofthe bulb failure
indicator, each LED chain in the trailer lighting
must be guaranteed a minimum current of
50 mA. Trailer with 7-pin connector
General notes Trailers with 7-pin connector:
you can
make a connection to the 13-pin connector
on the ball coupling using an adapter plug or,
if necessary, an adapter cable. Both can be
obtained in a qualified specialist workshop.
Fitting the adapter !
Make sure that there is sufficient cable
play so that the cable cannot become
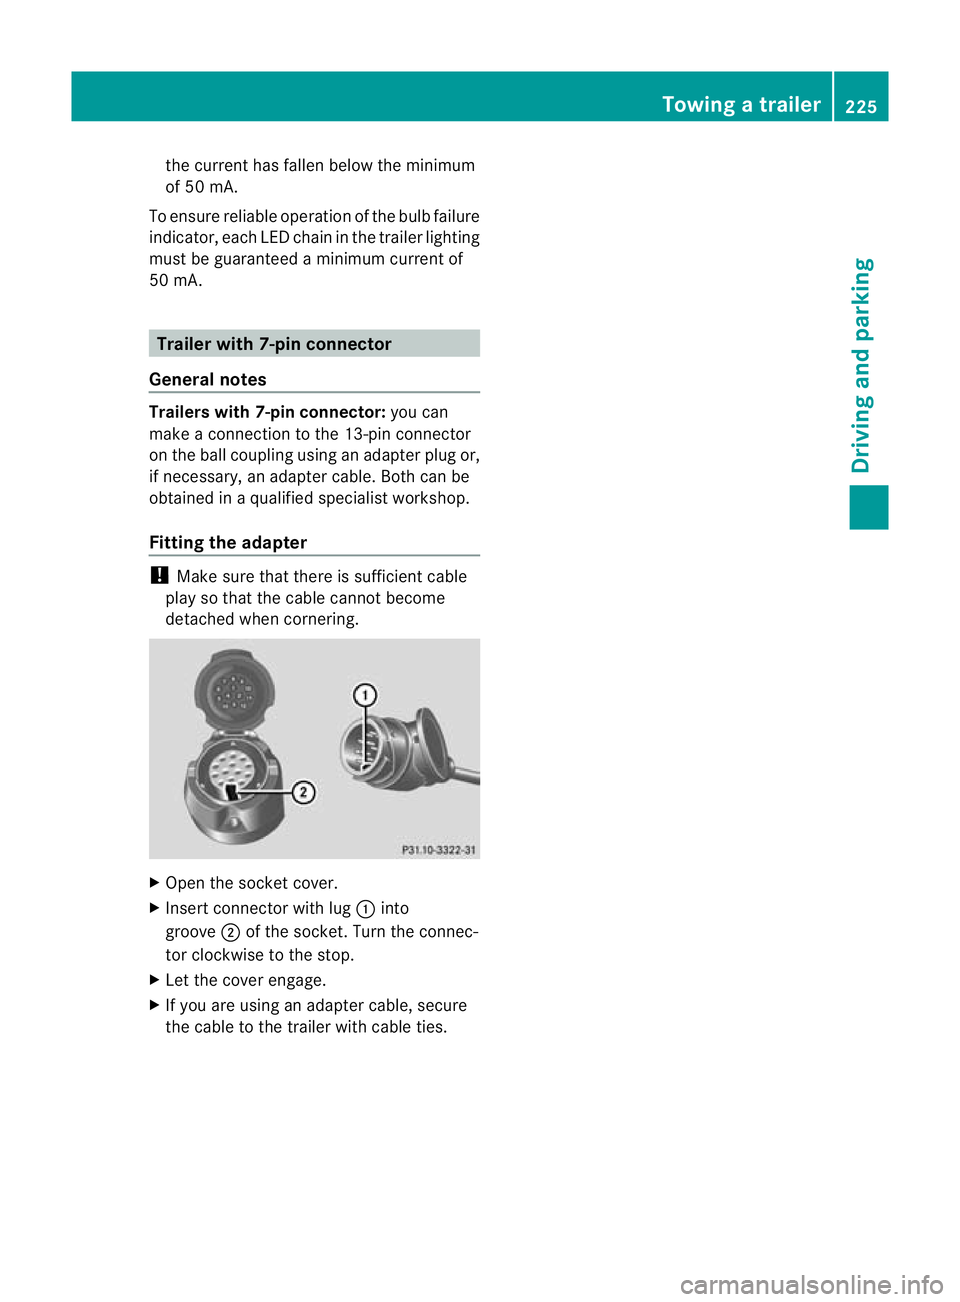
detached when cornering. X
Open the socket cover.
X Insert connector with lug :into
groove ;of the socket. Turn the connec-
tor clockwise to the stop.
X Let the cover engage.
X If you are using an adapter cable, secure
the cable to the trailer with cable ties. Towing
atrailer
225Driving an d parking Z
Page 232 of 389
Displays and operation
Instrument cluster
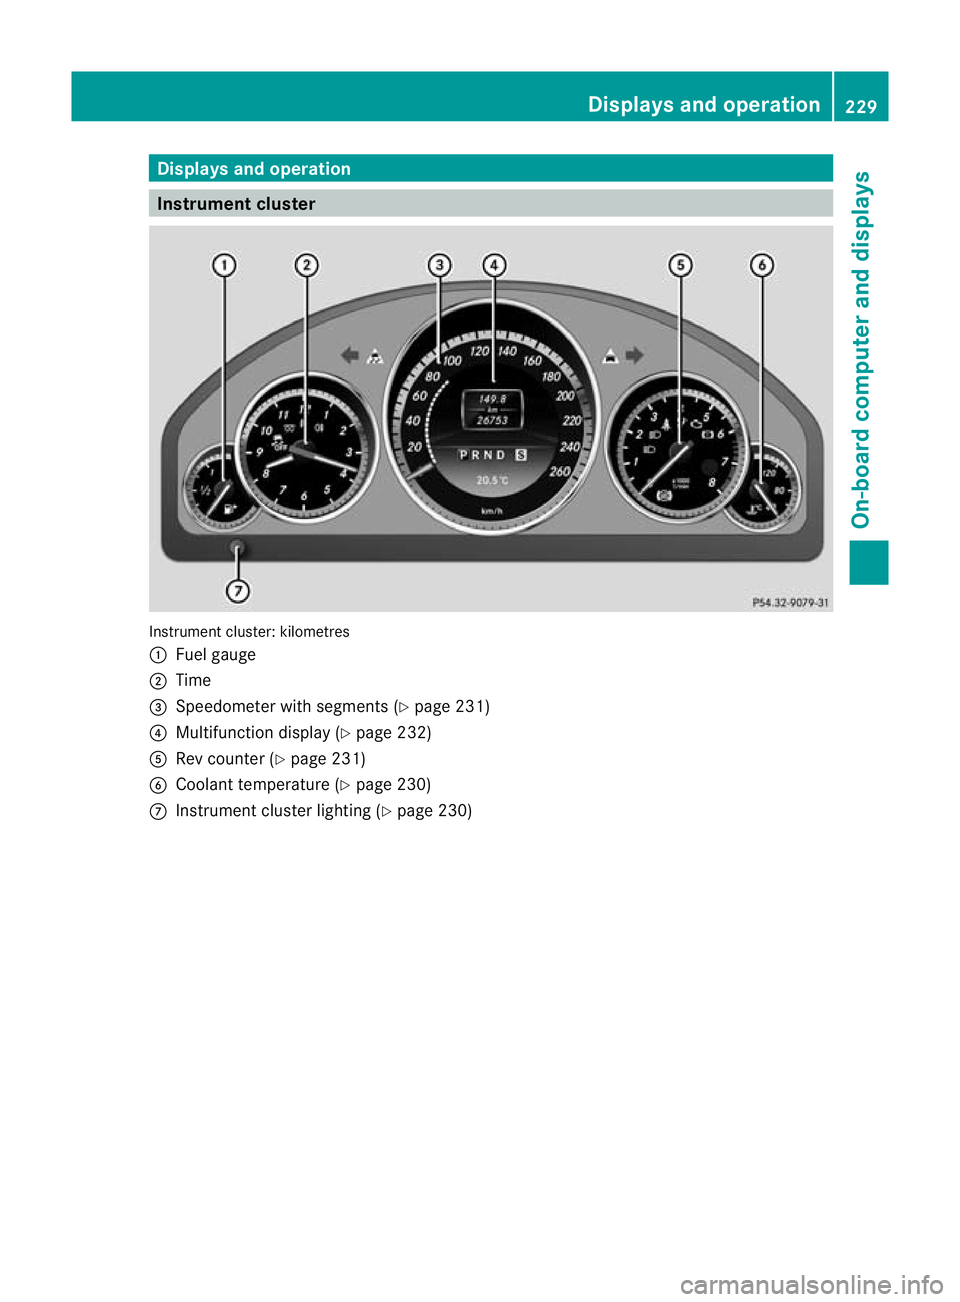
Instrument cluster: kilometres
:
Fuel gauge
; Time
= Speedometer with segments (Y page 231)
? Multifunction display (Y page 232)
A Rev counter (Y page 231)
B Coolant temperature ( Ypage 230)
C Instrumen tcluster lighting (Y page 230) Displays and operation
229On-board computer and displays Z
Page 233 of 389
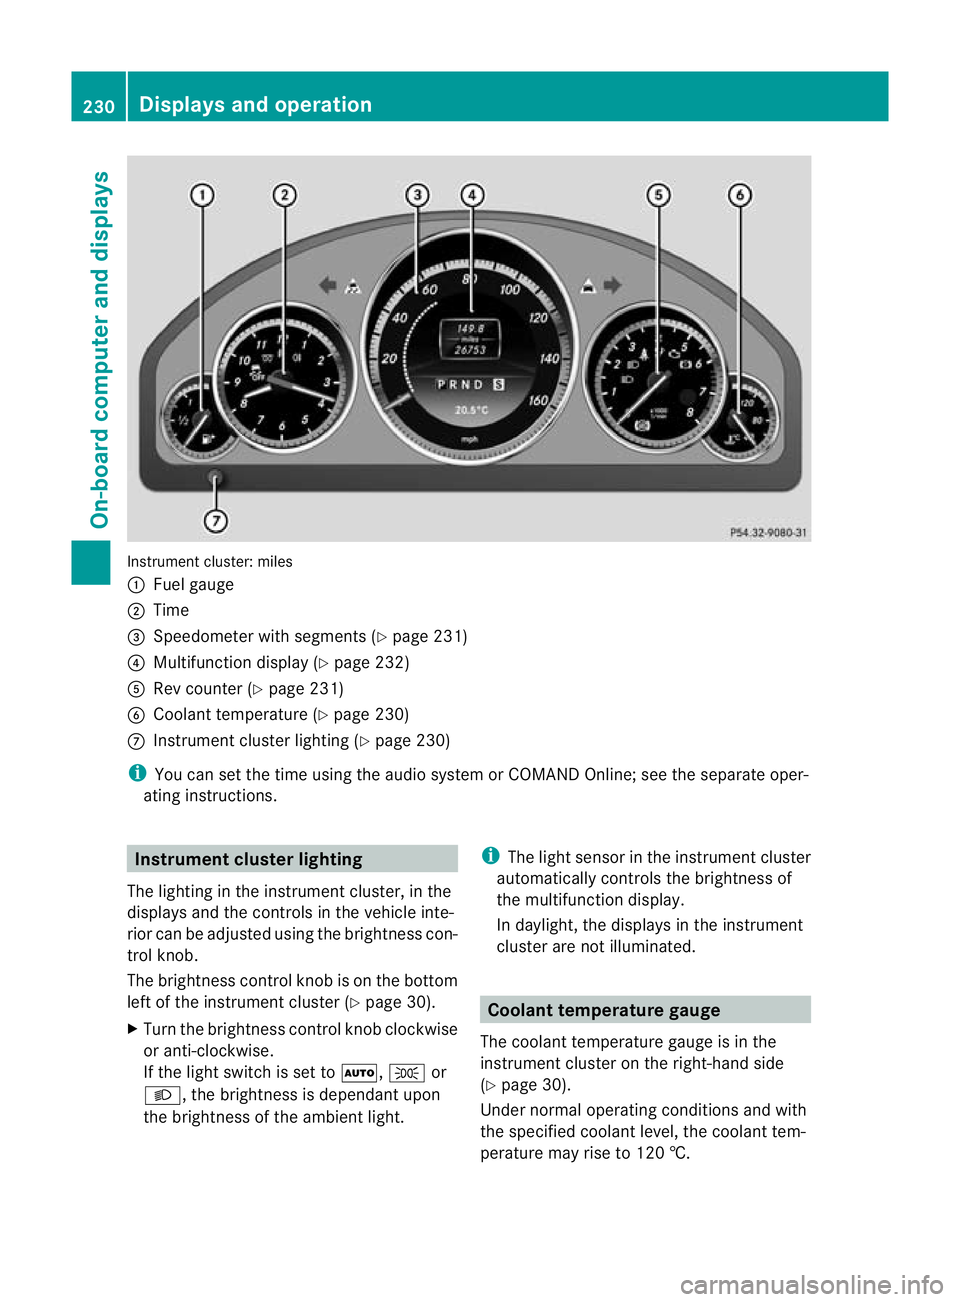
Instrument cluster: miles
:
Fuel gauge
; Time
= Speedometer with segments (Y page 231)
? Multifunction display (Y page 232)
A Rev counter (Y page 231)
B Coolant temperature (Y page 230)
C Instrument cluster lighting (Y page 230)
i You can set the time using the audio system or COMAND Online; see the separate oper-
ating instructions. Instrument clusterl
ighting
The lighting in the instrumen tcluster, in the
displays and the controls in the vehicle inte-
rior can be adjusted using the brightness con-
trol knob.
The brightness control knob is on the bottom
left of the instrument cluster (Y page 30).
X Turn the brightness control knob clockwise
or anti-clockwise.
If the light switch is set to Ã,Tor
L, the brightness is dependant upon
the brightness of the ambien tlight. i
The light sensor in the instrumen tcluster
automatically controls the brightness of
the multifunction display.
In daylight, the displays in the instrument
cluster are not illuminated. Coolant temperature gauge
The coolan ttemperature gauge is in the
instrument cluster on the right-hand side
(Y page 30).
Under normal operating conditions and with
the specified coolant level, the coolant tem-
perature may rise to 120 †. 230
Displays and operationOn-board computer and displays