2012 MERCEDES-BENZ E-CLASS COUPE warning
[x] Cancel search: warningPage 154 of 389
The following messages may appear in the
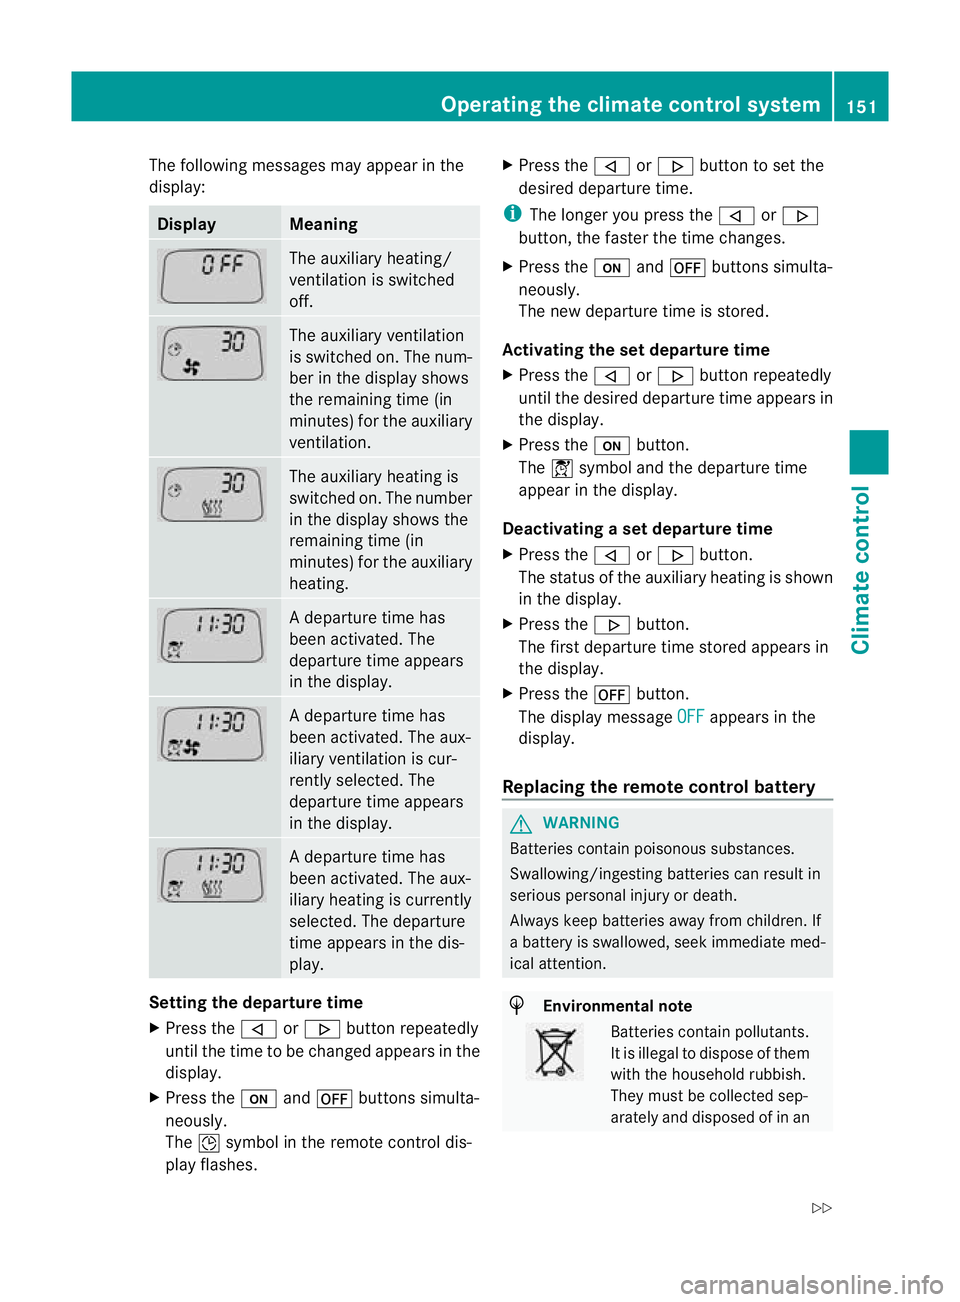
display: Display Meaning
The auxiliary heating/
ventilation is switched
off. The auxiliary ventilation
is switched on. The num-
ber in the display shows
the remaining time (in
minutes) for the auxiliary
ventilation. The auxiliary heating is
switched on. The number
in the display shows the
remaining time (in
minutes) for the auxiliary
heating. Ad
eparture time has
been activated. The
departure time appears
in the display. Ad
eparture time has
been activated. The aux-
iliary ventilation is cur-
rently selected. The
departure time appears
in the display. Ad
eparture time has
been activated. The aux-
iliary heating is currently
selected. The departure
time appears in the dis-
play. Setting the departure time
X
Press the ,or. button repeatedly
until the time to be changed appears in the
display.
X Press the uand^ buttons simulta-
neously.
The Îsymbol in the remote control dis-
play flashes. X
Press the ,or. button to set the
desired departure time.
i The longer you press the ,or.
button, the faster the time changes.
X Press the uand^ buttons simulta-
neously.
The new departure time is stored.
Activating the set departure time
X Press the ,or. button repeatedly
until the desired departure time appears in
the display.
X Press the ubutton.
The Ísymbol and the departure time
appear in the display.
Deactivating a set departure time
X Press the ,or. button.
The status of the auxiliary heating is shown
in the display.
X Press the .button.
The first departure time stored appears in
the display.
X Press the ^button.
The display message OFF appears in the
display.
Replacing the remote control battery G
WARNING
Batteries contain poisonous substances.
Swallowing/ingesting batteries can result in
serious personal injury or death.
Always keep batteries away from children .If
a battery is swallowed, seek immediate med-
ical attention. H
Environmental note Batteries contain pollutants.
It is illegal to dispose of them
with the household rubbish.
They must be collected sep-
arately and disposed of in anOperating the climate control system
151Climate control
Z
Page 156 of 389
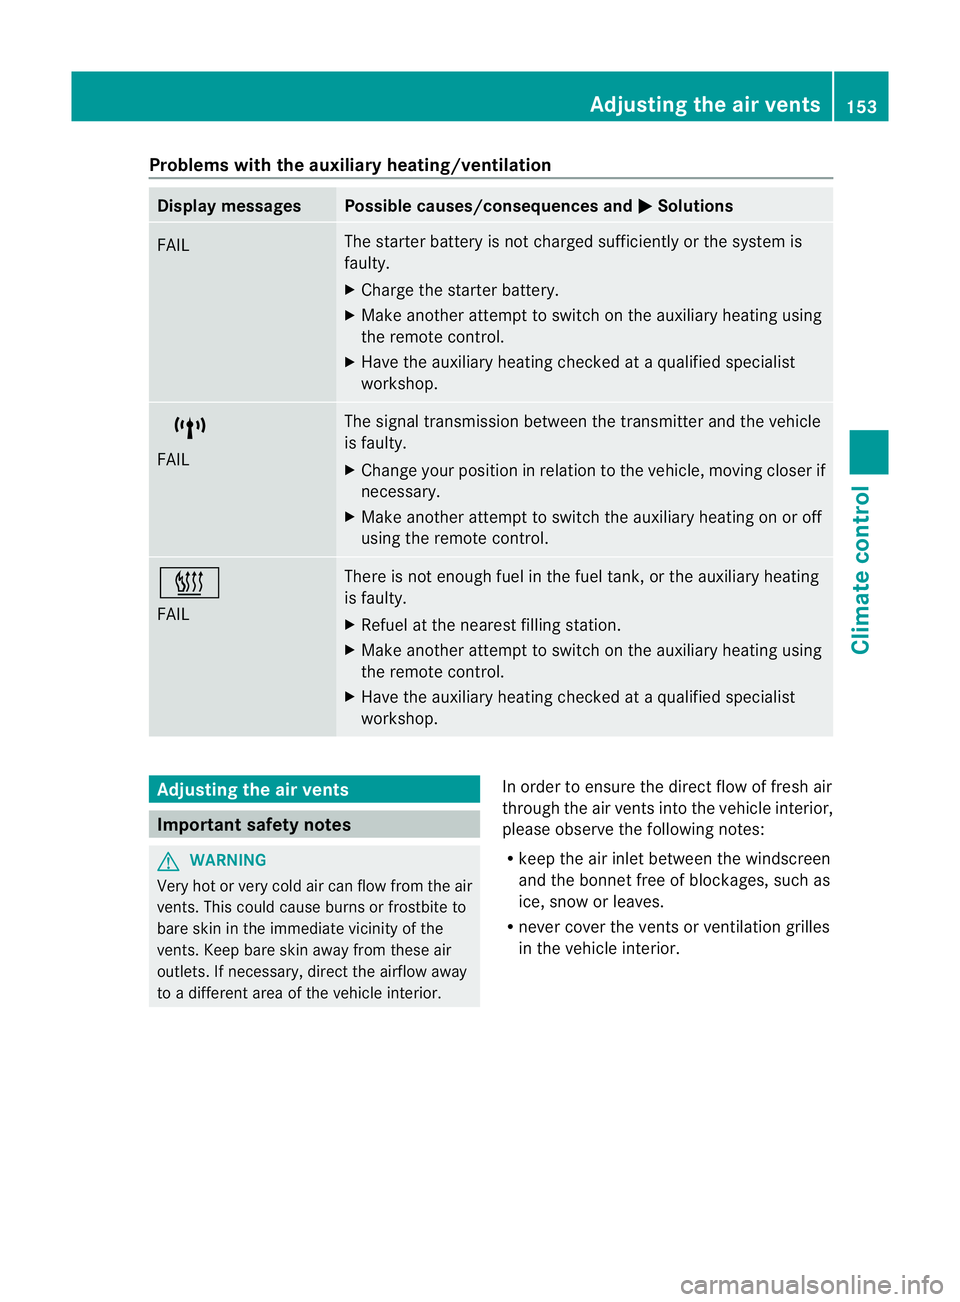
Problems with the auxiliary heating/ventilation
Display messages Possible causes/consequences and
M Solutions
FAIL The starter battery is not charged sufficiently or the system is
faulty.
X
Charge the starter battery.
X Make another attempt to switch on the auxiliary heating using
the remote control.
X Have the auxiliary heating checked at a qualified specialist
workshop. $
FAIL The signal transmission between the transmitter and the vehicle
is faulty.
X
Change your position in relation to the vehicle, moving closer if
necessary.
X Make another attempt to switch the auxiliary heating on or off
using the remote control. ©
FAIL There is not enough fuel in the fuel tank, or the auxiliary heating
is faulty.
X
Refuel at the nearest filling station.
X Make another attempt to switch on the auxiliary heating using
the remote control.
X Have the auxiliary heating checked at a qualified specialist
workshop. Adjusting the air vents
Important safety notes
G
WARNING
Very hot or very cold air can flow from the air
vents. This could cause burns or frostbite to
bare skin in the immediate vicinity of the
vents. Keep bare skin away from these air
outlets. If necessary, direct the airflow away
to a different area of the vehicle interior. In order to ensure the direct flow of fresh air
through the air vents into the vehicle interior,
please observe the following notes:
R
keep the air inlet between the windscreen
and the bonnet free of blockages, such as
ice, snow or leaves.
R never cover the vents or ventilation grilles
in the vehicle interior. Adjusting the air vents
153Climate control Z
Page 158 of 389
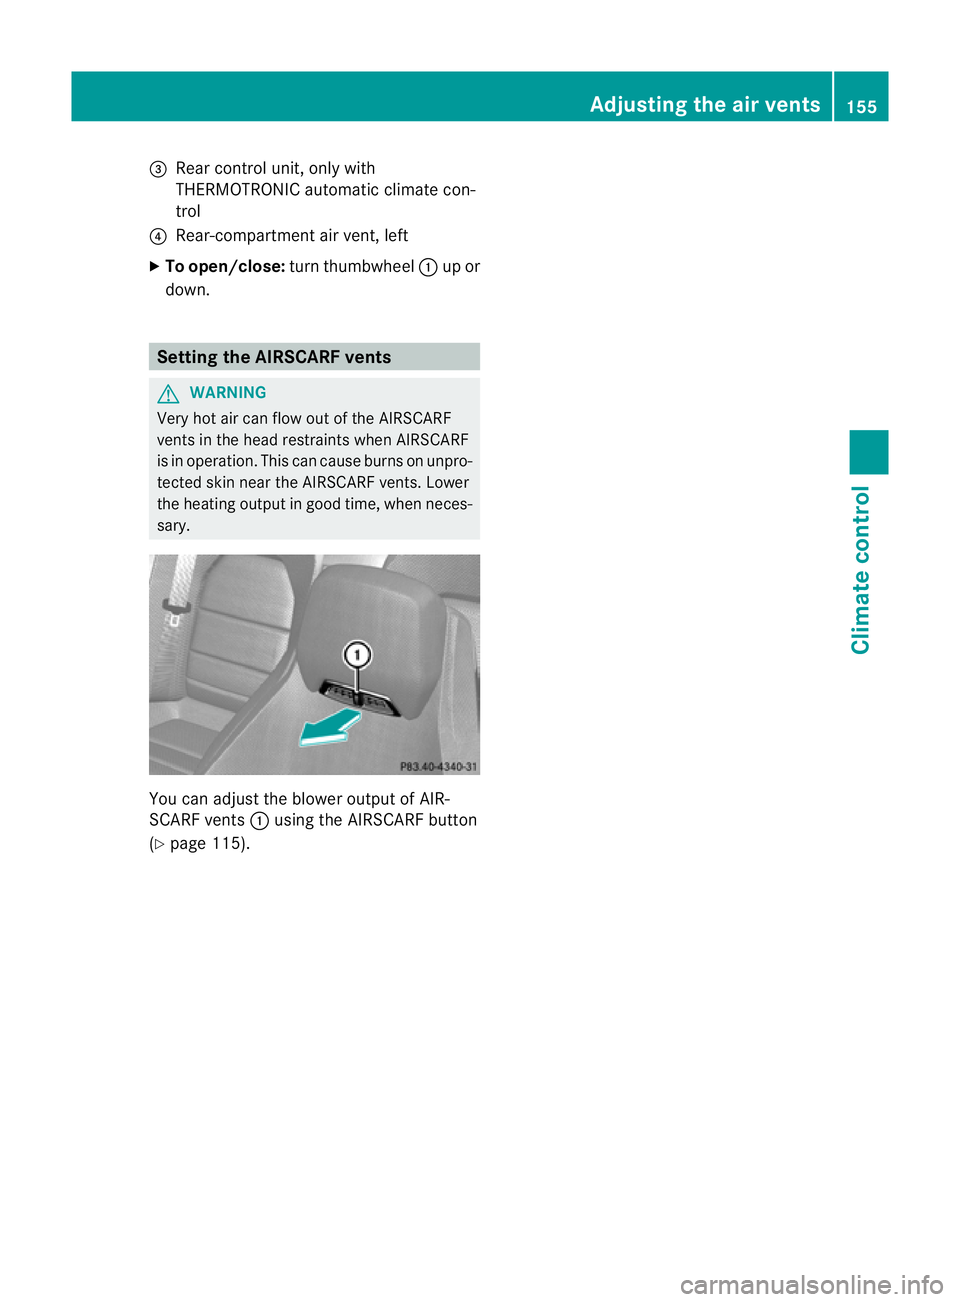
=
Rear control unit, only with
THERMOTRONIC automatic climate con-
trol
? Rear-compartment air vent, left
X To open/close: turnthumbwheel :up or
down. Setting the AIRSCARF vents
G
WARNING
Very hot air can flow out of the AIRSCARF
vents in the head restraints when AIRSCARF
is in operation. This can cause burns on unpro-
tected skin near the AIRSCARF vents. Lower
the heating output in good time, when neces-
sary. You can adjust the blower output of AIR-
SCARF vents :using the AIRSCARF button
(Y page 115). Adjusting the air vents
155Climate control Z
Page 161 of 389
Useful information
i This Owner's Manual describes all mod-
els, series and optional equipment for your
vehicle that were available at the time of
going to press. National variations are pos-
sible. Note that your vehicle may not be
equipped with all of the functions descri-
bed. This is also the case for systems and
functions relevant to safety.
i Read the information on qualified special-
ist workshops: (Y page 23). Running-in notes
Important safety notes
New and replaced brake pads and discs only
reach their optimum braking effec tafter sev-
eral hundred kilometres of driving. Compen-
sate for this by applying greater force to the
brake pedal. The first 1,500 km
If you treat the engine with sufficient care
from the very start, you will be rewarded with
excellent performance for the remainder of
the engine's life.
R Drive at varying vehicle speeds and engine
speeds for the first 1,500 km.
R Avoid overstraining the vehicle during this
period, e.g. driving at full throttle.
R Change gea ringood time, before the rev
counter needle is Ôof the way to the red
area of the rev counter.
R Do not shift down a gear manually in order
to brake.
Vehicles with automatic transmission:
R Try to avoid depressing the accelerator
pedal beyond the point of resistance (kick-
down).
R The shift ranges 3,2or 1should only be
engaged when driving slowly, e.g. when
driving in mountainous terrain. After 1500 km, you may gradually accelerate
the vehicle to full road and engine speeds.
i
You should also observe these notes on
running in if the engine or parts of the drive
train on your vehicle have been replaced. Driving
Important safety notes
G
WARNING
Objects in the driver's footwell can restric tthe
pedal travel or obstruct adepressed pedal.
The operating and road safety of the vehicle
is jeopardised. There is a risk of an accident.
Make sure that all objects in the vehicle are
stowed correctly, and that they cannot enter
the driver's footwell. Fit the floormats
securely and as specified in order to ensure
sufficien tclearance for the pedals. Do not use
loose floormats. G
WARNING
Unsuitable footwear can hinde rcorrect usage
of the pedals, e.g.:
R shoes with thick soles
R shoes with high heels
R slippers
There is a risk of an accident.
Wear suitable footwear to ensure correct
usage of the pedals. G
WARNING
If you switch off the ignition while driving,
safety-relevant functions are only available
with limitations, or not at all. This could affect,
for example, the power steering and the brake
boosting effect .You will require considerably
more effort to steer and brake. There is a risk
of an accident.
Do not switch off the ignition while driving. 158
DrivingDriving and parking
Page 162 of 389
G
WARNING
If the parking brake has not been fully
released when driving, the parking brake can:
R overheat and cause a fire
R lose its hold function.
There is a risk of fire and an accident. Release
the parking brake fully before driving off.
! Warm up the engine quickly. Do not use
the engine's full performance until it has
reached operating temperature.
Only set the automatic transmission to the
respective drive positions when the vehicle
is stationary.
Where possible, avoid spinning the drive
wheels when pulling away on slippery
roads. Otherwise, you could damage the
drive train. Keyp
ositions
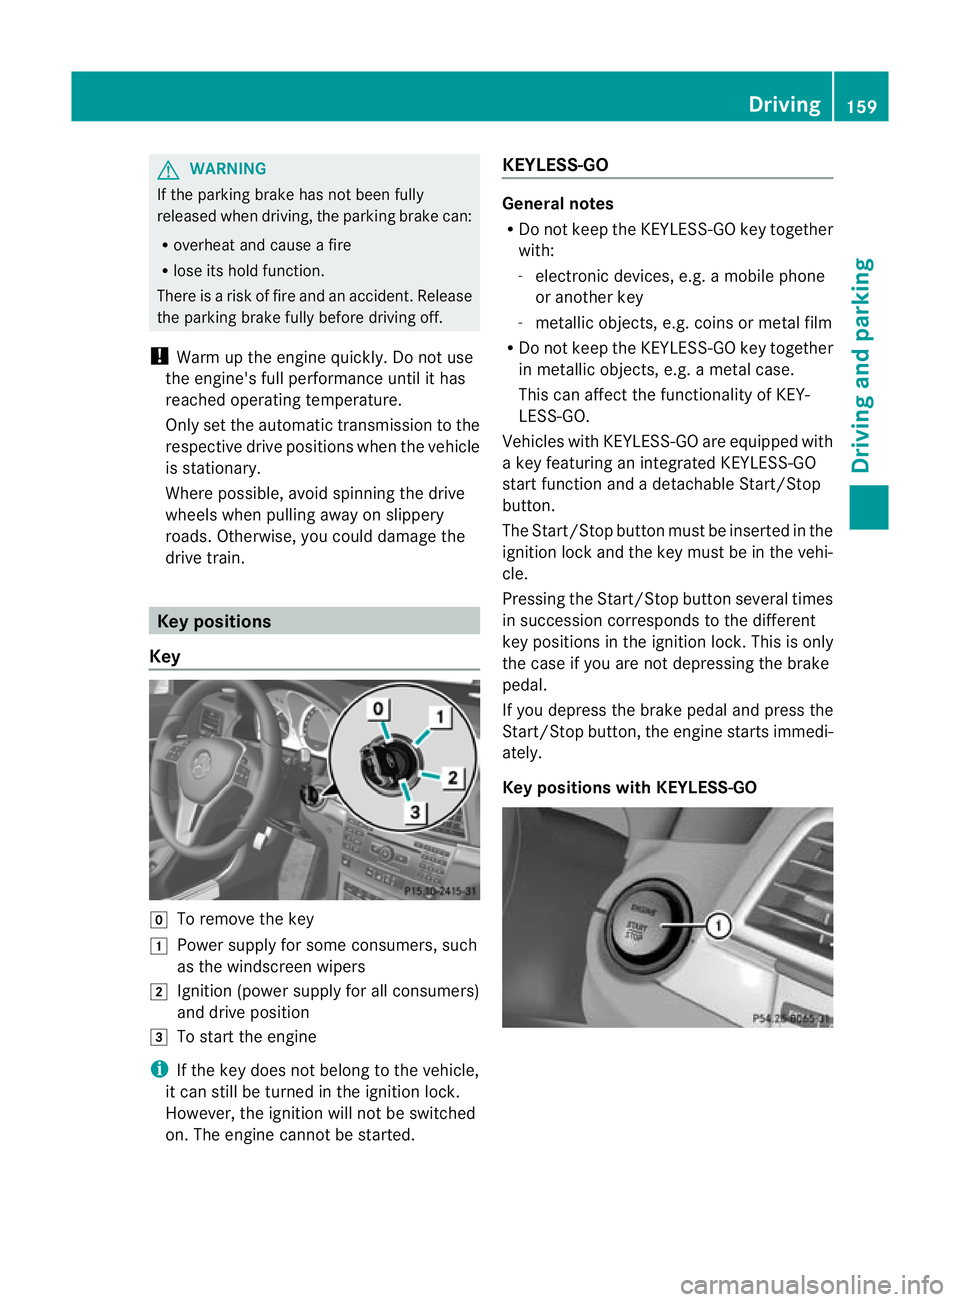
Key g
To remove the key
1 Power supply for some consumers, such
as the windscreen wipers
2 Ignitio n(power supply for all consumers)
and drive position
3 To start the engine
i If the key does not belong to the vehicle,
it can still be turned in the ignition lock.
However, the ignition will not be switched
on. The engine cannot be started. KEYLESS-GO General notes
R
Do not keep the KEYLESS-GO key together
with:
-electronic devices, e.g. a mobile phone
or another key
- metallic objects, e.g. coins or metal film
R Do not keep the KEYLESS-GO key together
in metallic objects, e.g. a metal case.
This can affect the functionality of KEY-
LESS-GO.
Vehicles with KEYLESS-GO are equipped with
a key featuring an integrated KEYLESS-GO
start function and a detachable Start/Stop
button.
The Start/Stop button must be inserted in the
ignition lock and the key must be in the vehi-
cle.
Pressing the Start/Stop button several times
in succession corresponds to the different
key positions in the ignition lock .This is only
the case if you are not depressing the brake
pedal.
If you depress the brake pedal and press the
Start/Stop button, the engine starts immedi-
ately.
Key positions with KEYLESS-GO Driving
159Driving and parking Z
Page 163 of 389
Switching on the power supply
X Position 0: if Start/Stop button :has not
yet been pressed, this corresponds to the
key being removed from the ignition.
X Position 1: press Start/Stop button :.
The power supply is switched on. You can
now activate the windscreen wipers, for
example.
i If you then open the driver's door when in
this position, the power supply is deactiva-
ted.
Switching on the ignition
X Position 2(ignition): press Start/Stop but-
ton :twice.
The ignition is switched on.
i The ignition is switched off if:
R the driver's door is open and
R you press Start/Stop button :once
when in this position.
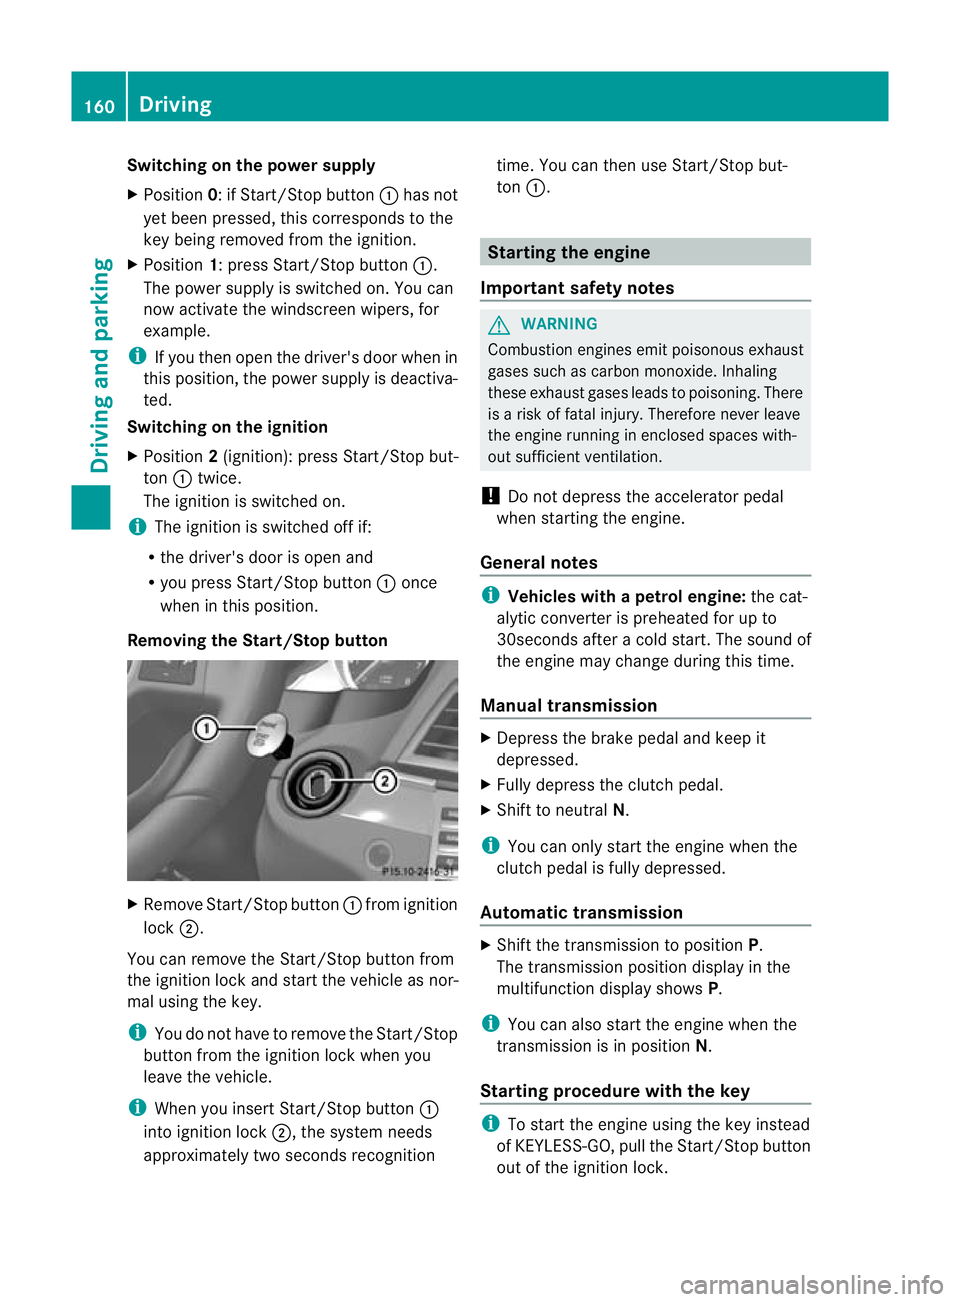
Removing the Start/Stop button X
Remove Start/Stop button :from ignition
lock ;.
You can remove the Start/Stop button from
the ignition lock and start the vehicle as nor-
mal using the key.
i You do not have to remove the Start/Stop
button from the ignition lock when you
leave the vehicle.
i When you insert Start/Stop button :
into ignition lock ;, the system needs
approximately two seconds recognition time. You can then use Start/Stop but-
ton
:. Starting the engine
Important safety notes G
WARNING
Combustion engines emit poisonous exhaust
gases such as carbon monoxide. Inhaling
these exhaust gases leads to poisoning. There
is a risk of fatal injury. Therefore never leave
the engine running in enclosed spaces with-
out sufficient ventilation.
! Do not depress the accelerator pedal
when starting the engine.
General notes i
Vehicles with apetrol engine: the cat-
alytic converter is preheated for up to
30seconds after a cold start .The sound of
the engine may change during this time.
Manual transmission X
Depress the brake pedal and keep it
depressed.
X Fully depress the clutch pedal.
X Shift to neutral N.
i You can only start the engine when the
clutch pedal is fully depressed.
Automatic transmission X
Shift the transmission to position P.
The transmission position displayint he
multifunction display shows P.
i You can also start the engine when the
transmission is in position N.
Starting procedure with the key i
To start the engine using the key instead
of KEYLESS-GO, pull the Start/Stop button
out of the ignition lock. 160
DrivingDriving and parking
Page 164 of 389
X
To start a petrol engine: turn the key to
position 3in the ignition lock
(Y page 159) and release it as soo nas the
engine is running.
X To start adiesel engine: turn the key to
position 2in the ignition lock
(Y page 159).
The % preglow indicator lamp in the
instrumen tcluster lights up.
X When the %erlischt, den Schlüssel auf
Stellung 3(Ypage 159) and release it as
soon as the engine is running.
i You can start the engine without preglow
if the engine is warm.
i Vehicles with automatic transmis-
sion: you can also use the touch-star tfunc-
tion .To do this, turn the key to position
3(Y page 159) and release it immediately.
The engine then starts automatically.
Using KEYLESS-GO to startt he engineG
WARNING
You rvehicle can be started using a valid KEY-
LESS-GO key. For this reason, children should
never be left unsupervised in the vehicle.
Always take the key with you when leaving the
vehicle, even if you are only leaving it for a
short time.
i The Start/Stop button can be used to
start the vehicle manually without inserting
the key into the ignition lock. The key must
be in the vehicle and the Start/Stop button
must be inserted in the ignition lock. This
mode for starting the engine operates inde-
pendently of the ECO start/stop automatic
engine start function. X
Depress the brake pedal and keep it
depressed.
X To star tapetrol engine: press the Start/
Stop button (Y page 159) once.
The engine starts.
X To start adiesel engine: press the Start/
Stop button (Y page 159) once.
Preglow is activated and the engine starts. Pulling away
Manual transmission !
Change gear in good time and avoid spin-
ning the wheels. Otherwise, you could dam-
age the vehicle.
X Depress the brake pedal and keep it
depressed.
X Fully depress the clutch pedal.
X Shift to either first gear or reverse gear R.
X Release the parking brake (Y page 178).
X Release the brake pedal.
X Slowly release the clutch pedal and gently
depress the accelerato rpedal.
i Follow the shift recommendations in the
multifunction display for an economical
driving style (Y page 167).
i The vehicle locks centrally once you have
pulled away. The locking knobs in the doors
drop down.
You can open the doors from the inside at
any time.
You can also deactivate the automatic lock-
ing feature (Y page 245).
Automatic transmission G
WARNING
If the engine speed is above the idling speed
and you engage transmission position Dor
R, the vehicle could pull away suddenly. There
is a risk of an accident. Driving
161Driving and parking
Z
Page 165 of 389
When engaging transmission position
Dor R,
always firmly depress the brake pedal and do
not simultaneously accelerate.
X Depress the brake pedal and keep it
depressed.
X Shift the transmission to position Dor R.
X Release the parking brake (Y page 178).
X Release the brake pedal.
X Carefully depress the accelerator pedal.
i It is only possible to shift the transmission
from position Pto the desired position if
you depress the brake pedal. Only then is
the selector lever lock released.
i The vehicle locks centrally once you have
pulled away .The locking knobs in the doors
drop down.
You can open the doors from the inside at
any time.
You can also deactivate the automatic lock-
ing feature (Y page 245).
i Upshifts take place at higher engine
speeds after a cold start. This helps the
catalytic converter to reach its operating
temperature more quickly.
Hill starta ssist G
WARNING
After a short time, hill start assist will no lon-
ger brake your vehicle and it could roll away.
There is a risk of an accident and injury.
Therefore, quickly move your foot from the
brake pedal to the accelerator pedal. Never
leave the vehicle when it is held by hill start
assist.
Hill start assist helps you when pulling away
forwards or in reverse on an uphill gradient.
It holds the vehicle for a short time after you
have removed your foot from the brake pedal.
This gives you enough time to move your foot
from the brake pedal to the accelerator pedal
and depress it before the vehicle begins to
roll. X
Take your foot off the brake pedal.
The vehicle is then held for about a second.
X Pull away.
Hill start assist will not function if:
R you are pulling away on a level road or a
downhill gradient.
R on vehicles with automatic transmission,
the transmission is in position N.
R the parking brake is applied.
R ESP ®
is malfunctioning. ECO start/stop function
Important safety notes G
WARNING
If the engine is switched off automatically and
you exit the vehicle, the engine is restarted
automatically. The vehicle may begin moving.
There is a risk of accident and injury.
If you wish to exit the vehicle, always turn off
the ignition and secure the vehicle against
rolling away.
General notes When the
¤symbol is shown in green in
the multifunction display, the ECO start/stop
function switches the engine off automati-
cally.
When pulling away again, the engine starts
automatically. The ECO start/stop function
thereby helps you to reduce the fuel con-
sumption and emissions of your vehicle.
Every time you switch on the engine using the
key or the Start/Stop button, the ECO start/
stop function is activated.
If the ECO start/stop function has been man-
ually deactivated (Y page 164) or a malfunc-
tion has caused the system to be deactivated,
the ¤ symbol is not displayed. 162
DrivingDriving and parking