2012 MERCEDES-BENZ CLS SHOOTING BRAKE seats
[x] Cancel search: seatsPage 6 of 405
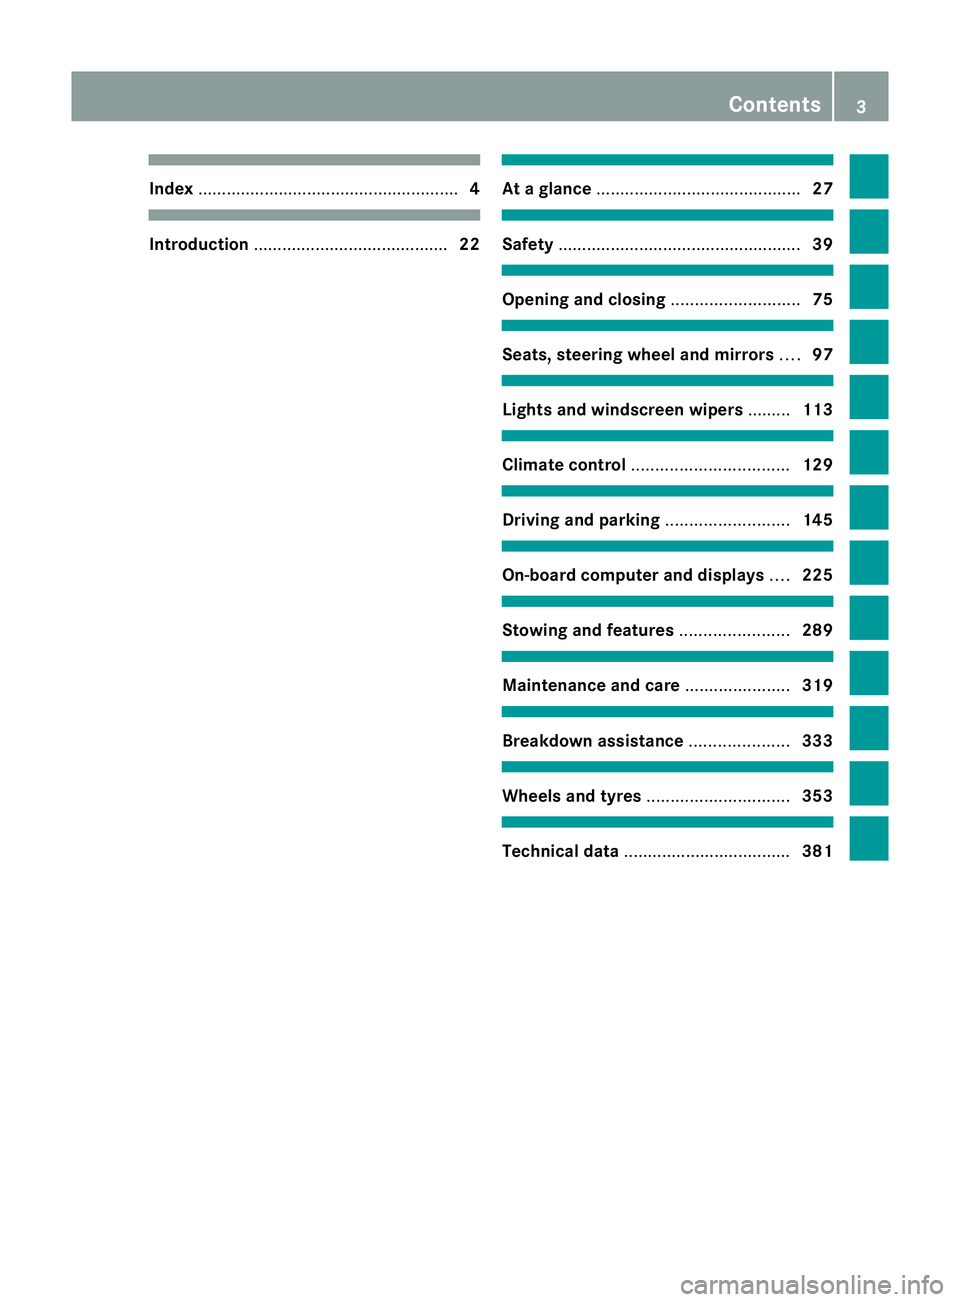
Index
....................................................... 4Introduction
......................................... 22 At
ag lance ........................................... 27 Safety
................................................... 39 Opening and closing
...........................75 Seats, steering wheel and mirrors
....97 Lights and windscreen wipers
.........113 Climate control
................................. 129 Driving and parking
..........................145 On-board computer and displays
....225 Stowing and features
.......................289 Maintenance and care
......................319 Breakdown assistance
.....................333 Wheels and tyres
.............................. 353 Technical data
................................... 381 Contents
3
Page 20 of 405

Seats
Adjusting (electrically) ...................100
Adjusting lumba rsuppor t.............. 104
Adjusting the 4-way lumba rsup-
por t................................................ 104
Adjusting the head restraint ..........100
Cleaning the cover .........................331
Correct driver's seat position ........... 98
Important safety notes ....................99
Overview .......................................... 99
Seat heating problem ....................105
Seat ventilation problem ................105
Storing settings (memory func-
tion) ............................................... 111
Switching sea theating on/off .......104
Switching the sea tventilation on/
off .................................................. 105
Selector lever
Cleaning ......................................... 331
Sensors (cleaning instructions) .......328
Service see ASSYST PLUS
Service Centre
see Qualified specialist workshop
Service menu (on-board computer) .239
Service products Brake fluid ..................................... 392
Coolant (engine) ............................ 392
Engine oil ....................................... 391
Fuel ................................................ 386
Important safety notes ..................385
Washer fluid .................................. .393
Settings
Factory (on-board computer) .........245
On-board computer .......................239
Setting the air distribution ...............135
Setting the airflow ............................135
SETUP (on-board computer) .............246
Short journeys (diesel particle fil-
ter) ...................................................... 168
Sidebag ................................................ 45
Side lamps Switching on/off ........................... 116
Side windows
Convenience closing ........................90
Convenience opening ......................90
Important safety notes ....................89Opening/closing
.............................. 89
Problem (malfunction) .....................92
resetting .......................................... 91
Sliding sunroof
Important safety information ...........92
Opening/closing .............................. 93
Problem (malfunction) .....................95
Rain closing feature .........................93
Resetting ......................................... 93
Snow chains ...................................... 357
Socket Centre console .............................. 308
Luggage compartment ...................309
Rea rcompartmen t......................... 309
Under the armrest .........................308
Sockets
General notes ................................ 308
Spare wheel
Storing ........................................... 378
Specialist workshop ............................ 24
Spectacles compartment .................291
Speed, controlling see Cruise control
Spee dLimit Assist
Activating/deactivating the warn-
ing function .................................... 236
Displayin g...................................... 236
Display message ............................ 262
Display message in the multifunc-
tion displa y.................................... 204
Important safety notes ..................204
Speedometer
Digita l............................................ 231
In the Instrument cluster .........30, 227
Segments ...................................... 228
Selecting the unit of measure-
ment .............................................. 239
see Instrument cluster
SPEEDTRONIC
Deactivating variabl e..................... 176
Display message ............................ 267
Function/notes ............................. 174
Important safety notes ..................174
LIM indicator lamp .........................175
Permanent ..................................... 177
Selecting ........................................ 175
Storing the current spee d.............. 175
Variabl e......................................... 175 Index
17
Page 41 of 405
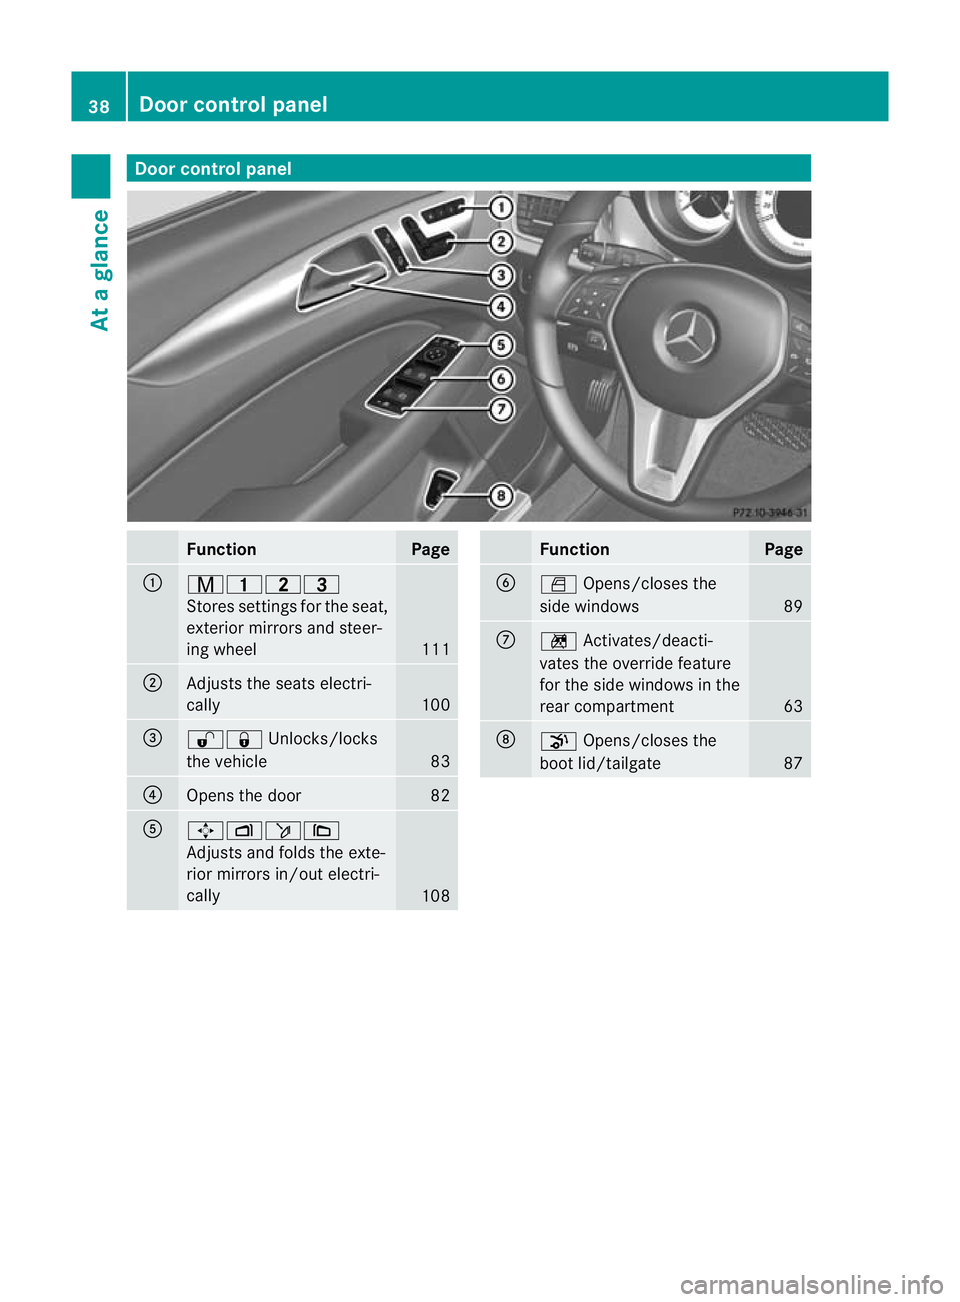
Door control panel
Function Page
:
r45=
Stores settings fo
rthe seat,
exterior mirrors and steer-
ing wheel 111
;
Adjusts the seats electri-
cally
100
=
%&
Unlocks/locks
the vehicle 83
?
Opens the door 82
A
7Zö\
Adjusts and folds the exte-
rior mirrors in/out electri-
cally
108 Function Page
B
W
Opens/closes the
side windows 89
C
n
Activates/deacti-
vates the override feature
for the side windows in the
rear compartment 63
D
p
Opens/closes the
boot lid/tailgate 8738
Doorc
ontrol panelAt a glance
Page 45 of 405
If there is an even higherr
ate of vehicle decel-
eration or acceleratio ninalongitudinal direc-
tion, the front airbags are also deployed.
Your vehicle has adaptive, two-stage front air-
bags. The airbag control unit evaluates vehi-
cle deceleration or acceleration in the event
of a collision. In the firs tdeployment stage,
the fron tairbag is filled with enough propel-
lant gas to reduce the risk of injuries. The
front airbag is fully deployed if a second
deploymen tthreshold is reached within a few
milliseconds.
The belt tensioner and airbag triggering
thresholds are variable and are adapted to the
rate of deceleration or acceleration of the
vehicle. This process is pre-emptive in nature.
The triggering process must take place in
good time at the start of the collision.
The rate of vehicle deceleration or accelera-
tion and the direction of the force are essen-
tially determined by:
R the distribution of forces during the colli-
sion
R the collision angle
R the deformation characteristics of the vehi-
cle
R the characteristics of the object with which
the vehicle has collided
Factors which can only be seen and measured
after a collision has occurred do not play a
decisive role in the deployment of an airbag,
nor do they provide an indication of airbag
deployment.
The vehicle may be deformed significantly,
e.g. the bonnet or the wing, without an airbag
being deployed. This is the case if only parts
which are relatively easily deformed are affec-
ted and the rate of deceleration is not high.
Conversely, airbags may be deployed even
though the vehicle suffers only minor defor-
mation. This is the case if, for example, very
rigid vehicle parts such as longitudinal body
members are hit, and sufficient deceleration
occurs as a result. i
The front belt tensioners can only be trig-
gered if the seat belt tongues on the front
seats are correctly engaged in the seat belt
buckles.
i Not all airbags are deployed in an acci-
dent. The different airbag systems work
independently of each other.
How the airbag system works is deter-
mined by the severity of the accident detec-
ted, especially the vehicle deceleration or
acceleration, and the apparent type of acci-
dent:
R head-on collision
R side impact
R overturn Airbags
Important safety notes G
WARNING
Airbags provide additional protection; they
are not, however, a substitute for seat belts.
Observe the following notes to reduce the risk
of serious or even fatal injury caused by airbag
deployment:
R all vehicle occupants –inparticular, preg-
nant women – must wear their seat belt
correctly at all times and lean back against
the backrest, which should be positioned
as close to the vertical as possible. The
head restraint must support the back of the
head at about eye level.
R always secure childre nless than
1.50mt all or unde r12years of age in suit-
able child restraint systems.
R all vehicle occupants must select a seat
position that is as far away from the airbag
as possible. The driver's seat position must
allow the vehicle to be driven safely. The
driver's chest should be as far away from
the centre of the driver's airbag cover as
possible. 42
Occupant safetySafety
Page 50 of 405
The use of non-approved head restraint cov-
ers may prevent NECK-PRO head restraints/
NECK-PRO luxury head restraints from trig-
gering properly. The NECK-PRO head
restraints/NECK-PRO luxury head restraints
can therefore not provide the intended pro-
tection.
Consult a Mercedes-Benz Service Centre
regarding availability.
NECK-PRO head restraints/NECK-PRO luxury
head restraints increase protection of the
driver's and front-passenger's head and
neck.Int he event of a rear collision of a cer-
tain severity, the NECK-PRO head restraints/
NECK-PRO luxury head restraints on the driv-
er's and front-passenger seats are moved for-
wards and upwards. This provides better
head support.
If the NECK-PRO head restraints/NECK-PRO
luxury head restraints have been triggered in
an accident, reset the NECK-PRO head
restraints/NECK-PRO luxury head restraints
on the driver's and front-passenger seats
(Y page 48). Otherwise, the additional pro-
tection will not be available in the event of
another rear-end collision. NECK-PRO head
restraints/NECK-PRO luxury head restraints
that have been triggered are moved forwards
and can no longer be adjusted.
Mercedes-Ben zrecommends that you have
the NECK-PRO head restraints/NECK-PRO
luxury head restraints checked at a qualified
specialist workshop after a rear-end collision. Resetting
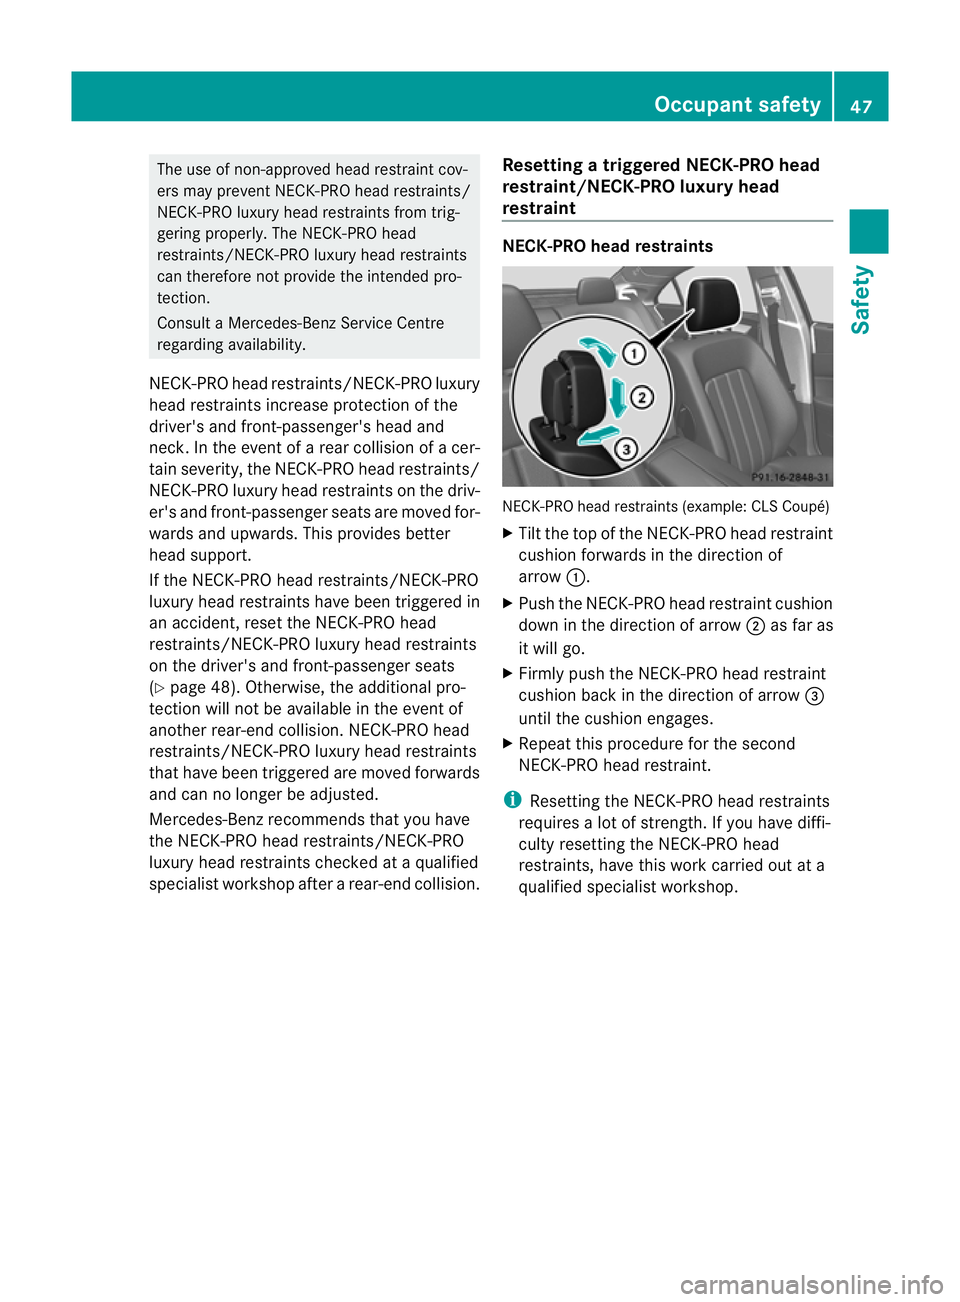
atriggered NECK-PRO head
restraint/NECK-PRO luxury head
restraint NECK-PRO head restraints
NECK-PRO head restraints (example: CL
SCoupé)
X Tilt the top of the NECK-PRO head restraint
cushion forwards in the direction of
arrow :.
X Push the NECK-PRO head restraint cushion
down in the direction of arrow ;as far as
it will go.
X Firmly push the NECK-PRO head restraint
cushion back in the direction of arrow =
until the cushion engages.
X Repeat this procedure for the second
NECK-PRO head restraint.
i Resetting the NECK-PRO head restraints
requires a lot of strength. If you have diffi-
culty resetting the NECK-PRO head
restraints, have this work carried out at a
qualified specialist workshop. Occupant safety
47Safety Z
Page 51 of 405
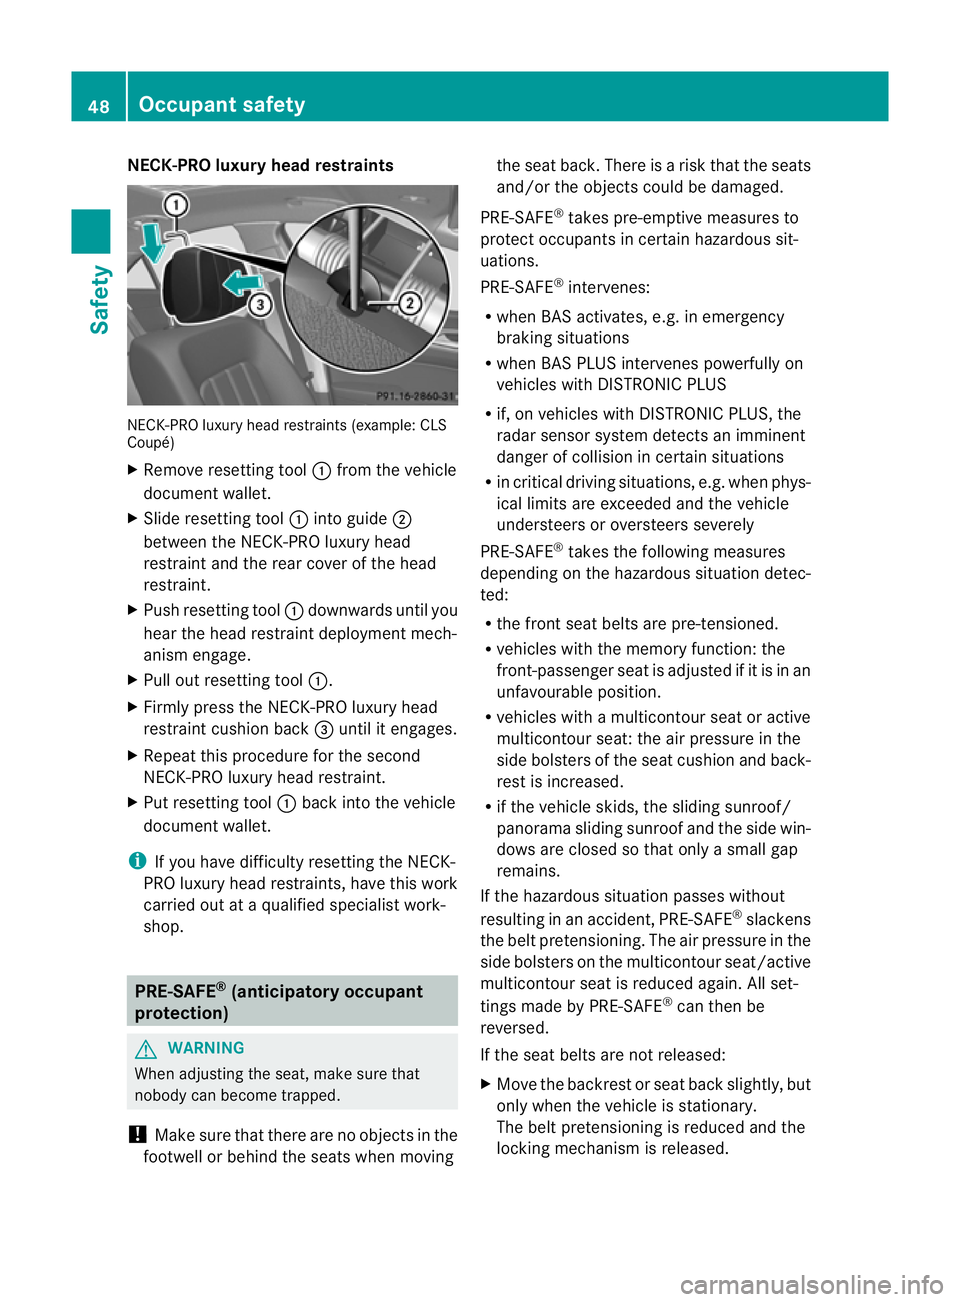
NECK-PRO luxury head restraints
NECK-PRO luxury head restraints (example: CLS
Coupé)
X
Remove resetting tool :from the vehicle
document wallet.
X Slide resetting tool :into guide ;
between the NECK-PRO luxury head
restraint and the rear cover of the head
restraint.
X Push resetting tool :downwards until you
hear the head restraint deployment mech-
anism engage.
X Pull ou tresetting tool :.
X Firmly press the NECK-PRO luxury head
restraint cushion back =until it engages.
X Repeat this procedure for the second
NECK-PRO luxury head restraint.
X Put resetting tool :back into the vehicle
documen twallet.
i If you have difficulty resetting the NECK-
PRO luxury head restraints, have this work
carried out at a qualified specialist work-
shop. PRE-SAFE
®
(anticipatory occupant
protection) G
WARNING
When adjusting the seat, make sure that
nobody can become trapped.
! Make sure that there are no objects in the
footwell or behind the seats when moving the seat back
.There is a risk that the seats
and/or the objects could be damaged.
PRE-SAFE ®
takes pre-emptive measures to
protect occupants in certain hazardous sit-
uations.
PRE-SAFE ®
intervenes:
R when BAS activates, e.g. in emergency
braking situations
R when BAS PLUS intervenes powerfully on
vehicles with DISTRONIC PLUS
R if, on vehicles with DISTRONIC PLUS, the
radar sensor system detectsani mminent
dange rofcollision in certain situations
R in critical driving situations, e.g. when phys-
ical limits are exceeded and the vehicle
understeers or oversteers severely
PRE-SAFE ®
takes the following measures
depending on the hazardous situation detec-
ted:
R the front seat belts are pre-tensioned.
R vehicles with the memory function: the
front-passenger seat is adjusted if it is in an
unfavourable position.
R vehicles with a multicontour seat or active
multicontour seat: the air pressure in the
side bolsters of the seat cushion and back-
rest is increased.
R if the vehicle skids, the sliding sunroof/
panorama sliding sunroof and the side win-
dows are closed so that only a small gap
remains.
If the hazardous situation passes without
resulting in an accident, PRE-SAFE ®
slackens
the belt pretensioning. The air pressure in the
side bolsters on the multicontour seat/active
multicontour seat is reduced again. All set-
tings made by PRE-SAFE ®
can then be
reversed.
If the seat belts are not released:
X Move the backrest or seat back slightly, but
only when the vehicle is stationary.
The belt pretensioning is reduced and the
locking mechanism is released. 48
Occupant safetySafety
Page 53 of 405
been approved by Mercedes-Benz for your
vehicle.
Seat belts are the most effective means of
restraining the movement of vehicle occu-
pants in the event of an accident. This
reduces the risk of vehicle occupants coming
into contact with parts of the vehicle interior.
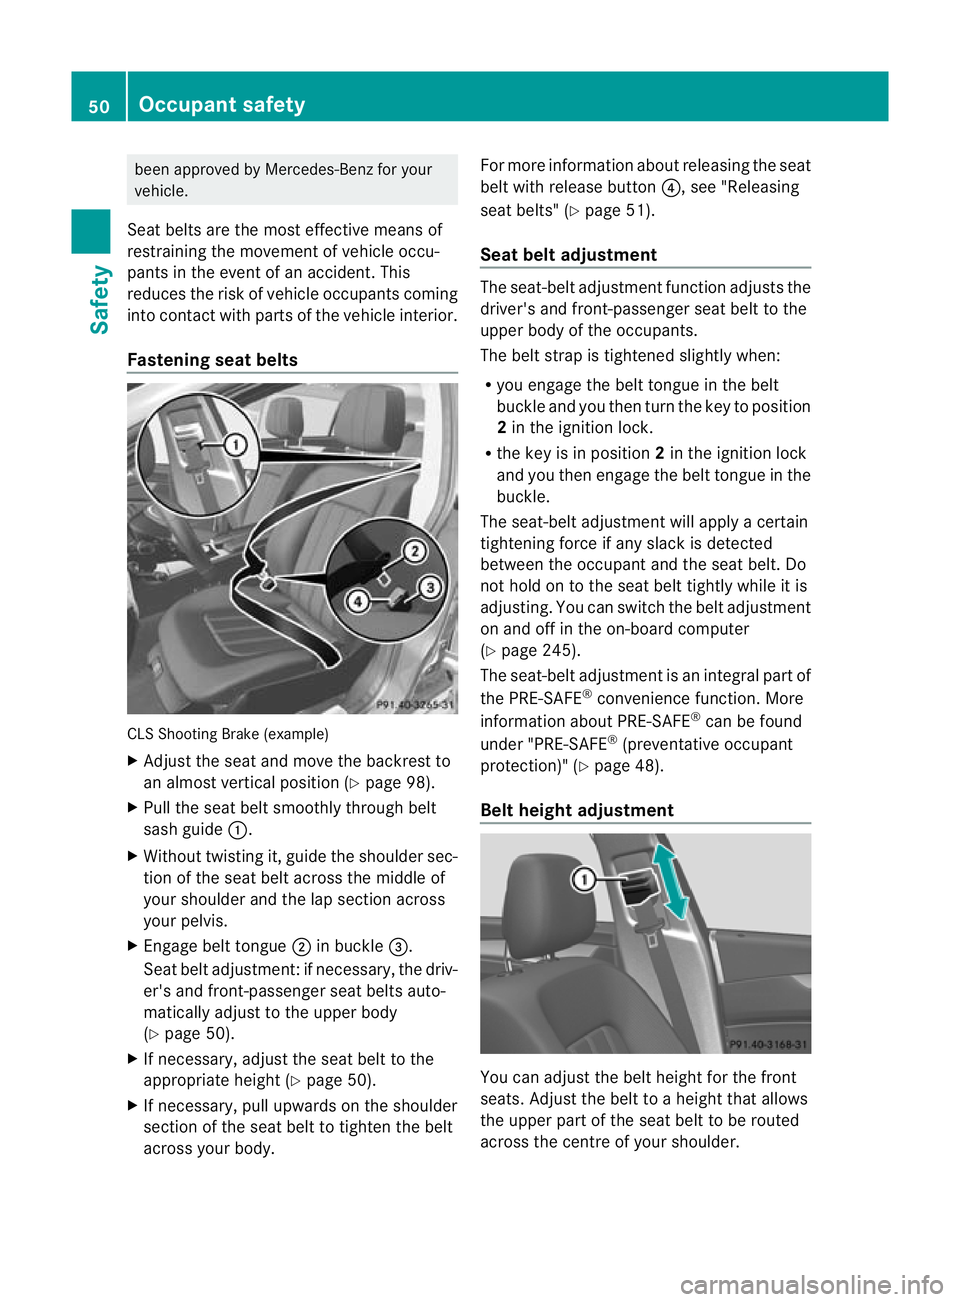
Fastening seat belts CLS Shooting Brake (example)
X Adjust the seat and move the backrest to
an almost vertical position (Y page 98).
X Pull the seat belt smoothly through belt
sash guide :.
X Without twisting it, guide the shoulder sec-
tion of the seat belt across the middle of
your shoulder and the lap section across
your pelvis.
X Engage belt tongue ;in buckle =.
Seat belt adjustment :ifnecessary, the driv-
er's and front-passenger seat belts auto-
matically adjust to the upper body
(Y page 50).
X If necessary, adjust the seat belt to the
appropriate height (Y page 50).
X If necessary, pull upwards on the shoulder
section of the seat belt to tighten the belt
across your body. For more information about releasing the seat
belt with release button
?, see "Releasing
seat belts" (Y page 51).
Seat belt adjustment The seat-belt adjustment function adjusts the
driver's and front-passenger seat belt to the
upper body of the occupants.
The belt strap is tightened slightly when:
R
you engage the belt tongue in the belt
buckle and you then turn the key to position
2in the ignition lock.
R the key is in position 2in the ignition lock
and you then engage the belt tongue in the
buckle.
The seat-belt adjustment will apply a certain
tightening force if any slack is detected
between the occupant and the seat belt. Do
not hold on to the seat belt tightly while it is
adjusting. You can switch the belt adjustment
on and off in the on-board computer
(Y page 245).
The seat-belt adjustment is an integral part of
the PRE-SAFE ®
convenience function. More
information about PRE-SAFE ®
can be found
under "PRE-SAFE ®
(preventative occupant
protection)" (Y page 48).
Belt height adjustment You can adjust the belt height for the front
seats. Adjust the belt to a height that allows
the upper part of the seat belt to be routed
across the centre of your shoulder.50
Occupant safetySafety
Page 55 of 405
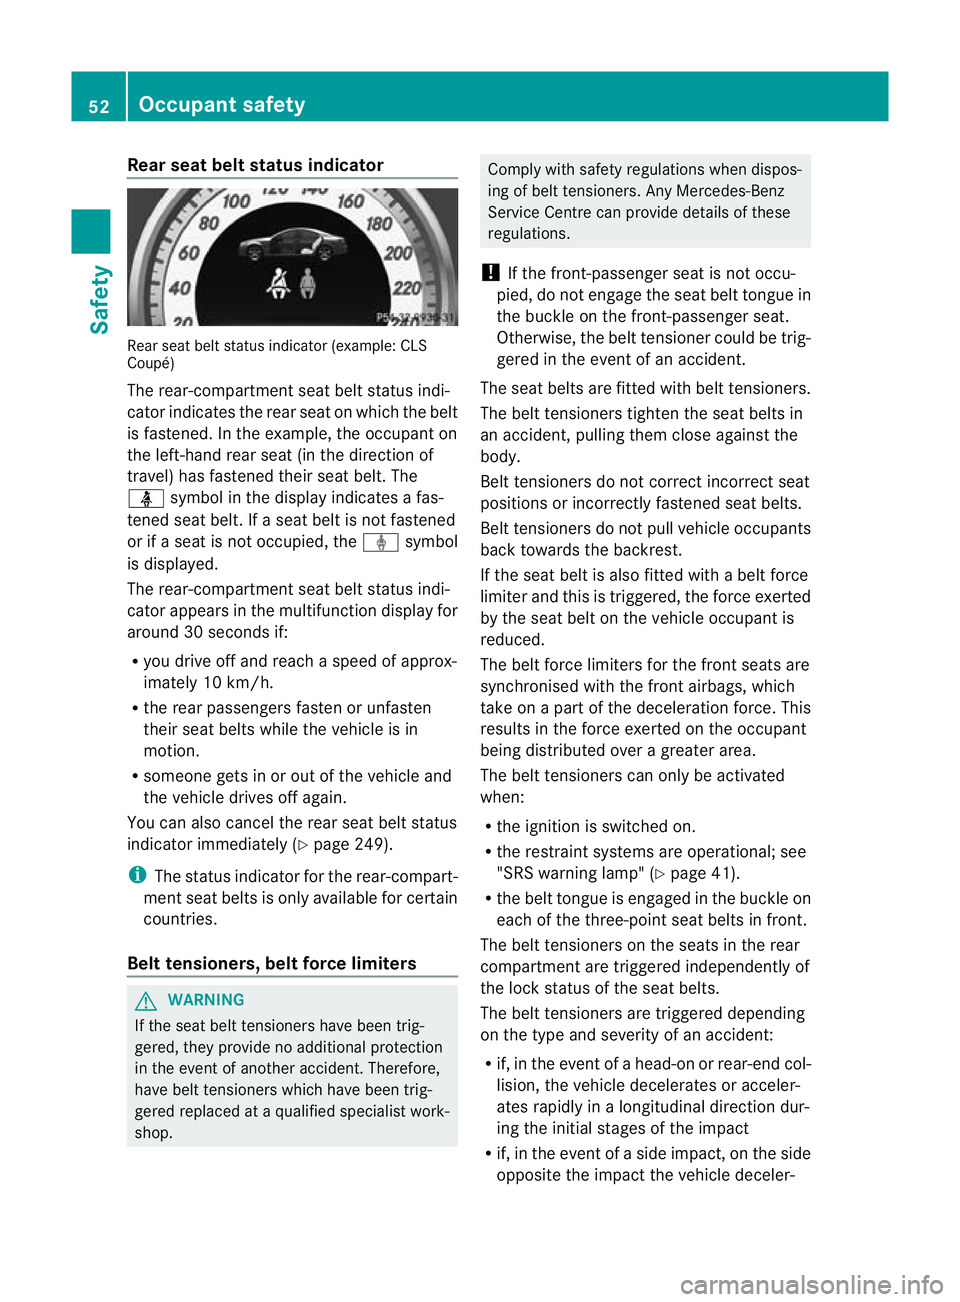
Rear seat belt status indicator
Rear sea
tbelt status indicato r(example: CLS
Coupé)
The rear-compartment seat belt status indi-
cator indicates the rear seat on which the belt
is fastened. In the example, the occupant on
the left-hand rear seat (in the direction of
travel) has fastened their seat belt. The
ü symbol in the display indicates a fas-
tened seat belt. If a seat belt is not fastened
or if a seat is not occupied, the ýsymbol
is displayed.
The rear-compartment seat belt status indi-
cator appears in the multifunction display for
around 30 seconds if:
R you drive off and reach a speed of approx-
imately 10 km/h.
R the rear passengers fasten or unfasten
their seat belts while the vehicle is in
motion.
R someone gets in or out of the vehicle and
the vehicle drives off again.
You can also cancel the rear seat belt status
indicato rimmediately (Y page 249).
i The status indicator for the rear-compart-
ment seat belts is only available for certain
countries.
Belt tensioners, beltf orce limitersG
WARNING
If the seat belt tensioners have been trig-
gered, they provide no additional protection
in the event of another accident. Therefore,
have belt tensioners which have been trig-
gered replaced at a qualified specialist work-
shop. Comply with safety regulations when dispos-
ing of belt tensioners. Any Mercedes-Benz
Service Centre can provide details of these
regulations.
! If the front-passenger seat is not occu-
pied, do no tengage the sea tbelt tongue in
the buckle on the front-passenger seat.
Otherwise, the belt tensioner could be trig-
gered in the event of an accident.
The seat belts are fitted with belt tensioners.
The belt tensioners tighten the seat belts in
an accident, pulling them close against the
body.
Belt tensioners do not correct incorrect seat
positions or incorrectly fastened seat belts.
Belt tensioners do not pull vehicle occupants
back towards the backrest.
If the seat belt is also fitted with a belt force
limiter and this is triggered, the force exerted
by the seat belt on the vehicle occupan tis
reduced.
The belt force limiters for the front seats are
synchronised with the front airbags, which
take on a part of the deceleration force. This
results in the force exerted on the occupant
being distributed over a greater area.
The beltt ensioners can only be activated
when:
R the ignition is switched on.
R the restraint systems are operational; see
"SRS warning lamp" (Y page 41).
R the belt tongue is engaged in the buckle on
each of the three-point seat belts in front.
The belt tensioners on the seats in the rear
compartment are triggered independently of
the lock status of the seat belts.
The belt tensioners are triggered depending
on the type and severity of an accident:
R if, in the event of a head-on or rear-end col-
lision, the vehicle decelerates or acceler-
ates rapidly in a longitudinal direction dur-
ing the initial stages of the impact
R if, in the event of a side impact, on the side
opposite the impact the vehicle deceler- 52
Occupant safetySafety