2012 MERCEDES-BENZ CLS SHOOTING BRAKE steering
[x] Cancel search: steeringPage 221 of 405
Never use the brake pedal as a footrest. Do
not simultaneously depress both the brake
pedal and the accelerator pedal while driving. G
WARNING
You could lose control of the vehicle/trailer
combination if it begins to swerve. The vehi-
cle/trailer combination could even overturn.
There is a risk of an accident.
On no account should you attempt to
straighten out the vehicle/trailer combina-
tion by increasing speed. Decrease your
speed and do not countersteer. Brake if nec-
essary. G
WARNING
If you exceed the permissible noseweight
while carrying a load, the carrier system could
detach from the vehicle and fall on the road.
There is a risk of an accident and injury.
Always maintain the permissible noseweight
when carrying loads. G
WARNING
If the ball coupling is not correctly engaged, it
could detach while driving and fall on the road.
There is a risk of an accident and injury.
Engage the ball coupling as described. G
WARNING
If the ball coupling is not correctly engaged,
the trailer can detach. There is a risk of an
accident.
Always engage the ball coupling as described.
! Depressing the brake pedal constantly
results in excessive and premature wearto
the brake pads.
You can use carrier systems, e.g .bicycle
racks or load-bearing implements, on the ball
coupling. The maximum noseweight of
75 kg applies when using carrier systems on
the ball coupling.
When reversing the vehicle towards the
trailer, make sure there is nobody between
the trailer and the vehicle. Couple and uncouple the trailer carefully. If
you do not couple the trailer to the towing
vehicle correctly, the trailer could become
detached.
Make sure that the followin gvalues are not
exceeded:
R the permissible trailer drawbar noseweight
R the permissible trailer load
R the permissible rear axle load of the towing
vehicle
R the maximum permissible gross vehicle
weigh tofboth the towing vehicle and the
trailer
You will find the applicable permissible val-
ues, which must not be exceeded, in the vehi-
cle documents.
You will find the values approved by the man-
ufacturer on the vehicle identification plates
and those for the towing vehicle in the "Tech-
nical data" section (Y page 398).
When towing a trailer, your vehicle's handling
characteristics will be different in comparison
to when driving without a trailer.
The vehicle/trailer combination:
R is heavier
R is restricted in its acceleration and gradi-
ent-climbing capability
R has an increased braking distance
R is affected more by strong crosswinds
R demands more sensitive steering
R has a larger turning circle
This could impair the handling characteris-
tics. Adapt your style of driving accordingly.
Maintain a safe distance. Drive carefully.
When towing a trailer, always adjust your
speed to the current road and weather con-
ditions. Do not exceed the maximum permis-
sible speed for your vehicle/trailer combina-
tion. 218
Towing
atrailerDriving an d parking
Page 232 of 405
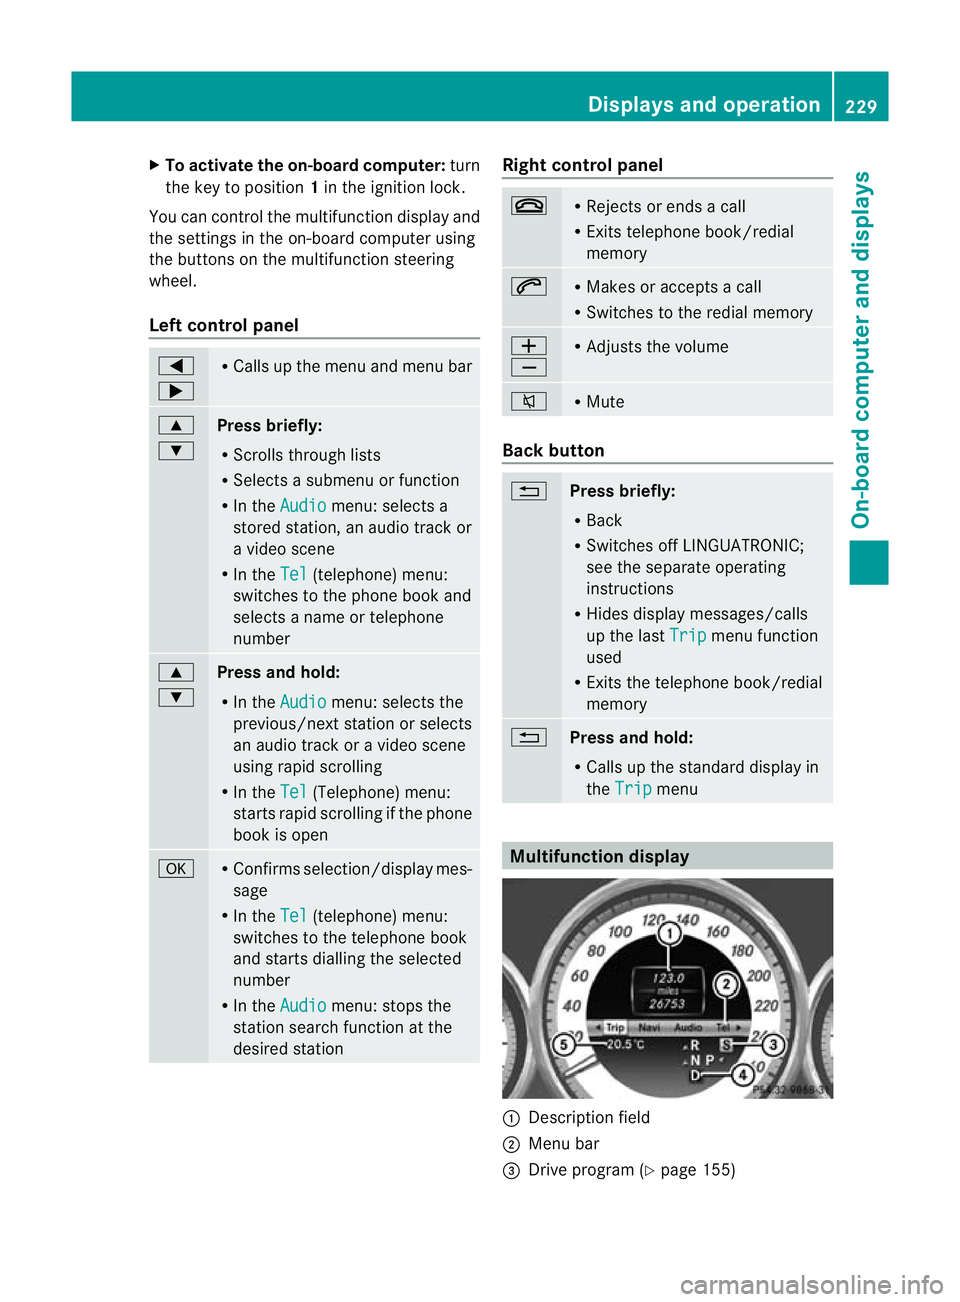
X
To activate the on-board computer: turn
the key to position 1in the ignition lock.
You can control the multifunctio ndisplay and
the settings in the on-board computer using
the buttons on the multifunction steering
wheel.
Left control panel =
; R
Calls up the menu and menu bar 9
:
Press briefly:
R
Scrolls through lists
R Selects a submenu or function
R In the Audio menu: selects a
stored station, an audio track or
a video scene
R In the Tel (telephone) menu:
switches to the phone book and
selects a name or telephone
number 9
:
Press and hold:
R
In the Audio menu: selects the
previous/next station or selects
an audio track or a video scene
using rapid scrolling
R In the Tel (Telephone) menu:
starts rapid scrolling if the phone
book is open a R
Confirms selection/display mes-
sage
R In the Tel (telephone) menu:
switches to the telephone book
and starts dialling the selected
number
R In the Audio menu: stops the
station search function at the
desired station Righ
tcontrol panel ~ R
Rejects or ends a call
R Exits telephone book/redial
memory 6 R
Makes or accepts a call
R Switches to the redial memory W
X R
Adjusts the volume 8 R
Mute Back button
%
Press briefly:
R
Back
R Switches off LINGUATRONIC;
see the separate operating
instructions
R Hides display messages/calls
up the last Trip menu function
used
R Exits the telephone book/redial
memory %
Press and hold:
R
Calls up the standard display in
the Trip menu
Multifunction display
:
Description field
; Menu bar
= Drive program (Y page 155) Displays and operation
229On-board computer and displays Z
Page 233 of 405
?
Transmission position (Y page 155)
A Permanen tdisplay: outside temperature
or speed (Y page 239)
X To show the menu bar ;:press the
= or; button on the steerin gwheel.
Menu bar ;disappears after a few seconds.
Text field :shows the selected menu or
submenu as well as display messages.
The following messages can appearint he
multifunction display:
XjY Active Parking Assist
(Ypage 194)
¯ Cruise control (Y page 171)
È SPEEDTRONIC (Y page 174)
_ Adaptive Highbeam Assist
(Ypage 121)
À ATTENTION ASSIST
(Ypage 202)
¤ ECO start/stop function
(Ypage 150)
Ä Speed Limit Assist
(Ypage 204)
à Lane Keeping Assist
(Ypage 210)
à Active Lane Keeping Assist
(Ypage 215)
ë HOLD function (Y page 186)
Ä PRE-SAFE®
Brake (Y page 70)
120 km/h! Maximum permissible speed
exceeded (only for certain coun-
tries)
Menus and submenus
Menu overview
Press the =or; button on the steer-
ing wheel to call up the menu bar and select
a menu.
Operating the on-board computer
(Y page 228). Depending on the equipment fitted in the
vehicle, you can call up the following menus:
R
Trip menu (Y
page 230)
R Navi menu (navigation instructions)
(Y page 232)
R Audio menu (Y
page 233)
R Tel menu (telephone) (Y
page 235)
R Assist. menu (assistance) (Y
page 236)
R Serv. menu (Y
page 239)
R Settings menu (Y
page 239)
R AMG menu in AMG vehicles (Y
page 246)
The Audio ,
Navi and
Tel menus differ slightly
in vehicles with an audio system and in vehi-
cles with COMAND Online. The examples
given in this Owner's Manual apply to vehicles
equipped with COMAND Online. Trip menu
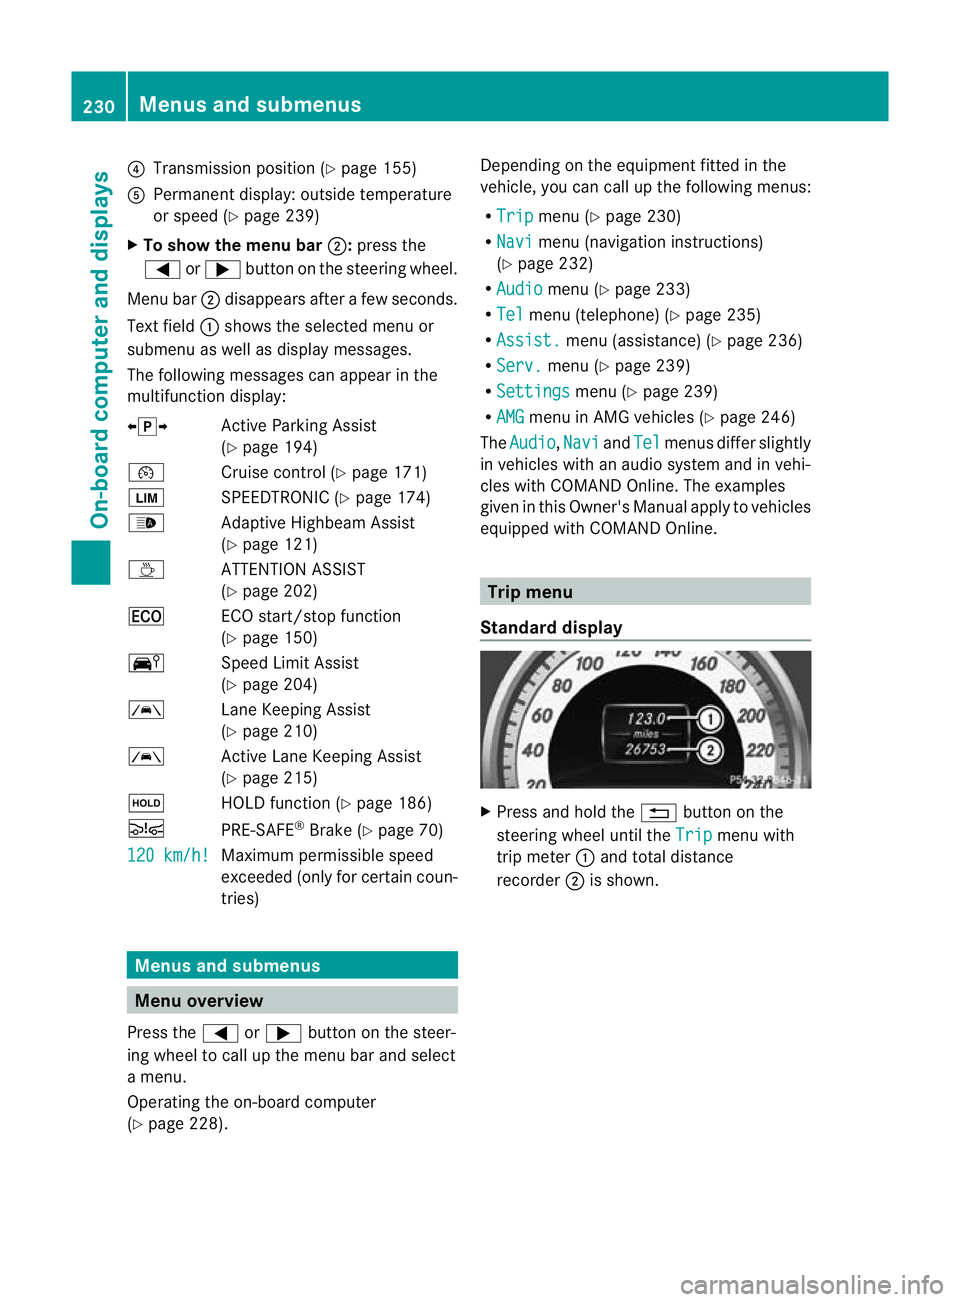
Standard display X
Press and hold the %button on the
steering wheel until the Trip menu with
trip meter :and total distance
recorder ;is shown. 230
Menus and submenusOn-board computer and displays
Page 238 of 405
X
To select the next or previous scene:
briefly press the 9or: button.
X To select ascene from the scene list
(rapid scrolling): press and hold the
9 or: buttonuntil desired
scene :has been reached. Telephone menu
Introduction G
WARNING
Observe the legal requirements of the country
in which you are currently driving regarding
the use of mobile phones in the vehicle.
If it is permitted to use mobile phones while
the vehicle is in motion, you should only use
them when the road and traffic conditions
allow. Otherwise, you may be distracted from
the traffic conditions, cause an accident and
injure yoursel fand others.
X Switch on the mobile phone (see the sep-
arate operating instructions).
X Switch on the audio system or COMAND
Online; see the separate operating instruc-
tions.
X Insert the mobile phone into the bracket
(Y page 311).
or
X Establish a Bluetooth ®
connection to the
audio system or COMAND Online; see the
separate operating instructions.
X Press the =or; button on the steer-
ing wheel to select the Tel menu.
You will see one of the following display mes-
sages in the multifunctio ndisplay:
R Please enter PIN :t
he mobile phone has
been placed in the mobile phone bracket
and the PIN has not been entered.
When you enter your PIN via the mobile
phone, LINGUATRONIC, the audio system or COMAND Online, the mobile phone
searches for a network.
R Telephone ready or the name of the net-
work provider: the mobile phone has found
a network and is ready to receive.
R Telephone No service : there is no net-
work available or the mobile phone is
searching for a network.
i You can obtain further information about
suitable mobile phones and connecting
mobile phones via Bluetooth ®
:
R from any Mercedes Benz Service Centre
R on the Internet at: http://
www.mercedes-benz.com/connect
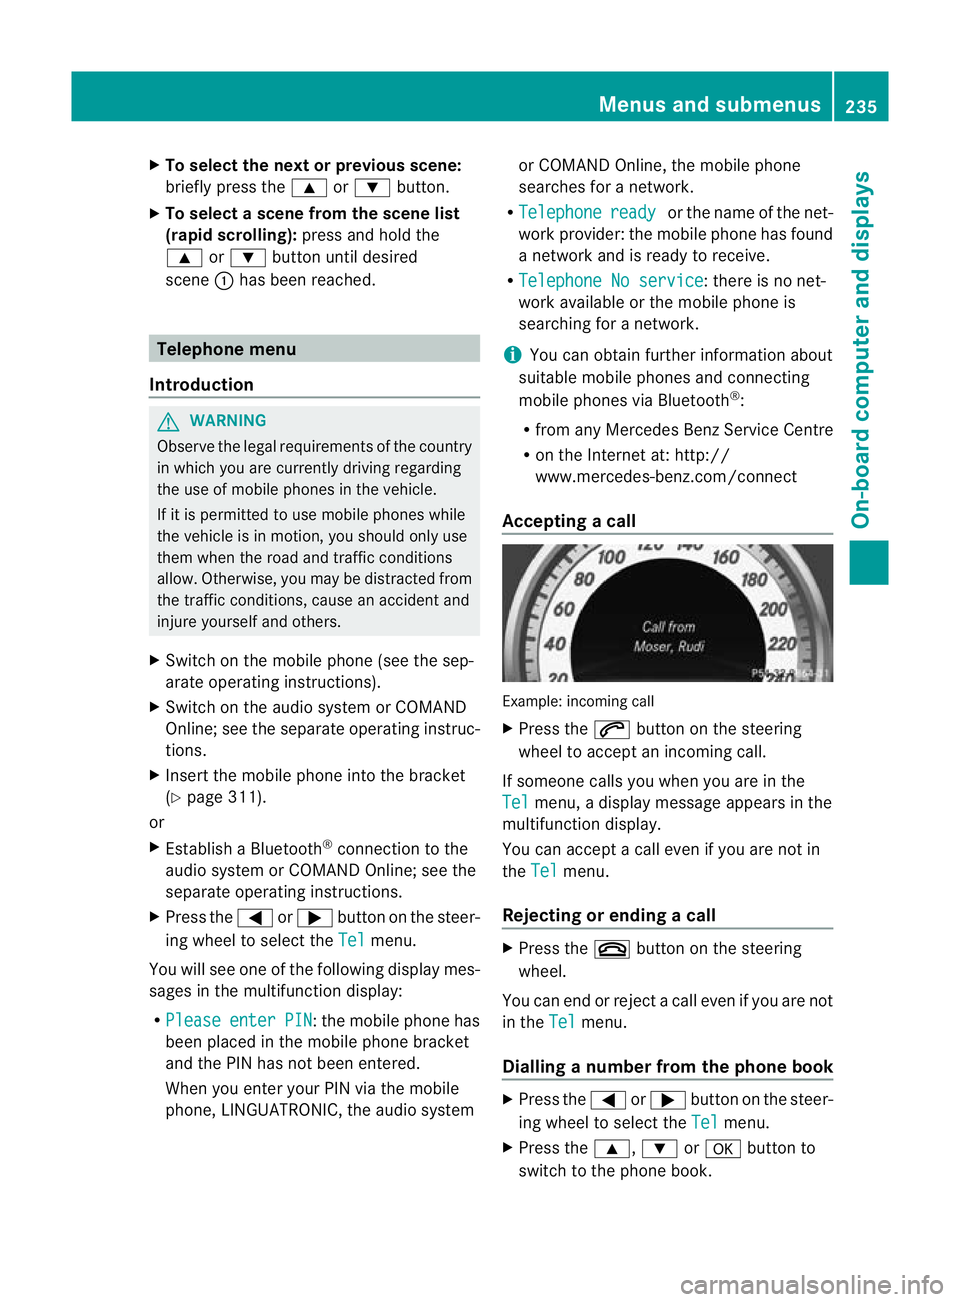
Accepting acall Example: incoming call
X
Press the 6button on the steering
wheel to accep tanincoming call.
If someone calls you when you are in the
Tel menu, a display message appears in the
multifunctio ndisplay.
You can accept a call even if you are not in
the Tel menu.
Rejecting or ending acall X
Press the ~button on the steering
wheel.
You can end or reject a call even if you are not
in the Tel menu.
Dialling anumber from the phone book X
Press the =or; button on the steer-
ing wheel to select the Tel menu.
X Press the 9,:ora button to
switch to the phone book. Menus and submenus
235On-board computer and displays Z
Page 241 of 405
When PRE-SAFE
®
Brake is activated, the mul-
tifunction display shows the Äsymbol as
long as the HOLD function is not activated
(Y page 186).
Vehicles with Active Parking Assist: if
PARKTRONIC is activated and you are driving
at a speed under 35 km/h, the jActive
Parking Assist symbol is shown instead of the
Ä symbol ( Ypage 194).
If the PRE-SAFE Brake: Sensors deacti‐ vated message appears, the radar sensor
system is deactivated.
X Check whether or not the radar sensor sys-
tem may be activated (Y page 398).
X Activate the radar sensor system
(Y page 243).
For more information on PRE-SAFE ®
Brake,
see (Y page 70).
Activating/deactivating ATTENTION
ASSIST X
Press the =or; button on the steer-
ing wheel to select the Assist. menu.
X Press the 9or: button to select
Attention Assist .
X Press the abutton.
The curren tselection is displayed.
X To activate/deactivate: press thea
button again.
When ATTENTION ASSIST is activated, the
À symbol appears in the multifunction
display when the ignition is on.
For further information about ATTENTION
ASSIST, see (Y page 202).
Activating/deactivating Blind Spot
Assist X
Press the =or; button on the steer-
ing wheel to select the Assist. menu.
X Press the 9or: button to select
Blind Spot Asst. .X
Press the abutton.
The curren tselection is displayed.
X To activate/deactivate: press thea
button again.
If the Blind Spot Assist Sensors deac‐ tivated or
Active blind spot assist. sensor system deactivated message
appears, the radar sensor system is deacti-
vated.
X Check whether or not the radar sensor sys-
tem may be activated (Y page 398).
X Activate the radar sensor system
(Y page 243).
For further information about Blind Spot
Assist, see (Y page 208).
For further information about Active Blind
Spot Assist, see (Y page 212).
Activating/deactivating Lane Keeping
Assist X
Press =or; on the steering wheel
to select the Assist. menu.
X Press the 9or: button to select
Lane Keep. Assist X
Press the abutton.
The curren tselection is displayed.
X Press ato confirm.
X Press the :or9 button to set Off ,
Standard or
Adaptive .
X Press the abutton to save the setting.
When Lane Keeping Assist or Active Lane
Keeping Assist is activated, the Ãsymbol
appears in the multifunction display when the
ignition is on.
For further information about Active Lane
Keeping Assist, see (Y page 215).238
Menus and submenusOn-board computer and displays
Page 247 of 405
ignitable material such as dry grass or fuels.
The material could otherwise ignite and set
the vehicle alight .Choose your parking spot
accordingly.
Operating the auxiliary heating is thus pro-
hibited at filling stations or when your vehicle
is being refuelled. You must therefore switch
off the auxiliary heating at filling stations.
! Operating the auxiliary heating/ventila-
tion draws on the vehicle battery. After you
have heated or ventilated the vehicle a
maximum of two times, drive for a longer
distance.
This function is only available on vehicles with
auxiliary heating (Y page 138).
In the Heating submenu, you can select a
stored departure time or change a departure
time.
The auxiliary heating timer function calcu-
lates the switch-on time according to the out-
side temperature so that the vehicle is pre-
heated by the departure time. When the
departure time is reached, the auxiliary heat-
ing continues to heat for a further five
minutes and then switches off. The auxiliary
heating adopts the THERMATIC or
THERMOTRONIC temperature setting.
You can switch off the auxiliary heating by
using the remote control or the auxiliary heat-
ing button on the centre console.
i Switch the auxiliary heating on regularly
once a month for about ten minutes.
Selecting the departure time or deactivat-
ing a selected departure time
X Press the =or; button on the steer-
ing wheel to select the Settings menu.
X Press the :or9 button to select the
Heating submenu.
X Press ato confirm.
You will see the selected setting.
X Press ato confirm. X
Press the :or9 button to select
one of the three departure times or Timer off (no timer active).
X Press ato confirm.
If a departure time is selected, the yellow
indicator lamp lights up on the auxiliary
heating button.
Changing the departure time
X Press the =or; button on the steer-
ing wheel to select the Settings menu.
X Press the :or9 button to select the
Heating submenu.
X Press ato confirm.
You will see the selected setting.
X Press ato confirm.
X Press the :or9 button to select A ,
B or
Change C .
X Press ato confirm.
You can now change the departure time.
X Press the =or; button to select the
display to be changed: hours, minutes.
X Press the :or9 button to set the
selected display.
X Press the abutton to store the entry.
The yellow indicator lamp on the auxiliary
heating button lights up.
Convenience Activating/deactivating the EASY-
ENTRY/EXIT feature
G
WARNING
The steering wheel moves when the EASY-
ENTRY/EXIT feature is active. There is a risk
of occupants becoming trapped. Before acti-
vating the EASY-ENTRY/EXIT feature, make
sure that nobody can become trapped.
Do not leave children unsupervised in the
vehicle, even if they are secured in a child
restraint system. The children could open the
driver's door and thereby unintentionally acti-
vate the EASY-ENTRY/EXIT feature and
become trapped. 244
Menus and submenusOn-board computer and displays
Page 248 of 405
X
Press the =or; button on the steer-
ing wheel to select the Settings menu.
X Press the :or9 button to select the
Convenience submenu.
X Press ato confirm.
X Press the :or9 button to select the
Easy Entry/Exit: function.
If the Easy Entry/Exit function is activa-
ted, the vehicle steering wheel is displayed
in red in the multifunction display.
X Press the abutton to save the setting.
Further information on the EASY-ENTRY/EXIT
feature (Y page 107).
Switching the belt adjustment on/off
X Press the =or; button on the steer-
ing wheel to select the Settings menu.
X Press the :or9 button to select the
Convenience submenu.
X Press ato confirm.
X Press the :or9 button to select the
Belt adjustment function.
When the Belt adjustment function is
activated, the vehicle seat belt is displayed
in red in the multifunction display.
X Press the abutton to save the setting.
For further information on belt adjustment,
see (Y page 50).
Switching the fold in mirrors when lock-
ing function on/off
This function is only available on vehicles with
Memory Function (Y page 111).
When you activate the Auto. fold in func-
tion, the exterior mirrors are folded in when
the vehicle is locked. When you unlock the
vehicle and then open a door, the exterior
mirrors fold out again.
X Press the =or; button on the steer-
ing wheel to select the Settings menu.
X Press the :or9 button to select the
Convenience submenu.
X Press ato confirm. X
Press the :or9 button to select the
Auto. fold in function.
If the Auto. fold in function is activated,
the vehicle's exterior mirror is displayed in
red in the multifunction display.
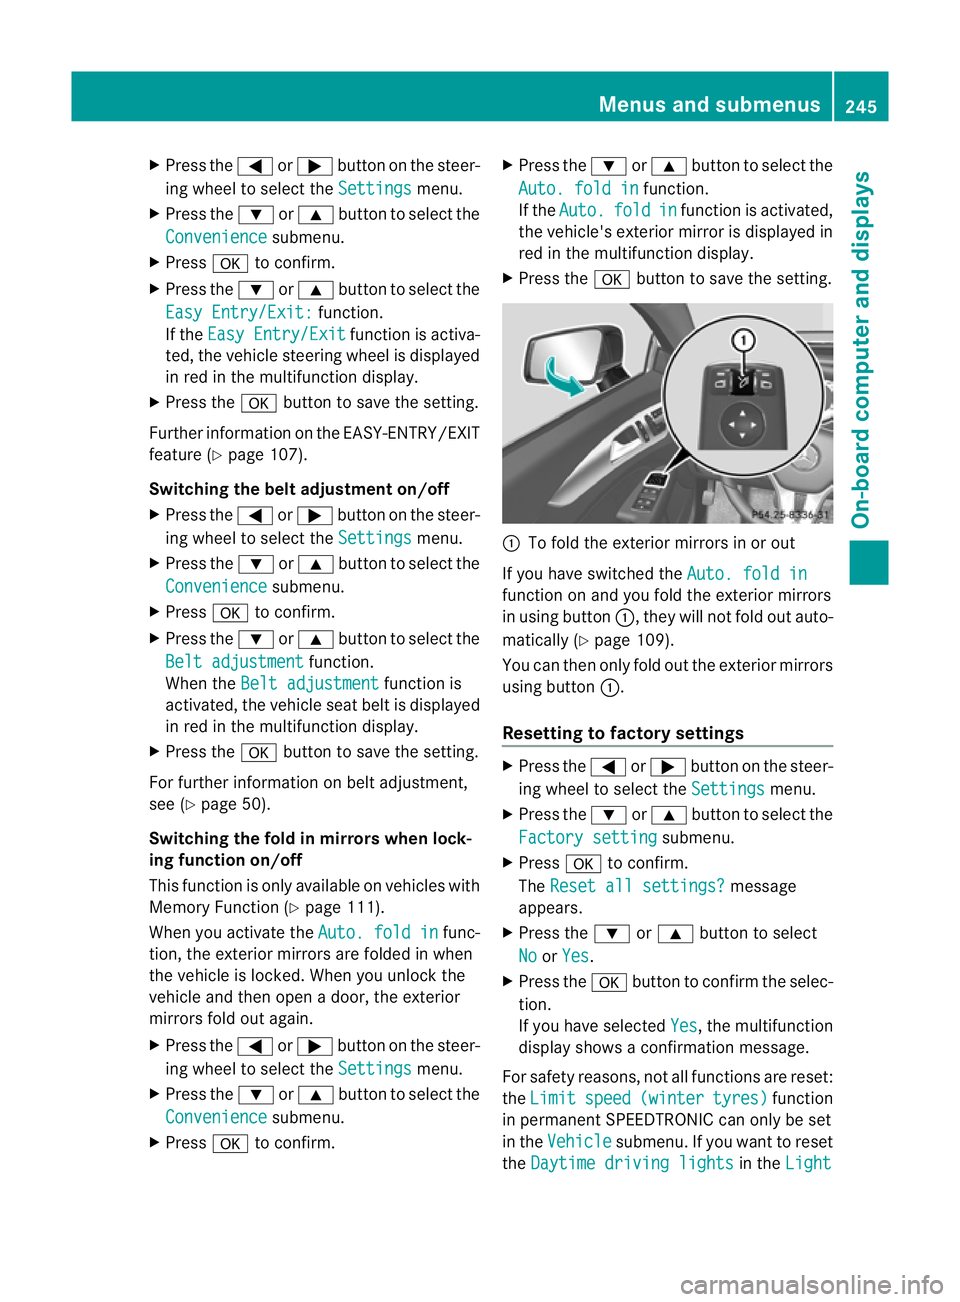
X Press the abutton to save the setting. :
To fold the exterior mirrors in or out
If you have switched the Auto. fold in function on and you fold the exterior mirrors
in using button
:, they will not fold out auto-
matically (Y page 109).
You can then only fold out the exterior mirrors
using button :.
Resetting to factor ysettings X
Press the =or; button on the steer-
ing wheel to selec tthe Settings menu.
X Press the :or9 button to select the
Factory setting submenu.
X Press ato confirm.
The Reset all settings? message
appears.
X Press the :or9 button to select
No or
Yes .
X Press the abutton to confirm the selec-
tion.
If you have selected Yes , the multifunction
display shows a confirmation message.
For safety reasons, not all functions are reset:
the Limit speed (winter tyres) function
in permanent SPEEDTRONIC can only be set
in the Vehicle submenu. If you want to reset
the Daytime driving lights in the
Light Menus and submenus
245On-board computer and displays Z
Page 249 of 405
submenu, you must turn the key to position
1
in the ignition lock. AMG menu in AMG vehicles
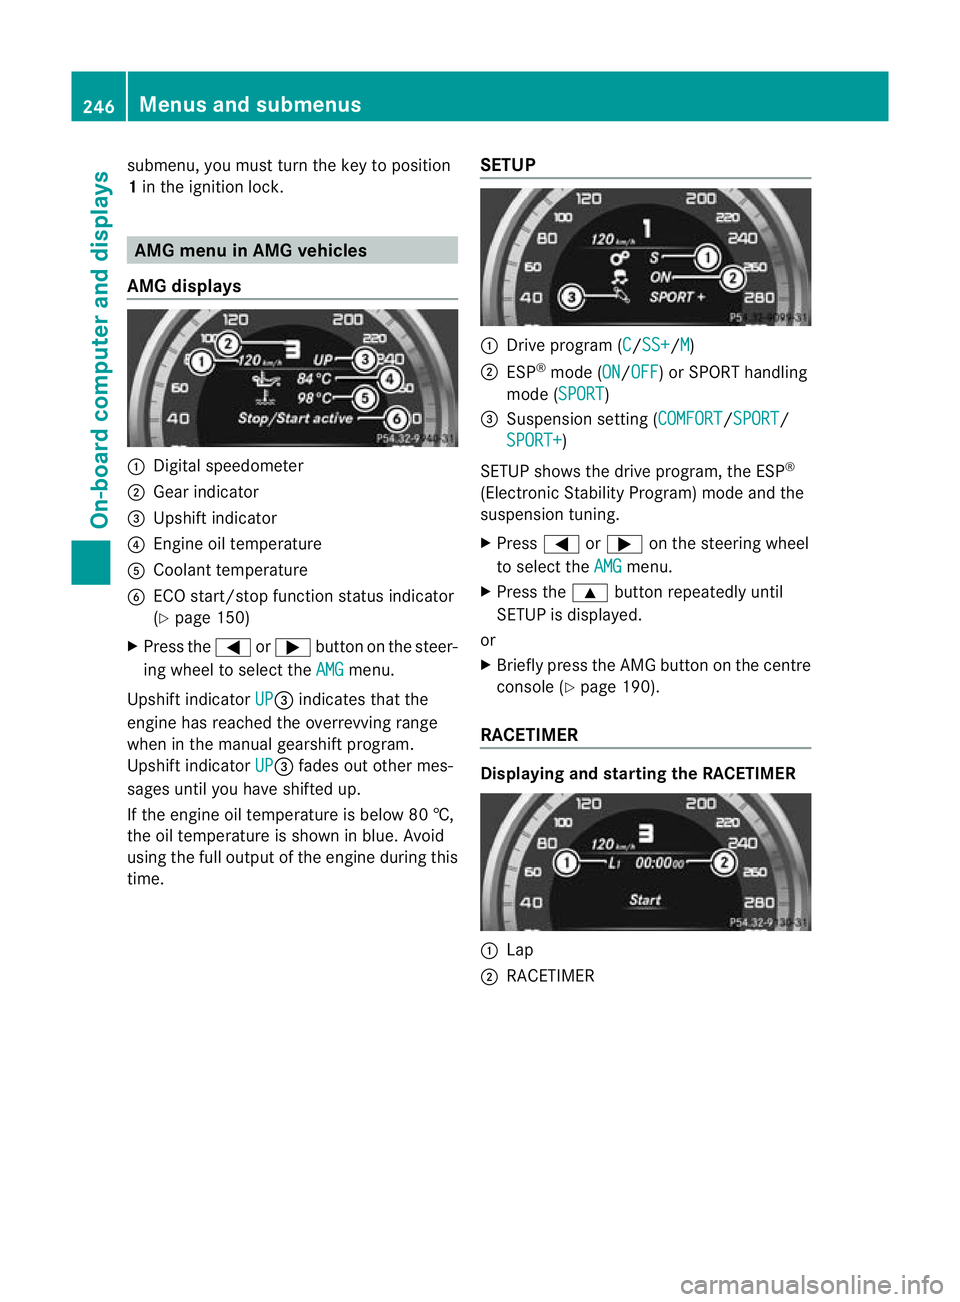
AMG displays :
Digital speedometer
; Gear indicator
= Upshift indicator
? Engine oil temperature
A Coolant temperature
B ECO start/stop function status indicator
(Y page 150)
X Press the =or; button on the steer-
ing wheel to select the AMG menu.
Upshift indicator UP =
indicates that the
engine has reached the overrevving range
when in the manual gearshift program.
Upshift indicator UP =
fades out other mes-
sages until you have shifted up.
If the engine oil temperature is below 80 †,
the oil temperature is shown in blue. Avoid
using the full output of the engine during this
time. SETUP :
Drive program (C /SS+ /M )
; ESP ®
mode (ON /OFF ) or SPORT handling
mode (SPORT )
= Suspension setting (COMFORT /SPORT /
SPORT+ )
SETUP shows the drive program, the ESP ®
(Electronic Stability Program) mode and the
suspension tuning.
X Press =or; on the steering wheel
to select the AMG menu.
X Press the 9button repeatedly until
SETUP is displayed.
or
X Briefly press the AMG button on the centre
console (Y page 190).
RACETIMER Displaying and starting the RACETIMER
:
Lap
; RACETIMER 246
Menus and submenusOn-board computer and displays