2012 MERCEDES-BENZ CLS towing
[x] Cancel search: towingPage 279 of 356
Frequencies for the garage door opener
The radio type approval number and the frequency range for the garage door opener can be
found on the Internet at: http://www.mercedes-benz.de/betriebsanleitung.
Compass
Calling up the compass
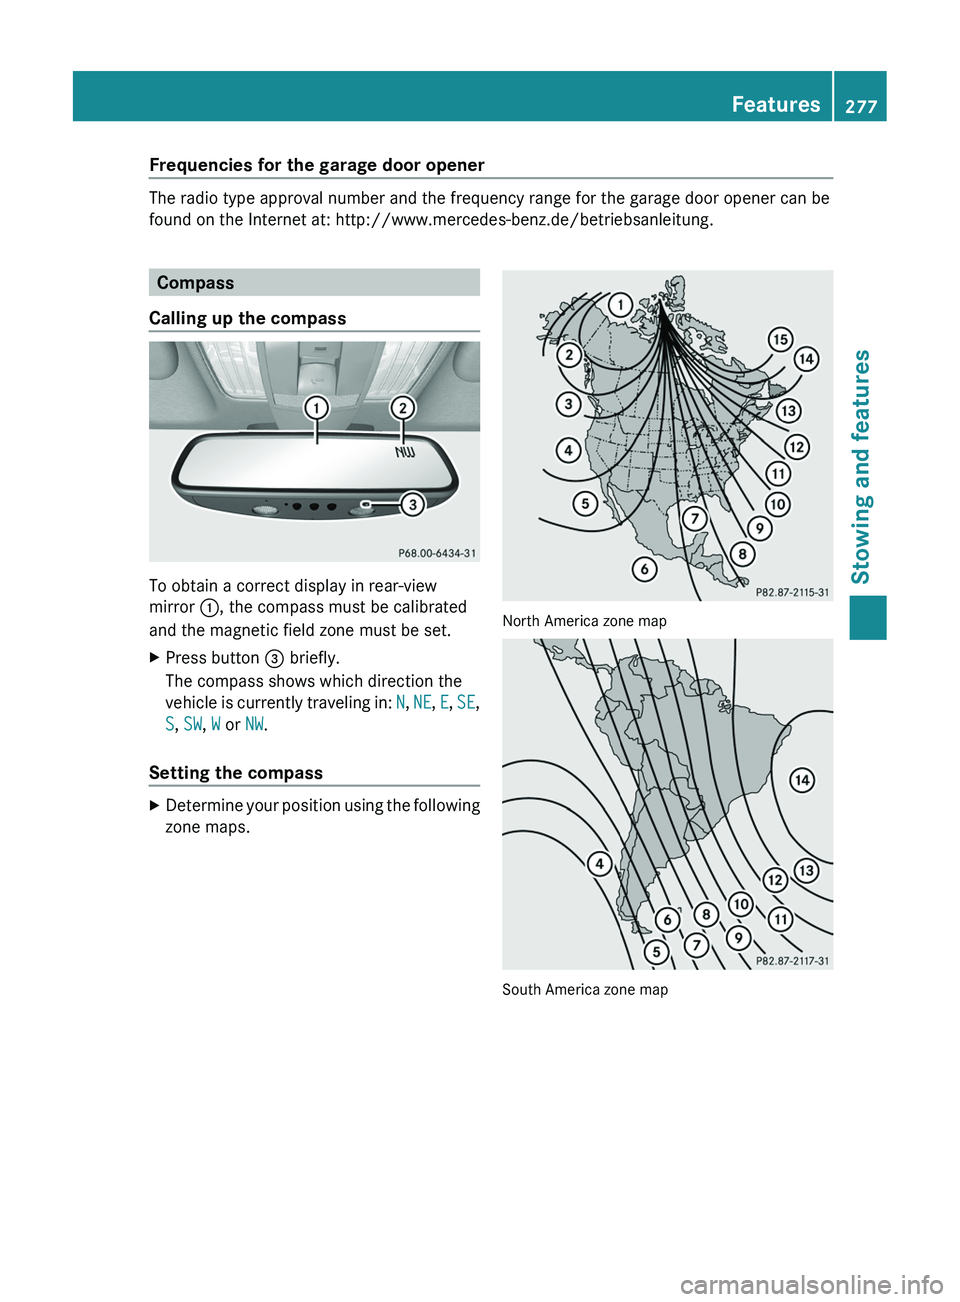
To obtain a correct display in rear-view
mirror :, the compass must be calibrated
and the magnetic field zone must be set.
XPress button = briefly.
The compass shows which direction the
vehicle is currently traveling in: N, NE , E , SE ,
S , SW , W or NW.
Setting the compass
XDetermine your position using the following
zone maps.
North America zone map
South America zone map
Features277Stowing and featuresZ
Page 280 of 356
XPress and hold button =(Y page 277) for
approximately three seconds.
The currently selected zone appears in
compass display ;(Y page 277).XTo select the zone: press
button =(Y page 277) repeatedly until the
desired zone is selected.
The zone has been selected when compass
display ;(Y page 277) shows the heading.
This takes a few seconds.
Calibrating the compass
XMake sure that there is sufficient space for
you to drive in a circle without impeding the
remaining traffic.
In order to calibrate the compass correctly,
observe the following points:
R calibrate the compass in the open and not
in the vicinity of steel constructions or high-
voltage transmission lines.
R switch off electrical consumers, for
example, the climate control, windshield
wipers or rear window defroster.
R close all doors and the trunk lid.
XSwitch the ignition on.XPress and hold button =(Y page 277) for
approximately six seconds until the
C symbol appears in compass display ;
( Y page 277).XDrive a full circle at approximately 3 mph
(5 km/h) to 6 mph (10 km/h).
Once the calibration has been successfully
completed, the current direction appears in
compass display ;(Y page 277).
Floormat on the driver's side
GWARNING
Whenever you are using a floormat, make sure
there is enough clearance and that the
floormat is securely fastened.
The floormat should always be securely
fastened using the fastening equipment.
Before driving off, check that the floormat is
securely in place and adjust it if necessary. A
loose floormat could slip and hinder proper
functioning of the pedals.
Do not place several floormats on top of each
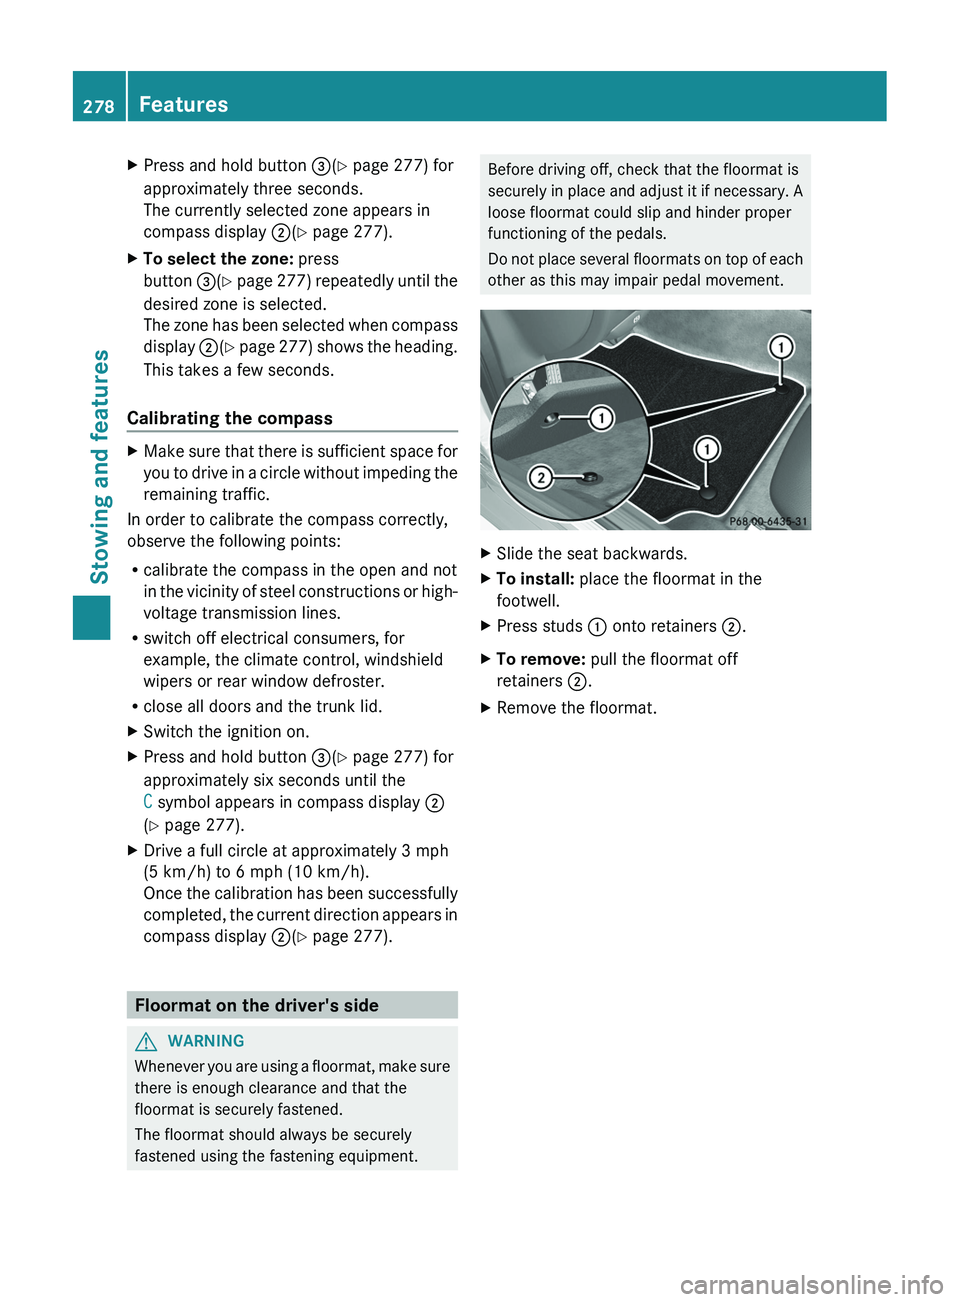
other as this may impair pedal movement.XSlide the seat backwards.XTo install: place the floormat in the
footwell.XPress studs : onto retainers ;.XTo remove: pull the floormat off
retainers ;.XRemove the floormat.278FeaturesStowing and features
Page 288 of 356
! Do not park the vehicle for an extended
period straight after cleaning it, particularly
after having cleaned the wheels with wheel
cleaner. Wheel cleaners could cause
increased corrosion of the brake discs and
brake pads/linings. For this reason, you
should drive for a few minutes after
cleaning. Braking heats the brake discs and
the brake pads/linings, thus drying them.
The vehicle can then be parked.
Exterior care
Automatic car wash
GWARNING
Braking efficiency is reduced after washing
the vehicle. This could cause an accident. For
this reason, you must drive particularly
carefully after washing the vehicle until the
brakes have dried.
GWARNING
The vehicle is braked when the HOLD function
or DISTRONIC PLUS is activated. Therefore,
deactivate the HOLD function and DISTRONIC
PLUS before the vehicle is washed in an
automatic car wash.
You can wash the vehicle in an automatic car
wash from the very start.
! Never clean your vehicle in a Touchless
Automatic Car Wash as these use special
cleaning agents. These cleaning agents can
damage the paintwork or plastic parts.
If the vehicle is very dirty, pre-wash it before
cleaning it in an automatic car wash.
! In car washes with a towing mechanism,
make sure that the automatic transmission
is in transmission position N, otherwise the
vehicle could be damaged.
R Vehicles with a SmartKey:
Do not remove the SmartKey from the
ignition lock. Do not open the driver's
door or front-passenger door when the
engine is switched off. Otherwise, the
automatic transmission selects park
position P automatically and locks the
wheels. You can prevent this by shifting
the automatic transmission to N
beforehand.
R Vehicles with KEYLESS-GO:
Do not open the driver's door or front-
passenger door when the engine is
switched off. Otherwise, the automatic
transmission selects park position P
automatically and locks the wheels.
Observe the following to make sure that the
automatic transmission stays in position N:XMake sure the vehicle is stationary and the
ignition is switched off.XTurn the SmartKey to position
2 (Y page 132) in the ignition lock.
Use the SmartKey instead of the Start/
Stop button on vehicles with KEYLESS-GO.XDepress and hold the brake pedal.XShift the automatic transmission to
position N.XRelease the brake pedal.XRelease the parking brake.XSwitch off the ignition and leave the
SmartKey in the ignition lock.
! Make sure that:
R the side windows and the sliding sunroof
are fully closed.
R the ventilation/heating is switched off
(the OFF button has been pressed).
R the windshield wiper switch is in position
0 .
Otherwise, the vehicle might be damaged.
After using an automatic car wash, wipe off
wax from the windshield and the wiper
blades. This will prevent smears and reduce
wiping noises caused by residue on the
windshield.
286CareMaintenance and care
Page 295 of 356
Useful information ............................294
Where will I find...? ...........................294
Flat tire .............................................. 296
Battery ............................................... 302
Jump-starting .................................... 305
Towing and tow-starting ..................306
Fuses .................................................. 309293Breakdown assistance
Page 296 of 356
Useful information
i This Operator's Manual describes all
models and all standard and optional
equipment of your vehicle available at the
time of publication of the Operator's
Manual. Country-specific differences are
possible. Please note that your vehicle may
not be equipped with all features
described. This also applies to safety-
related systems and functions.
i Please read the information on qualified
specialist workshops ( Y page 22).
Where will I find...?
First-aid kit
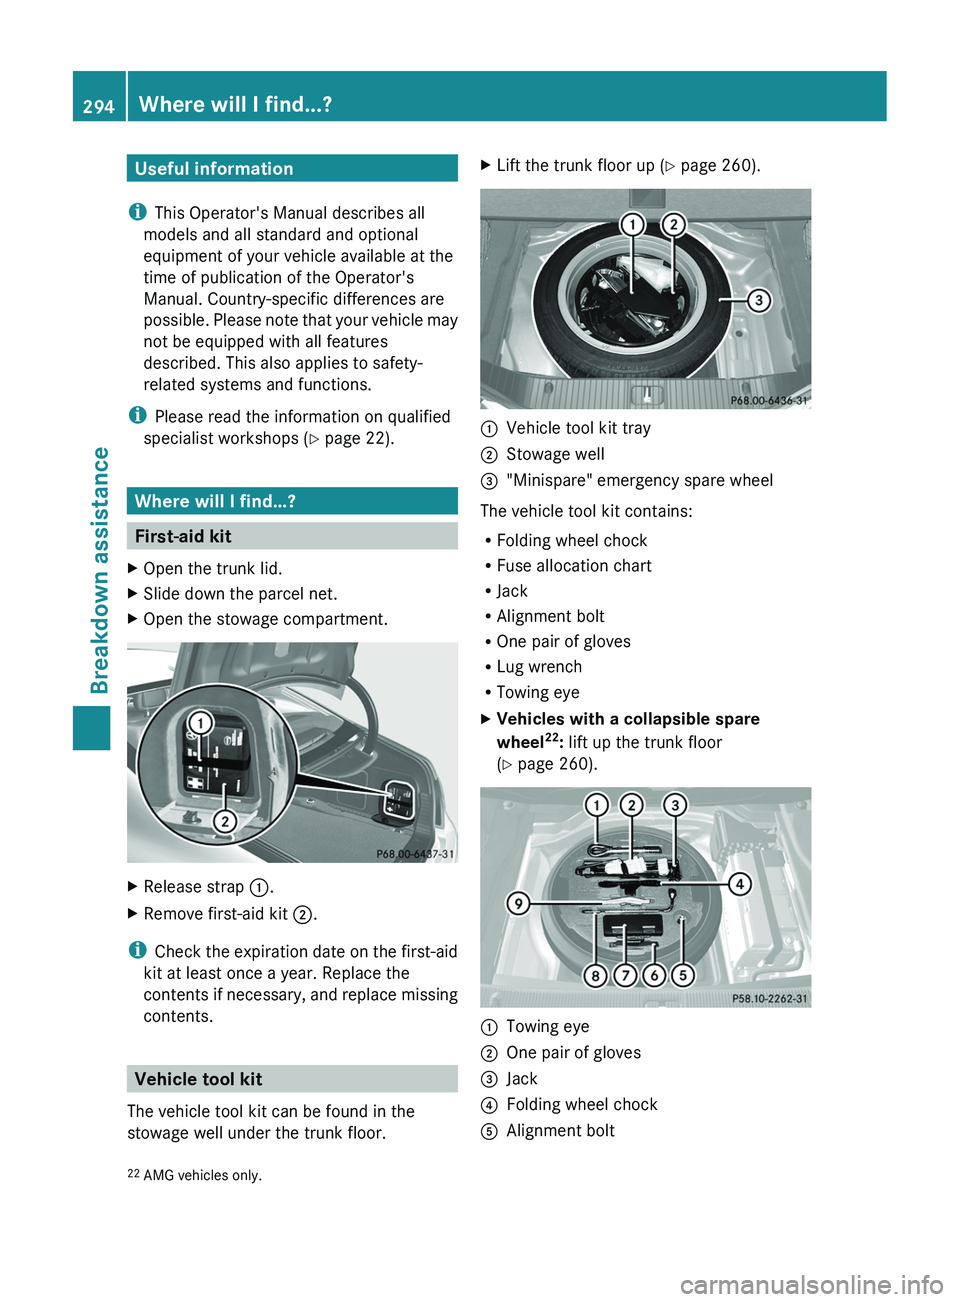
XOpen the trunk lid.XSlide down the parcel net.XOpen the stowage compartment.XRelease strap :.XRemove first-aid kit ;.
i
Check the expiration date on the first-aid
kit at least once a year. Replace the
contents if necessary, and replace missing
contents.
Vehicle tool kit
The vehicle tool kit can be found in the
stowage well under the trunk floor.
XLift the trunk floor up ( Y page 260).:Vehicle tool kit tray;Stowage well="Minispare" emergency spare wheel
The vehicle tool kit contains:
R Folding wheel chock
R Fuse allocation chart
R Jack
R Alignment bolt
R One pair of gloves
R Lug wrench
R Towing eye
XVehicles with a collapsible spare
wheel 22
: lift up the trunk floor
( Y page 260).:Towing eye;One pair of gloves=Jack?Folding wheel chockAAlignment bolt22
AMG vehicles only.294Where will I find...?Breakdown assistance
Page 297 of 356
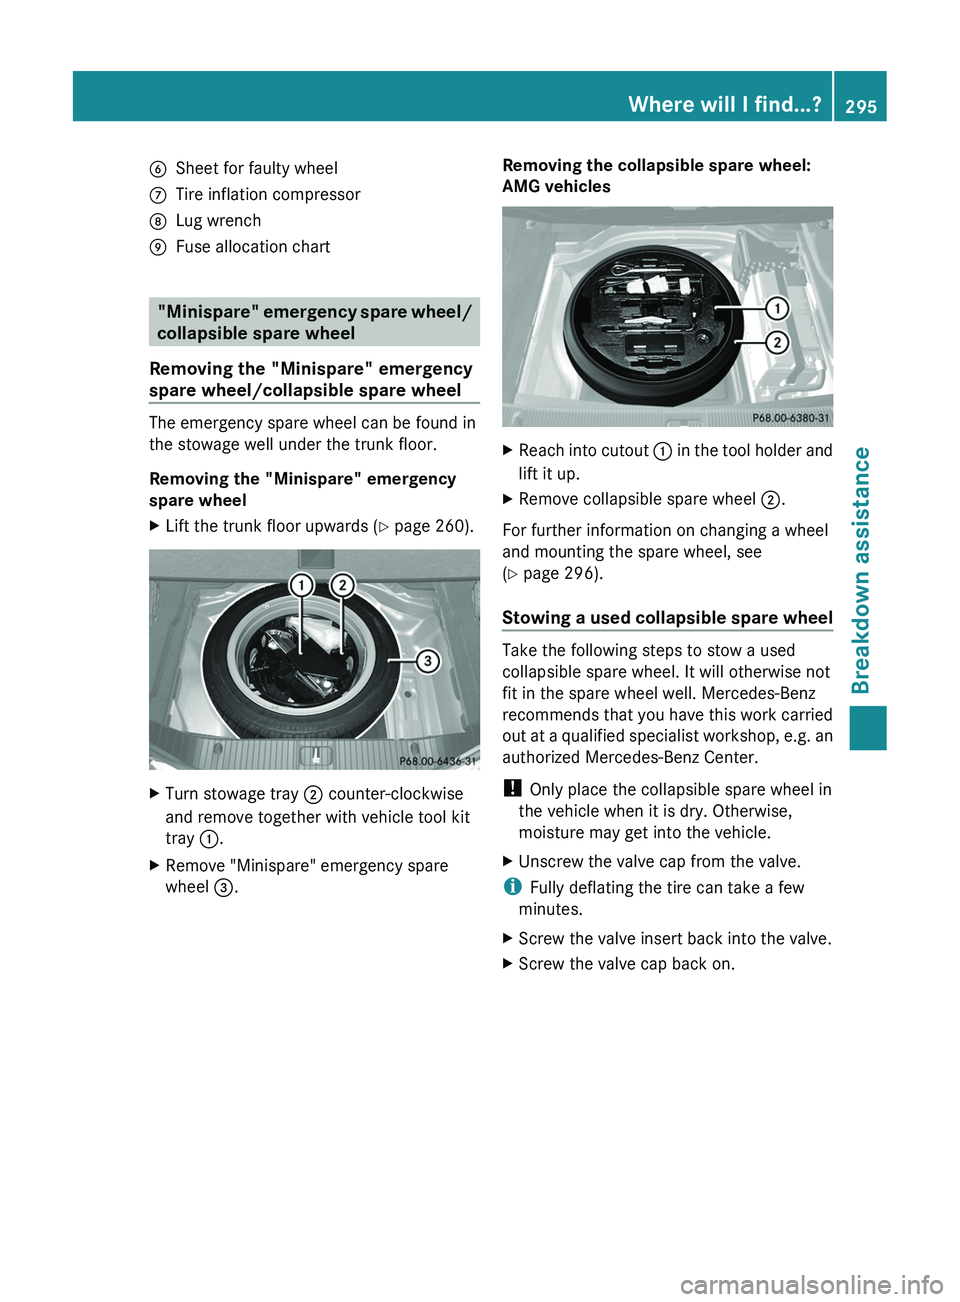
BSheet for faulty wheelCTire inflation compressorDLug wrenchEFuse allocation chart
"Minispare" emergency spare wheel/
collapsible spare wheel
Removing the "Minispare" emergency
spare wheel/collapsible spare wheel
The emergency spare wheel can be found in
the stowage well under the trunk floor.
Removing the "Minispare" emergency
spare wheel
XLift the trunk floor upwards ( Y page 260).XTurn stowage tray ; counter-clockwise
and remove together with vehicle tool kit
tray :.XRemove "Minispare" emergency spare
wheel =.Removing the collapsible spare wheel:
AMG vehiclesXReach into cutout : in the tool holder and
lift it up.XRemove collapsible spare wheel ;.
For further information on changing a wheel
and mounting the spare wheel, see
( Y page 296).
Stowing a used collapsible spare wheel
Take the following steps to stow a used
collapsible spare wheel. It will otherwise not
fit in the spare wheel well. Mercedes-Benz
recommends that you have this work carried
out at a qualified specialist workshop, e.g. an
authorized Mercedes-Benz Center.
! Only place the collapsible spare wheel in
the vehicle when it is dry. Otherwise,
moisture may get into the vehicle.
XUnscrew the valve cap from the valve.
i Fully deflating the tire can take a few
minutes.
XScrew the valve insert back into the valve.XScrew the valve cap back on.Where will I find...?295Breakdown assistance
Page 303 of 356
The specified tire pressure is printed on the
yellow label of the emergency spare wheel.XWhen the specified tire pressure has been
reached, press on/off switch A on the
electric air pump to 0.
The tire inflation compressor is switched
off.XTurn the SmartKey to position 0 in the
ignition lock.XIf the tire pressure is higher than the
specified pressure, press pressure release
button ; until the correct tire pressure has
been reached.XUnscrew union nut : on the air hose from
the valve.XScrew the valve cap onto the collapsible
spare wheel valve again.XStow plug ? and the air hose in the lower
section of the compressor housing.XStow the tire inflation compressor in the
designated place in the vehicle.
Lowering the vehicle
GWARNING
Vehicles with a spare wheel with a collapsible
spare wheel only: do not inflate the collapsible
spare wheel until it has been mounted.
Inflate the collapsible spare wheel using the
tire inflation compressor before lowering the
vehicle.
XTurn the crank of the jack counter-
clockwise until the vehicle is once again
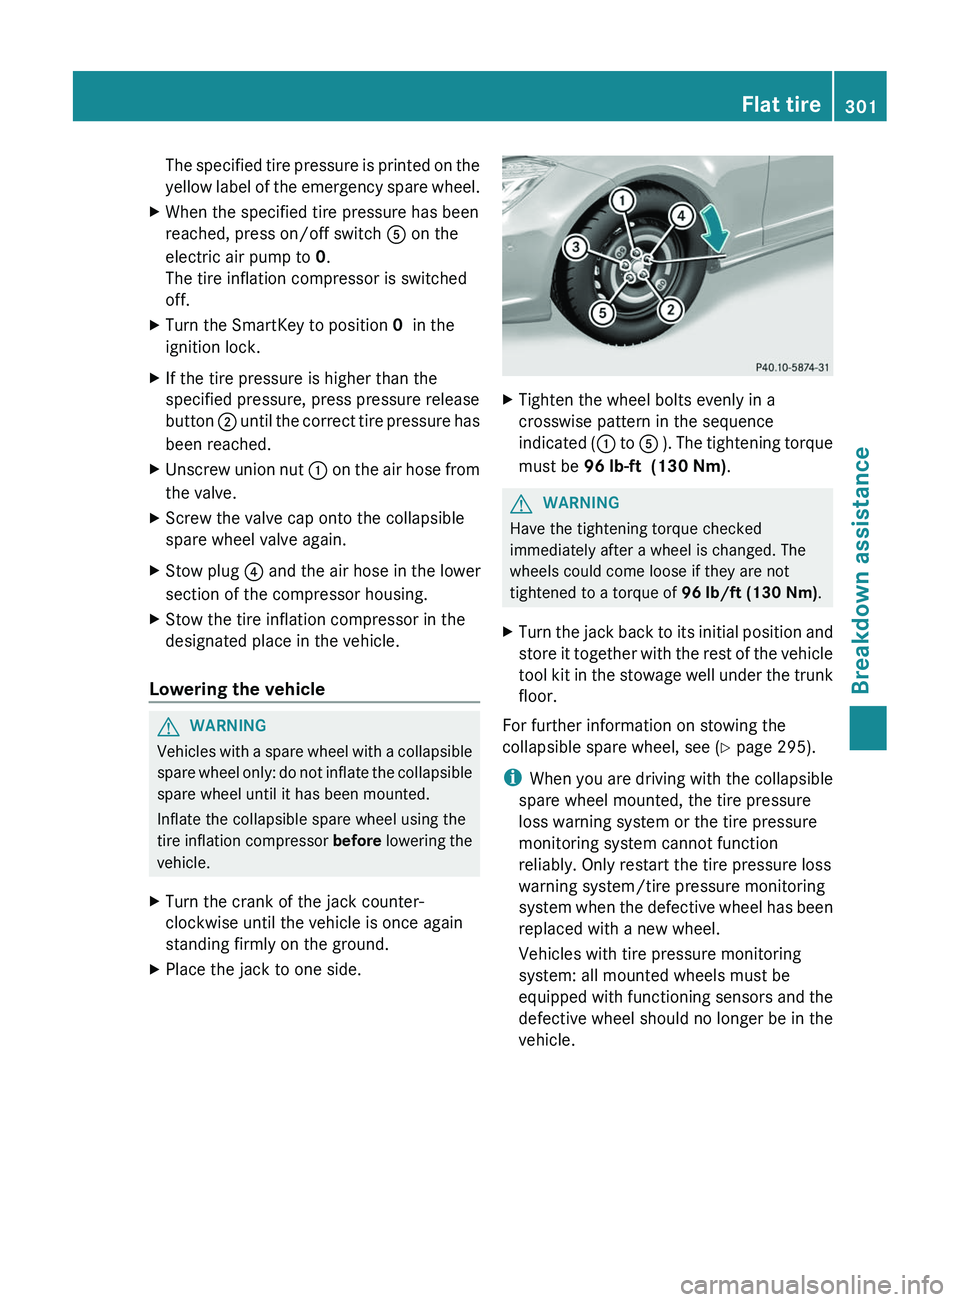
standing firmly on the ground.XPlace the jack to one side.XTighten the wheel bolts evenly in a
crosswise pattern in the sequence
indicated ( : to A ). The tightening torque
must be 96 lb-ft (130 Nm) .GWARNING
Have the tightening torque checked
immediately after a wheel is changed. The
wheels could come loose if they are not
tightened to a torque of 96 lb/ft (130 Nm).
XTurn the jack back to its initial position and
store it together with the rest of the vehicle
tool kit in the stowage well under the trunk
floor.
For further information on stowing the
collapsible spare wheel, see ( Y page 295).
i When you are driving with the collapsible
spare wheel mounted, the tire pressure
loss warning system or the tire pressure
monitoring system cannot function
reliably. Only restart the tire pressure loss
warning system/tire pressure monitoring
system when the defective wheel has been
replaced with a new wheel.
Vehicles with tire pressure monitoring
system: all mounted wheels must be
equipped with functioning sensors and the
defective wheel should no longer be in the
vehicle.
Flat tire301Breakdown assistanceZ
Page 308 of 356
XSwitch off all electrical consumers (e.g. radio, blower, etc.).XOpen the hood (Y page 280).
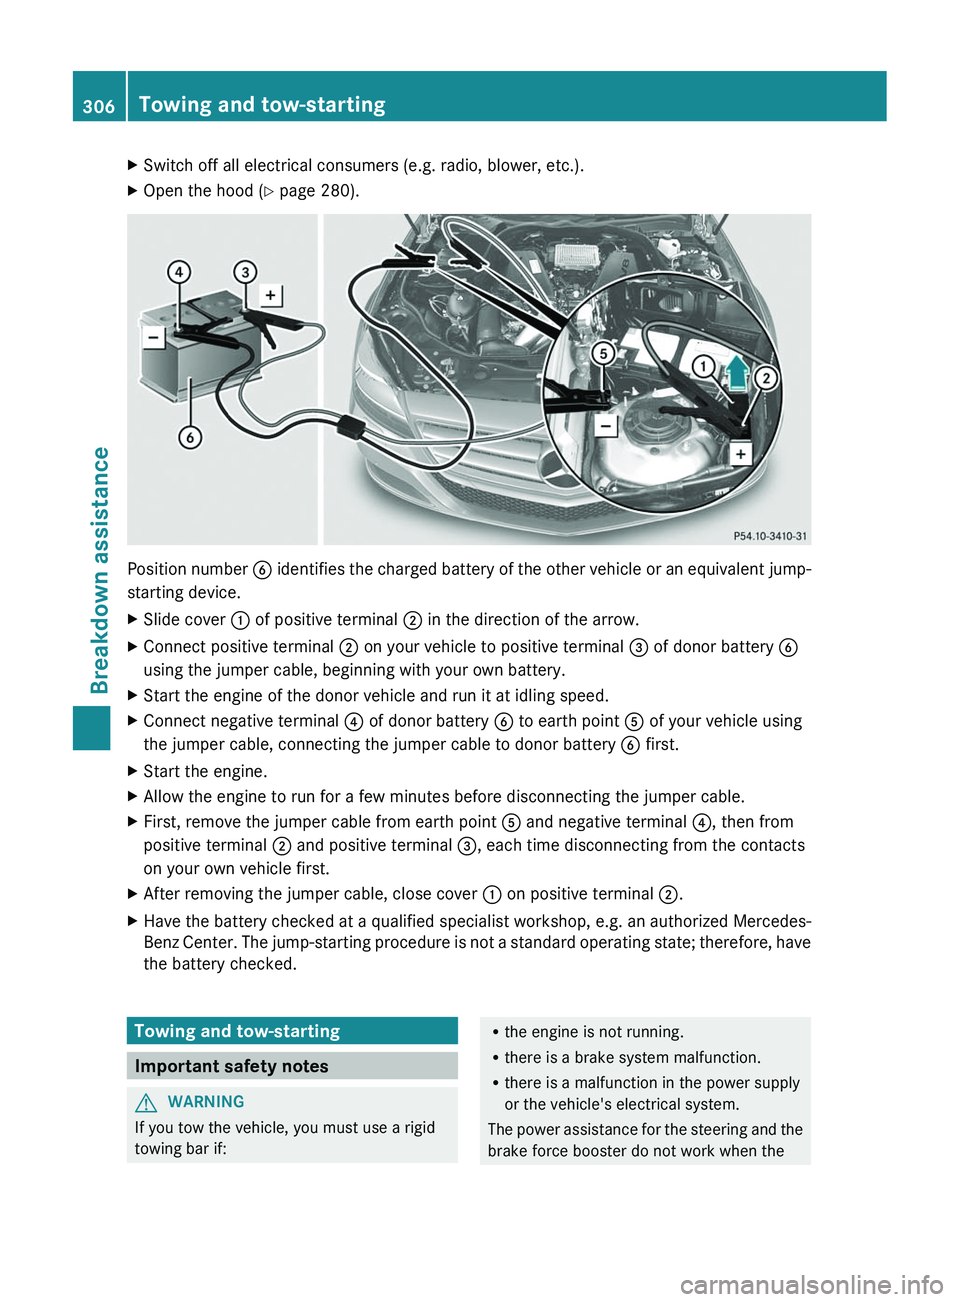
Position number B identifies the charged battery of the other vehicle or an equivalent jump-
starting device.
XSlide cover : of positive terminal ; in the direction of the arrow.XConnect positive terminal ; on your vehicle to positive terminal = of donor battery B
using the jumper cable, beginning with your own battery.XStart the engine of the donor vehicle and run it at idling speed.XConnect negative terminal ? of donor battery B to earth point A of your vehicle using
the jumper cable, connecting the jumper cable to donor battery B first.XStart the engine.XAllow the engine to run for a few minutes before disconnecting the jumper cable.XFirst, remove the jumper cable from earth point A and negative terminal ?, then from
positive terminal ; and positive terminal =, each time disconnecting from the contacts
on your own vehicle first.XAfter removing the jumper cable, close cover : on positive terminal ;.XHave the battery checked at a qualified specialist workshop, e.g. an authorized Mercedes-
Benz Center. The jump-starting procedure is not a standard operating state; therefore, have
the battery checked.Towing and tow-starting
Important safety notes
GWARNING
If you tow the vehicle, you must use a rigid
towing bar if:
R the engine is not running.
R there is a brake system malfunction.
R there is a malfunction in the power supply
or the vehicle's electrical system.
The power assistance for the steering and the
brake force booster do not work when the306Towing and tow-startingBreakdown assistance