Page 152 of 356

Problems with fuel and the fuel tankProblemPossible causes/consequences and M SolutionsFuel is leaking from the
vehicle.GRisk of explosion or fire
The fuel line or the fuel tank is defective.
XTurn the SmartKey to position 0(Y page 132) in the ignition lock
immediately and remove it.XDo not restart the engine under any circumstances.XConsult a qualified specialist workshop.The fuel filler flap
cannot be opened.The fuel filler flap is not unlocked.
or
The SmartKey battery is discharged.XUnlock the vehicle using the mechanical key ( Y page 75).XOpen the trunk lid.XManually unlock the fuel filler flap using the emergency release
( Y page 149).The fuel filler flap is unlocked, but the opening mechanism is
jammed.XConsult a qualified specialist workshop.Parking
Important safety notes
GWARNING
Do not park this vehicle in areas where
combustible materials can come into contact
with the hot exhaust system. Do not park the
vehicle on dry grassland or harvested grain
fields. Combustible materials, such as grass,
hay or leaves could be ignited by the hot
exhaust system and cause a vehicle fire.
Unintended vehicle movement can cause
serious personal injury or damage to the
vehicle or the vehicle drivetrain. To reduce
such risks, always do the following before
turning off the engine and leaving the vehicle:
R keep your right foot on the brake pedal.
R engage the parking brake.
R shift the automatic transmission to park
position P.
R
slowly release the brake pedal.
R when parked on an incline, always turn the
front wheels towards the road curb.
R turn the SmartKey in the ignition lock to
position 0 and remove the SmartKey from
the ignition lock, or press the KEYLESS-GO
Start/Stop button.
R take the SmartKey with you and lock the
vehicle when leaving.
Switching off the engine
Important safety notes
GWARNING
Do not turn off the engine before the vehicle
has come to a complete stop. With the engine
not running, there is no power assistance for
the brake and steering systems. In this case,
it is important to keep in mind that a
150ParkingDriving and parking
Page 261 of 356

Parcel nets are located in the front-passenger
footwell and on the left and right-hand sides
of the trunk.
Rear bench seat through-loading
feature
Important safety notes
GWARNING
When expanding the cargo volume, always
fold the seat backrests fully forward.
Unless you are transporting cargo, the seat
backrests must remain properly locked in the
upright position.
In an accident, during hard braking or sudden
maneuvers, loose items will be thrown around
inside the vehicle. This can cause injury to
vehicle occupants unless the items are
securely fastened in the vehicle.
Always use the cargo tie-down rings.
The left-hand and right-hand rear seat
backrests can be folded down separately to
increase the trunk capacity.
Folding the seat backrest forward
i Vehicles with memory function: when you
fold one or both parts of the rear seat
backrest forwards, the respective front
seat moves forward slightly, when
necessary, in order to avoid contact.
XVehicles without memory function: if
necessary, move the driver's or front-
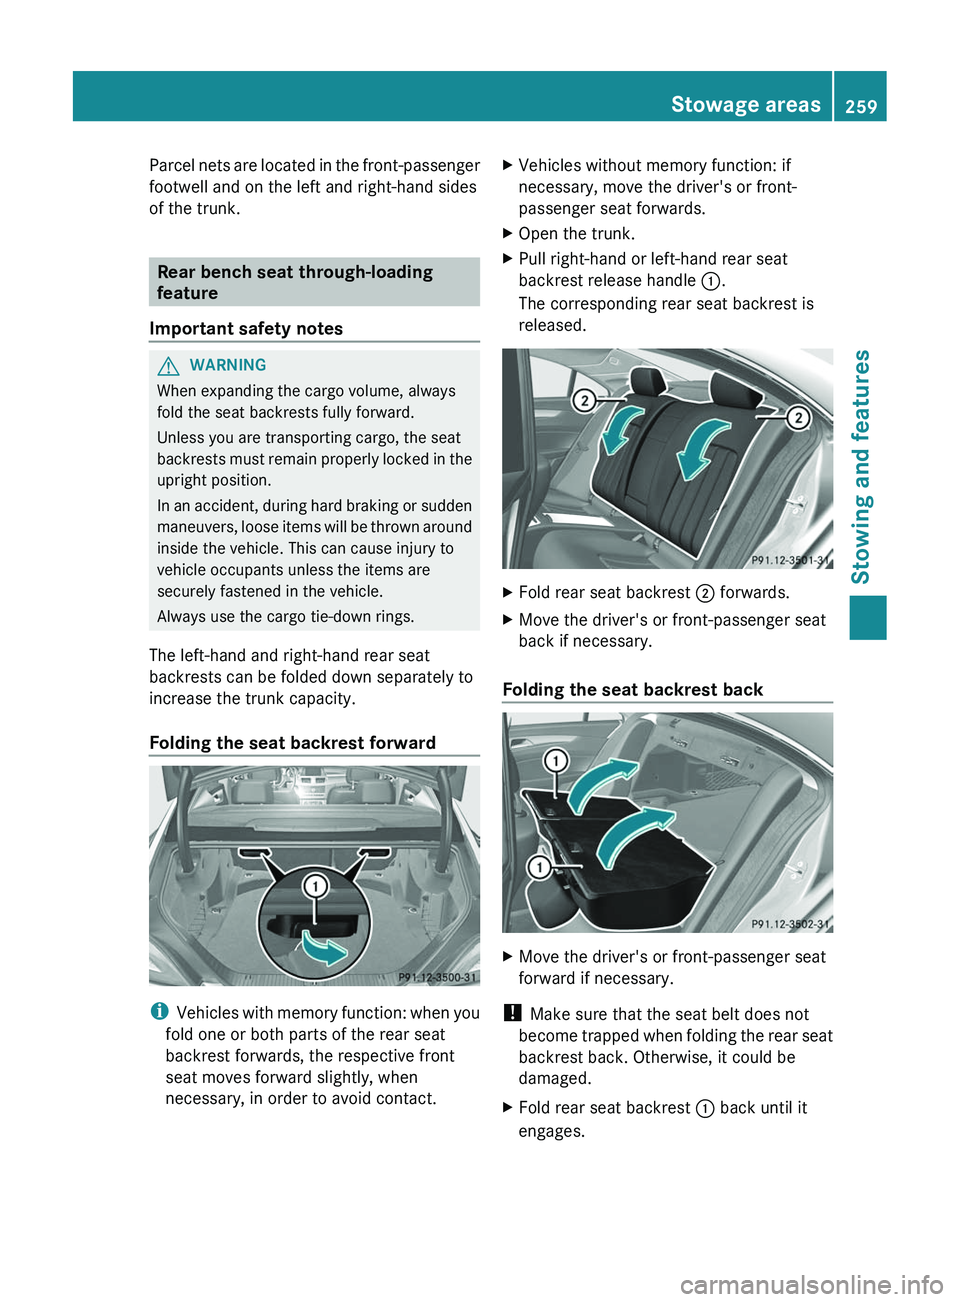
passenger seat forwards.XOpen the trunk.XPull right-hand or left-hand rear seat
backrest release handle :.
The corresponding rear seat backrest is
released.XFold rear seat backrest ; forwards.XMove the driver's or front-passenger seat
back if necessary.
Folding the seat backrest back
XMove the driver's or front-passenger seat
forward if necessary.
! Make sure that the seat belt does not
become trapped when folding the rear seat
backrest back. Otherwise, it could be
damaged.
XFold rear seat backrest : back until it
engages.Stowage areas259Stowing and featuresZ
Page 296 of 356

Useful information
i This Operator's Manual describes all
models and all standard and optional
equipment of your vehicle available at the
time of publication of the Operator's
Manual. Country-specific differences are
possible. Please note that your vehicle may
not be equipped with all features
described. This also applies to safety-
related systems and functions.
i Please read the information on qualified
specialist workshops ( Y page 22).
Where will I find...?
First-aid kit
XOpen the trunk lid.XSlide down the parcel net.XOpen the stowage compartment.XRelease strap :.XRemove first-aid kit ;.
i
Check the expiration date on the first-aid
kit at least once a year. Replace the
contents if necessary, and replace missing
contents.
Vehicle tool kit
The vehicle tool kit can be found in the
stowage well under the trunk floor.
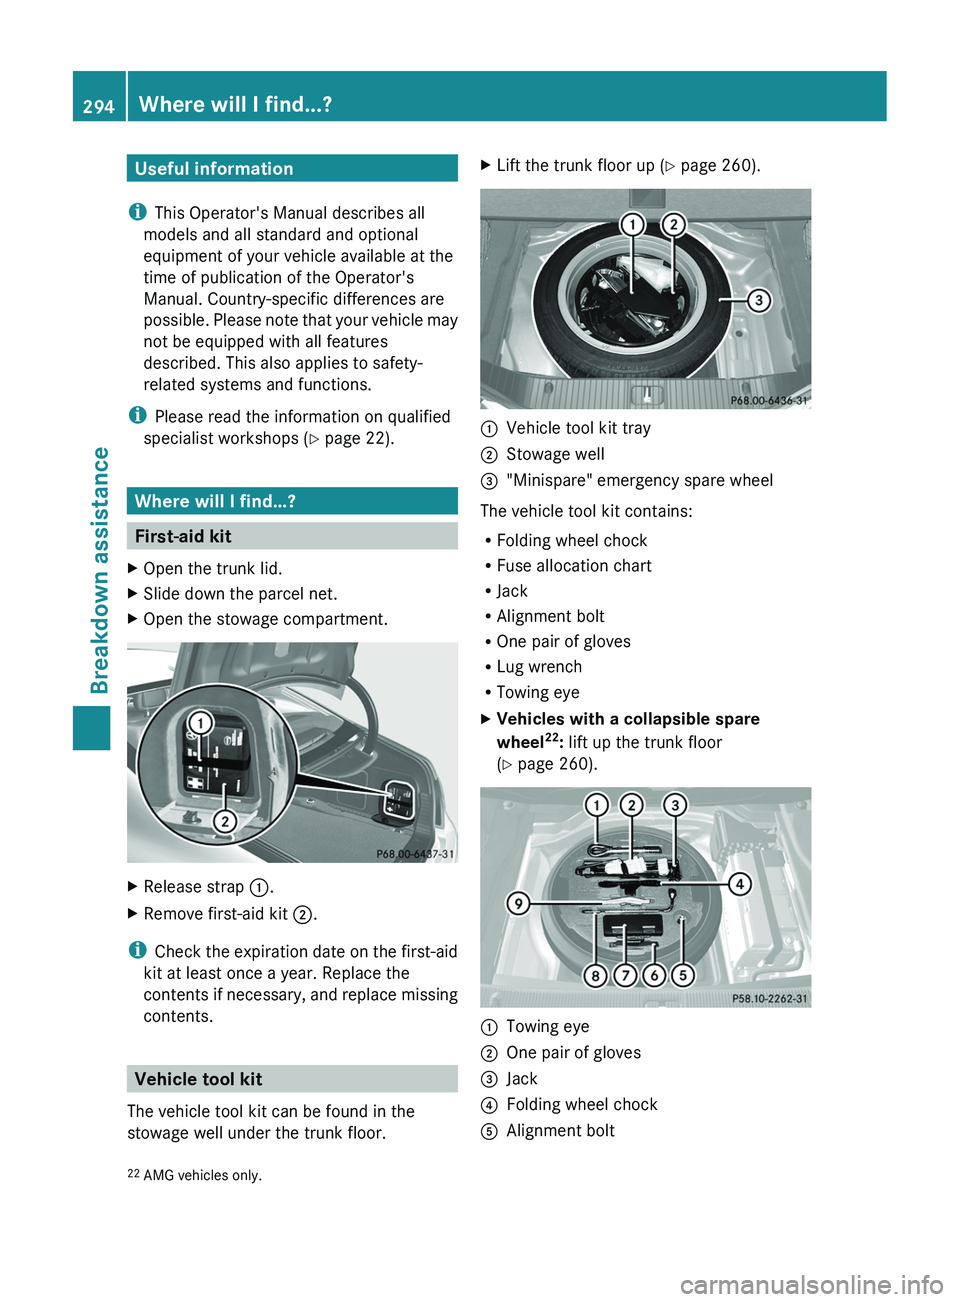
XLift the trunk floor up ( Y page 260).:Vehicle tool kit tray;Stowage well="Minispare" emergency spare wheel
The vehicle tool kit contains:
R Folding wheel chock
R Fuse allocation chart
R Jack
R Alignment bolt
R One pair of gloves
R Lug wrench
R Towing eye
XVehicles with a collapsible spare
wheel 22
: lift up the trunk floor
( Y page 260).:Towing eye;One pair of gloves=Jack?Folding wheel chockAAlignment bolt22
AMG vehicles only.294Where will I find...?Breakdown assistance
Page 303 of 356

The specified tire pressure is printed on the
yellow label of the emergency spare wheel.XWhen the specified tire pressure has been
reached, press on/off switch A on the
electric air pump to 0.
The tire inflation compressor is switched
off.XTurn the SmartKey to position 0 in the
ignition lock.XIf the tire pressure is higher than the
specified pressure, press pressure release
button ; until the correct tire pressure has
been reached.XUnscrew union nut : on the air hose from
the valve.XScrew the valve cap onto the collapsible
spare wheel valve again.XStow plug ? and the air hose in the lower
section of the compressor housing.XStow the tire inflation compressor in the
designated place in the vehicle.
Lowering the vehicle
GWARNING
Vehicles with a spare wheel with a collapsible
spare wheel only: do not inflate the collapsible
spare wheel until it has been mounted.
Inflate the collapsible spare wheel using the
tire inflation compressor before lowering the
vehicle.
XTurn the crank of the jack counter-
clockwise until the vehicle is once again
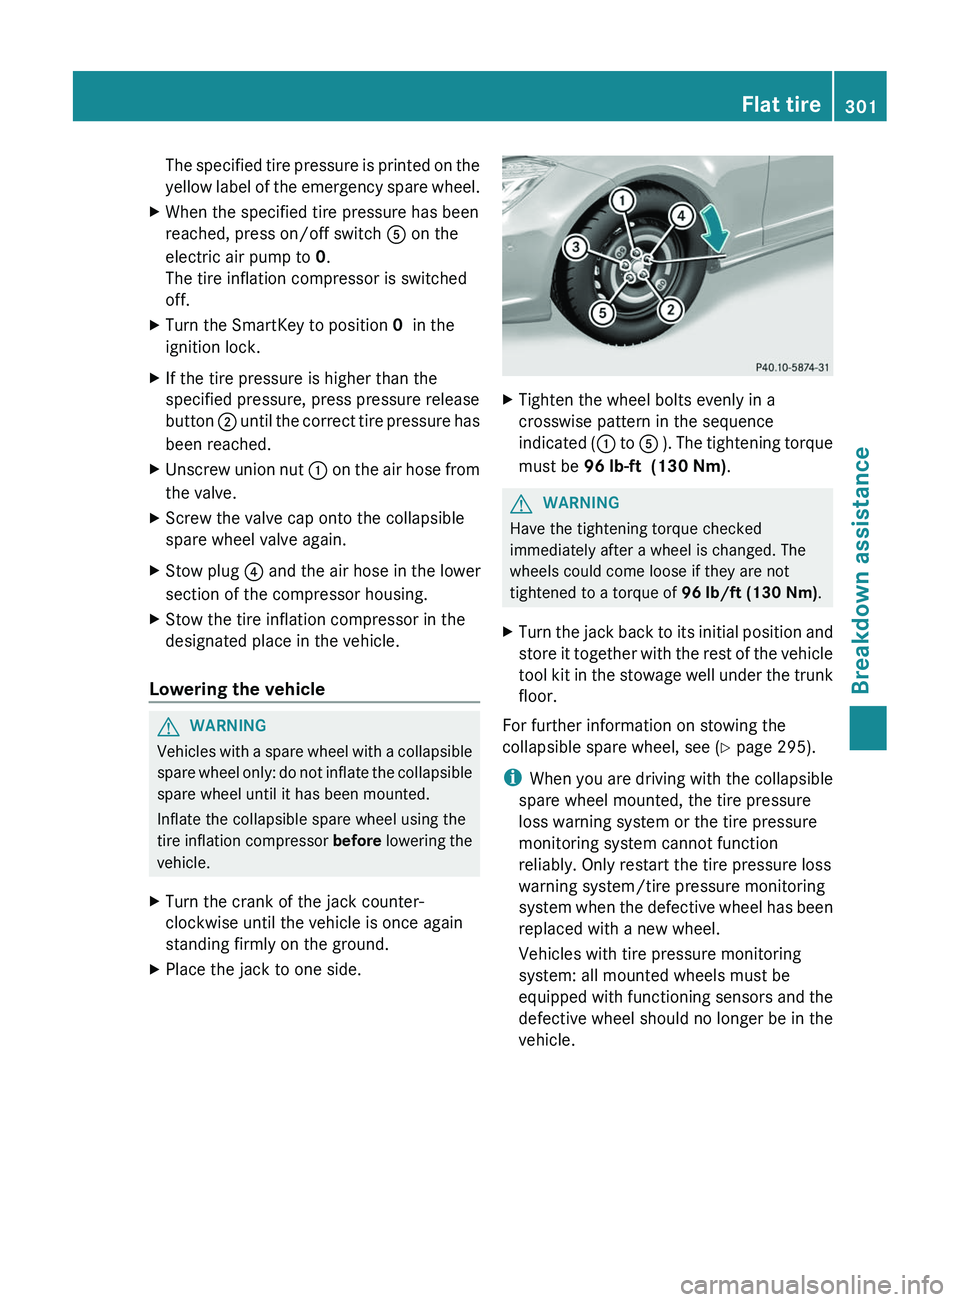
standing firmly on the ground.XPlace the jack to one side.XTighten the wheel bolts evenly in a
crosswise pattern in the sequence
indicated ( : to A ). The tightening torque
must be 96 lb-ft (130 Nm) .GWARNING
Have the tightening torque checked
immediately after a wheel is changed. The
wheels could come loose if they are not
tightened to a torque of 96 lb/ft (130 Nm).
XTurn the jack back to its initial position and
store it together with the rest of the vehicle
tool kit in the stowage well under the trunk
floor.
For further information on stowing the
collapsible spare wheel, see ( Y page 295).
i When you are driving with the collapsible
spare wheel mounted, the tire pressure
loss warning system or the tire pressure
monitoring system cannot function
reliably. Only restart the tire pressure loss
warning system/tire pressure monitoring
system when the defective wheel has been
replaced with a new wheel.
Vehicles with tire pressure monitoring
system: all mounted wheels must be
equipped with functioning sensors and the
defective wheel should no longer be in the
vehicle.
Flat tire301Breakdown assistanceZ