2012 MERCEDES-BENZ CLS COUPE airbag
[x] Cancel search: airbagPage 61 of 373
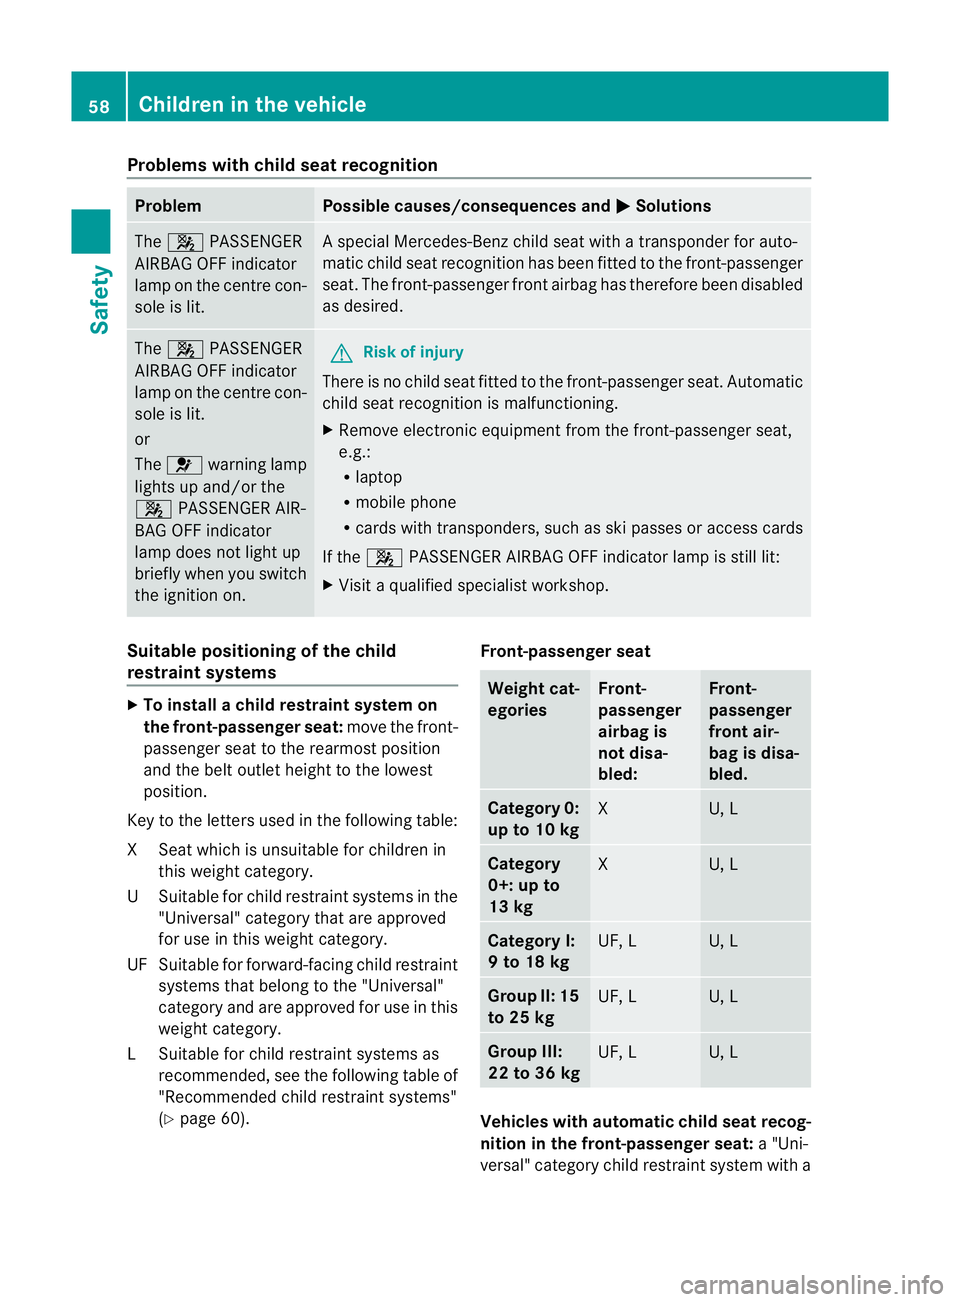
Problems with child seat recognition
Problem Possible causes/consequences and
M Solutions
The
4 PASSENGER
AIRBAGO FF indicator
lamp on the centre con-
sole is lit. As
pecial Mercedes-Benz child seat with atransponder for auto-
matic child seat recognition has been fitted to the front-passenger
seat. The front-passenger fron tairbag has therefore been disabled
as desired. The
4 PASSENGER
AIRBA GOFF indicator
lamp on the centr econ-
sole is lit.
or
The 6 warnin glamp
light supa nd/or the
4 PASSENGER AIR-
BA GO FF indicator
lamp does not light up
briefly when you switch
the ignition on. G
Risk of injury
There is no child seat fitted to the front-passenger seat .Automatic
child seat recognition is malfunctioning.
X Remove electronic equipmen tfrom the front-passenge rseat,
e.g.:
R laptop
R mobile phone
R cards with transponders ,such as ski passes or access cards
If the 4 PASSENGER AIRBA GOFF indicator lamp is still lit:
X Visit aqualified specialist workshop. Suitable positioning of the child
restraint systems
X
To install achild restraint system on
the front-passenger seat: move the front-
passenger seat to the rearmost position
and the belt outlet height to the lowest
position.
Key to the letters used in the following table:
XS eat which is unsuitable for children in
this weight category.
US uitable for child restraint systems in the
"Universal" categor ythata re approved
for use in this weigh tcategory.
UF Suitable for forward-facing child restraint systems that belon gtothe"Universal"
category and are approved for use in this
weight category.
LS uitable for child restraint systems as
recommended, see th efollowin gtable of
"Recommended child restraint systems"
(Y page 60). Front-passenger seat Weight cat-
egories Front-
passenger
airbag is
not disa-
bled: Front-
passenger
front air-
bag is disa-
bled. Categor
y0:
up to 10 kg X U, L
Category
0+: up to
13 kg
X U, L
Category I:
9to18kg
UF, L U, L
Group II:15
to 25 kg
UF, L U, L
Grou
pIII:
22 to 36 kg UF, L U, L
Vehicles with automatic child seat recog-
nition in the front-passenger seat:
a"Uni-
versal" category child restraint system with a 58
Children in thev
ehicleSafety
Page 62 of 373
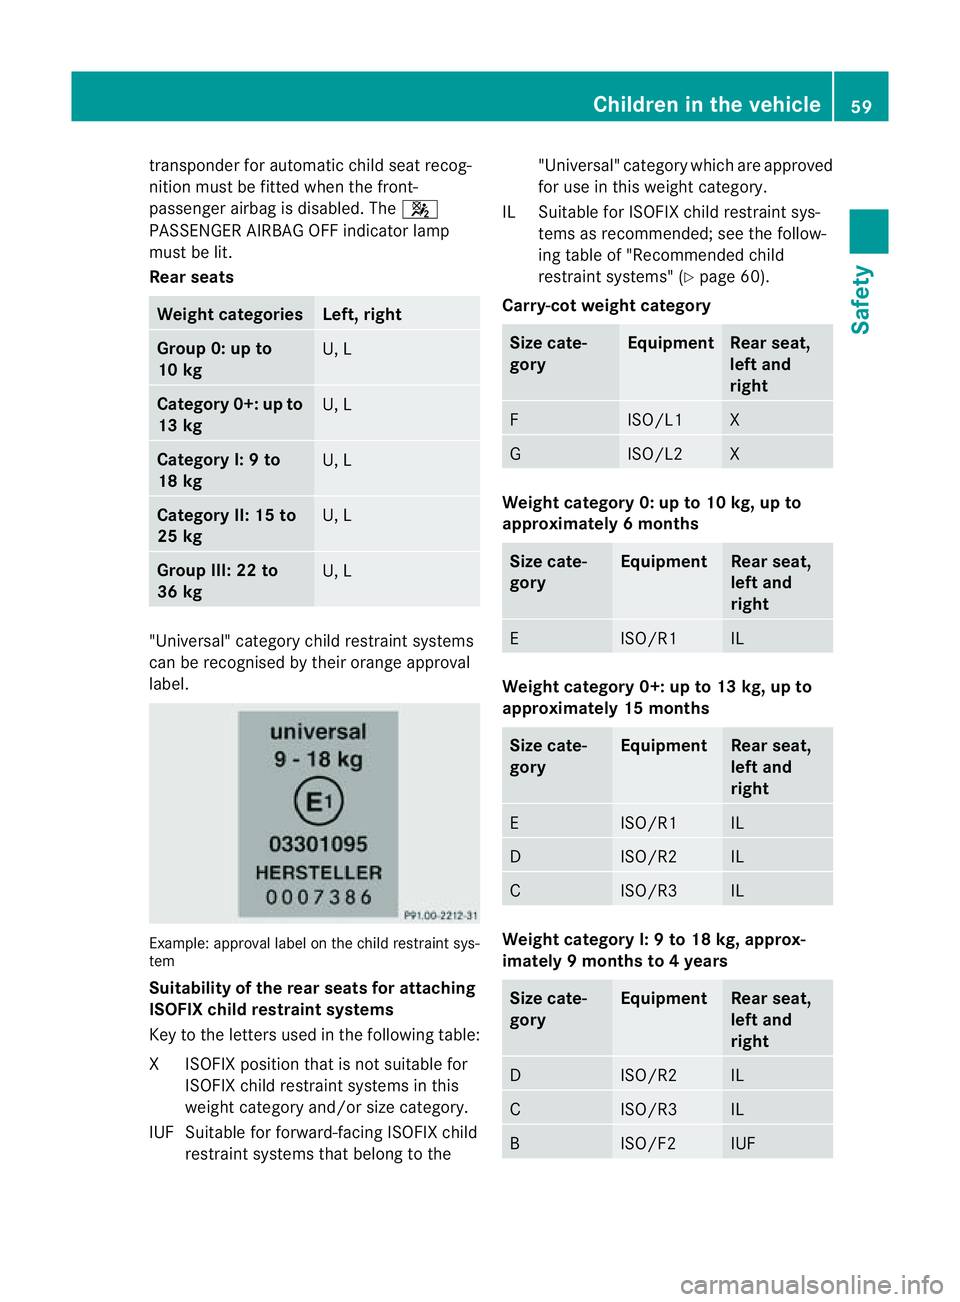
transponder for automatic child seat recog-
nition must be fitted when the front-
passenge rairbag is disabled. The 4
PASSENGER AIRBA GOFF indicator lamp
must be lit.
Rea rseats Weight categories Left, right
Group 0: up to
10 kg
U, L
Category 0+: up to
13 kg
U, L
Category I:
9to
18 kg U, L
Category II: 15 to
25 kg
U, L
Group III: 22 to
36 kg
U, L
"Universal" category child restraint systems
can be recognised by their orange approval
label.
Example: approval label on the child restrain
tsys-
tem
Suitabilit yofthe re ar seat sfor attaching
ISOFIX child restraint systems
Key to th eletter sused in th efollowing table:
XI SOFIX position tha tisnot suitablef or
ISOFIX child restraint systems in this
weight category and/or size category.
IUF Suitable for forward-facing ISOFIX child restraint systems that belong to the "Universal" category which are approved
for use in this weight category.
IL Suitable for ISOFIX child restraint sys- tems as recommended; see the follow-
ing table of "Recommended child
restraint systems" (Y page 60).
Carry-cot weight category Size cate-
gory Equipment Rear seat,
left and
right
F ISO/L1 X
G ISO/L2 X
Weight category 0: up to 10 kg, up to
approximately 6months Size cate-
gory Equipment Rear seat,
left and
right
E ISO/R1 IL
Weight category 0+: up to 13 kg, up to
approximately 15 months Size cate-
gory Equipment Rear seat,
left and
right
E ISO/R1 IL
D ISO/R2 IL
C ISO/R3 IL
Weight category I:
9to18kg, approx-
imately 9months to 4years Size cate-
gory Equipment Rear seat,
left and
right
D ISO/R2 IL
C ISO/R3 IL
B ISO/F2 IUFChildren in the vehicle
59Safety Z
Page 99 of 373
Useful information
i This Owner's Manual describes all mod-
els, series and optional equipment for your
vehicle that were available at the time of
going to press. National variation sare pos-
sible. Not ethat your vehicle may not be
equipped with all of the function sdescri-
bed. This is also the case for system sand
function srelevan ttosafety.
i Read the information on qualified special-
ist workshops: (Y page 23). Correct driver's seat position
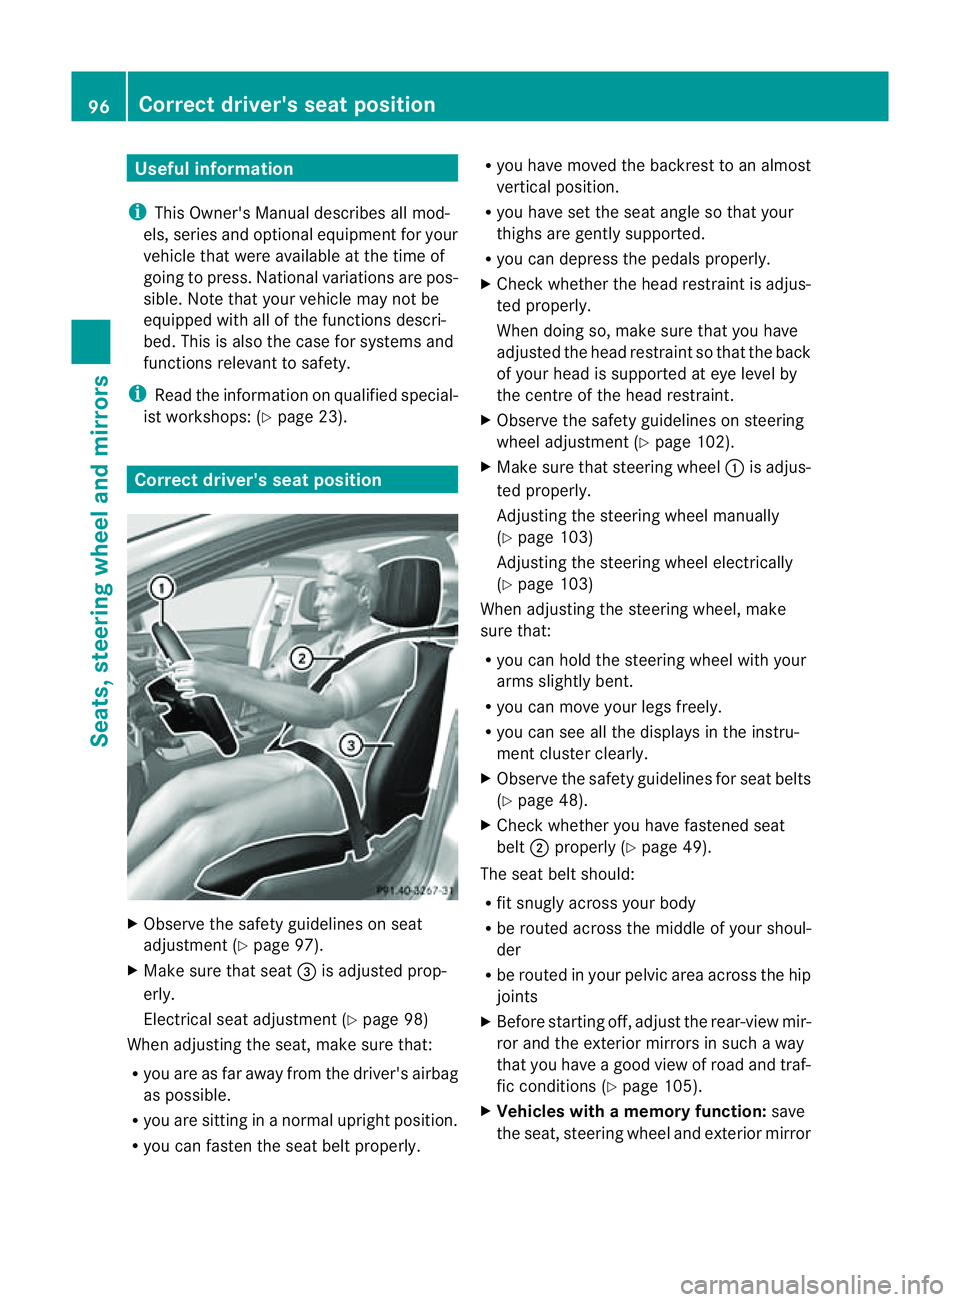
X
Observ ethe safet yguidelines on seat
adjustment (Y page 97).
X Make sure that seat =is adjusted prop-
erly.
Electrical seat adjustment (Y page 98)
When adjusting the seat, make sure that:
R you are as far away from the driver' sairbag
as possible.
R you are sitting in anormal upright position.
R you can faste nthe seat belt properly. R
you have moved the backrest to an almost
vertical position.
R you have set the seat angle so that your
thighs are gently supported.
R you can depress the pedals properly.
X Check whether the head restraint is adjus-
ted properly.
When doing so, make sure that you have
adjusted the head restraint so that the back
of your head is supported at eye level by
the centre of the head restraint.
X Observe the safety guidelines on steering
wheel adjustment (Y page 102).
X Make sure that steering wheel :is adjus-
ted properly.
Adjustingt he steering wheel manually
(Y page 103)
Adjustingt he steering wheel electrically
(Y page 103)
When adjusting the steering wheel, make
sure that:
R you can hold the steering wheel with your
arms slightly bent.
R you can move your legs freely.
R you can see all the displays in the instru-
ment cluster clearly.
X Observe the safety guidelines for seat belts
(Y page 48).
X Check whether you have fastened seat
belt ;properly (Y page 49).
The seat belt should:
R fit snugly across your body
R be routed across the middle of your shoul-
der
R be routed in your pelvic area across the hip
joints
X Before startingo ff, adjust the rear-view mir-
ror and the exterior mirrors in such away
that you have agood view of road and traf-
fic conditions( Ypage 105).
X Vehicles with amemory function: save
the seat, steering wheel and exterior mirror 96
Correct driver's seat positionSeats, steering wheela
nd mirrors
Page 100 of 373
settings with the memory function
(Y
page 107). Seats
Important safety notes
G
WARNING
The seats can still be adjusted when there is
no key in the ignition lock. For this reason,
children should never be left unsupervised in
the vehicle. They could adjust the seats and
become trapped. G
WARNING
Only adjust the driver's seat when the vehicle
is stationary. You will otherwise be distracted
from the road and traffic conditions and you
could lose control of the vehicle as aresult of
the seat moving. This could cause an acci-
dent. G
WARNING
If you adjust the seat height carelessly,y ou or
others could be trapped and thereby injured.
Children in particular could unintentionally
press the buttons to electrically adjust the
seats and become trapped.
Take care that:
R while moving the seats, your hands do not
get under the lever assembly of the seat
adjustment system.
R children in the vehicle do not slide their
hands under the levers. G
WARNING
Make sure that nobody can become trapped
when adjusting the seats.
Observe the notes on airbags.
Secure children as recommended; see the
"Children in the vehicle" section. G
WARNING
Make sure that the back of your head is sup-
ported at eye level by the central area of the head restraint. If your head is not supported
correctly by the head restraint, you could suf-
fer asevere neck injury in the event of an
accident. Never drive if the head restraints are
not engaged and set correctly. G
WARNING
As eat belt can only offer its intended degree
of protection when the backrest is almost ver-
tical and the occupant is sitting upright. Avoid
seat position sthat do not allow the seat belt
to be routed correctly. Adjust the backrest so
that it is as upright as possible. Never travel
with the backrest reclined too far backwards.
You could otherwise be seriously or even
fatally injured in the event of an acciden tor
sudden braking.
! To avoid damage to the seats and the seat
heating, observe the following information:
R do not spill any liquids on the seats. If
liquid is spilled on the seats, dry them as
soon as possible.
R if the seat cover sare damp or wet, do not
switch on the seat heating. The seat
heating should also not be used to dry
the seats.
R clean the seat cover sasrecommended;
see the "Interior care" section.
R do not transport heavy loads on the
seats. Do not place sharp objects on the
seat cushions ,e.g. knives, nails or tools.
The seats should only be occupied by
passengers, if possible.
R when the seat heating is in operation ,do
not cover the seats with insulating mate-
rials, e.g. blankets, coats, bags, seat cov-
ers, child seats or booster seats.
! To avoid damage to the seats and the seat
heating, observe the following information:
R do not spill any liquids on the seats. If
liquid is spilled on the seats, dry them as
soon as possible.
R if the seat cover sare damp or wet, do not
switch on the seat heating. The seat Seats
97Seats, steering wheel and mirrors Z
Page 117 of 373
X
To switc honthe main-beam head-
lamps: turnthe key in the ignition lock to
position 2or start the engine.
X Turn the light switch to LorÃ.
X Press the combinatio nswitc hbeyond the
pressure point in the direction of
arrow :.
In the Ãposition ,the main-beam head-
lamps are only switched on when it is dark
and the engin eisrunning.
The blue Kindicator lamp in the instru-
ment cluster lights up when the main-beam
headlamps are switched on.
X To switch off the main-beam head-
lamps: move the combination switch back
to its normal position.
The blue Kindicator lamp in the instru-
ment cluster goes out.
i Vehicles with Adaptiv eHighbeam Assist:
when Adaptiv eHighbeam Assist is active,
it controls activation of the main-beam
headlamps (Y page 116).
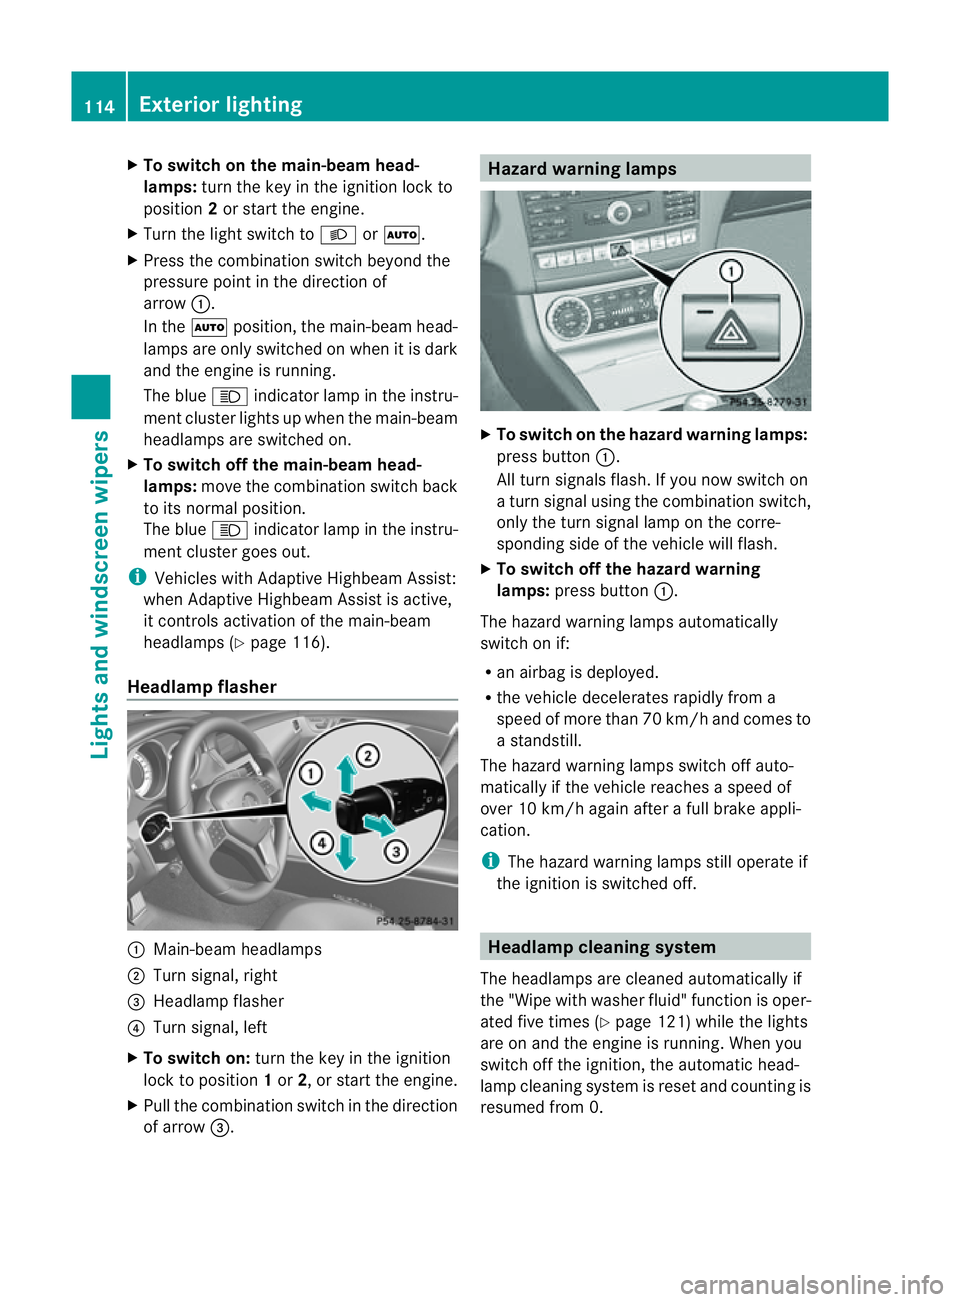
Headlamp flasher :
Main-beam headlamps
; Turn signal, right
= Headlamp flasher
? Turn signal, left
X To switch on: turn the key in the ignition
lock to position 1or 2,ors tart the engine.
X Pull the combination switch in the direction
of arrow =. Hazard warning lamps
X
To switch on the hazard warning lamps:
press button :.
All turn signals flash. If you now switch on
at urn signal using the combination switch,
only the turn signal lamp on the corre-
spondin gside of the vehicle will flash.
X To switch off the hazard warning
lamps: press button :.
The hazard warning lamps automatically
switch on if:
R an airbag is deployed.
R the vehicle decelerates rapidly from a
speed of more than 70 km/ha nd comesto
as tandstill.
The hazar dwarning lamps switch off auto-
maticall yifthe vehicl ereache saspeed of
ove r10k m/h agai nafter afullb rake appli-
cation.
i The hazar dwarning lamps still operate if
the ignition is switched off. Headlamp cleanin
gsystem
The headlamps ar ecleane dautomaticall yif
the "Wip ewithw ashe rfluid" function is oper-
ated five times (Y page 121)while the lights
are on and the engine is running. When you
switc hoff the ignition, the automatic head-
lamp cleaning system is reset and countin gis
resumed fro m0.114
Exterior lightingLight
sand windscreen wipers
Page 238 of 373
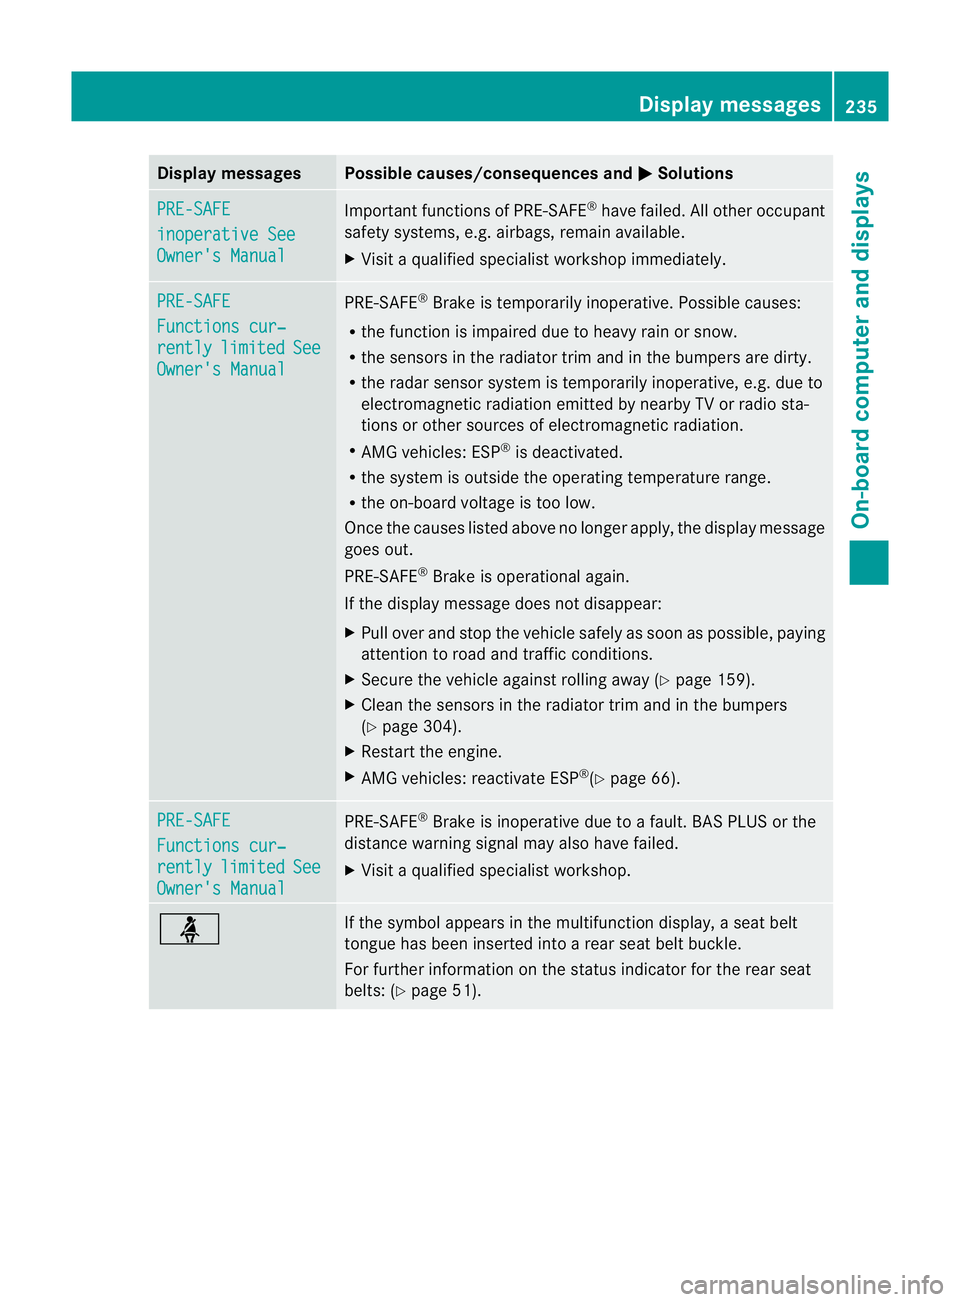
Display messages Possible causes/consequences and
M Solutions
PRE-SAFE
inoperative See
Owner'
sManual Importan
tfunction sofPRE-SAFE ®
have failed .All other occupant
safet ysystems, e.g. airbags, remain available.
X Visit aqualified specialist workshop immediately. PRE-SAFE
Function
scur‐ rently limited See
Owner's Manual PRE-SAFE
®
Brake is temporarily inoperative. Possible causes:
R the function is impaired due to heavy rain or snow.
R the sensors in the radiator trim and in the bumper sare dirty.
R the radar sensor system is temporarily inoperative, e.g. due to
electromagnetic radiation emitted by nearby TV or radio sta-
tion soro ther sources of electromagnetic radiation.
R AMG vehicles: ESP ®
is deactivated.
R the system is outside the operating temperature range.
R the on-board voltage is too low.
Onc ethe causes listed above no longer apply, the display message
goes out.
PRE-SAFE ®
Brake is operational again.
If the display message does not disappear:
X Pull over and stop the vehicle safely as soon as possible ,paying
attention to road and traffic conditions.
X Secure the vehicle against rollin gaway (Y page 159).
X Clean the sensors in the radiator trim and in the bumpers
(Y page 304).
X Restar tthe engine.
X AMG vehicles: reactivate ESP ®
(Y page 66). PRE-SAFE
Functions cur‐
rently limited See
Owner's Manual PRE-SAFE
®
Brake is inoperative due to afault. BAS PLUS or the
distance warning signal may also have failed.
X Visit aqualified specialist workshop. ü If the symbol appears in the multifunction display,
aseat belt
tongue has been inserted intoar ear seat belt buckle.
For further information on the status indicator for the rear seat
belts: (Y page 51). Display messages
235On-boardcomputer and displays Z
Page 239 of 373
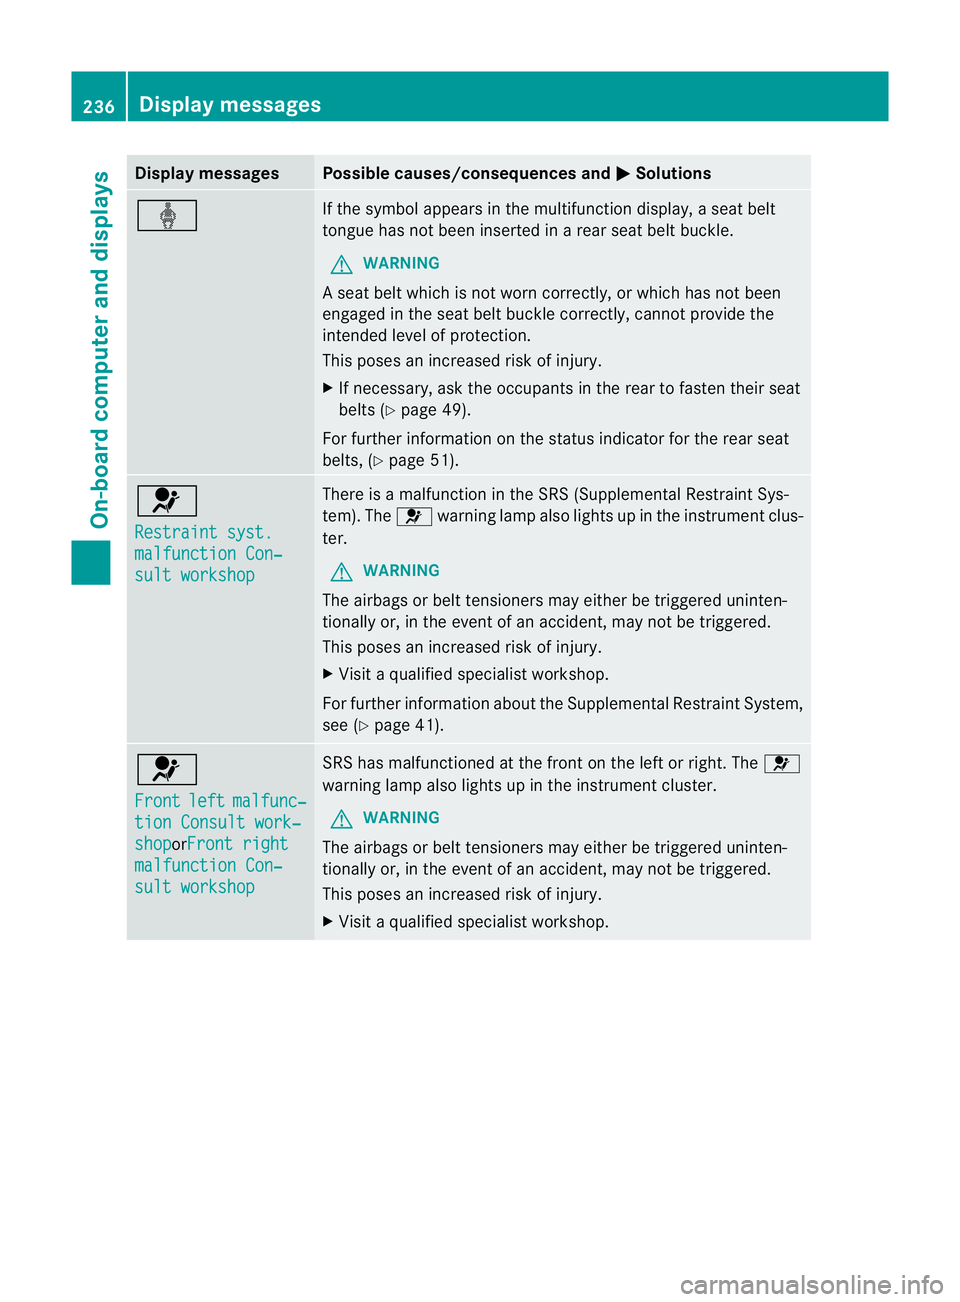
Display messages Possible causes/consequences and
M Solutions
ý If th
esymbol appears in th emultifunction display, aseat belt
tongue has not been inserted in arear seat belt buckle.
G WARNING
As eat belt which is not worn correctly, or which has not been
engaged in the seat belt buckle correctly, cannot provide the
intended level of protection.
This poses an increased risk of injury.
X If necessary, ask the occupants in the rear to fasten their seat
belts (Y page 49).
For further information on the status indicator for the rear seat
belts, (Y page 51). 6
Restraint syst.
malfunction Con‐
sult workshop There is
amalfunction in the SRS (Supplemental Restraint Sys-
tem). The 6warning lamp also lights up in the instrument clus-
ter.
G WARNING
The airbags or belt tensioners may either be triggered uninten-
tionally or, in the event of an accident, may not be triggered.
This poses an increased risk of injury.
X Visit aqualified specialist workshop.
For further information about the Supplemental Restraint System,
see (Y page 41). 6
Front
left malfunc‐
tion Consult work‐
shop orFront right
malfunction Con‐
sult workshop SRS has malfunctioned at the fron
tonthe left or right. The 6
warning lamp also lights up in the instrument cluster.
G WARNING
The airbags or belt tensioners may either be triggered uninten-
tionally or, in the event of an accident, may not be triggered.
This poses an increased risk of injury.
X Visit aqualified specialist workshop. 236
Display messagesOn-boar
dcomputer and displays
Page 240 of 373
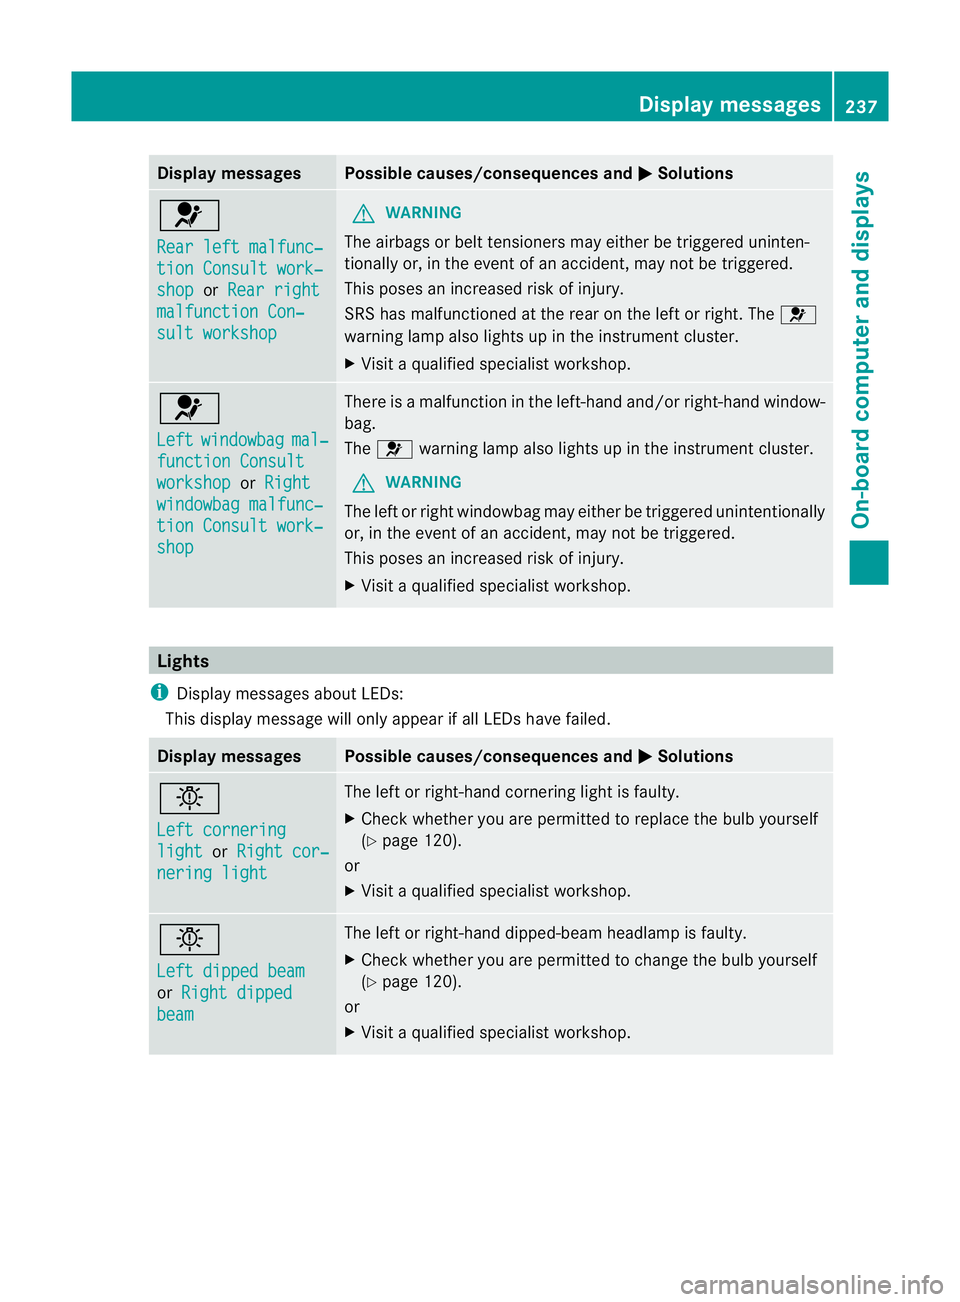
Display messages Possible causes/consequences and
M Solutions
6
Rea
rl eftm alfunc‐ tio
nC onsul twork‐ shop or
Rea rr ight malfunction Con‐
sul
tw orkshop G
WARNING
The airbags or belt tensioners may either be triggered uninten-
tionally or, in th eevent of an accident, may no tbetriggered.
This poses an increased risk of injury.
SRS has malfunctioned at the rear on the left or right. The 6
warning lamp also lights up in the instrument cluster.
X Visit aqualified specialist workshop. 6
Left
windowbag mal‐
functio
nConsult workshop or
Right windowbag malfunc‐
tion Consult work‐
shop There is
amalfunction in the left-hand and/or right-hand window-
bag.
The 6 warning lamp also lights up in the instrument cluster.
G WARNING
The left or right windowbag may either be triggered unintentionally
or, in the event of an accident, may not be triggered.
This poses an increased risk of injury.
X Visit aqualified specialist workshop. Lights
i Display messages about LEDs:
This display message will only appear if all LEDsh ave failed.Display messages Possible causes/consequences and
M Solutions
b
Left cornering
light or
Right cor‐ nering light The left or right-hand cornering light is faulty.
X
Check whether you are permitted to replace the bulb yourself
(Y page 120).
or
X Visit aqualified specialist workshop. b
Left dipped beam
or
Right dipped beam The left or right-hand dipped-beam headlamp is faulty.
X
Check whether you are permitted to change the bulb yourself
(Y page 120).
or
X Visit aqualified specialist workshop. Display messages
237On-boardcomputer and displays Z