2012 MERCEDES-BENZ CLS COUPE ESP
[x] Cancel search: ESPPage 278 of 373
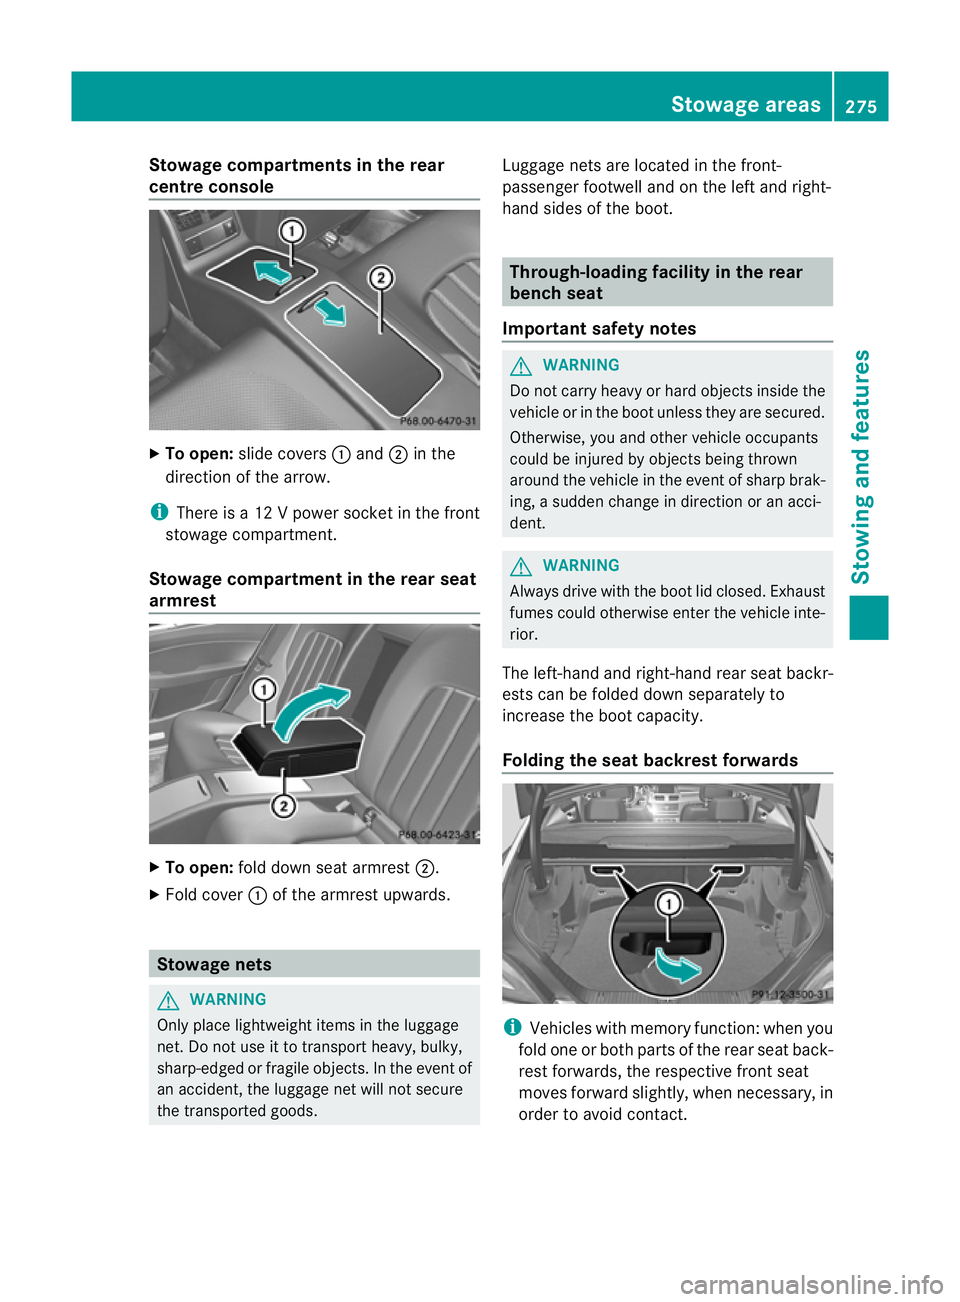
Stowage compartments in the rear
centre console
X
To open: slide covers :and ;in the
direction of the arrow.
i There is a12Vpower socket in the front
stowage compartment.
Stowage compartment in the rear seat
armrest X
To open: fold down seat armrest ;.
X Fold cover :of the armrest upwards. Stowage nets
G
WARNING
Only place lightweight items in the luggage
net. Do not use it to transport heavy, bulky,
sharp-edged or fragile objects. In the event of
an accident, the luggage net will not secure
the transported goods. Luggage nets are located in the front-
passenger footwell and on the left and right-
hand sides of the boot. Through-loading facility in the rear
bench seat
Important safety notes G
WARNING
Do not carry heavy or hard objectsi nside the
vehicle or in the boot unless they are secured.
Otherwise, you and other vehicle occupants
could be injured by objectsb eing thrown
around the vehicle in the event of sharp brak-
ing, asudden change in direction or an acci-
dent. G
WARNING
Always drive with the boot lid closed. Exhaust
fumes could otherwise enter the vehicle inte-
rior.
The left-hand and right-hand rear seat backr-
ests can be folded down separately to
increase the boot capacity.
Folding the seat backrest forwards i
Vehicles with memory function :when you
fold one or both parts of the rear seat back-
rest forwards, the respective front seat
moves forward slightly, when necessary, in
order to avoid contact. Stowage areas
275Stowing and features Z
Page 279 of 373
X
Vehicles without memory function: if nec-
essary,m ove the driver's or front-
passenger seat forwards.
X Open the boot.
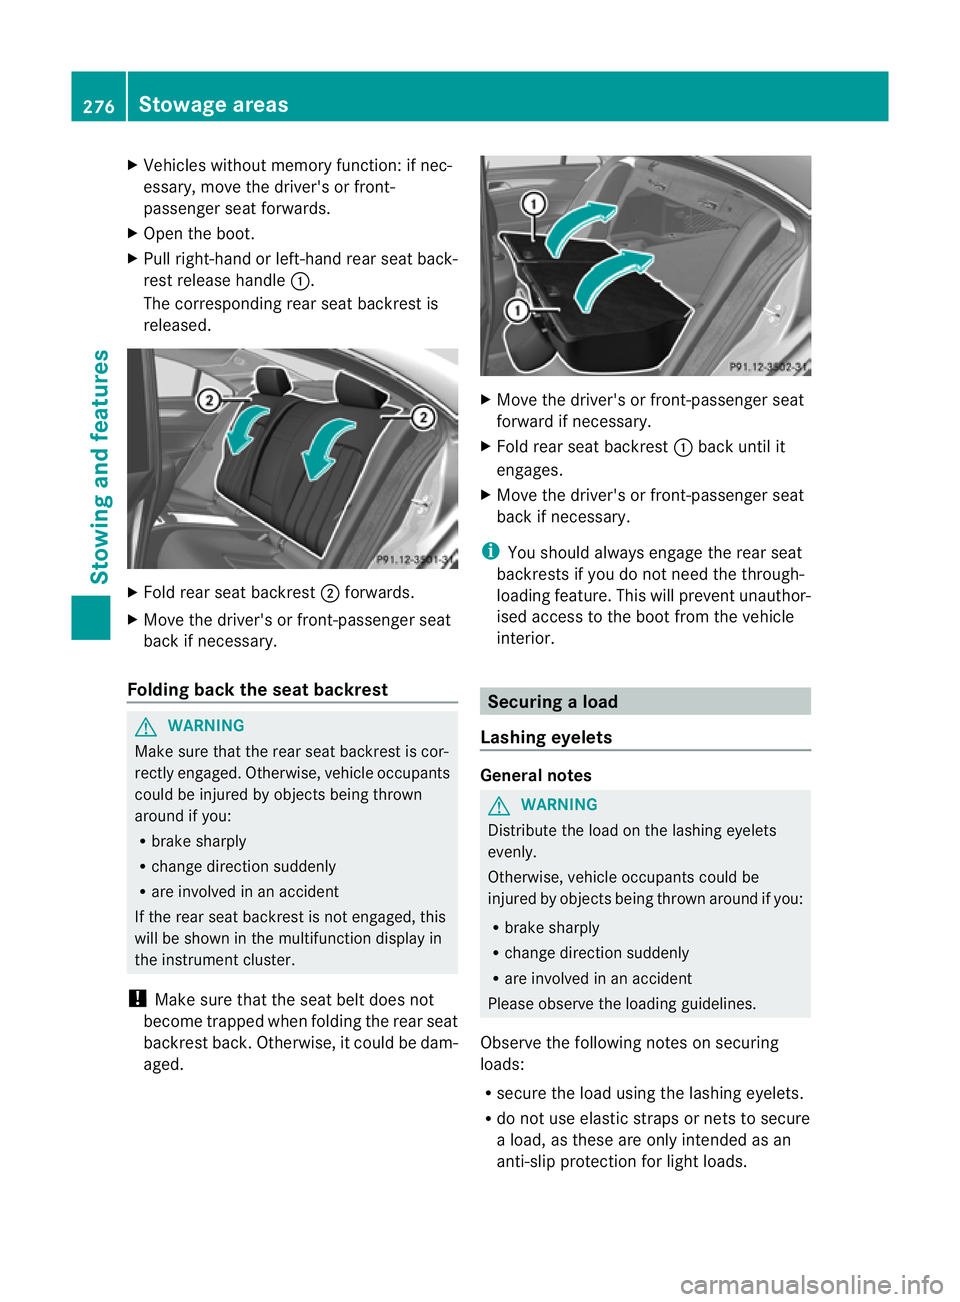
X Pull right-hand or left-hand rear seat back-
rest release handle :.
The corresponding rear seat backrest is
released. X
Fold rear seat backrest ;forwards.
X Move the driver's or front-passenger seat
back if necessary.
Folding back the seat backrest G
WARNING
Make sure that the rear seat backrest is cor-
rectly engaged. Otherwise, vehicle occupants
could be injured by objects being thrown
around if you:
R brake sharply
R change direction suddenly
R are involved in an accident
If the rear seat backrest is not engaged, this
will be shown in the multifunction display in
the instrument cluster.
! Make sure that the seat belt does not
become trapped when folding the rear seat
backrest back. Otherwise, it could be dam-
aged. X
Move the driver's or front-passenger seat
forward if necessary.
X Fold rear seat backrest :back until it
engages.
X Move the driver's or front-passenger seat
back if necessary.
i You shoulda lways engage the rear seat
backrests if you do not need the through-
loading feature. This will prevent unauthor-
ised access to the boot from the vehicle
interior. Securing
aload
Lashing eyelets General notes
G
WARNING
Distribut ethe load on th elashin geyelets
evenly.
Otherwise, vehicle occupant scould be
injured by object sbein gthrown aroun difyou:
R brak esharply
R change directio nsuddenly
R are involve dinanaccident
Pleas eobserv ethe loadin gguidelines.
Observ ethe followin gnotes on securing
loads:
R secure th eload usin gthe lashin geyelets.
R do no tuse elastic straps or nets to secure
al oad, as these are only intended as an
anti-slip protection for light loads. 276
Stowage areasStowinga
nd features
Page 304 of 373
Special service requirements
Arduous operating condition
sorincreased
loads on the vehicle will require some service
work to be performed more often than for a
vehicle in normal use. Such arduousc ondi-
tions include regular city driving with frequent
intermediate stops and use in mountainous
terrain or on poor road surfaces.
For example, if the vehicle is used under ardu-
ous operating conditions, have air filters,
engine oil and oil filters changed frequently
and check the wheels often.F urther informa-
tion can be obtaine dataqualified specialist
workshop, e.g. aMercedes-Ben zService
Centre.
Driving abroad
An extensive Mercedes-BenzS ervice network
is also available in other countries. The
Service Hotline's curren ttelephone numbers
for use when you are abroad are to be found
in the "Mercedes-Benz Service24h" section
of the Service Booklet. Care
General notes
H
Environmental note
Dispose of empty packagin gand cleaning
cloth sinane nvironmentally responsible man-
ner.
! For cleanin gyour vehicle, do not use any
of the following:
R dry, rough or hard cloths
R abrasive cleanin gagents
R solvents
R cleanin gagents containin gsolvents
Do not scrub.
Do not touch the surfaces or protective
films with hard objects, e.g. aring or ice
scraper. You could otherwise scratch or
damage the surfaces and protective film. !
Do not park up the vehicle for an extended
period straight after cleanin git, particularly
after having cleaned the wheels with wheel
cleaner. Wheel cleaners could cause
increased corrosion of the brake discs and
brake pads/linings. For this reason, you
should drive for afew minutes after clean-
ing. Braking heats the brake discs and the
brake pads/linings, thus drying them. The
vehicle can then be parked up.
Regular care of your vehicle is acondition for
retaining the quality in the long term.
Use care product sand cleanin gagents rec-
ommended and approved by Mercedes-Benz. Washing the vehicle and cleaning the
paintwork
Automatic car wash G
WARNING
Braking efficiency is reduced after washing
the vehicle. This could cause an accident. For
this reason, following acar wash, drive with
particular care until the brakes are dry. G
WARNING
The vehicle is braked when the HOLD function
or DISTRONIC PLUS is activated. Therefore,
deactivat ethe HOLD function and DISTRONIC
PLUS before the vehicle is washed in an auto-
matic car wash.
! Make sure that:
R the side windows and sliding sunroof are
closed completely.
R the blower for the ventilation/heating is
switched off (OFF button is depressed).
R the windscreen wiper switch is at posi-
tion 0.
The vehicle could otherwise be damaged.
! In car washes with atowing mechanism,
make sure that the automatic transmission
is in transmission position N,otherwise the
vehicle could be damaged. Care
301Maintenance and care Z
Page 308 of 373
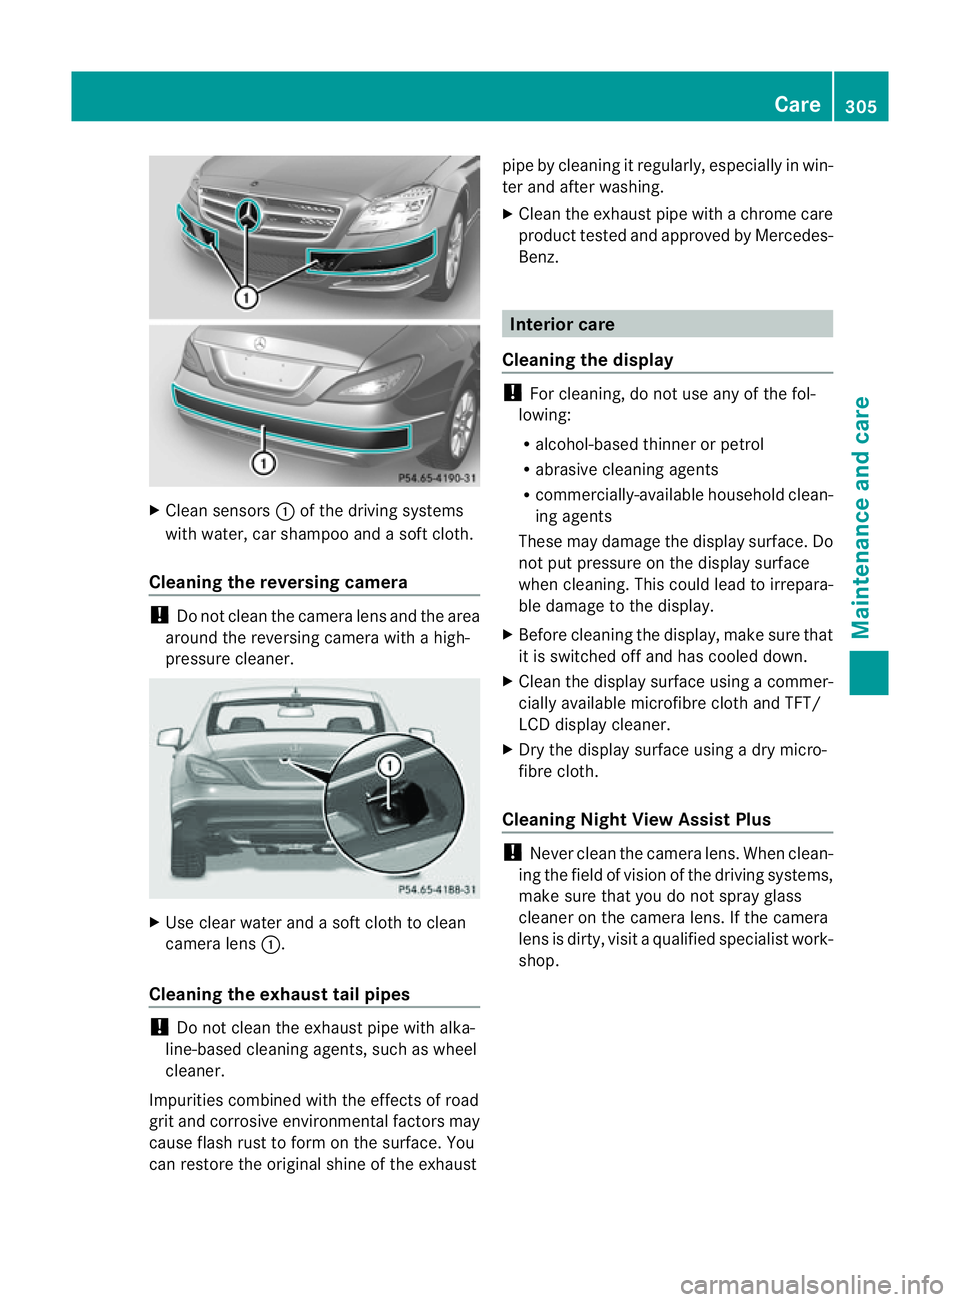
X
Clean sensors :of th edriving systems
wit hw ater, car shampoo and asoftc loth.
Cleaning th ereversing camera !
Do not clean the camera lens and the area
aroun dthe reversin gcamera with ahigh-
pressure cleaner. X
Use clear water and asoft clot htoclean
camera lens :.
Cleaning th eexhaust tail pipes !
Do not clean the exhaust pipe with alka-
line-based cleaning agents, such as wheel
cleaner.
Impurities combined with the effect sofroad
grit and corrosiv eenvironmental factors may
cause flash rust to for monthe surface. You
can restore the original shin eofthe exhaust pipe by cleaning it regularly, especially in win-
ter and after washing.
X Clean the exhaust pipe with achrome care
produc ttested and approved by Mercedes-
Benz. Interior care
Cleaning the display !
For cleaning, do not use any of the fol-
lowing:
R alcohol-based thinner or petrol
R abrasive cleanin gagents
R commercially-available household clean-
ing agents
These may damage the display surface. Do
not put pressure on the display surface
when cleaning. This could lead to irrepara-
ble damage to the display.
X Befor ecleanin gthe display, make sure that
it is switched off and has cooled down.
X Clean the display surface using acommer-
cially available microfibre cloth and TFT/
LCD display cleaner.
X Dry the display surface using adry micro-
fibre cloth.
Cleaning Night View Assist Plus !
Never clean the camera lens. When clean-
ing the field of vision of the driving systems,
make sure that you do not spray glass
cleaner on the camera lens. If the camera
lens is dirty, visit aqualified specialist work-
shop. Care
305Maintenance and care Z
Page 316 of 373

MOExtended tyres (tyres with run-flat
characteristics) G
WARNING
When driving in emergency mode, the driving
characteristics deteriorate, e.g. when corner-
ing, accelerating quickly and when braking.
There is arisk of accident.
Do not exceed the stated maximu mspeed.
Avoid abrupt steering and driving manoeu-
vres, and driving over obstacles (kerbs ,pot-
holes, off-road). This applies in particular to a
laden vehicle.
Stop driving in emergency mode if:
R you hear banging noises.
R the vehicle start stoshake.
R you see smok eand smell rubber.
R ESP ®
is intervening constantly.
R ther eare tears in the sidewalls of the tyre.
After driving in emergency mode, have the
wheel rims checked at aqualified specialist
workshop with regard to their further use. The
faulty tyre must be replaced.
With MOExtended tyres (tyres with run-flat
characteristics), you can continue to drive
your vehicle even if ther eisatotal loss of
pressure in one or more tyres.
MOExtended tyres may only be used in con-
junction with an activ etyre pressure loss
warning system or with an activ etyre pres-
sure monitor.
The maximum driving distance is approx-
imately 80 km when the vehicle is partially
laden, and approximately 30 km when the
vehicle is fully laden.
In addition to the vehicle load, the driving dis-
tanc epossible depends upon:
R speed
R road condition
R outside temperature
The driving distanc epossible in run-flat mode
may be reduced by extreme driving condi-
tions/manoeuvres, or it can be increased
through amoderat estyle of driving. The maximum permissible distanc
ewhich
can be driven in run-flat mode is counted from
the momen tthe tyre pressure loss warning
appears in the multifunction display.
You must not exceed amaximum speed of
80 km/h.
i When replacing one or all tyres, make
sure that you only use tyres marked
"MOExtended". Make sure that you only
use the size of tyre specified for the vehicle. TIREFIT kit
Using the TIREFIT kit TIREFIT is
atyre sealant.
You can use TIREFIT to seal punctures of up
to 4m m, particularly those in the tyre tread.
You can use TIREFIT at outside temperatures
down to Ò20 †. G
WARNING
In the following situations, the tyre sealant is
unable to provide sufficient breakdown assis-
tance, as it is unable to seal the tyre properly:
R there are cuts or punctures in the tyre
larger than those mentioned above.
R the wheel rim is damaged.
R you have driven at very low tyre pressures
or on aflat tyre.
There is arisk of accident.
Do not drive any further. Contact aqualified
specialist workshop. G
WARNING
The tyre sealant is harmful and causes irrita-
tion. It must not come into contact with your
skin, eyes or clothing or be swallowed. Do not
inhale TIREFIT fumes. Keep tyre sealant away
from children. There is arisk of injury. Flat tyre
313Breakdown assistance
Z
Page 319 of 373
icantly impair the vehicle's braking and driv-
ing characteristics. There is
arisk of accident.
Do not continue driving. Contact aqualified
specialist workshop.
X Correc tthe tyre pressure if it is still at least
130 kPa (1.3 bar/19 psi) (see the fuel filler
flap for values).
X To increase the tyre pressure: switch on
the tyre inflation compressor. X
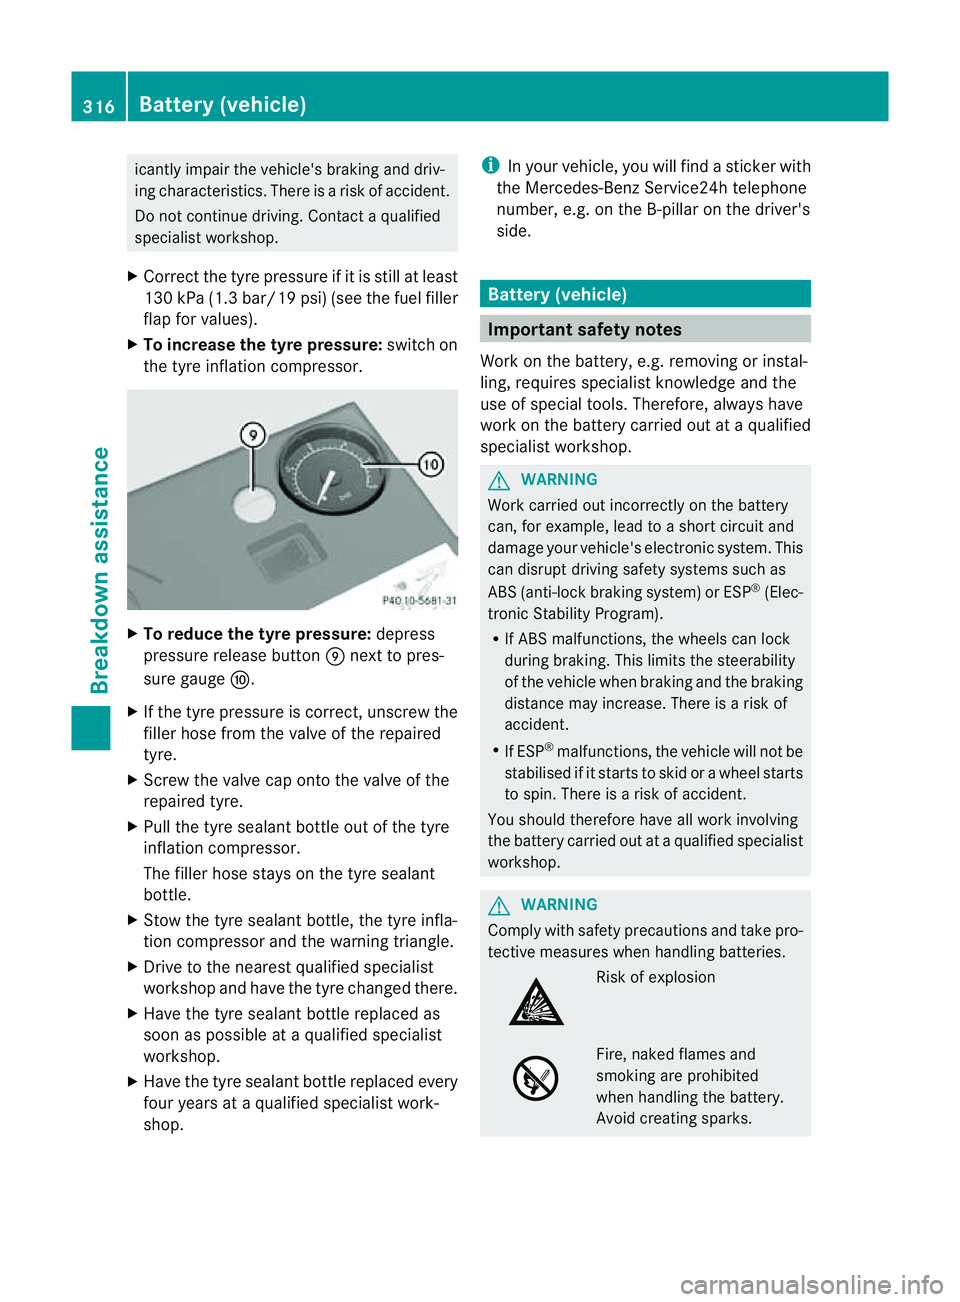
To reduce the tyre pressure: depress
pressure release button Enext to pres-
sure gauge F.
X If the tyre pressure is correct,u nscrew the
filler hose from the valve of the repaired
tyre.
X Screw the valve cap onto the valve of the
repaired tyre.
X Pull the tyre sealant bottle out of the tyre
inflation compressor.
The filler hose stays on the tyre sealant
bottle.
X Stow the tyre sealant bottle, the tyre infla-
tion compressor and the warning triangle.
X Drive to the nearest qualified specialist
workshop and have the tyre changed there.
X Have the tyre sealant bottle replaced as
soon as possible at aqualified specialist
workshop.
X Have the tyre sealant bottle replaced every
four years at aqualified specialist work-
shop. i
In your vehicle, you will find asticker with
the Mercedes-Ben zService24h telephone
number, e.g. on the B-pillar on the driver's
side. Battery (vehicle)
Important safet
ynotes
Work on the battery, e.g. removin gorinstal-
ling, requires specialist knowledge and the
use of special tools. Therefore, alway shave
work on the batter ycarried out at aqualified
specialist workshop. G
WARNING
Work carried out incorrectly on the battery
can, for example, lead to ashort circuit and
damage your vehicle's electronic system. This
can disrupt driving safety systems such as
ABS (anti-lock brakin gsystem) or ESP ®
(Elec-
tronic Stabilit yProgram).
R If AB Smalfunctions, th ewheels can lock
during braking. This limits th esteerability
of th evehicl ewhen brakin gand th ebraking
distanc emay increase .There is arisk of
accident.
R If ESP ®
malfunctions, the vehicle will not be
stabilised if it starts to skid or awheel starts
to spin. There is arisk of accident.
You should therefore have all work involving
the battery carried out at aqualified specialist
workshop. G
WARNING
Comply with safety precautions and take pro-
tective measures when handling batteries. Risk of explosion
Fire, naked flames and
smoking are prohibited
when handling the battery.
Avoid creating sparks.316
Battery (vehicle)Breakdown assistance
Page 320 of 373
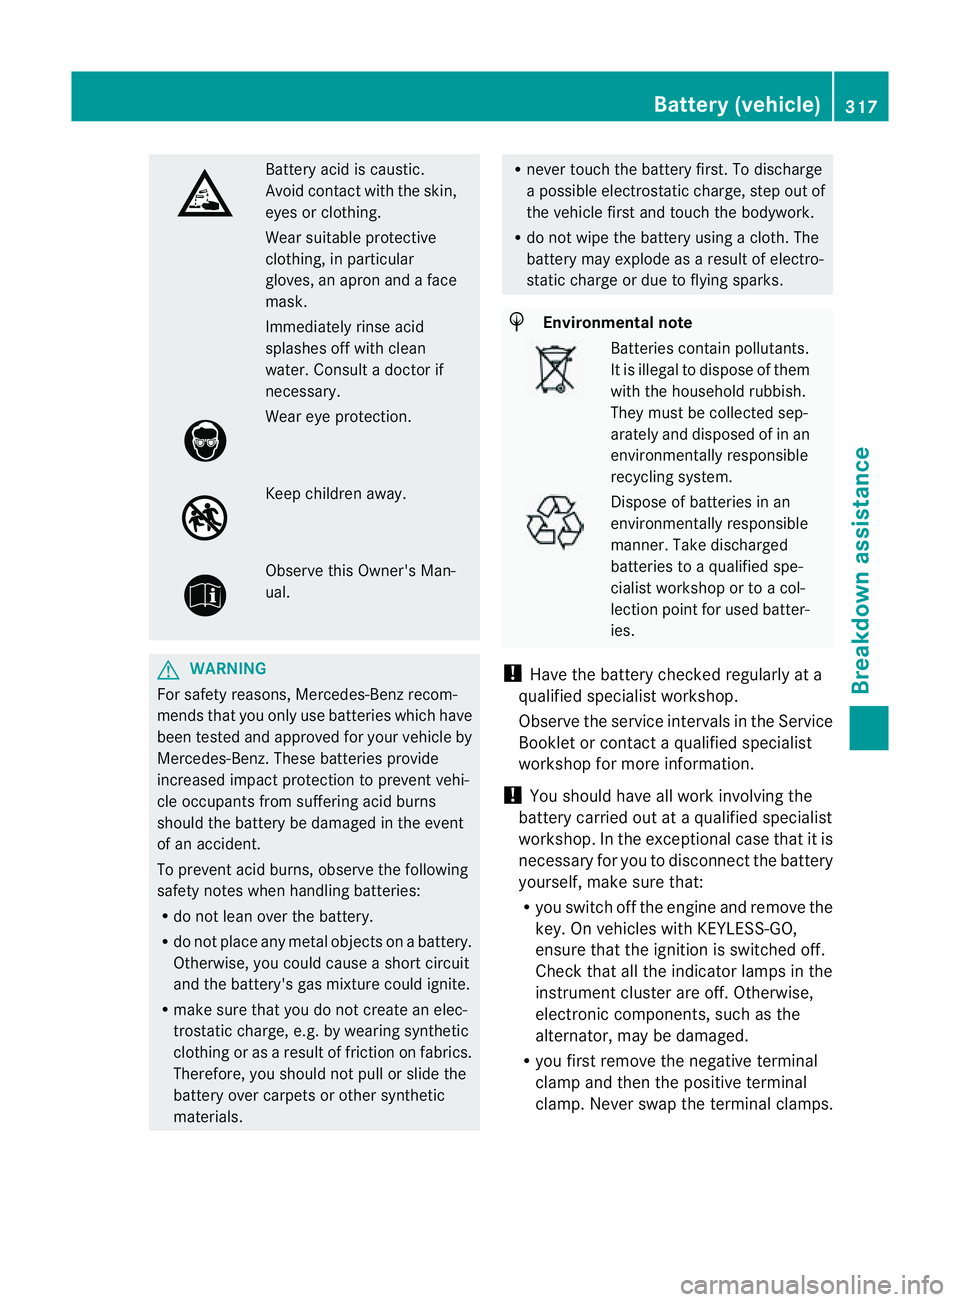
Battery aci
discaustic.
Avoid contact with the skin,
eyes or clothing.
Wea rsuitable protective
clothing ,inparticular
gloves, an apro nand aface
mask.
Immediately rins eacid
splashes off with clean
water. Consult adoctor if
necessary. Wear ey
eprotection. Kee
pchildren away. Observ
ethisO wner'sM an-
ual. G
WARNING
For safety reasons ,Mercedes-Benz recom-
mend stha tyou only use batteries which have
been tested and approved for your vehicle by
Mercedes-Benz. These batteries provide
increased impact protection to prevent vehi-
cle occupant sfrom suffering acid burns
should the battery be damaged in the event
of an accident.
To prevent acid burns, observe the following
safety notes when handling batteries:
R do not lean over the battery.
R do not place any metal object sonabattery.
Otherwise, you could cause ashort circuit
and the battery's gas mixture could ignite.
R make sure that you do not create an elec-
trostatic charge, e.g. by wearing synthetic
clothin gorasar esult of friction on fabrics.
Therefore, you should not pull or slide the
battery over carpets or other synthetic
materials. R
never touch the battery first. To discharge
ap ossible electrostatic charge, step out of
the vehicle first and touch the bodywork.
R do not wipe the battery using acloth. The
battery may explode as aresult of electro-
static charge or due to flying sparks. H
Environmental note Batteries contain pollutants.
It is illegal to dispose of them
with the household rubbish.
They must be collected sep-
arately and disposed of in an
environmentally responsible
recycling system. Dispose of batteries in an
environmentally responsible
manner. Take discharged
batteries to
aqualified spe-
cialis tworkshop or to acol-
lection point for used batter-
ies.
! Have the battery checked regularly at a
qualified specialist workshop.
Observe the service intervals in the Service
Booklet or contact aqualified specialist
workshop for more information.
! You should have all work involving the
battery carried out at aqualified specialist
workshop. In th eexcepti onal cas ethatitis
necessar yfor you to disconnect th ebattery
yourself, mak esure that:
R you switch off th eenginea nd remove the
key. On vehicles wit hKEYLESS-GO,
ensure that th eignition is switched off.
Chec kthat all the indicator lamps in the
instrumentc luster are off. Otherwise,
electronic components, such as the
alternator, may be damaged.
R you first remove the negative terminal
clamp and then the positive terminal
clamp. Never swap the terminal clamps. Battery (vehicle)
317Breakdown assistance Z
Page 325 of 373
particularly careful when removing the rear
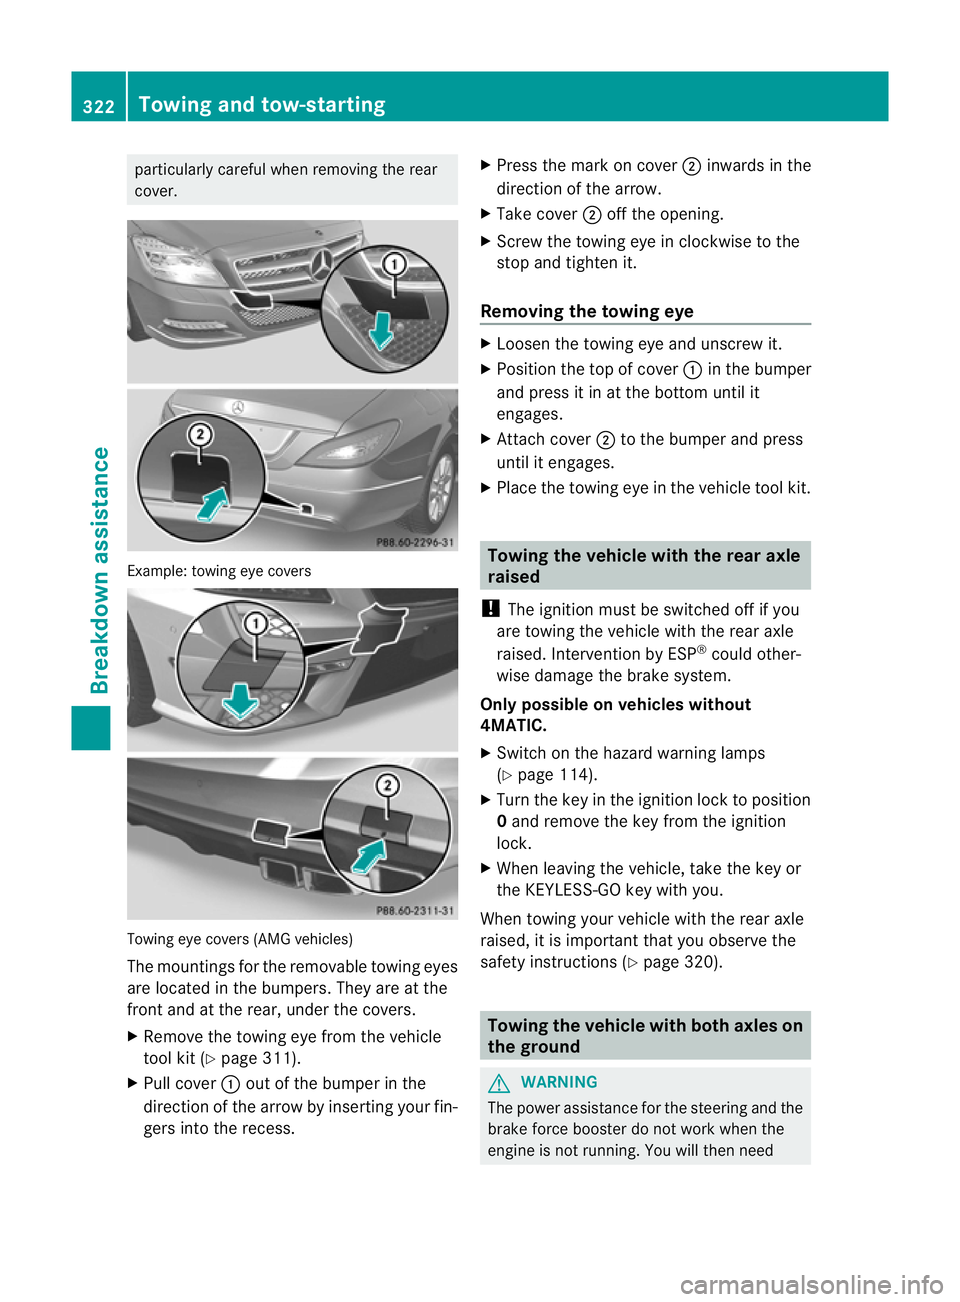
cover. Example: towing eye covers
Towing eye cover
s(AMG vehicles)
The mountings for the removable towing eyes
are located in the bumpers. They are at the
fron tand at the rear, under the covers.
X Remove the towing eye from the vehicle
tool kit (Y page 311).
X Pull cover :out of the bumper in the
direction of the arrow by inserting your fin-
gers int othe recess. X
Press the mark on cover ;inwards in the
direction of the arrow.
X Take cover ;off the opening.
X Screw the towing eye in clockwise to the
stop and tighten it.
Removing the towing eye X
Loosen the towing eye and unscrew it.
X Position the top of cover :in the bumper
and press it in at the bottom until it
engages.
X Attach cover ;to the bumper and press
until it engages.
X Place the towing eye in the vehicle tool kit. Towing the vehicle with the rear axle
raised
! The ignition must be switched off if you
are towing the vehicle with the rear axle
raised. Intervention by ESP ®
could other-
wise damage the brake system.
Only possible on vehicles without
4MATIC.
X Switc hont he hazard warning lamps
(Y page 114).
X Turn the key in the ignition lock to position
0and remov ethe key from the ignition
lock.
X When leaving the vehicle, take the key or
the KEYLESS-GO key with you.
When towing your vehicle with the rear axle
raised, it is important that you observe the
safety instructions (Y page 320). Towing the vehicle with both axles on
the ground
G
WARNING
The power assistance for the steering and the
brake forc ebooster do not work when the
engin eisnot running. You will then need 322
Towing and tow-startingBreakdown assistance