2012 MERCEDES-BENZ C-Class COUPE fold seats
[x] Cancel search: fold seatsPage 16 of 336

R
RACE START (AMG vehicles) ............. 161
RACETIMER (on-board computer) .... 198
Radar sensor system Activating/deactivating .................196
Display message ............................ 217
Radio
Selecting a station .........................189
see separate operating instructions
Reading lamp ..................................... 106
Rear compartment Setting the air vents ......................122
Rear fog lamp
Display message ............................ 211
Switching on/off ........................... 102
Rear seat (folding the backrest
forwards/back) ................................. 244
Rear view camera Cleaning instructions .....................273
Function/notes ............................. 168
Rear-view mirror
Anti-glare (manual) ..........................95
Dipping (automatic) .........................96
Rear window defroster
Problem (malfunction) ...................120
Rear window heating
Switching on/off ........................... 120
Refueling
Fuel gauge ....................................... 29
Important safety notes ..................137
Refueling process ..........................138
see Fuel
Releasing the parking lock
manually (automatic
transmission) ..................................... 137
Remote control Garage door opener .......................256
Reporting
Malfunctions relevant to safety ........ 24
Reserve (fuel tank)
see Fuel
Reserve fuel
Display message ............................ 216
Warning lamp ................................. 234
see Fuel Restraint system
see SRS (Supplemental Restraint
System)
Reverse gear
Engaging (automatic
transmission) ................................. 130
Roadside Assistance (breakdown) .... 21
Roller blind see Roller sunblind
Roller sunblind
Opening/closing .............................. 85
Panorama roof with power tilt/
sliding panel ..................................... 85
Roof carrier ........................................ 246
Roof lining and carpets (cleaning
guidelines) ......................................... 275
Roof load (maximum) ........................ 332
Route see Route guidance (navigation)
Route guidance (navigation) ............ 188
S
Safety Children in the vehicle .....................52
Child restraint systems ....................52
Occupant Classification System
(OCS) ............................................... 42
Overview of occupant safety
systems ........................................... 36
Safety systems
see Driving safety systems
Seat belts
Belt force limiters ............................ 51
Cleaning ......................................... 275
Correct usage .................................. 48
Emergency Tensioning Devices ........ 51
Fastening ......................................... 49
Important safety guidelines .............48
Releasing ......................................... 50
Safety guidelines ............................. 37
Special seat belt retractor ...............54
Warning lamp ................................. 227
Warning lamp (function) ................... 50
Seats
Adjusting (electrically) .....................90
Adjusting (manually and
electrically) ...................................... 90
14Index
Page 57 of 336

restraint systems are installed on the left and
right of the rear seats.
Secure non LATCH-type (ISOFIX) child
restraint systems using the vehicle's seat belt
system. Always install child restraint systems
according to the manufacturer's instructions.
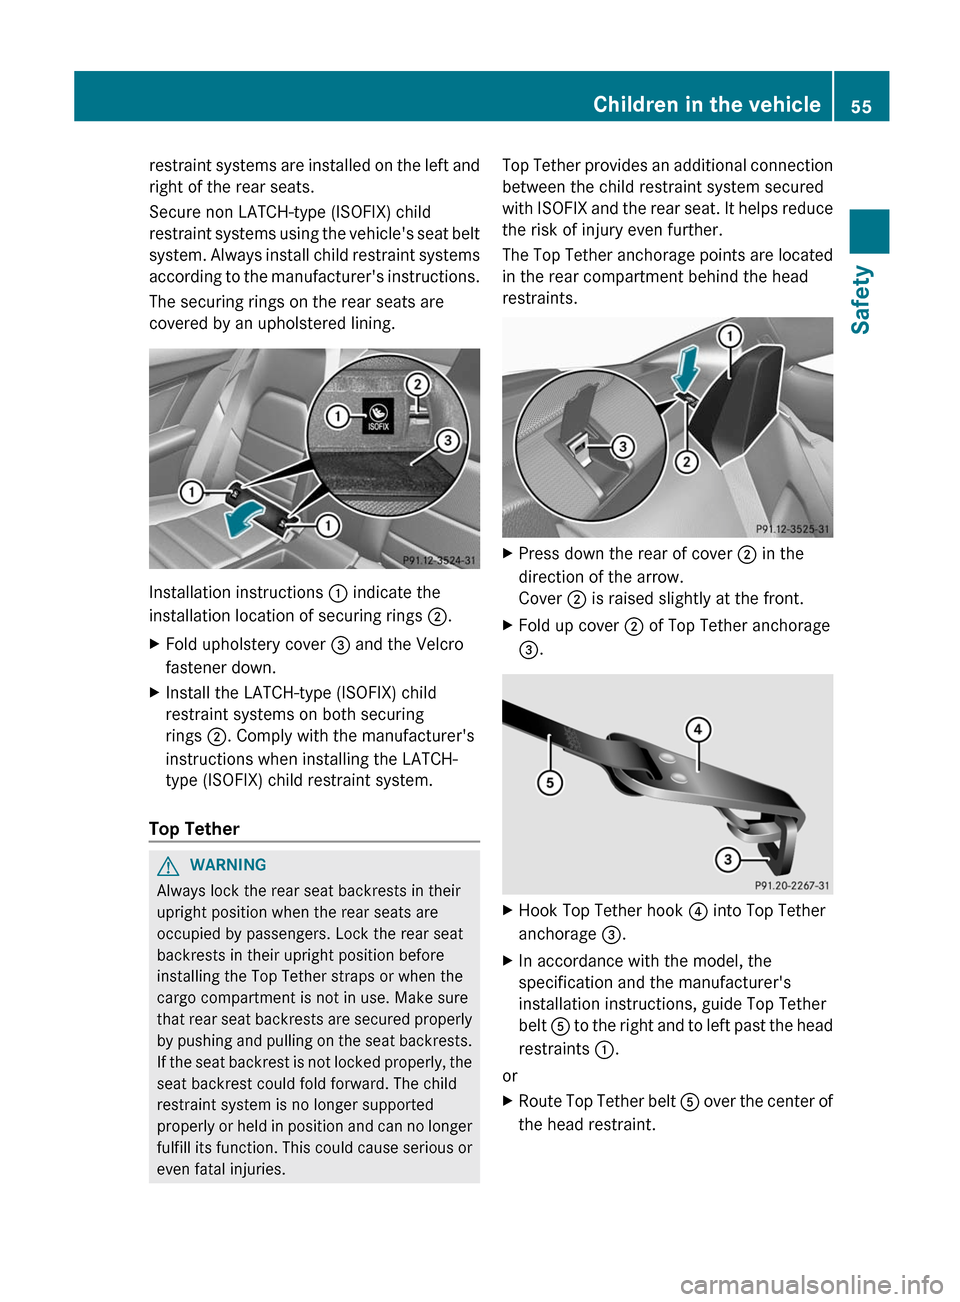
The securing rings on the rear seats are
covered by an upholstered lining.
Installation instructions : indicate the
installation location of securing rings 2.
XFold upholstery cover
= and the Velcro
fastener down.XInstall the LATCH-type (ISOFIX) child
restraint systems on both securing
rings ;. Comply with the manufacturer's
instructions when installing the LATCH-
type (ISOFIX) child restraint system.
Top Tether
GWARNING
Always lock the rear seat backrests in their
upright position when the rear seats are
occupied by passengers. Lock the rear seat
backrests in their upright position before
installing the Top Tether straps or when the
cargo compartment is not in use. Make sure
that rear seat backrests are secured properly
by pushing and pulling on the seat backrests.
If the seat backrest is not locked properly, the
seat backrest could fold forward. The child
restraint system is no longer supported
properly or held in position and can no longer
fulfill its function. This could cause serious or
even fatal injuries.
Top Tether provides an additional connection
between the child restraint system secured
with ISOFIX and the rear seat. It helps reduce
the risk of injury even further.
The Top Tether anchorage points are located
in the rear compartment behind the head
restraints.XPress down the rear of cover ; in the
direction of the arrow.
Cover ; is raised slightly at the front.XFold up cover ; of Top Tether anchorage
= .XHook Top Tether hook ? into Top Tether
anchorage =.XIn accordance with the model, the
specification and the manufacturer's
installation instructions, guide Top Tether
belt A to the right and to left past the head
restraints :.
or
XRoute Top Tether belt A over the center of
the head restraint.Children in the vehicle55SafetyZ
Page 93 of 336

?Seat fore-and-aft adjustmentABackrest angle
Adjusting the head restraints
Adjusting the head restraint height
electrically
XTo adjust the head restraint height: slide
the switch for head restraint adjustment
( Y page 90) up or down in the direction of
the arrow.
Folding the front-seat backrests
forward/back
Important safety notes
GWARNING
The seat belts can only provide protection if
the seat backrest is locked in the upright
position. The seat backrest must therefore be
locked in the upright position during the
journey. Do not drive the vehicle if the seat
backrest is not locked in the upright position.
If the
Lock Seat Backrest Front Right
or
Lock Seat Backrest Front Left
warning message is displayed in the
multifunction display, then the corresponding
seat backrest is not locked. Carefully slow
down and drive with caution to an area which
is a safe distance from the road. Always
ensure that there is sufficient space behind
the seat backrest and fold the seat backrest
back fully until it engages in the locking
mechanism.
The warning message is no longer displayed
once the seat backrest engages in the locking
mechanism. If both seat backrests are locked
and the warning message continues to be
displayed, have the system checked by a
Mercedes-Benz Center without delay.
GWARNING
Always ensure that no-one can become
trapped or injured by the movement of the
seat. In a potentially hazardous situation, the
procedure can be interrupted by moving the
seat adjustment switch in the door control
panel or by operating one of the position
buttons of the Memory function.
Folding the backrest forwards
The seat moves forwards if you have folded
the backrest forwards and the seat is in the
rear half of the range. This makes it easier for
passengers to get into and out of the rear
compartment. The head restraint is lowered
simultaneously.
XPull seat release handle : forwards and
fold the backrest forwards as far as it will
go.
The seat automatically moves to the
foremost position and the head restraint is
lowered.
Folding back the backrest
XSwing back the seat backrest.
The seat moves automatically to the stored
position.
Adjusting the four-way lumbar
support
You can adjust the contour of the front seat
backrests individually to provide optimum
support for your back.
Seats91Seats, steering wheel and mirrorsZ
Page 97 of 336

Mirrors
Rear-view mirror
Rear-view mirror (manual anti-glare)
Xanti-glare mode: flick anti-glare
switch : forwards or back.
Exterior mirrors
Adjusting the exterior mirrors
GWARNING
Exercise care when using the passenger-side
exterior rear view mirror. The mirror surface
is convex (outwardly curved surface for a
wider field of view). Objects in mirror are
closer than they appear. Check your interior
rear view mirror and glance over your
shoulder before changing lanes.
The exterior mirrors are automatically heated
if the rear window defroster is switched on
and the outside temperature is low.
XMake sure that the SmartKey is in position
1 or 2 in the ignition lock.XPress button : for the left-hand exterior
mirror or button ; for the right-hand
exterior mirror.
The indicator lamp in the corresponding
button lights up in red.
The indicator lamp goes out again after
some time. You can adjust the selected
mirror using adjustment button = as long
as the indicator lamp is lit.XPress adjustment button = up, down, to
the right or to the left until the exterior
mirror is set to a position that provides you
with a good overview of traffic conditions.
Folding the exterior mirrors in or out
electrically
This function is only available in vehicles for
Canada.
XMake sure that the SmartKey is in position
1 or 2 in the ignition lock.XBriefly press button :.
Both exterior mirrors fold in or out.
i Make sure that the exterior mirrors are
always folded out fully while the vehicle is
in motion, as they may otherwise vibrate.
i If you are driving faster than
9 mph (15 km/h), you can no longer fold in
the exterior mirrors.
Mirrors95Seats, steering wheel and mirrorsZ
Page 98 of 336

Setting the exterior mirrors
This function is only available in vehicles for
Canada.
If the battery has been disconnected or
completely discharged, the exterior mirrors
must be reset. The exterior mirrors will
otherwise not fold in when you select the
"Fold in mirrors when locking" function in the
on-board computer ( Y page 197).
XMake sure that the SmartKey is in
position 1 in the ignition lock.XBriefly press button :.
Folding the exterior mirrors in or out
automatically
This function is only available in vehicles for
Canada.
If the "Fold in mirrors when locking" function
is activated in the on-board computer
( Y page 197):
R the exterior mirrors fold in automatically as
soon as you lock the vehicle from the
outside.
R the exterior mirrors fold out again
automatically as soon as you unlock the
vehicle and then open the driver's or front-
passenger door.
i The mirrors do not fold out if they have
been folded in manually.
Exterior mirror out of position
If an exterior mirror has been pushed out of
position, proceed as follows:
XVehicles without electrically folding
exterior mirrors: move the exterior mirror
into the correct position manually.XVehicles with electronically folding
mirrors 3
: press the mirror-folding button( Y page 95) repeatedly until you hear the
mirror engage in position.
The mirror housing is engaged again and
you can adjust the exterior mirrors as usual
( Y page 95).
Automatic anti-glare mirrors
GWARNING
If incident light from headlamps is prevented
from striking the sensor in the rear-view
mirror, for instance, by luggage piled too high
in the vehicle, the mirror's automatic anti-
glare function will not operate.
Incident light could then blind you. This may
distract you from the traffic conditions and,
as a result, you may cause an accident.
The rear-view mirror and the exterior mirror
on the driver's side automatically go into anti-
glare mode if the ignition is switched on and
incident light from headlamps strikes the
sensor in the rear-view mirror.
The mirrors do not go into anti-glare mode if
reverse gear is engaged.
Parking position for the exterior
mirror on the front-passenger side
Setting and storing the parking position
You can position the front-passenger side
exterior mirror in such a way that you can see
the rear wheel on that side as soon as you
engage reverse gear. You can store this
position.
3 Canada only96MirrorsSeats, steering wheel and mirrors