2012 MERCEDES-BENZ C-Class ESP
[x] Cancel search: ESPPage 126 of 234

X
Sel ect symbo l: byturni ngcVd the
CO MAND controllera nd pre ssW to
confi rm.
or
X Pre ssthe ; button onCOMAND.
X Enter thephone num ber:
R ma nua lly (Y page 121)
R us ing the phone book (Ypage 125)
R from thecalllists (Ypage 129)
R us ing speeddial (Y page 122)
Cal lwa iting Yo
ucan switch back and forth betwe encalls
wi th thisfu nctio n.The functio nisavail able if
your mobile phonesupports thetoggling
function (viaBluetooth ®
).
You canusethefunction ifyou areanswering
a second callormaking asecond call.
Switching betweenthe active calland the
call onhold :
Active call
; Callon hold
X Confirm symbol;bypressing W.
or
X Press the; button onCOMAND oron
the multifunction steeringwheel.
The previous callonhold isactivated. Ends
anactive call
X Select ¢inthe telephone basicmenu and
press Wtoconfirm.
or
X Press the~ button onCOMAND oron
the multifunction steeringwheel.
The callonhold isactivated.
Confe rence call You
canintercon nectcalls (active andon
hold) onthe mobile phone. Thispermits
several partiestohear oneanother andspeak
with oneanother.
You canalso make afurther callinCOMAND
(Y page 123).
Sending DTMFtones This
function isnot supported byallmobile
phones.
Answering machinesorother devices canbe
cont rolled byDTMF tones, e.g.forremote
query function s.
X Ifyou woul dlike tolisten tothe messages
on your answering machine,forexample,
select thecorresponding number.
X To transmit individual characters: once
a conn ection hasbeen established tothe
answering machine,selectthedesired
characters inthe character barand press
W toconfirm.
or
X Press thecorresponding keyonthe
COMAND numberkeypad.
Every character selectedwillbe
transmitt edimmediately .
X To send aphone bookentry asaDTMF
sequence :select Name by
turning cVdthe
COMAND controller andpress Wto
confirm.
X Select thedesired phonebookentry and
press Wtoconfirm.
The entry issent asaDTMF character
string. 124
Telephone
operationTelephone
Page 131 of 234

Using
calllists Intr
oduct ion
COMAND displayslistsofcalls receiv ed
(includin gmissed calls)andmade during
phone operation .Call list sare nota vail able
unle ssamobil ephone isconnected to
COMAND.
COMAND supports thePBAP Bluetooth ®
profil e.How COMAND processescall lists
depe ndsonthe model ofthe mobil ephone
connected:
R Blue tooth ®
telep hone withPBAP
Blue tooth ®
profil e:
The calllists are dow nload edautomatical ly
from themobil ephone byCOMAND as
soon asthe mobil ephone isconnected to
COMAND.
R Blue tooth ®
telep hone withoutPBAP
Blue tooth ®
profil e:
COMAND createsthecall lists from calls
dia led and receive d(inclu dingmisse dcall s)
as soon asthe mobil ephone isconnected
with COMAND.
i For Blue tooth ®
telep hones withoutthe
PBAP Bluetooth ®
profil e,the call lists in
COMAND arenot synchronized withthose
on you rmobile phone. Thesecallsmayor
may notbelisted onyour mobile phone,
depending onthe model.
i Ifno mobile phoneisconn ected, thenthe
Call Lists menu
itemisgrayed outand
cann otbe selected. Ifyou conn ectamobile
phone otherthantheprevious oneto
COMAND, thepreviously availablecall lists
and their entrieswill bedeleted
automatically. Theyarestill availa bleonthe
mobile phoneitself.
i The respect ivemenu itemcanonly be
selected ifcalls have already beenmade or
received inCOMAND.
Displaying missedcallsinthe COMAND
display isnot supported byallmobile
phones. Opening
thecall listand selec tingan
entry
X Press the% functionbutton .
X Select CallLists in
the telephone basic
menu bysliding VÆandturnin gcVd the
COMAND controller andpress Wto
conf irm.
Am enu appears.
X Select Calls Receive d or
Calls Dialed using
cVdandpress Wto
con firm.
The correspondin glist appears. List
ofselect edphone numbers (example)
: Toclose thelist
; Date/ time(ifavailable), symbols(if
assigned) andtelephon enumber ofthe
ent ryhighlighted
= Tocall upoption s
i You canalso callupthe listofdialed calls
by pressing the6 button whenthe
telephon ebasic menu isshown. Inthis
case, thelistwill only show phone
numbers.
X Select anent ryby turn ingcVd the
COMAND controller .
X To dial aphone number :press W.
X To close thelist: select Back and
press
W tocon firm orpress the% button . Using
calllists
129Telephone Z
Page 133 of 234
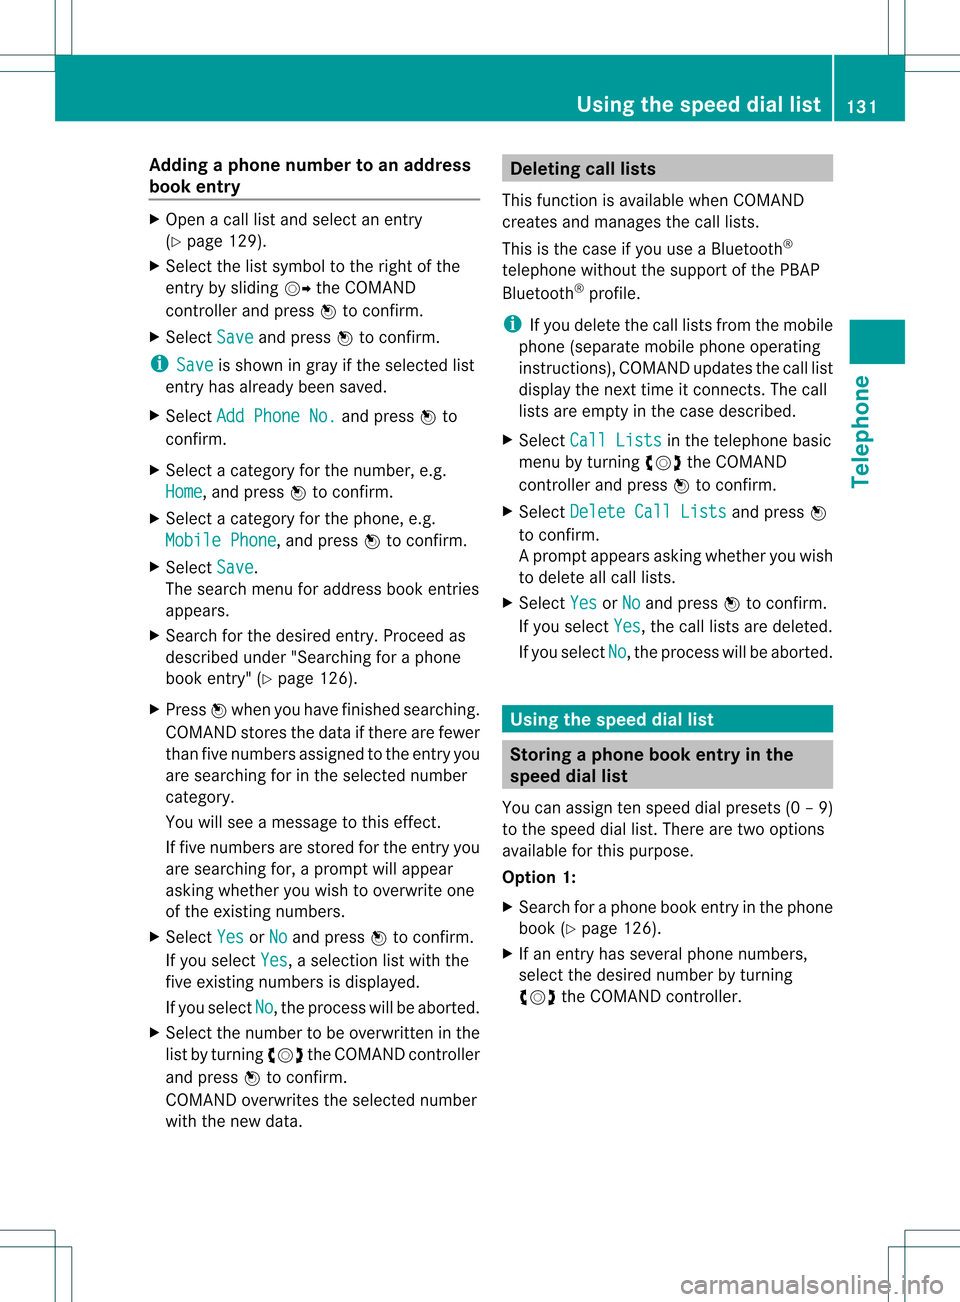
Add
ingaph one num bertoan address
book entry X
Open acall listand selectan entry
(Y page 129).
X Se lec tthe list symbol tothe right ofthe
entr yby sliding VYtheCOMAND
cont roller andpress Wtoconfirm .
X Select Save and
press Wtoconfirm .
i Save is
shown ingray ifthe selected list
entr yhas already beensaved.
X Select AddPhone No. and
press Wto
confirm .
X Select acategory forthe number, e.g.
Home ,
and press Wtoconfirm .
X Select acategory forthe phone, e.g.
Mobile Phone ,
and press Wtoconfirm .
X Select Save .
The search menuforaddress bookentries
appea rs.
X Search forthe desired entry.Proceed as
described under"Searching foraphone
book entry"(Y page 126).
X Press Wwhen youhave finished searching.
COMAND storesthedata ifthere arefewer
than fivenumbers assigned tothe entr yyou
are searching forinthe selected number
category.
You willsee amessage tothis effect .
If five numbers arestored forthe entr yyou
are searching for,aprompt willappea r
asking whether youwish tooverwrite one
of the existing numbers.
X Select Yes or
No and
press Wtoconfirm .
If you select Yes ,
a selection listwith the
five existing numbers isdispla yed.
If you select No ,
the process willbeaborted.
X Select thenumber tobe overwritten inthe
list byturning cVdtheCOMAND controller
and press Wtoconfirm .
COMAND overwrites theselected number
with thenew data. Dele
ting calllists
This funct ionisavaila blewhen COMAND
creates andmanages thecall lists.
This isthe case ifyou useaBluetooth ®
telephone withoutthesupport ofthe PBAP
Bluetooth ®
profile.
i Ifyou delete thecall lists from themobile
phone (separate mobilephoneoperating
instruct ions),COMAND updatesthecall list
displa ythe next time itconn ects. Thecall
lists areempty inthe case described.
X Select CallLists in
the telephone basic
menu byturning cVdtheCOMAND
cont roller andpress Wtoconfirm .
X Select Delete CallLists and
press W
to confirm .
Ap rompt appears asking whethe ryou wish
to delete allcall lists.
X Select Yes or
No and
press Wtoconf irm.
If you select Yes ,
the call lists aredeleted.
If you select No ,
the process willbeaborted. Using
thespeed diallist Storing
aphone bookentry inthe
speed diallist
You canassign tenspeed dialpresets (0–9 )
to the spee ddial list. There aretwo optio ns
av ailabl e for thispu rpo se.
Opti on1:
X Sea rchforaph one book entry inthe phone
bo ok (Ypage 126) .
X Ifan entry hasse ver alph one num bers,
se lect the desired num berb ytur ning
cVd theCOMA NDcontro ller . Usin
gth esp eed dial list
131Telepho ne Z
Page 134 of 234

X
Sel ect the list symbo lto the right ofthe
entry bysliding VY theCOMAND
control lera nd pre ssW toconfi rm.
Am enu appears.
X Select Speed dial by
turn ingcVd the
COMAND controller andpress Wto
con firm.
Am enu appears. Speed
dialmenu
X Confirm Assign SpeedDialPreset by
pressing W.
The speed diallistappears. Theselect ed
phone bookentryislisted asthe first entry.
The nextavail ablespee ddia lprese tis
highlighted. X
Select thespeed dialpreset byturning
cVd theCOMAND controller andpress
W toconfirm .
The phone bookentryis saved inthe speed
dial preset. Option
2
X Call upthe telephone basicmenu; see
(Y page 119)
X Select CallLists by
sliding VÆand
turning cVdtheCOMAND controller and
press Wtoconfirm .
X Select Speed DialPreset List and
press Wtoconfirm .
The speed diallistappea rs.
X Select thelistsymbol tothe right ofthe
entr yby sliding VYtheCOMAND
cont roller andpress Wtoconfirm .
X Confirm Assign SpeedDialPreset by
pressing W.
X Proceed asdescribed underoption 1. Making
acall viaspeed dial
Ad escript ioncan befound inthe "Making a
call" section(Ypage 122). Deleting
aspee ddialnum ber
X To delet easpeed dialnum ber: selec t
Dele teSpee dDial Preset in
the
"Speed dial"menuby turn ingcVd the
COMAN Dcontroller andpress Wto
conf irm.
The speed dialnumber isdeleted.
X To delete allspeed dialnumbers: select
Delete AllSpeed DialPresets in
the
"Speed dial"menu byturnin gcVd the
COMAND controller andpress Wto
conf irm.
You willbeasked whether youwant to
cont inue.
X Select Yes or
No and
press Wtoconf irm.
If you select Yes ,
all speed dialnumbers will
be deleted fromthespeed diallist.
If you select No ,
the process willbeaborted. 132
Using
thespeed diallistTelephone
Page 140 of 234
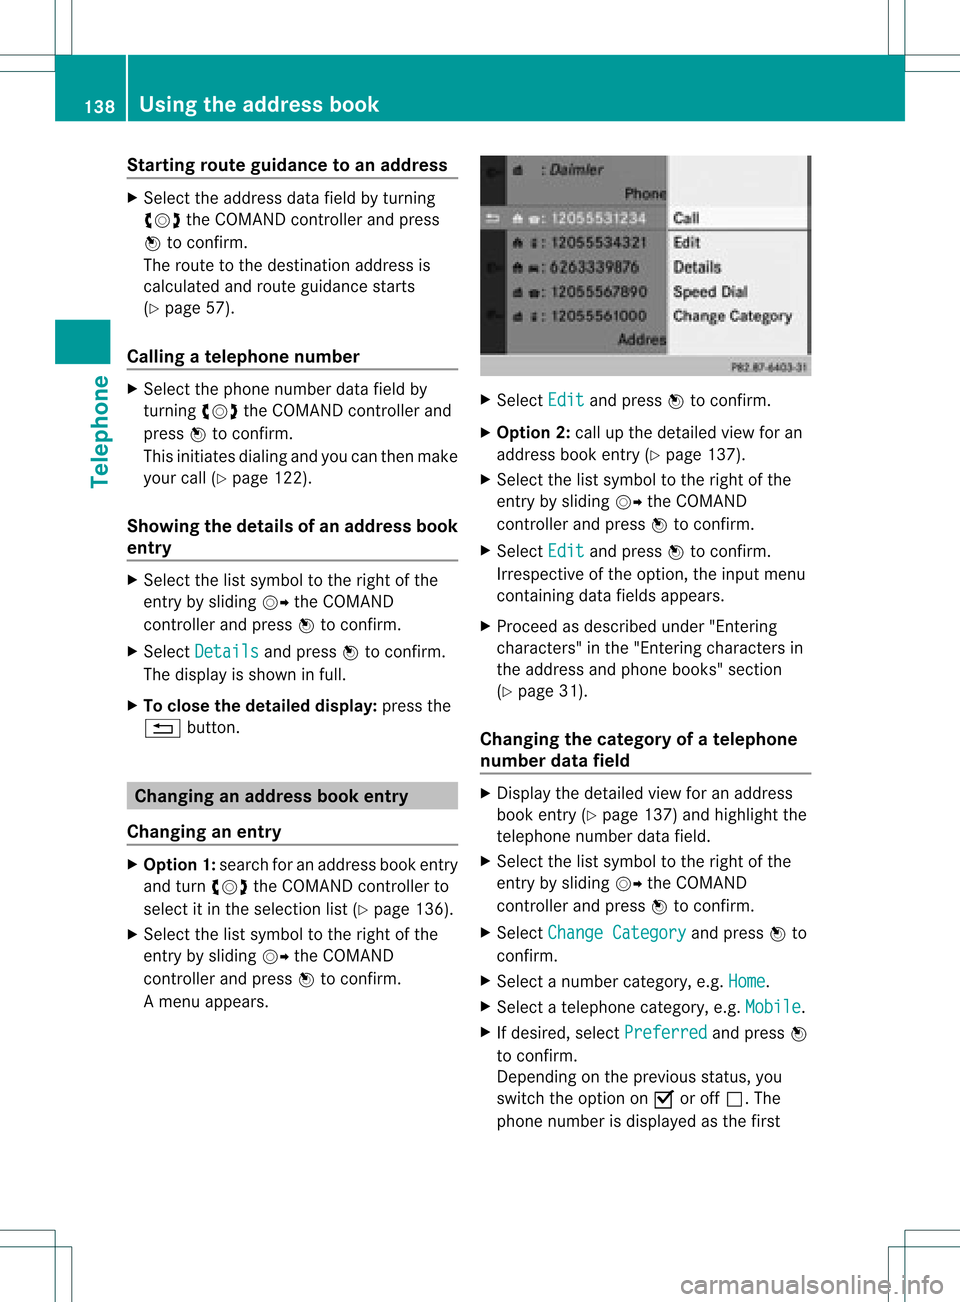
Star
ting route guidance toan add ress X
Select theaddress datafieldbyturnin g
cVd theCOMAND controller andpress
W toconf irm.
The route tothe destination addressis
calculated androute guidancestarts
(Y page 57).
Calling ateleph onenum ber X
Sele ctthephon enum berdata fieldby
tur nin gcVd theCOMA NDcontroller and
pres sW tocon firm.
This initiate sdialin gand youcan then mak e
your call(Ypage 122).
Showing thedet ails ofan address book
entr y X
Sele ctthelist symbo lto therigh tofthe
entr yby sliding VYtheCOMAND
cont roller andpress Wtoconfirm .
X Select Details and
press Wtoconfirm .
The displa yis shown infull.
X To close thedetailed display:pressthe
% button. Changing
anadd ress book entry
Changing anentry X
Option 1:search foranaddress bookentry
and turn cVd theCOMAND controller to
select itin the selection list(Ypage 136).
X Select thelistsymbol tothe right ofthe
entr yby sliding VYtheCOMAND
cont roller andpress Wtoconfirm .
Am enu appears. X
Select Edit and
press Wtocon firm.
X Opt ion 2:call upthe detailed viewforan
address bookentry(Y page 137).
X Select thelistsymbol tothe right ofthe
ent ryby sliding VYtheCOMAND
con troller andpress Wtocon firm.
X Select Edit and
press Wtocon firm.
Irrespec tiveofthe option ,the input menu
con tainin gdata fields appears.
X Proceed asdescribed under"Entering
charact ers"inthe "Ent ering charact ersin
the address andphone books" section
(Y page 31).
Changing thecategory ofatelephone
number datafield X
Display thedetailed viewforanaddress
book entry(Y page 137)and highlight the
telephon enumber datafield.
X Select thelistsymbol tothe right ofthe
ent ryby sliding VYtheCOMAND
con troller andpress Wtocon firm.
X Select Change Category and
press Wto
con firm.
X Select anumber category,e.g. Home .
X Select atelephon ecategor y,e.g. Mobile .
X Ifdesired, selectPreferr ed and
press W
to con firm.
Depen dingonthe previous status,you
switch theoption onO oroff ª.T he
phone number isdispla yedasthe first 138
Using
theaddress bookTelephone
Page 141 of 234
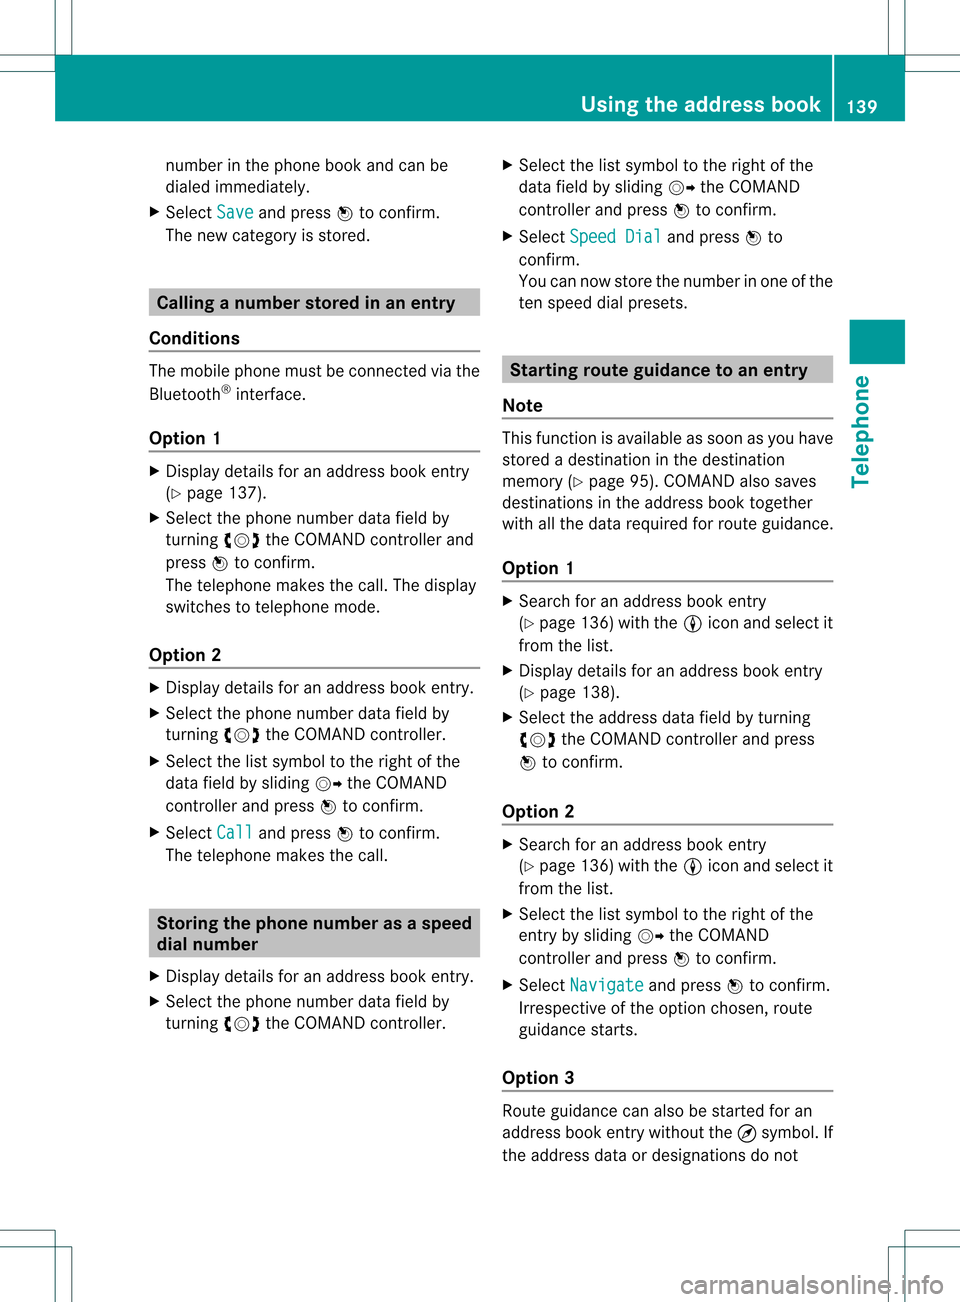
num
berint he phone bookandcanbe
diale dimmediately.
X Select Save and
press Wtoconfirm .
The new category isstored. Calling
anumber storedinan entry
Co nditio ns The
mobi lephone mustbeconnected viathe
Blue tooth ®
interface .
Option 1 X
Displ aydetai lsfor anadd ress book entry
(Y pag e137).
X Select thephone numbe rdata fieldby
tur nin gcVd theCOMA NDcontroll erand
pres sW toconfirm .
The telepho nemak esthecall. Thedispl ay
swit ches totelepho nemod e.
Opt ion 2 X
Dis play details foranaddre ssbook entry.
X Sel ect thephon enum berdatafiel dby
tur nin gcVd theCOMA NDcontroll er.
X Sel ect thelist symb olto therigh tofthe
data fieldbysliding VYtheCOMAND
cont roller andpress Wtoconfirm .
X Select Call and
press Wtoconfirm .
The telephone makesthecall. Storing
thephone number asas pee d
dial numb er
X Disp layde tai lsfor anaddre ssboo kentry .
X Sel ect the phone num berd ata fieldby
tur nin gcVd theCOMA NDcontroll er. X
Sel ect thelist symb olto therigh tofthe
data fieldbysliding VYtheCOMAND
cont roller andpress Wtoconfirm .
X Select Speed Dial and
press Wto
confirm .
You cannow store thenumber inone ofthe
ten speed dialpresets. Star
ting route guidance toan entry
Note This
funct ionisavaila bleassoon asyou have
stored adestination inthe destination
memory (Ypage 95).COMAND alsosaves
destinations inthe address booktogether
with allthe data required forroute guidance.
Option 1 X
Search foranaddress bookentry
(Y page 136)withtheLicon andselect it
from thelist.
X Display detailsforanaddress bookentry
(Y page 138).
X Select theaddress datafieldbyturning
cVd theCOMAND controller andpress
W toconfirm .
Option 2 X
Search foranaddress bookentry
(Y page 136)withtheLicon andselect it
from thelist.
X Select thelistsymbol tothe right ofthe
entr yby sliding VYtheCOMAND
cont roller andpress Wtoconfirm .
X Select Navigate and
press Wtoconfirm .
Irrespect iveofthe option chosen, route
guida ncestarts.
Option 3 Route
guidancecanalso bestarted foran
address bookentrywithout the¤symbol. If
the address dataordesignations donot Using
theaddress book
139Telephone Z
Page 143 of 234
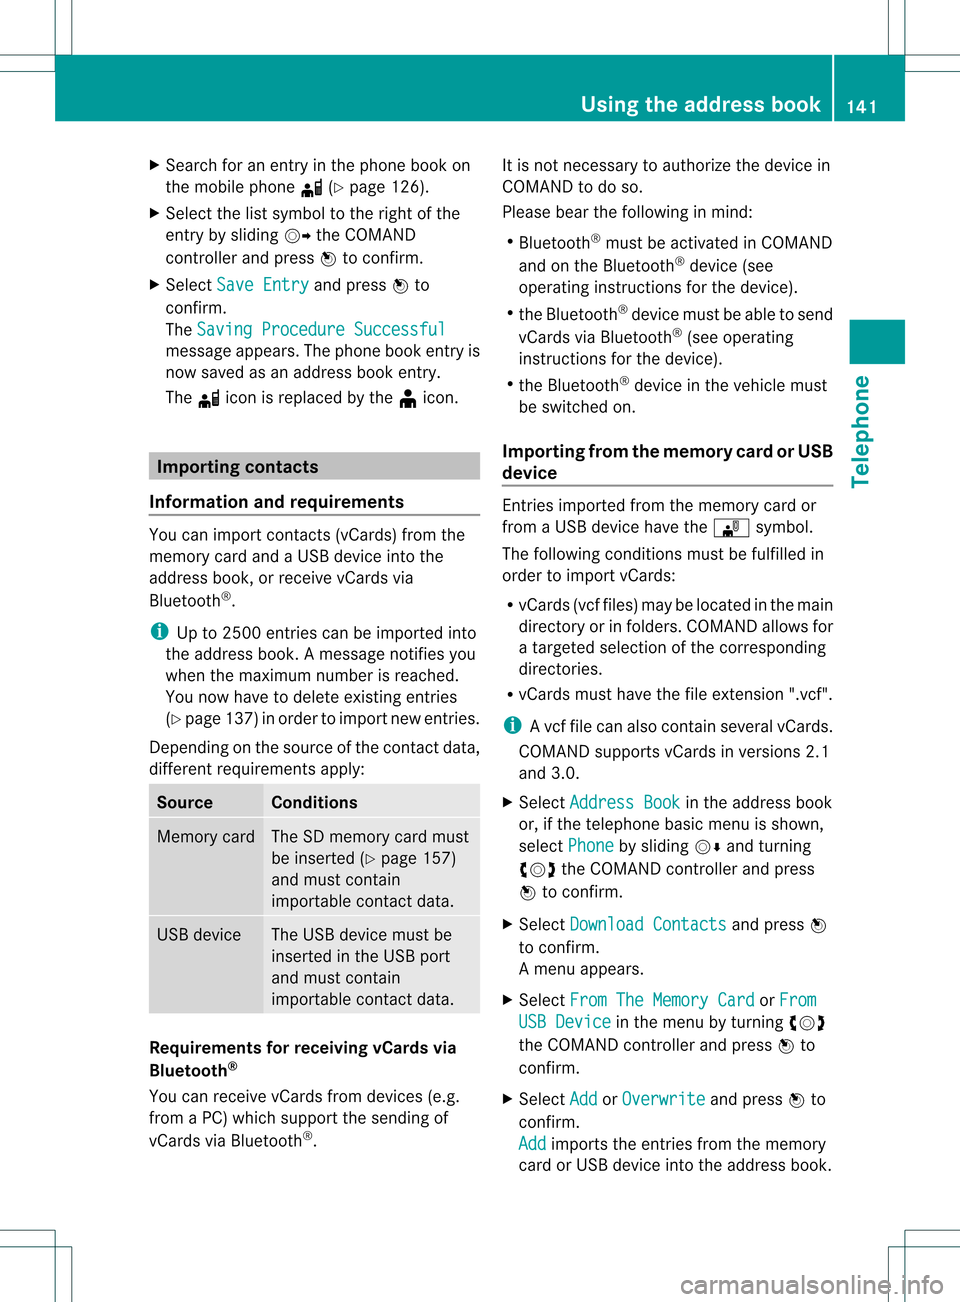
X
Sea rch foranentry inthe phoneboo kon
the mob ile pho ned (Ypage 126) .
X Sel ect the list symbo lto the right ofthe
entry bysliding VY theCOMAND
control lera nd pre ssW toconfi rm.
X Sel ect SaveEnt ry and
pressW to
confi rm.
The Saving Procedure Successful mes
sage appe ars. The phone book entry is
now saved asan addre ssbook entry .
The diconisreplaced bythe ¥icon. Importing
contacts
Information andrequirem ents You
canimport contacts (vCards) fromthe
memory cardandaUSB device intothe
address book,orreceive vCardsvia
Bluetooth ®
.
i Upto2500 entries canbeimported into
the address book.Amessage notifies you
when themaximum numberisreached.
You now have todelete existingentries
(Y page 137)ino rder toimport newentries.
Dependi ngon the source ofthe contact data,
differe ntrequ ireme ntsapply: Source Con
dition s Memory
card The
SDmemory cardmust
be inserted (Ypag e157)
and must contain
importa blecontact data. USB
device The
USB devicemust be
inserted inthe USB port
and must contain
importa blecontact data. Requiremen
tsfor rece ivingvCards via
Bluetoo th®
You canreceive vCards from devices(e.g.
from aPC) whichsup port thesending of
vCa rds viaBlue tooth ®
. It
is not necessary toauthorize thedevi cein
COMAND todo so.
Plea sebea rthe following inmind:
R Bluetooth ®
must beactivated inCOMAND
and onthe Bluetooth ®
device (see
operating instructionsforthe device).
R the Bluetooth ®
device mustbeable tosend
vCards viaBluetooth ®
(see operating
instruct ionsforthe device).
R the Bluetooth ®
device inthe vehicle must
be switched on.
Import ingfrom thememory cardorUSB
device Ent
ries imported fromthememory cardor
from aUSB device havethe¯ symbol.
The following conditionsmust befulfilled in
order toimport vCards:
R vCards (vcffiles) maybelocated inthe main
directory orinfolders. COMAND allowsfor
a targeted selection ofthe corresponding
directories.
R vCards musthavethefileexten sion".vcf".
i Avcffilecan also contai nseveral vCards.
COMAND supportsvCardsinversion s2.1
and 3.0.
X Select Address Book in
the address book
or, ifthe telephon ebasic menu isshown,
select Phone by
sliding VÆandturning
cVd theCOMAND controller andpress
W tocon firm.
X Select Downloa dContact s and
press W
to con firm.
Am enu appears.
X Select FromTheMemory Card or
From USB
Device in
the menu byturn ingcVd
the COMAND controller andpress Wto
con firm.
X Select Add or
Overwri te and
press Wto
con firm.
Add import
sthe entries from thememory
card orUSB device intothe address book. Using
theadd ress book
141Telephone Z
Page 144 of 234
Overwrite imports
theentries fromthe
memory cardorUSB device andoverwrites
all entries inthe address bookwiththe
¯ symbol. Theprevious entriesarethen
no longer available.
Aft erthe cont actdata hasbeen imported
successfully ,you willsee amessage tothis
effec t.The address bookorthe respect ive
telephon ebasic menu isdisplayed.
i You canselect theOverwri te menu
item
if the address bookalready contains
corr espondin gent ries. Amessage notifies
you when theaddress bookisfull.
Receiving vCardsvia Bluet ooth® Received
vCardsareidentif iedbythe ®
symbol inthe address book.
i Ifyou switch toanoth ermain function,
e.g. navigation ,while receivin gvCards, the
recept ionofvCards willbeterm inated.
X Select Address Book in
the address book
or, ifthe telephon ebasic menu isshown,
select Phone by
sliding VÆandturning
cVd theCOMAND controller andpress
W tocon firm.
Am enu appears.
X Select Downloa dContact s and
press W
to con firm.
X Select Receive dBusines sCards in
the
menu byturn ingcVd theCOMAND
con troller andpress Wtocon firm.
This interrupts theBluetoot h®
con nection
between COMAND andyour active mobile
phone. COMAND is,however, readyto
receive vCardsfromanoth erBluetoot h®
device (PC,mobile phone).
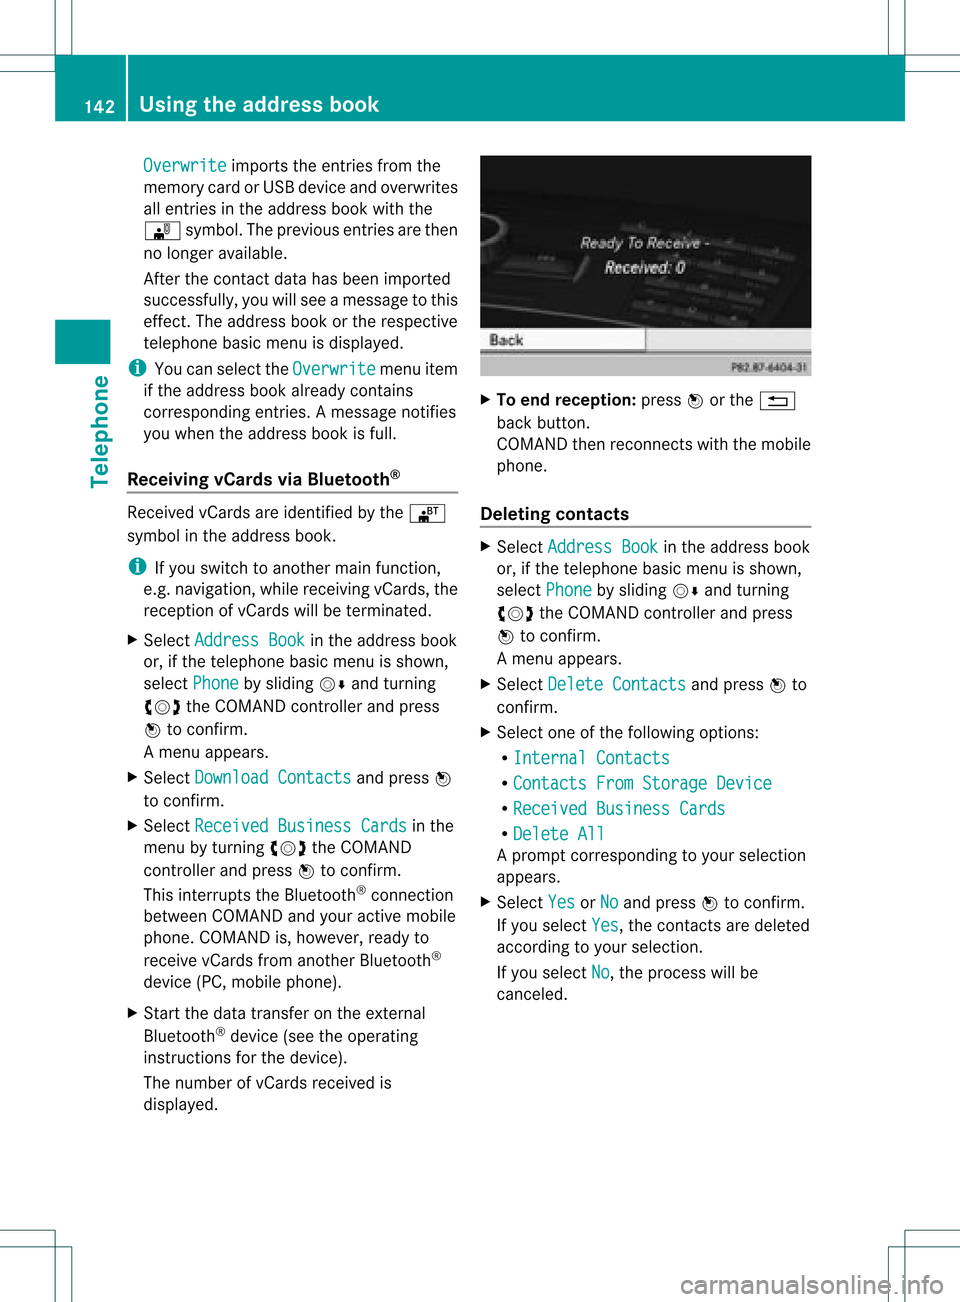
X Start the data transfer onthe external
Bluetoot h®
device (seetheoperatin g
inst ruct ions forthe device).
The number ofvCards received is
displayed. X
To end recept ion:press Worthe %
back button .
COMAND thenrecon nectswith themobile
phone.
Deleting contacts X
Select Address Book in
the address book
or, ifthe telephon ebasic menu isshown,
select Phone by
sliding VÆandturning
cVd theCOMAND controller andpress
W tocon firm.
Am enu appears.
X Select Delete Contacts and
press Wto
con firm.
X Select oneofthe following options:
R Interna lContact s R
Contact sFrom Storage Device R
Receive dBusines sCards R
Delete All Ap
rompt correspo ndingtoyou rselection
appears.
X Select Yes or
No and
press Wtocon firm.
If you select Yes ,
the contact sare deleted
accor dingtoyour select ion.
If you select No ,
the process willbe
canc eled. 142
Using
theadd ress bookTelephone