2012 MERCEDES-BENZ B-CLASS display
[x] Cancel search: displayPage 65 of 340

!
When testing the electric parking brake
on a braking dynamometer, switch off the
ignition. Application of the brakes by
ESP ®
may otherwise destroy the brake
system.
When towing your vehicle with the front axle
raised, observe the notes on
ESP ®
(Y page 293).
ESP ®
is deactivated if the å ESP®
OFF
warning lamp in
the instrument cluster lights
up continuously when the engine is running.
If the ÷ ESP ®
warning lamp and the
å ESP ®
OFF warning lamp are lit
continuously, ESP ®
is not available due to a
malfunction.
Observe the information on warning lamps
(Y page 227) and display messages which
may be shown in the instrument cluster
(Y page 201).
i Only use wheels with the recommended
tire sizes. Only then will ESP ®
function
properly.
Characteristics of ESP ®General information
ESP
®
is activated automatically when the
engine is started.
If ESP ®
intervenes, the ÷ ESP®
warning
lamp flashes in the instrument cluster.
If ESP ®
intervenes:
X Do not deactivate ESP ®
under any
circumstances.
X Only depress the accelerator pedal as far
as necessary when pulling away.
X Adapt your driving style to suit the
prevailing road and weather conditions.
Vehicles with the ECO start/stop function Deactivating/activating ESP
® Important safety notes
i
Observe the "Important safety notes"
section for driving safety systems
(Y page 59).
You can select between the following states
of ESP ®
:
R ESP ®
is activated.
R ESP ®
is deactivated. G
WARNING
If you deactivate ESP ®
, ESP ®
no longer
stabilizes the vehicle. There is an increased
risk of skidding and an accident.
Only deactivate ESP ®
in the situations
described in the following.
It may be best to deactivate ESP ®
in the
following situations:
R when using snow chains
R in deep snow
R on sand or gravel
i Activate ESP ®
as soon as the situations
described above no
longer apply. ESP®
will
otherwise not be able to stabilize the
vehicle if the vehicle starts to skid or a
wheel starts to spin.
! Avoid spinning the driven wheels for an
extended period with ESP ®
deactivated.
You could otherwise damage the drivetrain.
Deactivating/activating ESP ®
You can deactivate or activate ESP ®
via the
on-board computer.
X To deactivate: (Y page 194).
The å ESP ®
OFF warning lamp in the
instrument cluster lights up.
X To activate: (Y page 194).
The å ESP ®
OFF warning lamp in the
instrument cluster goes out. Driving safety systems
63
Safety Z
ProCarManuals.com
Page 66 of 340

Characteristics when ESP
®
is deactivated
If ESP ®
is deactivated and one or more wheels
start to spin, the ÷ ESP®
warning lamp in
the instrument cluster flashes. In such
situations, ESP ®
will not stabilize the vehicle.
If you deactivate ESP ®
:
R ESP ®
no longer improves driving stability.
R the engine's torque is no longer limited and
the drive wheels are able to spin. The
spinning of the wheels results in a cutting
action, which provides better grip.
R ETS is still active.
R ESP ®
still provides support when you
brake. EBD (electronic brake force
distribution)
i Observe the "Important safety notes"
section for driving safety systems
(Y page 59). G
WARNING
If EBD has malfunctioned, the rear wheels can
still lock, e.g. under full braking. This
increases the risk
of skidding and an accident.
You should therefore adapt your driving style
to the different handling characteristics. Have
the brake system checked at a qualified
specialist workshop.
Observe information regarding indicator and
warning lamps ( Y page 225) as well as
display messages ( Y page 203).
EBD monitors and controls the brake
pressure on the rear wheels to improve
driving stability while braking. ADAPTIVE BRAKE
ADAPTIVE BRAKE enhances braking safety
and offers increased braking comfort. In
addition to the braking function, ADAPTIVE
BRAKE also has the HOLD function
(Y page 168) and hill start assist (Y page 136). For further information, see
Driving tips (Y page 154).
STEER CONTROL
STEER CONTROL helps
you by transmitting a
noticeable steering force to the steering
wheel in the direction required for vehicle
stabilization.
This steering assistance is provided in
particular if:
R both right wheels or both left wheels are on
a wet or slippery road surface when you
brake
R the vehicle starts to skid
If ESP ®
is malfunctioning, you will not receive
steering support from STEER CONTROL.
Power steering will, however, continue to
function. Theft deterrent locking system
Immobilizer
The immobilizer prevents your vehicle from
being started without the correct SmartKey.
X To activate: remove the SmartKey from
the ignition lock.
X To deactivate: switch on the ignition.
When leaving the vehicle, always take the
SmartKey with you and lock the vehicle. The
engine can be started by anyone with a valid
SmartKey that is left inside the vehicle.
i The immobilizer is always deactivated
when you start the engine.
In the event that the engine cannot be
started when the starter battery is fully
charged, the immobilizer may be faulty.
Contact an authorized Mercedes-Benz
Center or call
1-800-FOR-MERCedes (in the
USA) or 1-800-387-0100 (in Canada). 64
Theft deterrent locking system
Safety
ProCarManuals.com
Page 88 of 340

Useful information
i This Operator's Manual describes all
models and all standard and optional
equipment of your vehicle available at the
time of publication of the Operator's
Manual. Country-specific differences are
possible. Please note
that your vehicle may
not be equipped with all features
described. This also applies to safety-
related systems and functions.
i Read the information on qualified
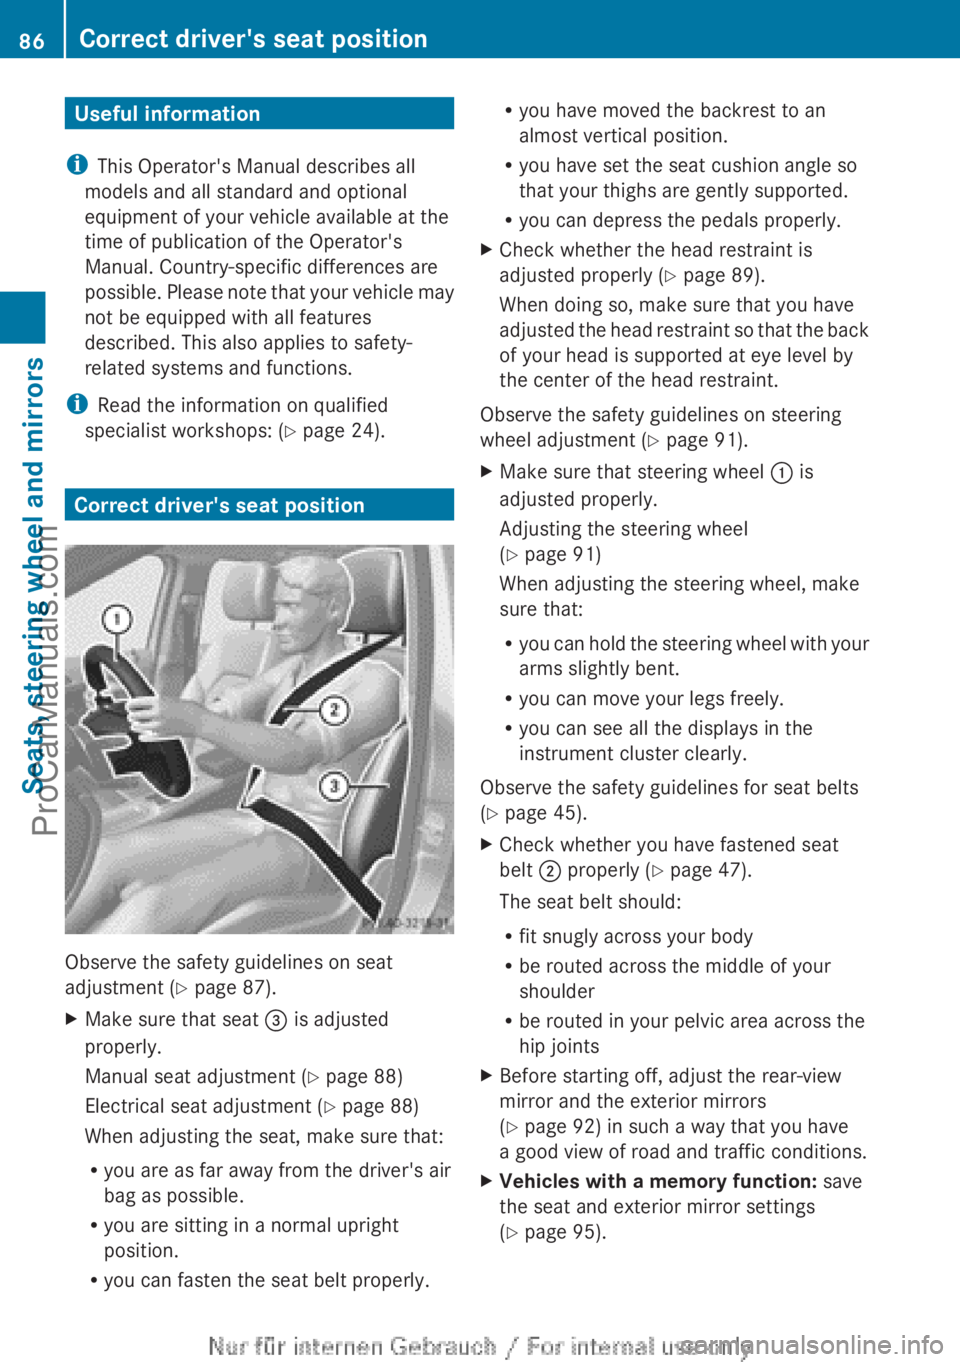
specialist workshops: ( Y page 24).Correct driver's seat position
Observe the safety guidelines on seat
adjustment (
Y page 87).
X Make sure that seat = is adjusted
properly.
Manual seat adjustment ( Y page 88)
Electrical seat adjustment ( Y page 88)
When adjusting the seat, make sure that:
R you are as far away from the driver's air
bag as possible.
R you are sitting in a normal upright
position.
R you can fasten the seat belt properly. R
you have moved the backrest to an
almost vertical position.
R you have set the seat cushion angle so
that your thighs are gently supported.
R you can depress the pedals properly.
X Check whether the head restraint is
adjusted properly ( Y page 89).
When doing so, make sure that you have
adjusted
the head restraint so that the back
of your head is supported at eye level by
the center of the head restraint.
Observe the safety guidelines on steering
wheel adjustment ( Y page 91).
X Make sure that steering wheel : is
adjusted properly.
Adjusting the steering wheel
(Y page 91)
When adjusting the steering wheel, make
sure that:
R you can hold
the steering wheel with your
arms slightly bent.
R you can move your legs freely.
R you can see all the displays in the
instrument cluster clearly.
Observe the safety guidelines for seat belts
(Y page 45).
X Check whether you have fastened seat
belt ; properly ( Y page 47).
The seat belt should:
R fit snugly across your body
R be routed across the middle of your
shoulder
R be routed in your pelvic area across the
hip joints
X Before starting off, adjust the rear-view
mirror and the exterior mirrors
(
Y page 92) in such a way that you have
a good view of road and traffic conditions.
X Vehicles with a memory function: save
the seat and exterior mirror settings
(Y page 95). 86
Correct driver's seat position
Seats, steering wheel and mirrors
ProCarManuals.com
Page 105 of 340

X
To activate: activate the Adaptive
Highbeam Assist function using the on-
board computer ( Y page 197).
X Turn the light switch to Ã.
X Press the combination switch beyond the
pressure point in
the direction of arrow :
(Y page 100).
The _ indicator lamp in the
multifunction display lights up if it is dark
and the light sensor activates the low-beam
headlamps.
If you are driving at speeds above
approximately 28 mph (45 km/h):
The headlamp range is set automatically
depending on the distance between the
vehicle and other road users.
If you are driving at speeds above
approximately 35 mph (55 km/h) and no
other road users have been detected:
The high-beam headlamps are switched on
automatically. The K indicator lamp in
the instrument cluster also lights up.
If you are driving at speeds below
approximately 30 mph (45 km/h) or other
road users have been detected or the roads
are adequately lit: The high-beam headlamps are switched off
automatically. The
K indicator lamp in
the instrument cluster goes out. The _
indicator lamp in the multifunction display
remains lit.
X To deactivate: move the combination
switch back to its normal position.
The _ indicator lamp in the
multifunction display goes out. Headlamps fogged up on the inside
The headlamps may fog up on the inside if
there is high atmospheric humidity.
X Switch on the lights and drive off.
The level of moisture diminishes,
depending on the
length of the journey and
the weather conditions (humidity and
temperature).
If the level of moisture does not diminish:
X Have the headlamps checked at a qualified
specialist workshop. Interior lighting
Overview of interior lighting
Front overhead control panel
:
p To switch the left-hand front reading
lamp on/off
; c To switch the front interior lighting
on
= v
To switch the on/off Interior lighting
103
Lights and windshield wipers Z
ProCarManuals.com
Page 122 of 340

?
To activate/deactivate air-recirculation mode ( Y page 129)
A To set the airflow ( Y page 126)
B To switch cooling with air dehumidification on/off ( Y page 123)
C To switch the rear window defroster on/off (Y page 128) Notes on using automatic climate
control
Automatic climate control The following contains notes and
recommendations on optimum use of the
automatic climate control.
R
Switch on the air-conditioning system by
turning control knob A clockwise to the
desired position (except position 0).
R Set the temperature to 72 ‡ (22 †).
R Recommendation for preventing
fogged up windows with low outside
temperatures
or rain: switch ¯ on for
the air distribution and switch P and
O off if possible (Y page 126).
In air-recirculation mode, switch d off
(Y page 129).
Set airflow control A to a setting between
3 and 6(Y page 126).
R Recommendation for rapid cooling or
heating of the vehicle interior: briefly set
airflow control A to a setting between 3
and 6(Y page 126).
R Recommendation for a constant
vehicle interior temperature: set airflow
control A to a setting between 1 and
3(Y page 126).
R Recommendation for air distribution in
the winter: set O and
¯(Y page 126).
Recommendation for air distribution in
the summer: set P or P and
¯(Y page 126).
R Only use the "windshield defrosting"
function briefly until the windshield is clear
again. R
Only use
air-recirculation
mode briefly, e.g.
if there are unpleasant outside odors or
when in a tunnel. The windows could
otherwise fog up, since no fresh air is drawn
into the vehicle in air-recirculation mode.
R If you change the settings of the climate
control system, the climate status display
appears for three seconds at the bottom of
the screen in the COMAND display. See
also the separate COMAND operating
instructions 4
. You will see the current
settings of the various climate control
functions.
ECO start/stop function During automatic engine switch-off, the ECO
start/stop function only operates at a
reduced capacity. If you require the full
climate control
output,
you can switch off the
ECO start/stop function by pressing the ECO
button ( Y page 138).
4 Only for vehicles with "COMAND Multimedia System" optional equipment120
Overview of climate control systemsClimate control
ProCarManuals.com
Page 123 of 340

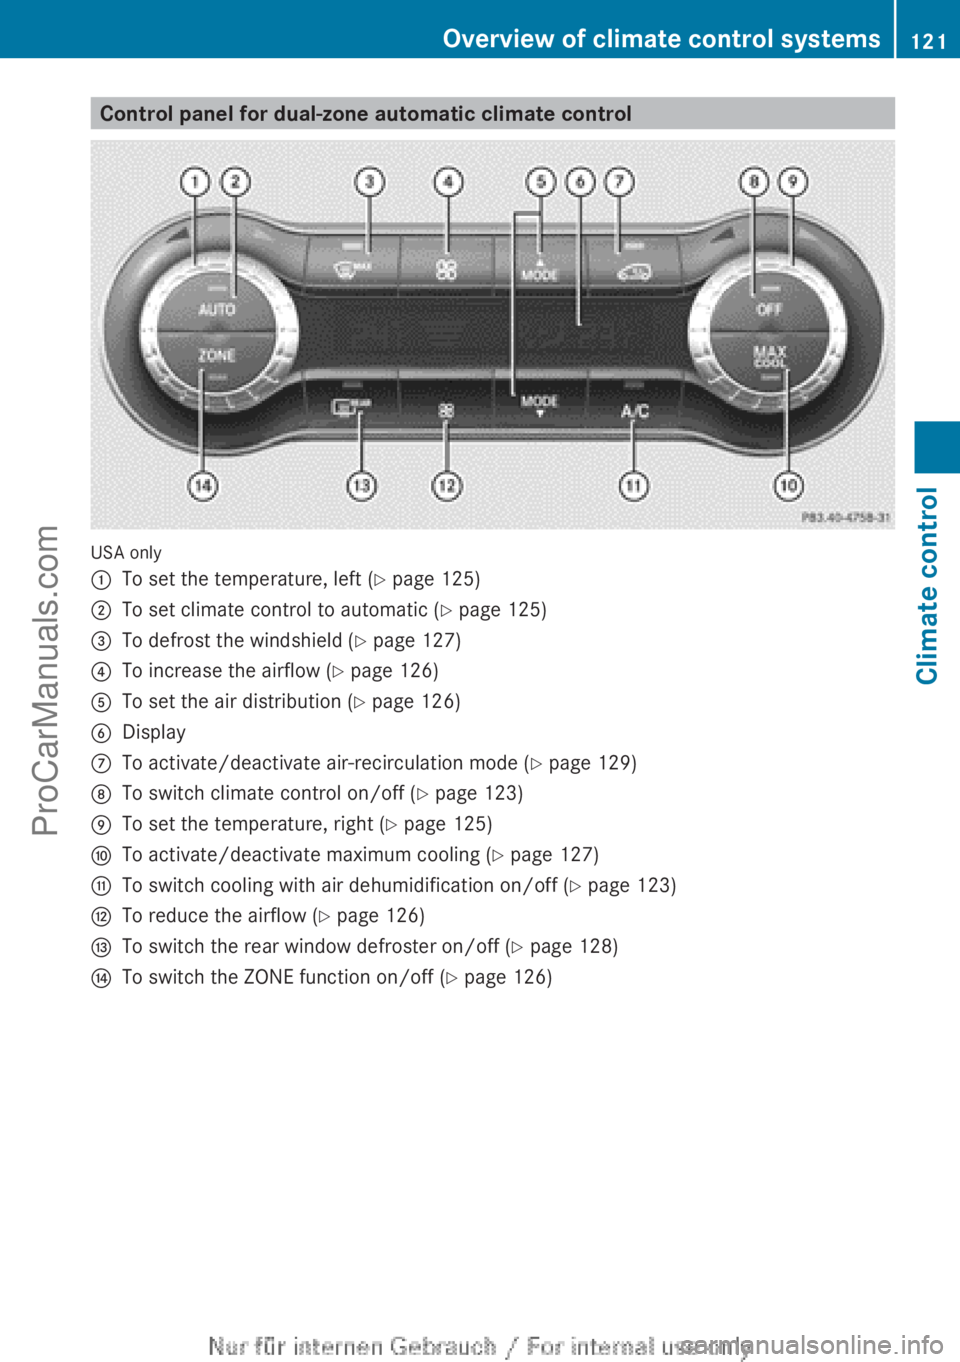
Control panel for dual-zone automatic climate control
USA only
:
To set the temperature, left (Y page 125)
; To set climate control to automatic ( Y page 125)
= To defrost the windshield (Y page 127)
? To increase the airflow ( Y page 126)
A To set the air distribution ( Y page 126)
B Display
C To activate/deactivate air-recirculation mode ( Y page 129)
D To switch climate control on/off (Y page 123)
E To set the temperature, right (Y page 125)
F To activate/deactivate maximum cooling ( Y page 127)
G To switch cooling with air dehumidification on/off ( Y page 123)
H To reduce the airflow ( Y page 126)
I To switch the rear window defroster on/off (Y page 128)
J To switch the ZONE function on/off (Y page 126) Overview of climate control systems
121Climate control
ProCarManuals.com
Page 124 of 340

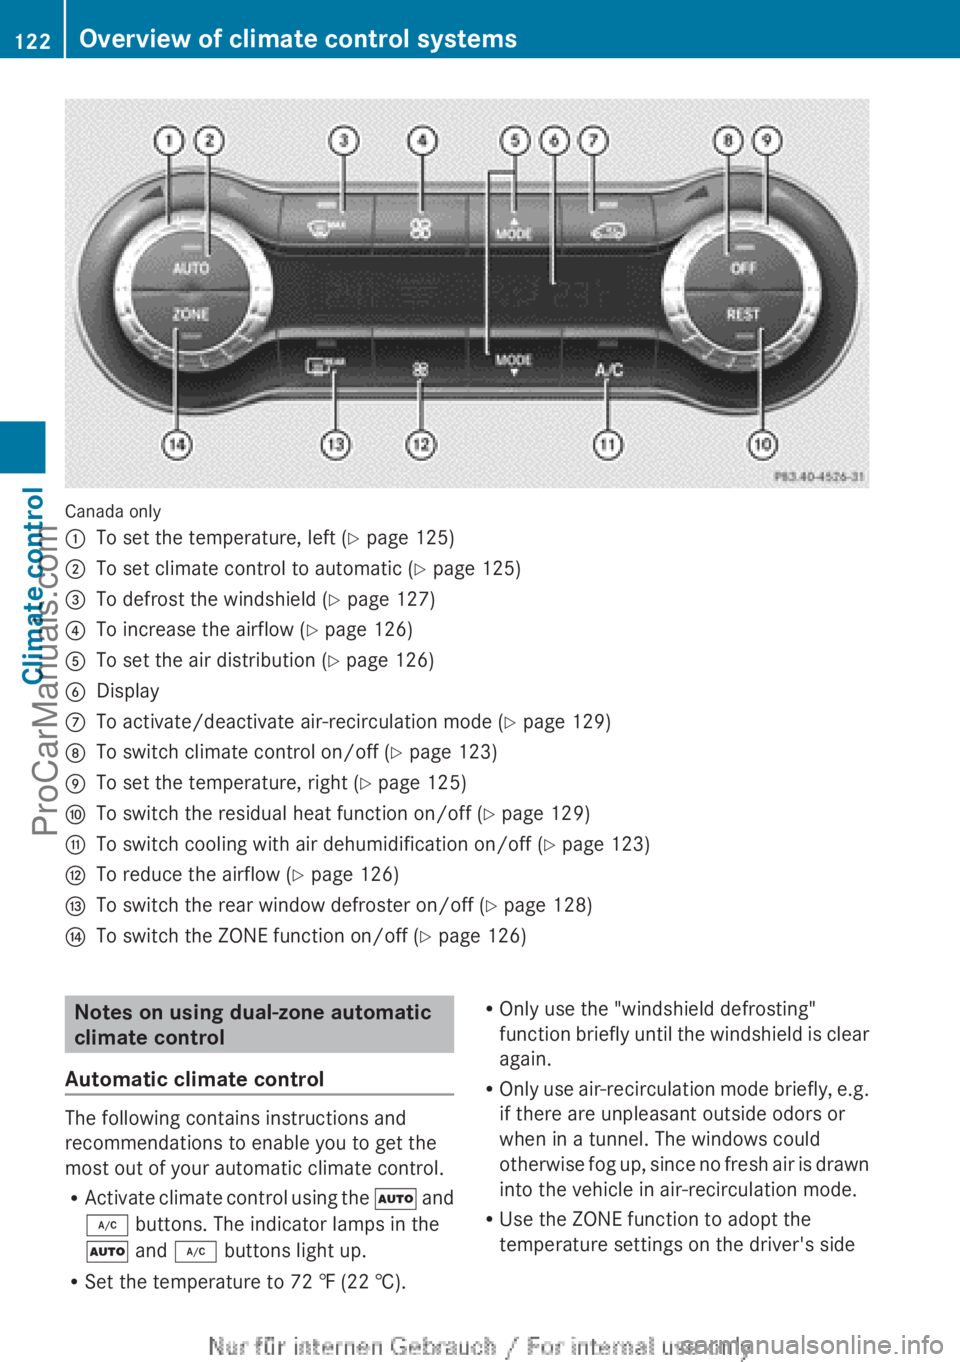
Canada only
:
To set the temperature, left (Y page 125)
; To set climate control to automatic ( Y page 125)
= To defrost the windshield (Y page 127)
? To increase the airflow ( Y page 126)
A To set the air distribution ( Y page 126)
B Display
C To activate/deactivate air-recirculation mode ( Y page 129)
D To switch climate control on/off (Y page 123)
E To set the temperature, right (Y page 125)
F To switch the residual heat function on/off (Y page 129)
G To switch cooling with air dehumidification on/off ( Y page 123)
H To reduce the airflow ( Y page 126)
I To switch the rear window defroster on/off (Y page 128)
J To switch the ZONE function on/off (Y page 126) Notes on using dual-zone automatic
climate control
Automatic climate control The following contains instructions and
recommendations to enable you to get the
most out of your automatic climate control.
R
Activate climate control
using the à and
¿ buttons. The indicator lamps in the
à and ¿ buttons light up.
R Set the temperature to 72 ‡ (22 †). R
Only use the "windshield defrosting"
function briefly
until
the windshield is clear
again.
R Only use air-recirculation mode briefly, e.g.
if there are unpleasant outside odors or
when in a tunnel. The windows could
otherwise fog up, since no fresh air is drawn
into the vehicle in air-recirculation mode.
R Use the ZONE function to adopt the
temperature settings on the driver's side122
Overview of climate control systems
Climate control
ProCarManuals.com
Page 128 of 340

setting in small increments. Start at 72 ‡
(22 †).
Setting the air distribution
Automatic climate control Air distribution settings
¯
Directs air through the defroster vents
P Directs air through the center and side
air vents
O Directs air through the footwell air
vents
i You can also activate several air
distribution settings simultaneously. To do
this, press multiple
air distribution buttons.
The air is then directed through various
vents.
Setting the air distribution
X Turn the SmartKey to position 2 in the
ignition lock (Y page 135).
X Press one or more of the P, O,
¯ buttons.
The corresponding indicator
lamp lights up
briefly.
Dual-zone automatic climate control Air distribution settings
¯
Directs air through the defroster vents
P Directs air through the center and side
air vents
O Directs air through the footwell air
vents
b Directs air through the defroster,
center and side air vents
a Directs air through the defroster and
footwell vents
i Regardless of the air distribution setting,
airflow is always directed through the side
air vents. The side air vents can only be
closed if the
adjusters are turned clockwise
until they engage. Setting the air distribution
X
Turn the SmartKey to position 2 in the
ignition lock (Y page 135).
X Press the É or Ë button repeatedly
until the desired symbol appears in the
display. Setting the airflow
Automatic climate control X
Turn the SmartKey to position 2 in the
ignition lock (Y page 135).
X To increase/reduce: turn control A
clockwise or counter-clockwise
(Y page 119).
Dual-zone automatic climate control X
Turn the SmartKey to position 2 in the
ignition lock (Y page 135).
X To increase/reduce: press the K or
I button. Switching the ZONE function on/off
This function is only available with dual-zone
automatic climate control.
X To activate: press the á button.
The indicator lamp
in the á button lights
up.
The temperature setting for the driver's
side is not adopted for the front-passenger
side.
X To deactivate: press the á button.
The indicator lamp
in the á button goes
out.
The temperature setting for the driver's
side is adopted for the front-passenger
side. 126
Operating the climate control systems
Climate control
ProCarManuals.com