2012 MERCEDES-BENZ B-CLASS run flat
[x] Cancel search: run flatPage 286 of 340

X
Press on/off switch ? on the tire inflation
compressor to ON.
The tire inflation compressor is switched
on. The tire is inflated.
i First, tire sealant is pumped into the tire.
The pressure can briefly rise to
approximately 500 kPa (5 bar/73 psi).
Do not switch off the tire inflation
compressor during this phase.
X Let the tire inflation compressor run for a
maximum of ten minutes. The tire should
then have attained a pressure of at least
200 kPa (2.0 bar/29 psi).
! Do not operate the tire inflation
compressor for longer than ten minutes at
a time without a break. It may otherwise
overheat.
The tire inflation compressor can be
operated again once it has cooled down.
If a pressure
of 200 kPa (2.0 bar/29 psi) has
been attained after a maximum of after ten
minutes, see ( Y page 284).
If a pressure of 200 kPa (2.0 bar/29 psi) has
not been attained after a maximum of ten
minutes, see ( Y page 284).
i If tire sealant leaks out, allow it to dry. It
can then be removed like a layer of film.
If your clothes are soiled with tire sealant,
have them cleaned with perchloroethylene
at a dry cleaner as soon as possible.
Tire pressure not reached If a pressure of 200 kPa (
2.0 bar
/29 psi) has
not been achieved after ten minutes:
X Switch off the tire inflation compressor.
X Unscrew the filler hose from the valve of
the faulty tire.
X Very slowly drive forwards or reverse
approximately 30 ft (10 m).
X Pump up the tire again.
After a maximum of ten minutes, the tire
pressure
must be
at least 200 kPa (2.0 bar/
29 psi). G
WARNING
If the required tire pressure is not reached
after the specified time, the tire is too badly
damaged. The tire sealant cannot repair the
tire in this
instance. Damaged tires and a tire
pressure that is too low can significantly
impair the vehicle's braking and driving
characteristics. There is a risk of accident.
Do not continue driving. Contact a qualified
specialist workshop.
Tire pressure reached G
WARNING
A tire temporarily sealed with tire sealant
impairs the driving characteristics and is not
suitable for higher speeds. There is a risk of
accident.
You should therefore adapt your driving style
accordingly and drive
carefully. Do not exceed
the specified maximum speed with a tire that
has been repaired using tire sealant.
! After use, excess tire sealant may run out
of the filler hose. This could cause stains.
Therefore, place the filler hose in the plastic
bag that contained the TIREFIT kit. H
Environmental note
Have the used tire sealant bottle disposed of
professionally, e.g. at a qualified specialist
workshop.
If a tire
pressure of 200 kPa (2.0 bar/29 psi)
has been achieved after ten minutes:
X Switch off the tire inflation compressor.
X Unscrew the filler hose from the valve of
the faulty tire.
X Stow the tire sealant bottle and the tire
inflation compressor.
X Pull away immediately.
The maximum speed for a tire sealed with tire
sealant is 50 mph (
80 km/h). The upper part
of the TIREFIT sticker must be affixed to the
instrument cluster in the driver's field of
vision. 284
Flat tire
Breakdown assistance
ProCarManuals.com
Page 300 of 340
Useful information
i This Operator's Manual describes all
models and all standard and optional
equipment of your vehicle available at the
time of publication of the Operator's
Manual. Country-specific differences are
possible. Please note
that your vehicle may
not be equipped with all features
described. This also applies to safety-
related systems and functions.
i Read the information on qualified
specialist workshops: ( Y page 24).Important safety notes
G
WARNING
If wheels and tires of the wrong size are used,
the wheel brakes or suspension components
may be damaged. There is a risk of an
accident.
Always replace wheels and tires with those
that fulfill the specifications of the original
part.
When replacing wheels,
make sure to use the
correct:
R designation
R model
When replacing tires, make sure to use the
correct:
R designation
R manufacturer
R model G
WARNING
A flat tire severely impairs the driving,
steering and braking characteristics of the
vehicle. There is a risk of accident.
Tires without run-flat characteristics:
R do not drive with a flat tire.
R immediately replace the flat tire with your
emergency spare wheel or spare wheel, or
consult a qualified specialist workshop. Tires with run-flat characteristics:
R
pay attention to the information and
warning notices on
MOExtended tires (tires
with run-flat characteristics).
Accessories that are not approved for your
vehicle by Mercedes-Benz or are not being
used correctly can impair the operating
safety.
Before purchasing and using non-approved
accessories, visit a qualified specialist
workshop and inquire about:
R suitability
R legal stipulations
R factory recommendations
Information on dimensions and types of
wheels and tires for your vehicle can be found
(Y page 323).
Information on air pressure for the tires on
your vehicle can be found:
R on the vehicle's Tire and Loading
Information placard on the B-pillar
R on the tire pressure label on the fuel filler
flap
R under "Tire pressure"
i Further information on wheels and tires
can be obtained at any qualified specialist
workshop. Operation
Information on driving
R If the vehicle is heavily loaded, check the
tire pressures and correct them if
necessary.
R While driving, pay attention to vibrations,
noises and unusual handling
characteristics, e.g. pulling to one side.
This may indicate that the wheels or tires
are damaged. If you suspect that a tire is
defective, reduce your speed immediately.
Stop the vehicle as soon as possible to
check the wheels and tires for damage.
Hidden tire damage could also be causing298
Operation
Wheels and tires
ProCarManuals.com
Page 302 of 340
Bar indicator : for tread wear is integrated
into the tire tread.
Treadwear indicators (TWI) are required by
law. Six indicators are positioned on the tire
tread. They are visible once the tread depth
is approximately
á
in (1.6 mm). If this is the
case, the tire is so worn that it must be
replaced. Selecting, mounting and replacing
tires
R Only mount tires and wheels of the same
type and make.
Exception: it is permissible to mount a
different type or
make in the event of a flat
tire. Observe the "MOExtended tires (tires
with run-flat characteristics" section
(Y page 281).
R Only mount tires of the correct size onto
the wheels.
R After mounting new tires, break in them in
at moderate speeds for the first 60 miles
(100 km), as they only reach their full
performance after this distance.
R Do not drive with tires which have too little
tread depth, as this significantly reduces
the traction on wet roads (hydroplaning).
R Replace the tires after six years at the
latest, regardless of wear. MOExtended tires (tires with run-flat
properties)
With MOExtended tires (tires with run flat
characteristics), you can continue to drive
your vehicle even if there is a total loss of
pressure in one or more tires.
MOExtended tires may only be used in
conjunction with an active tire pressure loss
warning system and only on wheels
specifically tested by Mercedes-Benz.
Notes on driving with MOExtended tires with
a flat tire ( Y page 281). i
Vehicles equipped with
MOExtended tires
are not equipped with a TIREFIT kit at the
factory. It is therefore recommended that
you additionally equip your vehicle with a
TIREFIT kit if you mount tires that do not
feature run-flat properties, e.g. winter tires.
A TIREFIT kit can be obtained from a
qualified specialist workshop. Winter operation
General notes
Have your vehicle
winterproofed at a qualified
specialist workshop at the onset of winter.
Observe the notes in the "Changing a wheel"
section ( Y page 319). Driving with summer tires
At temperatures below
45 ‡ (+7 †), summer
tires lose elasticity and therefore traction and
braking power. Change the tires on your
vehicle to M+S tires. Using summer tires at
very cold temperatures could cause cracks to
form, thereby damaging the tires
permanently. Mercedes-Benz cannot accept
responsibility for this type of damage. M+S tires
G
WARNING
M+S tires with a tire tread depth of less than
ã in (4
mm) are not suitable for use in winter
and do not provide sufficient traction. There
is a risk of an accident.
M+S tires with a tread depth of less than ã
in (4 mm) must be replaced immediately.
At temperatures below 45 ‡ (+7 †), use
winter tires or all-season tires. Both types of
tire are identified by the M+S marking.
Only winter tires bearing the i snowflake
symbol in addition to the M+S marking
provide the best possible grip in wintry road
conditions. Only these tires will allow driving 300
Winter operation
Wheels and tires
ProCarManuals.com
Page 308 of 340
X
Press = or ; on the steering wheel
to select the Service menu.
X Press the 9 or : button to select
Tire Pressure.
X Press the a button.
The Run Flat Indicator Active
Press 'OK' to Restart message
appears in the multifunction display.
If you wish to confirm the restart:
X Press the a button.
The Tire Pressure Now OK? message
appears in the multifunction display.
X Press the 9 or : button to select
Yes.
X Press the a button.
The Run Flat Indicator Restarted
message appears in the multifunction
display.
After a teach-in period, the tire pressure
loss warning system will monitor the set
tire pressures of all four tires.
or
If you wish to cancel the restart:
X Press the % button.
or
X If the Tire Pressure Now OK? message
appears, use the 9 or : button to
select Cancel.
X Press the a button.
The tire pressure values stored at the last
restart will continue to be monitored. Loading the vehicle
Instruction labels for tires and loads
G
WARNING
Overloaded tires can overheat, causing a
blowout. Overloaded tires
can also impair the
steering and driving characteristics and lead
to brake failure. There is a risk of accident.
Observe the load rating of the tires. The load
rating must be at least half of the GAWR of your vehicle. Never overload the tires by
exceeding the maximum load.
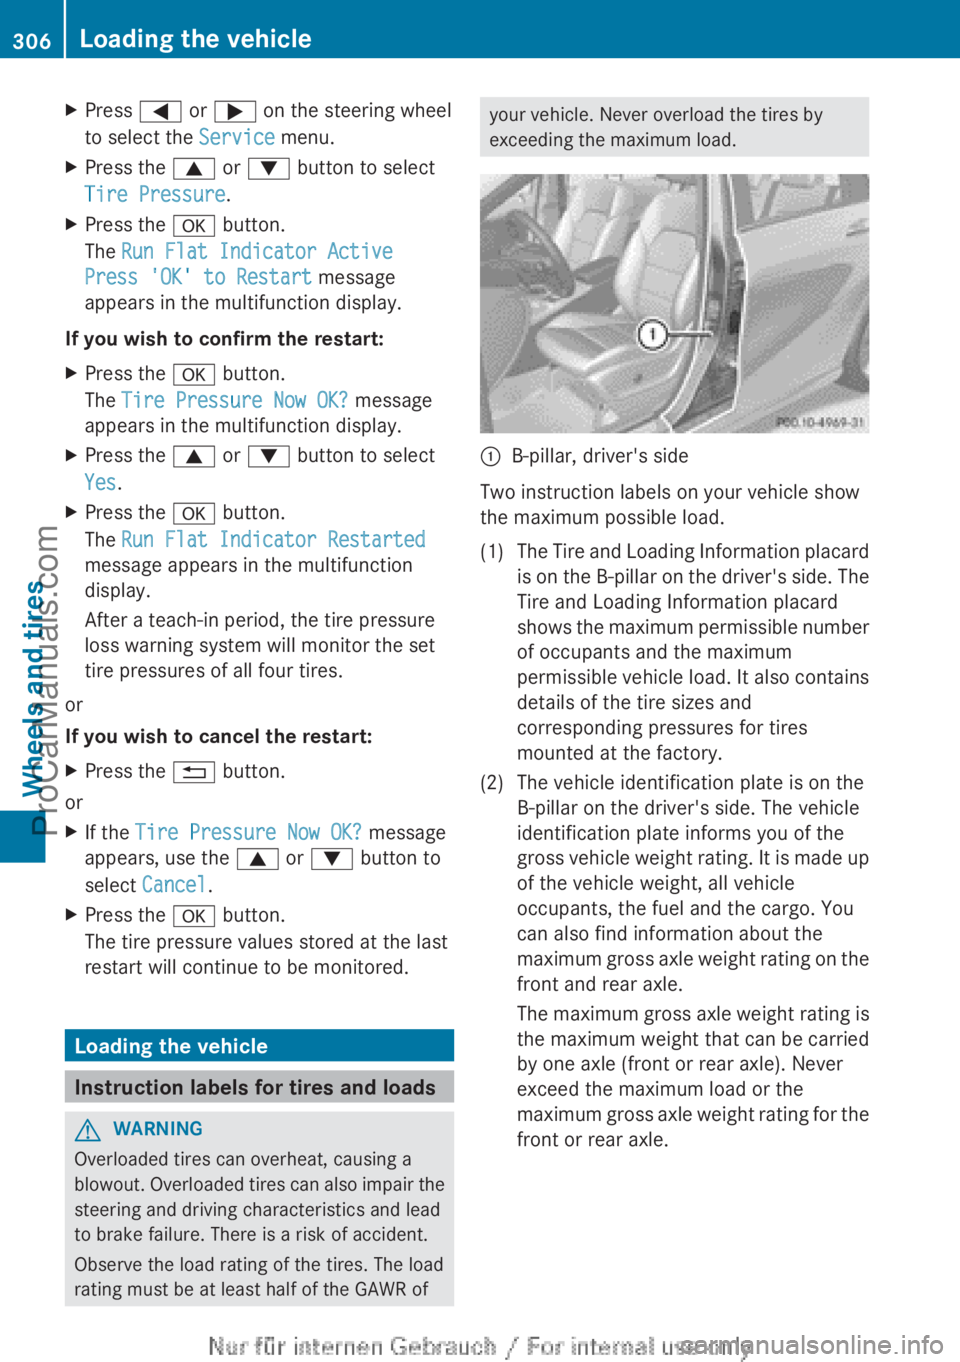
:
B-pillar, driver's side
Two instruction labels on your vehicle show
the maximum possible load.
(1) The Tire and Loading Information placard is on the
B-pillar on the driver's side. The
Tire and Loading Information placard
shows the maximum permissible number
of occupants and the maximum
permissible vehicle load. It also contains
details of the tire sizes and
corresponding pressures for tires
mounted at the factory.
(2) The vehicle identification plate is on the B-pillar on the driver's side. The vehicle
identification plate informs you of the
gross vehicle weight
rating. It is made up
of the vehicle weight, all vehicle
occupants, the fuel and the cargo. You
can also find information about the
maximum gross axle weight rating on the
front and rear axle.
The maximum gross axle weight rating is
the maximum weight that can be carried
by one axle (front or rear axle). Never
exceed the maximum load or the
maximum gross axle weight rating for the
front or rear axle. 306
Loading the vehicleWheels and tires
ProCarManuals.com
Page 323 of 340

R
before raising the vehicle, secure it from
rolling away by applying the parking brake
and inserting wheel chocks. Never
disengage the parking brake while the
vehicle is raised.
R the jack must be placed on a firm, flat and
non-slip surface. On a loose surface, a
large, load-bearing underlay
must be used.
On a slippery surface, a non-slip underlay
must be used, e.g. rubber mats.
R do not use wooden blocks or similar
objects as a jack underlay. Otherwise, the
jack will not be able to achieve its load-
bearing capacity due to the restricted
height.
R make sure that the distance between the
underside of the tires and the ground does
not exceed 1.2 inches (3 cm).
R never place your hands and feet under the
raised vehicle.
R never lie under the raised vehicle.
R never start the engine when the vehicle is
raised.
R never open or close a door or the trunk lid
when the vehicle is raised.
R make sure that no persons are present in
the vehicle when the vehicle is raised.
! The jack is designed exclusively for
jacking up the vehicle at the jacking points.
Otherwise, your vehicle could be damaged. X
Using lug wrench :, loosen the bolts on
the wheel you
wish to change by about one
full turn. Do not unscrew the bolts
completely. The jacking points are located just behind the
wheel housings of the front wheels and just
in front of the wheel housings of the rear
wheels (arrows).
X
Take the ratchet wrench out of the tire-
changing tool kit and place it on the
hexagon nut of the jack so that the letters
AUF are visible. X
Position jack = at jacking point ;. X
Make sure the foot of the jack is directly
beneath the jacking point. Changing a wheel
321
Wheels and tires Z
ProCarManuals.com
Page 325 of 340

X
Place the ratchet wrench onto the hexagon
nut of the jack so that the letters AB are
visible.
X Turn the ratchet wrench until the vehicle is
once again standing firmly on the ground.
X Place the jack to one side.
X Tighten the wheel bolts evenly in a
crosswise pattern in the sequence
indicated ( : to A).
The tightening torque
must be 96 lb-ft (130 Nm).
X Turn the jack back to its initial position.
X Stow the jack and the rest of the vehicle
tools in the vehicle again.
X Check the tire pressure of the newly
mounted wheel and adjust it if necessary.
Observe the recommended tire pressure
(Y page 301). Wheel and tire combinations
General notes
! For safety reasons, Mercedes-Benz
recommends that you only use tires and
wheels which have been approved by
Mercedes-Benz specifically for your
vehicle.
These tires have
been specially adapted for
use with the control systems, such as ABS
or ESP ®
, and are marked as follows:
R MO = Mercedes-Benz Original
R MOE = Mercedes-Benz Original Extended
(tires featuring run-flat characteristics)
R MO1 = Mercedes-Benz Original (only
certain AMG tires)
Mercedes-Benz Original Extended tires
may only be used on wheels that have been
specifically approved by Mercedes-Benz.
Only use tires, wheels or accessories
tested and approved by Mercedes-Benz.
Certain characteristics, e.g. handling,
vehicle noise emissions or fuel
consumption, may otherwise be adversely
affected. In addition, when driving with a load, tire dimension variations could cause
the tires to come into contact with the
bodywork
and axle
components. This could
result in damage to the tires or the vehicle.
Mercedes-Benz accepts no liability for
damage resulting from the use of tires,
wheels or accessories other than those
tested and approved.
Information on tires, wheels and approved
combinations can be obtained from any
qualified specialist workshop.
! Retreaded tires are neither tested nor
recommended by Mercedes-Benz, since
previous damage cannot always be
detected on retreaded tires. As a result,
Mercedes-Benz cannot guarantee vehicle
safety if retreaded tires are mounted. Do
not mount used tires if you have no
information about their previous usage.
Overview of abbreviations used in the
following tire tables:
R BA: both axles
R FA: front axle
R RA: rear axle
The recommended pressures for various
operating conditions can be found:
R on the Tire and Loading Information placard
with the recommended tire pressures on
the B-pillar on the driver's side
R in the tire pressure table on the inside of
the fuel filler flap
Observe the notes on recommended tire
pressures under various operating conditions
(Y page 301).
Check tire pressures regularly, and only when
the tires are cold. Comply with the
maintenance recommendations of the tire
manufacturer in the vehicle document wallet. Wheel and tire combinations
323
Wheels and tires Z
ProCarManuals.com
Page 326 of 340
Notes on the vehicle equipment – always
equip the vehicle with:
R
tires of the
same size on a given axle (left/
right)
R the same type of tires at a given time
(summer tires, winter tires, MOExtended
tires)
Exception: it is permissible to install a
different type or make in the event of a flat
tire. Observe the "MOExtended tires (tires
with run-flat characteristics" section
(Y page 281).
Vehicles equipped with MOExtended tires are
not equipped with a TIREFIT kit at the factory.
It is therefore recommended that you
additionally equip your vehicle with a TIREFIT
kit if you mount tires that do not feature run-
flat properties, e.g. winter tires. A TIREFIT kit
may be obtained from a qualified specialist
workshop.
i The following pages contain information
on approved wheel rim and tire sizes for
equipping your vehicle with winter tires.
Winter tires are not available at the factory
as standard equipment or optional extras.
If you want to equip your vehicle with
approved winter tires, it may be necessary
to obtain wheel rims in the corresponding
size. The size of the approved winter tires
may differ from the standard tires. This is
dependent on the model and the
equipment installed at the factory.
The tires and wheel rims, as well as further
information, can be obtained at a qualified
specialist workshop.
In the following table, the wheel/tire
combinations are assigned to the vehicle
models through variants, e.g. V1, V2 etc.: V1
B 250
7 i
Not all wheel and tire combinations are
available at the factory for all countries.
7 BlueEFFICIENCY324
Wheel and tire combinations
Wheels and tires
ProCarManuals.com
Page 327 of 340
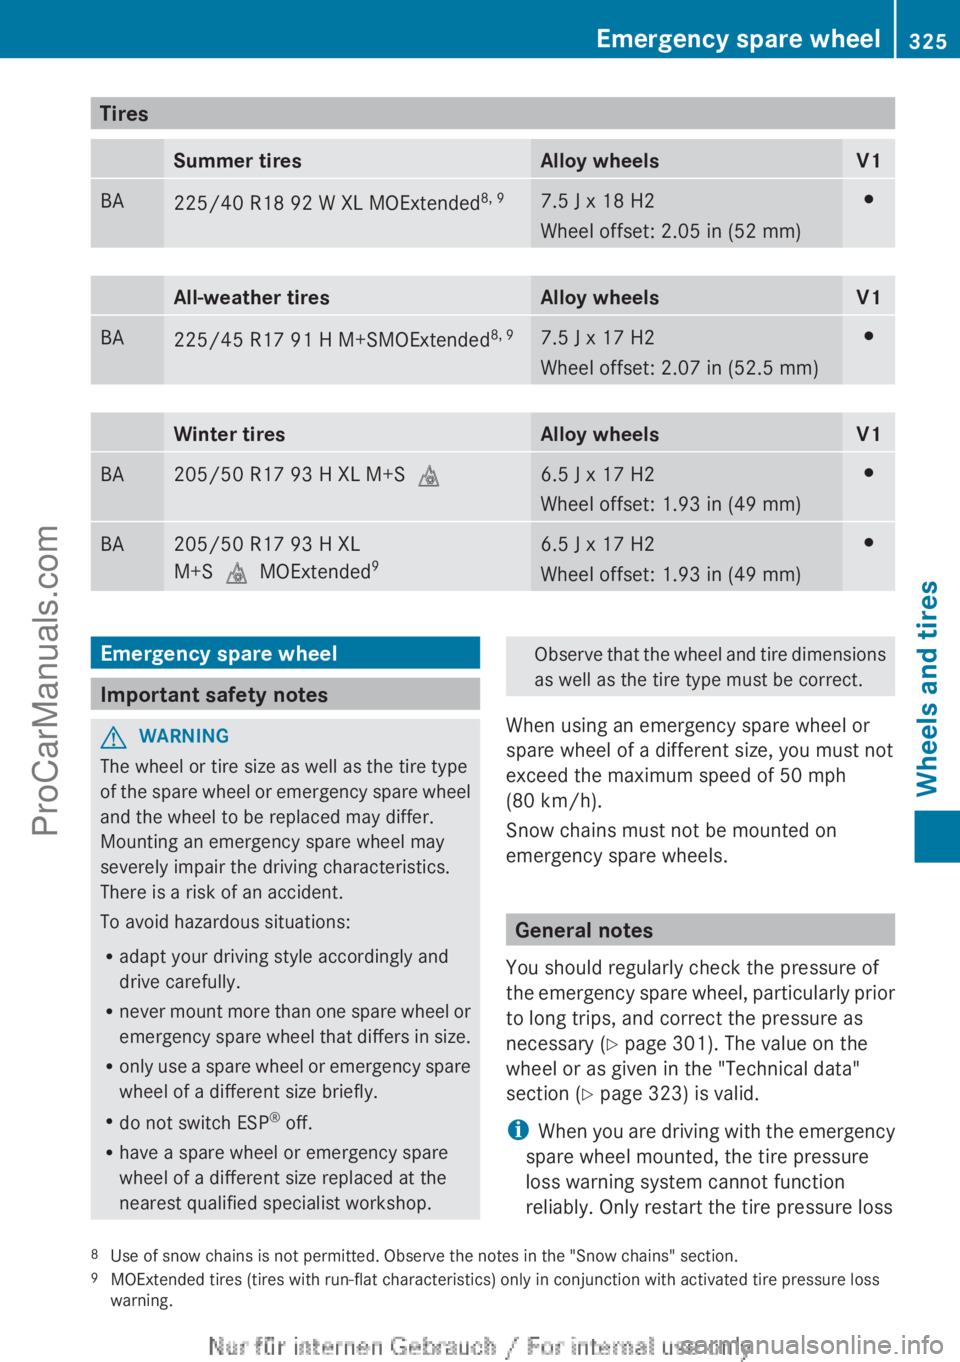
Tires
Summer tires Alloy wheels V1
BA
225/40 R18 92 W XL MOExtended
8, 9 7.5 J x 18 H2
Wheel offset: 2.05 in (52 mm) #
All-weather tires Alloy wheels V1
BA
225/45 R17 91 H M+SMOExtended
8, 9 7.5 J x 17 H2
Wheel offset: 2.07 in (52.5 mm
) #
Winter tires Alloy wheels V1
BA 205/50 R17 93 H XL M+S
i 6.5 J x 17 H2
Wheel offset: 1.93 in (49 mm) #
BA 205/50 R17 93 H XL
M+SiMOExtended
9 6.5 J x 17 H2
Wheel offset: 1.93 in (49 mm) #
Emergency spare wheel
Important safety notes
G
WARNING
The wheel or tire size as well as the tire type
of the spare
wheel or emergency spare wheel
and the wheel to be replaced may differ.
Mounting an emergency spare wheel may
severely impair the driving characteristics.
There is a risk of an accident.
To avoid hazardous situations:
R adapt your driving style accordingly and
drive carefully.
R never mount more than one spare wheel or
emergency spare wheel that differs in size.
R only use a spare wheel or emergency spare
wheel of a different size briefly.
R do not switch ESP ®
off.
R have a spare wheel or emergency spare
wheel of a different size replaced at the
nearest qualified specialist workshop. Observe that the wheel and tire dimensions
as well as the tire type must be correct.
When using an emergency spare wheel or
spare wheel of a different size, you must not
exceed the maximum speed of 50 mph
(80 km/h).
Snow chains must not be mounted on
emergency spare wheels. General notes
You should regularly check the pressure of
the emergency spare
wheel, particularly prior
to long trips, and correct the pressure as
necessary ( Y page 301). The value on the
wheel or as given in the "Technical data"
section ( Y page 323) is valid.
i When you are driving with the emergency
spare wheel mounted, the tire pressure
loss warning system cannot function
reliably. Only restart the tire pressure loss
8 Use of snow chains is not permitted. Observe the notes in the "Snow chains" section.
9 MOExtended tires (tires with run-flat characteristics) only in conjunction with activated tire pressure loss
warning. Emergency spare wheel
325
Wheels and tires Z
ProCarManuals.com