2012 MERCEDES-BENZ B-CLASS washer fluid
[x] Cancel search: washer fluidPage 17 of 340

(vehicles without the EASY-
VARIO-PLUS system)
.....................240
Folding the backrest (rear
compartment) forwards/back
(vehicles with the EASY-VARIO-
PLUS system) ................................ 241
Seat belts
Adjusting the height ......................... 48
Belt force limiters ............................ 49
center rear-compartment seat
.........48
Cleaning ......................................... 277
Correct usage .................................. 46
Emergency Tensioning Devices ........ 49
Fastening ......................................... 47
Important safety guidelines .............45
Releasing ......................................... 48
Safety guidelines ............................. 40
Warning lamp ................................. 224
Warning lamp (function) ................... 49
Seats
Adjusting (electrically) .....................88
Adjusting (manually) ........................ 88
Adjusting the 4-way lumbar
support ............................................ 90
Adjusting the head restraint ............ 89
Cleaning the cover ......................... 276
Correct driver's seat position ........... 86
Important safety notes .................... 87
Seat heating problem ...................... 91
Storing settings (memory function) .. 95
Switching seat heating on/off ......... 91
Sensors (cleaning instructions) .......275
Service menu (on-board computer) . 196
Service products Brake fluid ..................................... 332
Coolant (engine) ............................ 333
Engine oil ....................................... 332
Fuel ................................................ 330
Important safety notes .................. 329
Refrigerant (air-conditioning
system) .......................................... 334
Washer fluid ................................... 334
Service work
see ASSYST PLUS
Settings
Factory (on-board computer) ......... 199
On-board computer ....................... 196
Setting the air distribution ...............126Setting the airflow
............................ 126
Side impact air bag ............................. 44
Side marker lamp (display
message) ............................................ 211
Side windows Cleaning ......................................... 274
Convenience closing feature ............ 78
Convenience opening feature
..........78
Important safety information ........... 77
Opening/closing .............................. 77
Problem (malfunction) .....................79
Resetting ......................................... 79
Sliding sunroof
see Panorama roof with power
tilt/sliding panel
SmartKey
Changing the battery ....................... 70
Changing the programming ............. 69
Checking the battery ....................... 70
Convenience closing feature ............ 78
Convenience opening feature .......... 78
Display message ............................ 223
Door central locking/unlocking ....... 68
Important safety notes .................... 68
Loss ................................................. 72
Mechanical key ................................ 69
Positions (ignition lock) ................. 135
Problem (malfunction) .....................72
Starting the engine ........................ 135
SmartKey positions (ignition lock) ..135
Snow chains ...................................... 301
Sockets Center console .............................. 251
Luggage compartment ................... 251
Points to observe before use ......... 250
Rear compartment ......................... 251
Specialist workshop ............................ 24
Speed, controlling see Cruise control
Speedometer
Activating/deactivating the
additional speedometer .................196
Digital ............................................ 190
In the Instrument cluster ................. 29
Segments ...................................... 187
Selecting the unit of measurement 196
see Instrument cluster Index
15
ProCarManuals.com
Page 21 of 340

PASSENGER AIR BAG OFF ...............
53
Reserve fuel ................................... 231
Seat belt
........................................ 224
SRS ................................................ 230
Warranty ............................................ 328
Washer fluid Display message ............................ 223
Wheel bolt tightening torque ...........322
Wheel chock ...................................... 320
Wheels Changing a wheel .......................... 319
Checking ........................................ 299
Cleaning ......................................... 273
Cleaning (warning) .........................319
Emergency spare wheel ................. 325
Important safety notes .................. 298
Interchanging/changing ................319
Mounting a new wheel ................... 322
Mounting a wheel .......................... 319
Removing a wheel ..........................322
Storing ........................................... 319
Tightening torque ........................... 322
Wheel size/tire size ....................... 323
Window curtain air bag
Display message ............................ 208
Operation ......................................... 45
Windows
see Side windows
Windshield
Defrosting ...................................... 127
Windshield washer fluid
see Windshield washer system
Windshield washer system
Adding washer fluid .......................269
Notes ............................................. 334
Windshield wipers
Display message ............................ 223
Problem (malfunction) ...................115
Rear window wiper ........................112
Replacing the wiper blades ............ 112
Switching on/off ........................... 111
Winter driving
Slippery road surfaces ................... 157
Snow chains .................................. 301
Winter operation
General notes ................................ 300
Winter tires
M+S tires ....................................... 300Wiper blades
Cleaning ......................................... 274
Important safety notes
..................112
Replacing (rear window) ................113
Replacing (windshield) ................... 113
Wooden trim (cleaning instructions) 276
Workshops see Qualified specialist workshop Z
ZONE function Switching on/off ........................... 126 Index
19
ProCarManuals.com
Page 103 of 340

The blue
K indicator lamp in the
instrument cluster lights
up when the high-
beam headlamps are switched on.
X To switch off the high-beam
headlamps: move the combination
switch
back to its normal position.
The blue K indicator lamp in the
instrument cluster goes out.
i Vehicles with Adaptive Highbeam Assist:
when Adaptive Highbeam Assist is active,
it controls activation of the high-beam
headlamps (Y page 102).
High-beam flasher X
To switch on: turn the SmartKey in the
ignition lock to position 1 or 2 or start the
engine.
X Pull the combination switch in the direction
of arrow =. Hazard warning lamps
The hazard warning lamps automatically
switch on if:
R
an air bag is deployed
R the vehicle decelerates rapidly from a
speed of
more
than 45mph (70 km/h) and
comes to a standstill
X To switch on the hazard warning lamps:
press button :.
All turn signals flash. If you now switch on
a turn signal
using the combination switch, only the turn signal lamp on the
corresponding side
of
the vehicle will flash.
X To switch off the hazard warning
lamps: press button :.
The hazard warning lamps switch off
automatically if the vehicle reaches a speed
of over 6mph (10km/h) again after a full
brake application.
i The hazard warning lamps still operate if
the ignition is switched off. Headlamp cleaning system
The headlamps are cleaned automatically if
the "Wipe with washer fluid" function is
operated five times
while the lights are on and
the engine is running (Y page 111). When you
switch off the ignition, the automatic
headlamp cleaning system is reset and
counting is resumed from 0. Cornering light function
The cornering light function improves the
illumination of the road over a wide angle in
the direction
you
are turning, enabling better
visibility in tight bends, for example. The
cornering light function can only be activated
when the low-beam headlamps are switched
on. Exterior lighting
101
Lights and windshield wipers Z
ProCarManuals.com
Page 113 of 340

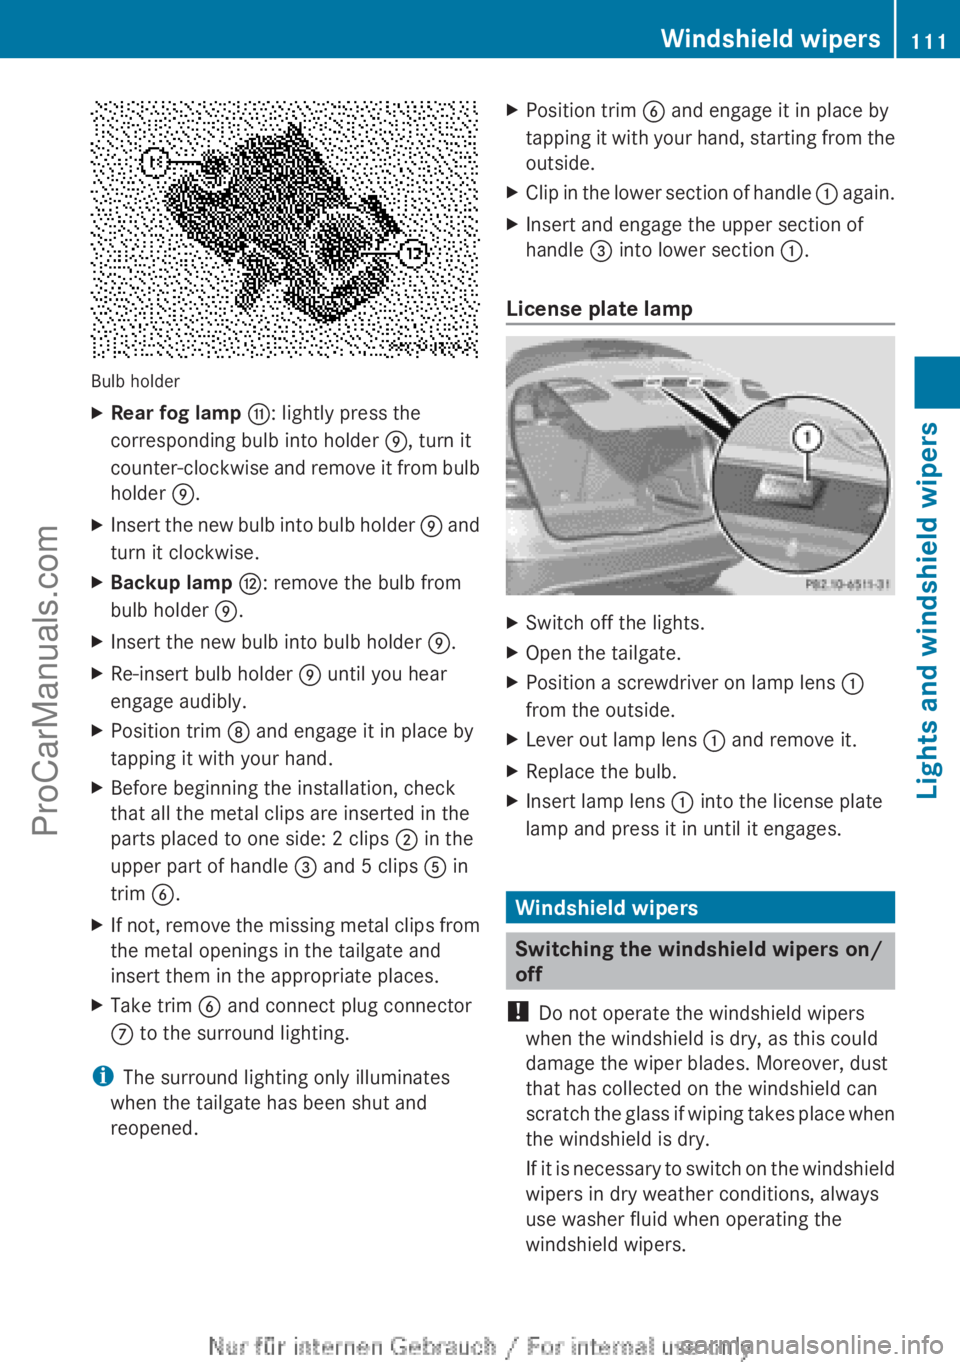
Bulb holder
X
Rear fog lamp G: lightly press the
corresponding bulb into holder E, turn it
counter-clockwise and
remove
it from bulb
holder E.
X Insert the new bulb into bulb holder E and
turn it clockwise.
X Backup lamp H: remove the bulb from
bulb holder E
.
X Insert the new bulb into bulb holder E.
X Re-insert bulb holder E until you hear
engage audibly.
X Position trim D and engage it in place by
tapping it with your hand.
X Before beginning the installation, check
that all the metal clips are inserted in the
parts placed to one side: 2 clips ; in the
upper part of handle = and 5 clips A in
trim B.
X If not, remove the missing metal clips from
the metal openings in the tailgate and
insert them in the appropriate places.
X Take trim B and connect plug connector
C to the surround lighting.
i The surround lighting only illuminates
when the tailgate has been shut and
reopened. X
Position trim B and engage it in place by
tapping it
with
your hand, starting from the
outside.
X Clip in the lower section of handle : again.
X Insert and engage the upper section of
handle = into lower section
:.
License plate lamp X
Switch off the lights.
X Open the tailgate.
X Position a screwdriver on lamp lens :
from the outside.
X Lever out lamp lens : and remove it.
X Replace the bulb.
X Insert lamp lens : into the license plate
lamp and press it in until it engages. Windshield wipers
Switching the windshield wipers on/
off
! Do not operate the windshield wipers
when the windshield is dry, as this could
damage the wiper blades. Moreover, dust
that has collected on the windshield can
scratch the glass
if wiping takes place when
the windshield is dry.
If it is necessary to switch on the windshield
wipers in dry weather conditions, always
use washer fluid when operating the
windshield wipers. Windshield wipers
111
Lights and windshield wipers Z
ProCarManuals.com
Page 114 of 340

!
If the windshield wipers leave smears on
the windshield after the vehicle has been
washed in an automatic car wash, wax or
other residues may be the reason for this.
Clean the windshield using washer fluid
after washing the vehicle in an automatic
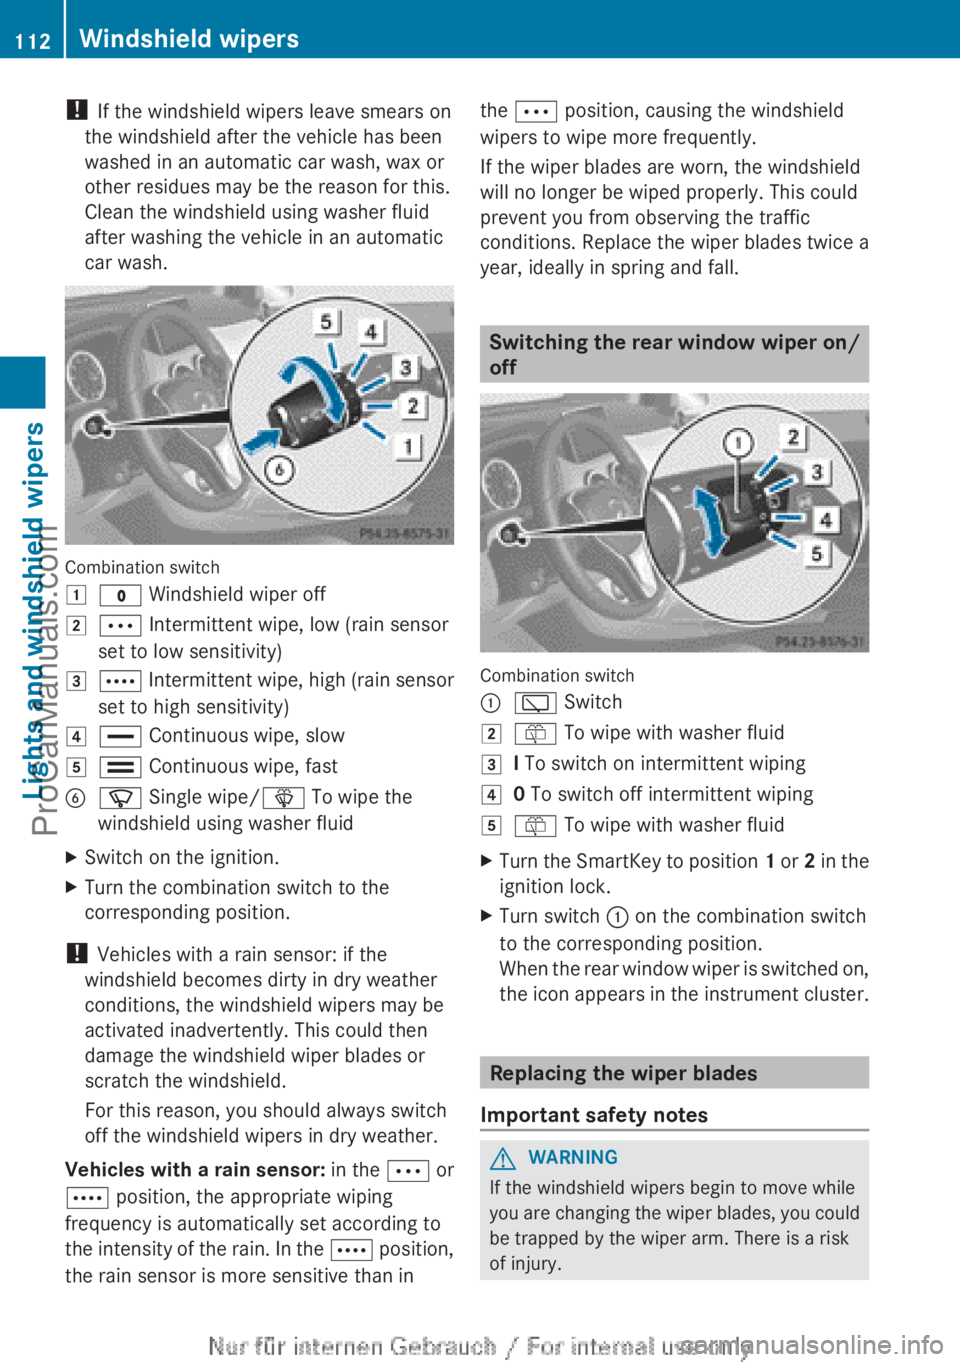
car wash. Combination switch
1
$ Windshield wiper off
2 Ä Intermittent wipe, low (rain sensor
set to low sensitivity)
3 Å Intermittent wipe, high (rain sensor
set to high sensitivity)
4 ° Continuous wipe, slow
5 ¯
Continuous wipe, fast
B í Single wipe/ î To wipe the
windshield using washer fluid
X Switch on the ignition.
X Turn the combination switch to the
corresponding position.
! Vehicles with a rain sensor: if the
windshield becomes dirty in dry weather
conditions, the windshield wipers may be
activated inadvertently. This could then
damage the windshield wiper blades or
scratch the windshield.
For this reason, you should always switch
off the windshield wipers in dry weather.
Vehicles with
a
rain sensor: in the Ä or
Å position, the appropriate wiping
frequency is automatically set according to
the intensity of the rain. In the Å position,
the rain sensor is more sensitive than in the Ä position, causing the windshield
wipers to wipe more frequently.
If the wiper blades are worn, the windshield
will no longer be wiped properly. This could
prevent you from observing the traffic
conditions. Replace the wiper blades twice a
year, ideally in spring and fall.
Switching the rear window wiper on/
off
Combination switch
:
è Switch
2 ô To wipe with washer fluid
3 I To switch on intermittent wiping
4 0 To switch off intermittent wiping
5 ô To wipe with washer fluid
X Turn the SmartKey to position 1 or
2
in the
ignition lock.
X Turn switch : on the combination switch
to the corresponding position.
When the rear
window wiper is switched on,
the icon appears in the instrument cluster. Replacing the wiper blades
Important safety notes G
WARNING
If the windshield wipers begin to move while
you are changing
the wiper blades, you could
be trapped by the wiper arm. There is a risk
of injury. 112
Windshield wipers
Lights and windshield wipers
ProCarManuals.com
Page 117 of 340

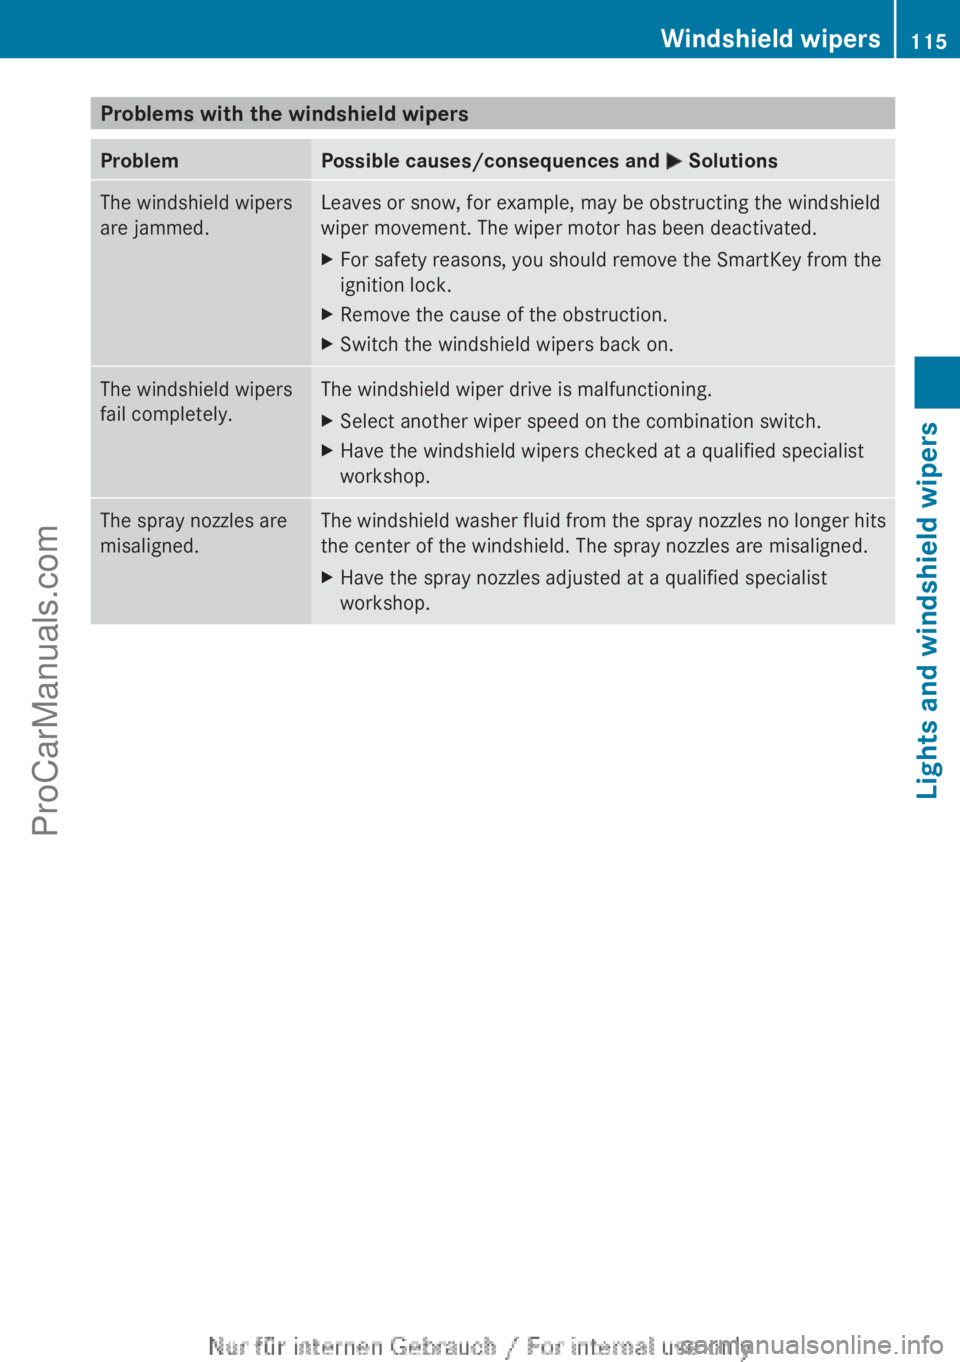
Problems with the windshield wipers
Problem Possible causes/consequences and
M SolutionsThe windshield wipers
are jammed. Leaves or snow, for example, may be obstructing the windshield
wiper movement. The wiper motor has been deactivated.
X
For safety reasons, you should remove the SmartKey from the
ignition lock.
X Remove the cause of the obstruction.
X Switch the windshield wipers back on. The windshield wipers
fail completely. The windshield wiper drive is malfunctioning.
X
Select another wiper speed on the combination switch.
X Have the windshield wipers checked at a qualified specialist
workshop. The spray nozzles are
misaligned. The windshield washer fluid from the spray nozzles no longer hits
the center of the windshield. The spray nozzles are misaligned.
X
Have the spray nozzles adjusted at a qualified specialist
workshop. Windshield wipers
115Lights and windshield wipers Z
ProCarManuals.com
Page 225 of 340

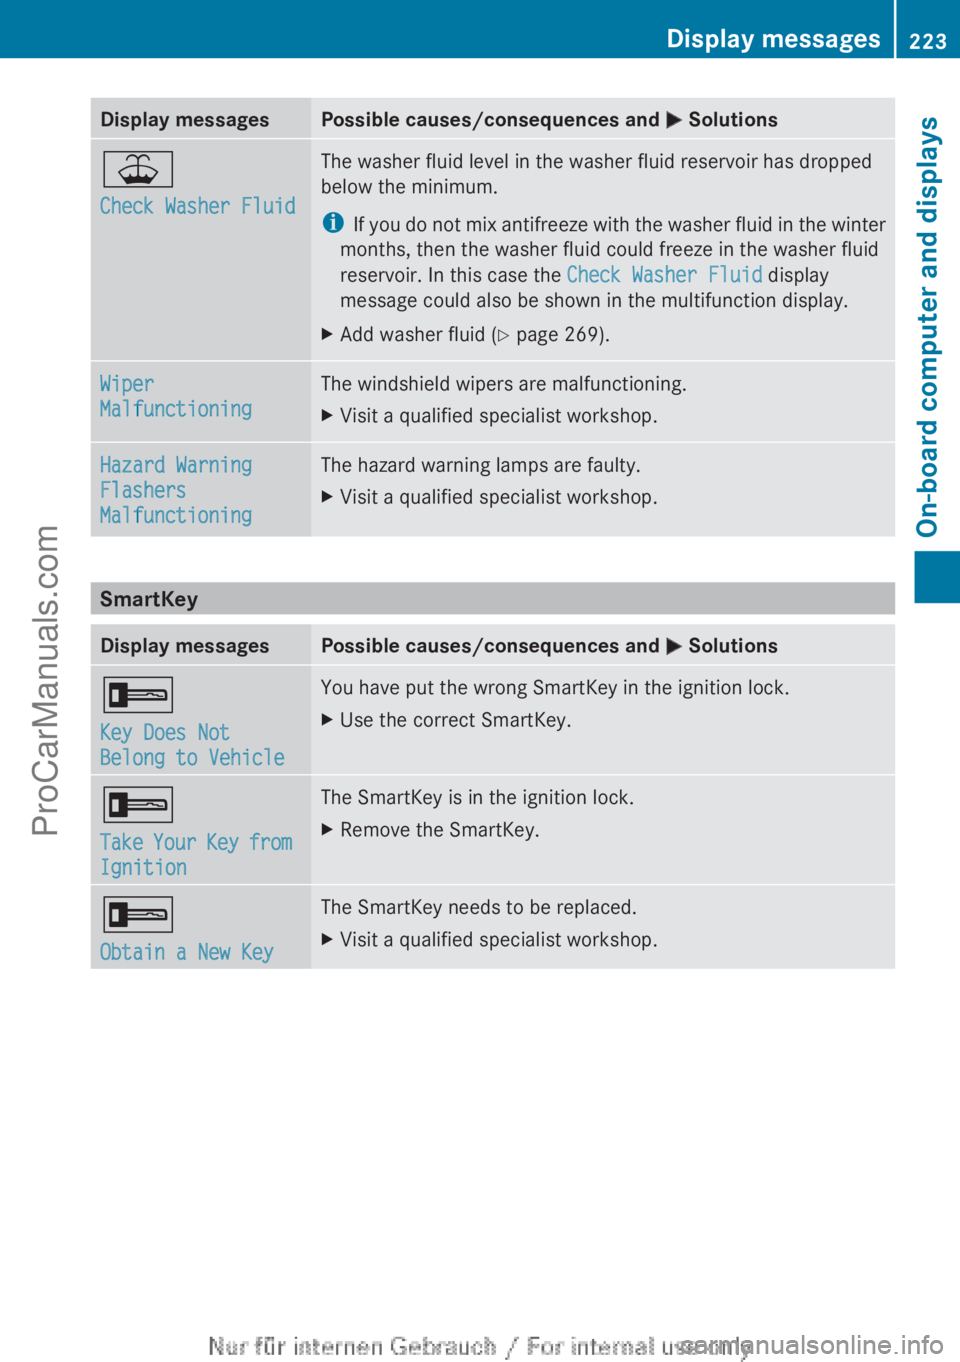
Display messages Possible causes/consequences and
M Solutions¥
Check Washer Fluid The washer fluid level in the washer fluid reservoir has dropped
below the minimum.
i
If you do
not mix antifreeze with the washer fluid in the winter
months, then the washer fluid could freeze in the washer fluid
reservoir. In this case the Check Washer Fluid display
message could also be shown in the multifunction display.
X Add washer fluid ( Y page 269).Wiper
Malfunctioning The windshield wipers are malfunctioning.
X
Visit a qualified specialist workshop. Hazard Warning
Flashers
Malfunctioning The hazard warning lamps are faulty.
X
Visit a qualified specialist workshop. SmartKey
Display messages Possible causes/consequences and
M Solutions+
Key Does Not
Belong to Vehicle You have put the wrong SmartKey in the ignition lock.
X
Use the correct SmartKey. +
Take Your
Key
from
Ignition The SmartKey is in the ignition lock.
X
Remove the SmartKey. +
Obtain a New Key The SmartKey needs to be replaced.
X
Visit a qualified specialist workshop. Display messages
223
On-board computer and displays Z
ProCarManuals.com
Page 271 of 340

Checking and adding other service
products
Checking coolant level G
WARNING
The engine cooling system is pressurized,
particularly when the engine is warm. When
opening the cap,
you could be scalded by hot
coolant spraying out. There is a risk of injury.
Let the engine cool down before opening the
cap. Wear eye and hand protection when
opening the cap. Open the cap slowly half a
turn to allow pressure to escape.
! The coolant may only be checked and
corrected when the engine is cool (coolant
temperature below 104 ‡ (40 †).
Checking the coolant when the coolant
temperature is above 104 ‡ (40 †) may
result in damage to the engine or to the
engine cooling system. Example
X
Park the vehicle on a level surface.
Only check the coolant level when the
vehicle is on
a level surface and the engine
has cooled down.
X Turn the SmartKey to position 2 in the
ignition lock (Y page 135).
X Check the coolant temperature display in
the instrument cluster.
The coolant temperature must be below
104 ‡ (40 †).
X Turn the SmartKey to position
0 (
Y page 135) in the ignition lock. X
Slowly turn cap : half a turn counter-
clockwise to allow excess pressure to
escape.
X Turn cap : further counter-clockwise
and
remove it.
If the coolant is at the level of marker bar
= in the filler neck when cold, there is
enough coolant in coolant expansion
tank ;.
X If necessary, add coolant that has been
tested and approved by Mercedes-Benz.
X Replace cap : and turn
it clockwise as far
as it will go.
For further information on coolant, see
(Y page 333).
Adding washer fluid to the windshield
washer system/headlamp cleaning
system G
WARNING
Windshield washer concentrate is highly
flammable. If it comes into contact with hot
engine components or the exhaust system it
could ignite. There is a risk of fire and injury.
Make sure that no windshield washer
concentrate is spilled next to the filler neck. Example
X
To open: pull cap : upwards by the tab.
X Add the premixed washer fluid.
X To close:
press cap :
onto the filler neck
until it engages. Engine compartment
269
Maintenance and care Z
ProCarManuals.com