2012 MAZDA MODEL CX-7 sat nav
[x] Cancel search: sat navPage 9 of 522

Black plate (9,1)
Interior Equipment (View B)
Audio control switch ......................................................................................... page 6-54
Air bags ............................................................................................................. page 2-45
Multi information display ................................................................................ page 6-108
Multi information display (MID) with compact navigation system (if
equipped) .............................................................................. Refer to the separate manual
Climate control system ........................................................................................ page 6-2
Hazard warning flasher switch .......................................................................... page 5-75
Information display .......................................................................................... page 6-106
Audio system ..................................................................................................... page 6-15
Glove compartment ......................................................................................... page 6-126
Rear window defroster switch ........................................................................... page 5-73
Accessory socket ............................................................................................. page 6-128
Seat warmer switches ........................................................................................ page 2-13
AT shift lever (Sport AT) ................................................................................... page 5-12
Cruise control switches ...................................................................................... page 5-21
7-inch navigation system (if equipped) ................................ Refer to the separate manual
Your Vehicle at a Glance
Interior Overview
1-3The equipment and installation position varies by vehicle CX-7_8CG3-EA-11J_Edition1 Page9
Saturday, September 24 2011 10:31 AM
Form No.8CG3-EA-11J
Page 12 of 522

Black plate (12,1)
Rear
Rear wiper blade ................................................................................................ page 8-32
Liftgate .............................................................................................................. page 3-31
Light bulbs ......................................................................................................... page 8-42
Antenna ............................................................................................................. page 6-14
Child safety locks .............................................................................................. page 3-31
Outside mirror .................................................................................................... page 3-56
Tires ................................................................................................................... page 8-36
Rear view parking camera (Without 7-inch navigation system) ...................... page 6-119
Rear view parking camera (With 7-inch navigation system) (if
equipped) .............................................................................. Refer to the separate manual
1-6
Your Vehicle at a Glance
The equipment and installation position varies by vehicle
Exterior Overview
CX-7_8CG3-EA-11J_Edition1 Page12
Saturday, September 24 2011 10:31 AM
Form No.8CG3-EA-11J
Page 44 of 522

Black plate (44,1)
Do not install a front-facing child-restraint system on the front passenger seat unless
it is unavoidable:
In a collision, the force of a deploying air bag could cause serious injury or death to
the child. If installing a front-facing child-restraint system on the front passenger
seat is unavoidable, move the front passenger seat as far back as possible.
Seating a child in a child-restraint system on the front passenger seat is dangerous
under certain conditions:
Your vehicle is equipped with front passenger seat weight sensors. Even with the
front passenger seat weight sensors, if you must use the front passenger seat to seat
a child, using a child-restraint system on the front passenger seat under the
following conditions increases the danger of the front passenger air bag deploying
and could result in serious injury or death to the child.
ØThe front passenger air bag deactivation indicator light does not illuminate when
seating a child in the child-restraint system.
ØLuggage or other items are placed on the seat with the child in the child-restraint
system.
ØA rear passenger or luggage pushing or pulling down on the front passenger
seatback.
ØA rear passenger puts their feet on the front seat rails.
ØLuggage or other items are placed on the seatback or hung on the head restraint.
ØHeavy items are placed in the seatback map pocket.
ØThe seat is washed.
ØLiquids are spilled on the seat.
ØThe front passenger seat is moved backward, pushing into luggage or other items
placed behind it.
ØThe front passenger seatback contacts the rear seat.
ØLuggage or other items are placed between the front passenger seat and driver
seat.
ØAny accessories, which might increase the total seated weight on the front
passenger seat, are attached to the front passenger seat.
The designated positions with seat belts on the rear seats are the safest places for
children. Always use seat belts and child restraints.
2-32
Essential Safety Equipment
Child Restraint
CX-7_8CG3-EA-11J_Edition1 Page44
Saturday, September 24 2011 10:31 AM
Form No.8CG3-EA-11J
Page 50 of 522

Black plate (50,1)
qIf You Must Use the Front Seat
for Children
If you cannot put all children in the rear
seat, at least put the smallest children in
the rear and be sure the largest child up
front uses the shoulder belt over the
shoulder.
NEVER put a rear-facing child-restraint
system on the front passenger seat
whether your vehicle is equipped with a
seat weight sensor or not.
This seat is also not set up for tethered
child-restraint systems, put them in one of
the rear seat positions set up with tether
anchors.
Likewise the LATCH child-restraint
system cannot be secured in the front
passenger's seat and should be used in the
rear seat.
Do not allow anyone to sleep against the
side window if you have an optional side
and curtain air bags, it could cause serious
injuries to an out of position occupant. As
children more often sleep in cars, it is
better to put them in the rear seat. If
installing the child-restraint system on the
front seat is unavoidable, follow these
instructions when using a front-facing
child-restraint system in the front
passenger's seat.
NOTE
lTo check if your front seats have side air
bags:
Mazda vehicles equipped with side air bag
will have a“SRS AIRBAG”tag on the
outboard shoulder of the front seats.
lTo check if your vehicle has curtain air
bags:
Mazda vehicles equipped with curtain air
bag will have an“SRS AIRBAG”marking
on the window pillars along the roof edge.
WARNING
Always move the front passenger seat
as far back as possible if installing a
front-facing child-restraint system on it
is unavoidable:
As your vehicle has front air bags
and doubly so because your vehicle
has side air bags, a front-facing
child-restraint system should be put
on the front passenger seat only
when it is unavoidable.
Even if the front passenger air bag
deactivation indicator light
illuminates, always move the seat as
far back as possible, because the
force of a deploying air bag could
cause serious injury or death to the
child.
Never use a rear-facing child-restraint
system in the front seat with an air bag
that could deploy:
Rear-facing child-restraint systems
on the front seat are particularly
dangerous.
Even in a moderate collision, the
child-restraint system can be hit by a
deploying air bag and moved
violently backward resulting in
serious injury or death to the child.
Even though you may feel assured
that the front passenger air bag will
not deploy based on the fact that the
front passenger air bag deactivation
indicator light illuminates, you
should not use a rear-facing child-
restraint system in the front seat.
2-38
Essential Safety Equipment
Child Restraint
CX-7_8CG3-EA-11J_Edition1 Page50
Saturday, September 24 2011 10:31 AM
Form No.8CG3-EA-11J
Page 273 of 522

Black plate (273,1)
NOTE
Do not perform the following operation while
“UPDATING”is displayed. Otherwise, the
updating procedure will be cancelled.
lTurning off the audio powerlSwitching to other modeslSwitching the ignition off
When the SIRIUS mode is switched to
another mode, or when the power is
turned off, the present channel which is
being received is stored as the last
channel.
Channel selection
Turning the manual tuning dial allows you
to select the desired receiving channel.
lTurn the knob clockwise: Channel UplTurn the knob counterclockwise:
Channel Down
Unsubscribed channel
When a selected station has not been
subscribed to, the display indicates the
following:
[CALL
888] and [539SIRI]
(Flashes alternately)
NOTE
When the subscription contract is canceled, all
of the channels including channel 184 appear
as unsubscribed.
Invalid channel
When a selected channel is not
broadcasting, [SR
(bank number)
INVALID] is displayed for one second,
followed by [SR
(bank number)
CHANNEL], which is also displayed for
one second. The display then returns to
the previous valid channel.NOTE
If the last channel selected has become
unavailable because of a channel update the
above indication is displayed until any button
is pressed.
Preset channel programming
(Programming with“channel number”
display)
1. Select the desired channel to be
programmed. At this point, the
following is displayed:
[SR
(bank number)(channel
number)]
2. Keep pressing the channel preset
button for 1.5 seconds or more.
The programming process is complete
after the channel number flashes. Then,
[SR
(bank number)] is displayed
and a beep sound is heard at the same
time.
3. [SR
(bank number)CH
(preset number)(channel number)]
are displayed.
(Programming with“text”display (e.g.
channel name))
1. Select the desired channel to be
programmed. At this point, the
following is displayed:
[SR
(bank number)(selected text
(e.g. channel name))]
2. Keep pressing the channel preset
button for 1.5 seconds or more.
The programming process is complete
after the text (e.g. channel name)
flashes. Then, [SR
(bank number)]
is displayed and you will hear beep
sound at the same time.
Interior Comfort
Audio System
6-35
CX-7_8CG3-EA-11J_Edition1 Page273
Saturday, September 24 2011 10:32 AM
Form No.8CG3-EA-11J
Page 292 of 522

Black plate (292,1)
Audio Control Switch
Operation
When the audio unit is turned on,
operation of the audio unit from the
steering wheel is possible.
NOTE
Because the audio unit will be turned off under
the following conditions, the switches will be
inoperable.
lWhen the ignition is switched off.lWhen the power button on the audio unit is
pressed and the audio unit is turned off.
lWhen the CD being played is ejected and
the audio unit is turned off.
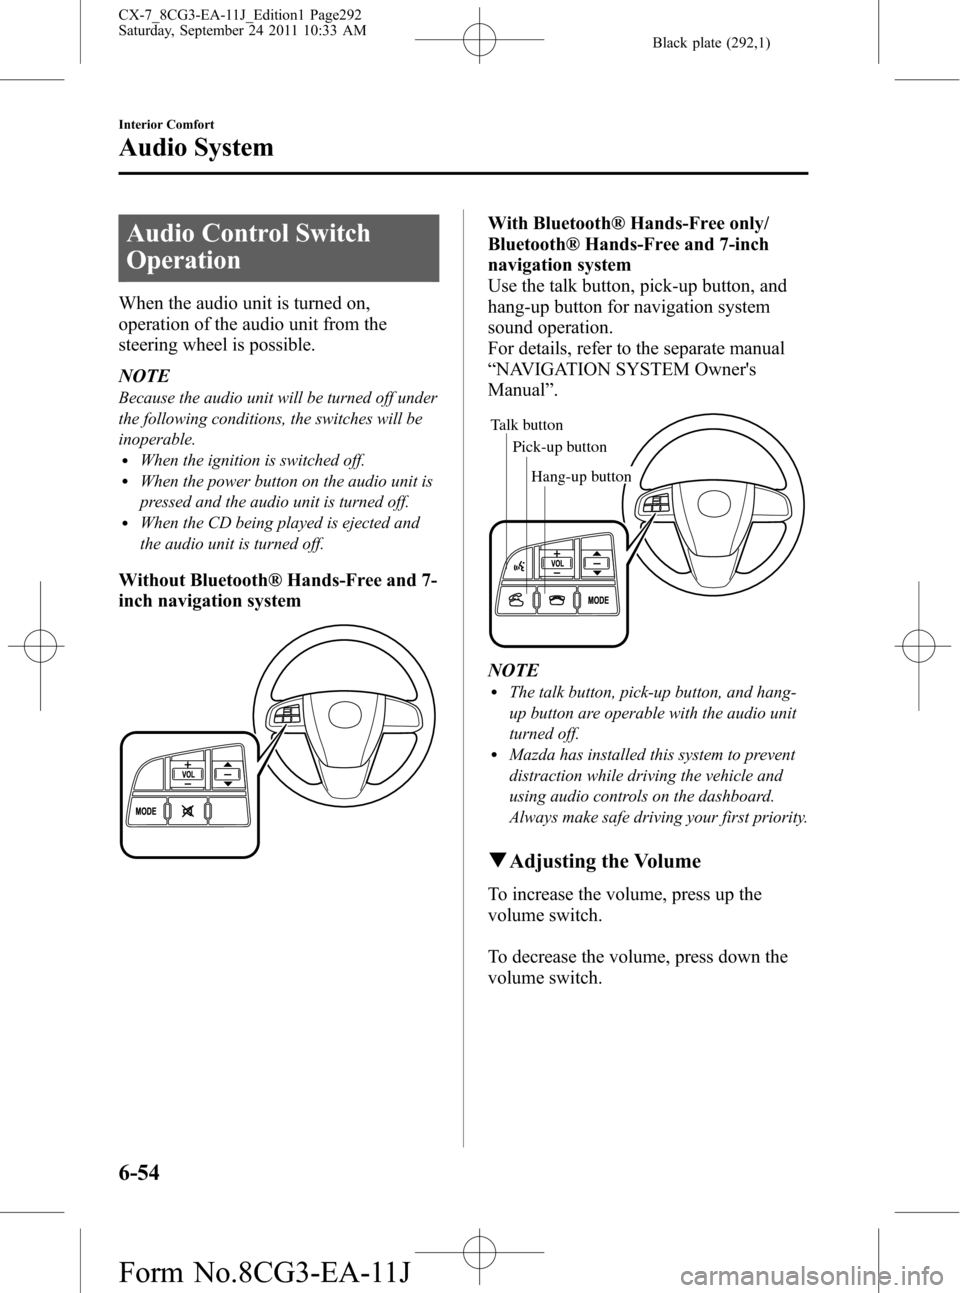
Without Bluetooth® Hands-Free and 7-
inch navigation system
With Bluetooth® Hands-Free only/
Bluetooth® Hands-Free and 7-inch
navigation system
Use the talk button, pick-up button, and
hang-up button for navigation system
sound operation.
For details, refer to the separate manual
“NAVIGATION SYSTEM Owner's
Manual”.
Talk button
Pick-up buttonTalk button
Hang-up button Pick-up button
NOTElThe talk button, pick-up button, and hang-
up button are operable with the audio unit
turned off.
lMazda has installed this system to prevent
distraction while driving the vehicle and
using audio controls on the dashboard.
Always make safe driving your first priority.
qAdjusting the Volume
To increase the volume, press up the
volume switch.
To decrease the volume, press down the
volume switch.
6-54
Interior Comfort
Audio System
CX-7_8CG3-EA-11J_Edition1 Page292
Saturday, September 24 2011 10:33 AM
Form No.8CG3-EA-11J
Page 293 of 522

Black plate (293,1)
Without Bluetooth® Hands-Free and 7-
inch navigation system
With Bluetooth® Hands-Free only/
Bluetooth® Hands-Free and 7-inch
navigation system
qChanging the Source
Press the mode switch () to change
the audio source (FM1 radio→FM2
radio→AM radio→CD player or CD
changer→SIRIUS1→SIRIUS2→
SIRIUS3→AUX→BT audio→
cyclical).
Without Bluetooth® Hands-Free and 7-
inch navigation system
With Bluetooth® Hands-Free only/
Bluetooth® Hands-Free and 7-inch
navigation system
Interior Comfort
Audio System
6-55
CX-7_8CG3-EA-11J_Edition1 Page293
Saturday, September 24 2011 10:33 AM
Form No.8CG3-EA-11J
Page 294 of 522

Black plate (294,1)
NOTE
CD, CD changer, SIRIUS digital satellite
radio, and BT audio modes cannot be selected
in the following cases:
lSIRIUS digital satellite radio unit, or BT
audio unit is not equipped on the audio
system.
lCD has not been inserted.
The AUX mode is unavailable unless you
connect a commercially available portable
audio unit (such as an MP3 player) to the
auxiliary jack. Connect a portable audio unit
or similar product on the market to the
auxiliary jack to listen to music or audio over
the vehicle's speakers. Change the audio
source to AUX mode (page 6-57).
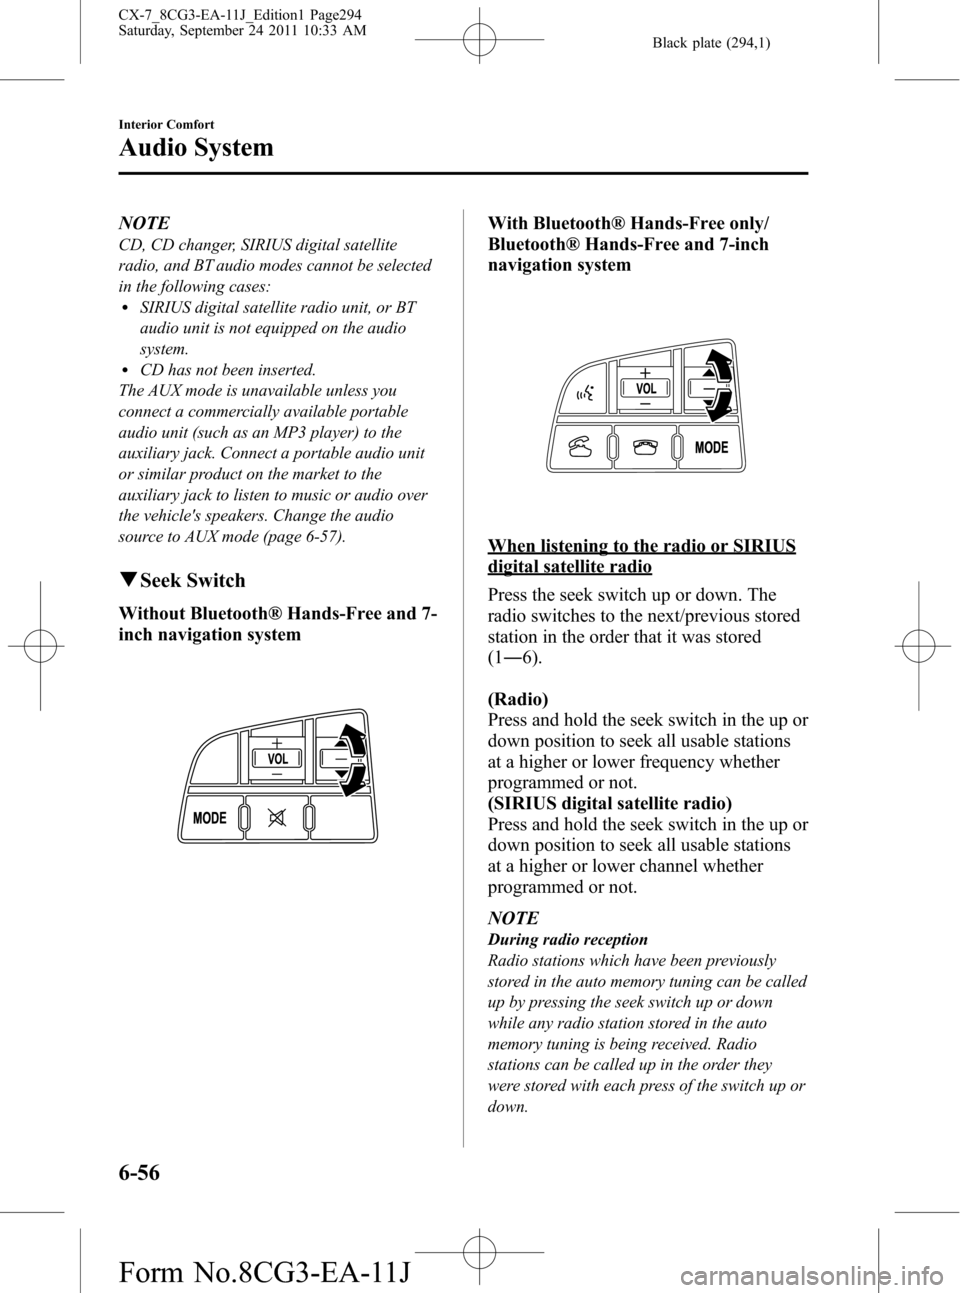
qSeek Switch
Without Bluetooth® Hands-Free and 7-
inch navigation system
With Bluetooth® Hands-Free only/
Bluetooth® Hands-Free and 7-inch
navigation system
When listening to the radio or SIRIUS
digital satellite radio
Press the seek switch up or down. The
radio switches to the next/previous stored
station in the order that it was stored
(1―6).
(Radio)
Press and hold the seek switch in the up or
down position to seek all usable stations
at a higher or lower frequency whether
programmed or not.
(SIRIUS digital satellite radio)
Press and hold the seek switch in the up or
down position to seek all usable stations
at a higher or lower channel whether
programmed or not.
NOTE
During radio reception
Radio stations which have been previously
stored in the auto memory tuning can be called
up by pressing the seek switch up or down
while any radio station stored in the auto
memory tuning is being received. Radio
stations can be called up in the order they
were stored with each press of the switch up or
down.
6-56
Interior Comfort
Audio System
CX-7_8CG3-EA-11J_Edition1 Page294
Saturday, September 24 2011 10:33 AM
Form No.8CG3-EA-11J