2012 MAZDA MODEL 3 5-DOOR brake light
[x] Cancel search: brake lightPage 350 of 528

Black plate (350,1)
3. Select the item you want to turn off(TIRE ROTATION or SERVICE DUE)
by pressing the Enter (up/down) switch
up or down, and then press the Enter
(up/down) switch.
4. Select OFF and press the Enter (up/
down) switch.
qWarning Indicator
The following warning indicators are
displayed according to necessity. Warning
indicators are displayed regardless of the
multi information display operation.
lDOOR OPENlTRUNK OPEN (including the liftgate)lTIGHTEN FUEL CAP (Displayed
when the check fuel cap warning light
illuminates in the instrument cluster.)
lCHECK TIRE PRESSURE
lRELEASE PARKING BRAKElAdvanced Keyless Entry System
related
lKEY BATTERY IS LOWlADVANCED KEY NOT FOUNDlMOVE SHIFT LEVER TO PlDEPRESS BRAKE PEDAL TO
START ENGINE
lDEPRESS CLUTCH PEDAL TO
START ENGINE
lUSE AUXILIARY KEY
NOTE
When more than two warnings occur at the
same time, indicators are switched at each
specified time.
q Settings
The following settings can be changed:lScreen adjustment (Brightness/contrast,
screen-off)í
lBuzzer volume (Ignition key reminder,
lights-on reminder, Blind Spot
Monitoring (BSM) warning beep)
lTurn indicator soundlTemperature unitlDisplay language
NOTE
A personalized function is available to change
the distance unit.
Refer to Personalization Features on page
10-12.
The data for the trip computer average
fuel economy and the average vehicle
speed can also be reset.
To change settings
1. Press the INFO switch until the SETTINGS screen is displayed.
6-108
Interior Comfort
íSome models.
Interior Equipment
Mazda3_8BY6-EA-11F_Edition3 Page350
Thursday, March 1 2012 10:18 AM
Form No.8BY6-EA-11F
Page 374 of 528

Black plate (374,1)
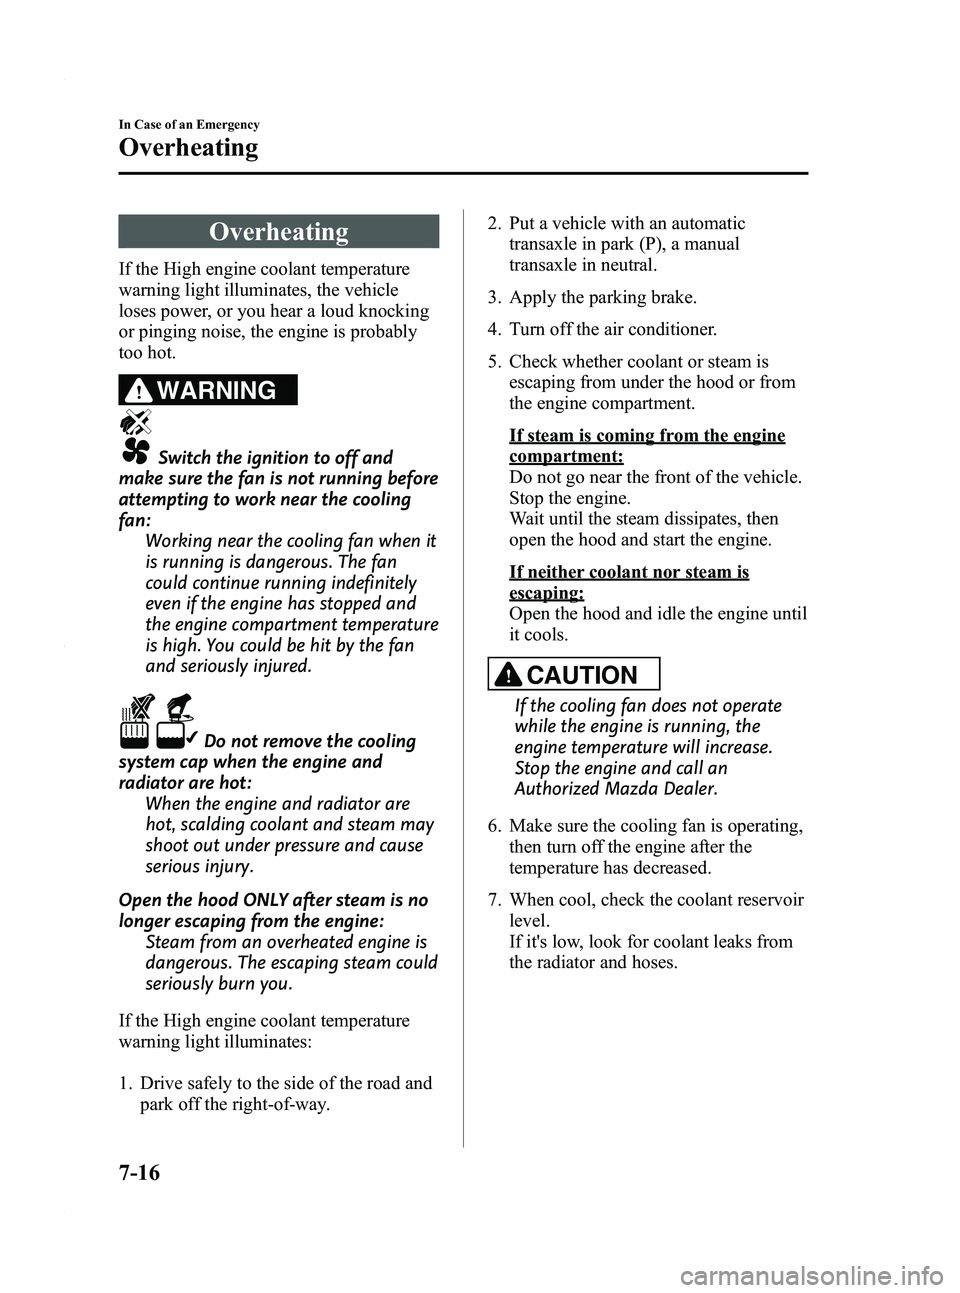
Overheating
If the High engine coolant temperature
warning light illuminates, the vehicle
loses power, or you hear a loud knocking
or pinging noise, the engine is probably
too hot.
WARNING
Switch the ignition to off and
make sure the fan is not running before
attempting to work near the cooling
fan: Working near the cooling fan when it
is running is dangerous. The fan
could continue running indefinitely
even if the engine has stopped and
the engine compartment temperature
is high. You could be hit by the fan
and seriously injured.
Do not remove the cooling
system cap when the engine and
radiator are hot:
When the engine and radiator are
hot, scalding coolant and steam may
shoot out under pressure and cause
serious injury.
Open the hood ONLY after steam is no
longer escaping from the engine: Steam from an overheated engine is
dangerous. The escaping steam could
seriously burn you.
If the High engine coolant temperature
warning light illuminates:
1. Drive safely to the side of the road and park off the right-of-way. 2. Put a vehicle with an automatic
transaxle in park (P), a manual
transaxle in neutral.
3. Apply the parking brake.
4. Turn off the air conditioner.
5. Check whether coolant or steam is escaping from under the hood or from
the engine compartment.
If steam is coming from the engine
compartment:
Do not go near the front of the vehicle.
Stop the engine.
Wait until the steam dissipates, then
open the hood and start the engine.
If neither coolant nor steam is
escaping:
Open the hood and idle the engine until
it cools.
CAUTION
If the cooling fan does not operate
while the engine is running, the
engine temperature will increase.
Stop the engine and call an
Authorized Mazda Dealer.
6. Make sure the cooling fan is operating, then turn off the engine after the
temperature has decreased.
7. When cool, check the coolant reservoir level.
If it's low, look for coolant leaks from
the radiator and hoses.
7-16
In Case of an Emergency
Overheating
Mazda3_8BY6-EA-11F_Edition3 Page374
Thursday, March 1 2012 10:18 AM
Form No.8BY6-EA-11F
Page 387 of 528

Black plate (387,1)
8Maintenance and Care
How to keep your Mazda in top condition.
Introduction .................................................................................. 8-2Introduction ............................................................................... 8-2
Scheduled Maintenance ................................................................ 8-3 Scheduled Maintenance (USA, Canada, and Puerto Rico) ....... 8-3
Scheduled Maintenance (Mexico) ............................................. 8-8
Owner Maintenance ................................................................... 8-15 Owner Maintenance Schedule ................................................ 8-15
Owner Maintenance Precautions ............................................. 8-16
Engine Compartment Overview .............................................. 8-17
Engine Oil ............................................................................... 8-19
Engine Coolant ....................................................................... 8-22
Brake/Clutch Fluid .................................................................. 8-24
Power Steering Fluid ............................................................... 8-25
Automatic Transaxle Fluid (ATF)
í........................................ 8-26
Washer Fluid ........................................................................... 8-27
Body Lubrication .................................................................... 8-28
Wiper Blades ........................................................................... 8-29
Battery ..................................................................................... 8-33
Tires ........................................................................................ 8-37
Light Bulbs ............................................................................. 8-44
Fuses ....................................................................................... 8-56
Appearance Care ........................................................................ 8-63 How to Minimize Environmental Paint Damage .................... 8-63
Exterior Care ........................................................................... 8-65
Interior Care ............................................................................ 8-69
8-1íSome models.
Mazda3_8BY6-EA-11F_Edition3 Page387
Thursday, March 1 2012 10:18 AM
Form No.8BY6-EA-11F
Page 397 of 528

Black plate (397,1)
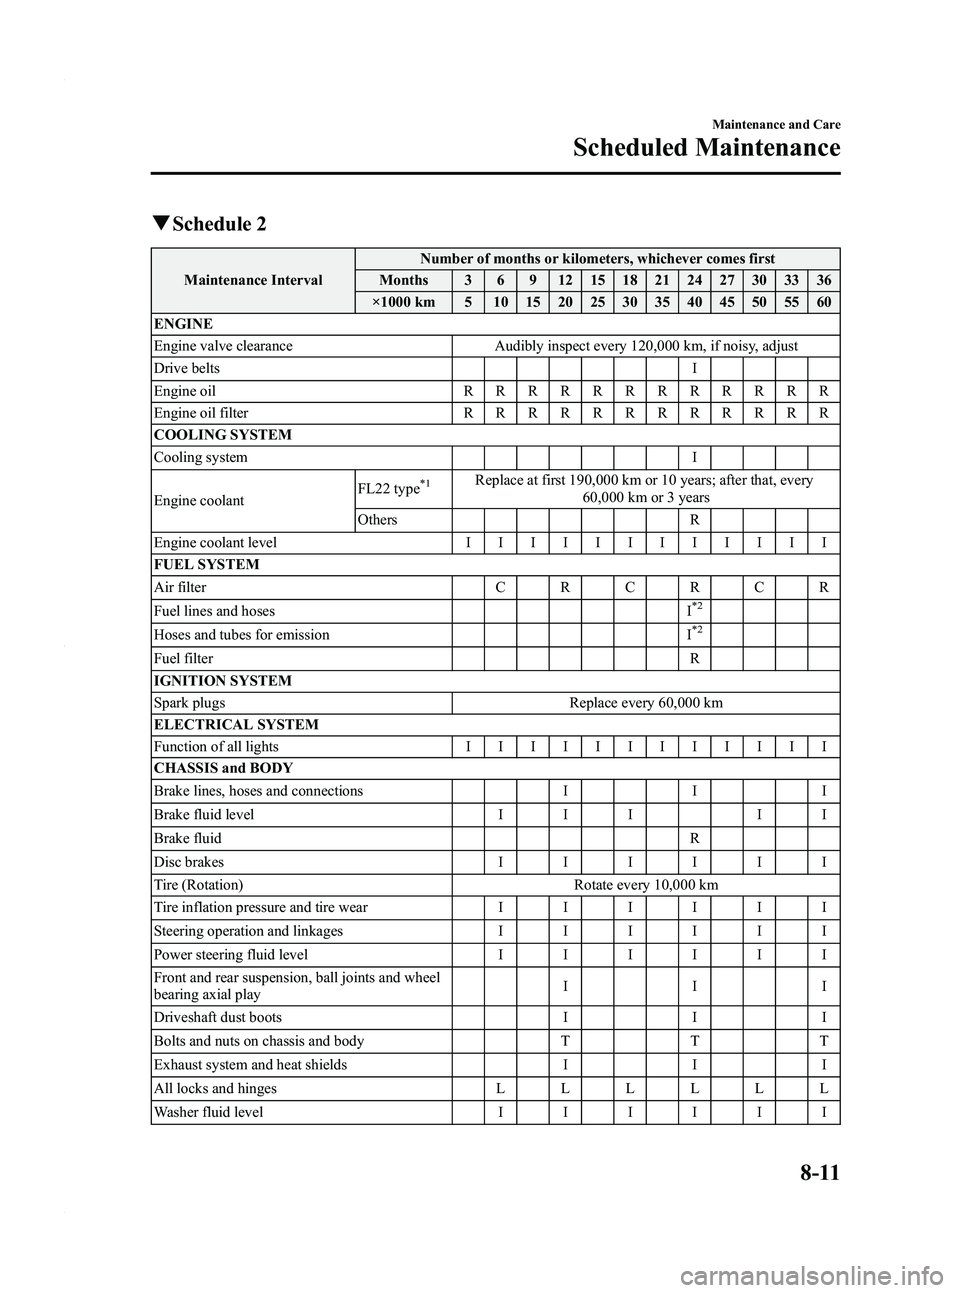
qSchedule 2
Maintenance Interval Number of months or kilometers, whichever comes first
Months 3 6 9 12 15 18 21 24 27 30 33 36
×1000 km 5 10 15 20 25 30 35 40 45 50 55 60
ENGINE
Engine valve clearance Audibly inspect every 120,000 km, if noisy, adjust
Drive belts I
Engine oil RRRRRRRRRRRR
Engine oil filter RRRRRRRRRRRR
COOLING SYSTEM
Cooling system I
Engine coolant FL22 type
*1Replace at first 190,000 km or 10 years; after that, every
60,000 km or 3 years
Others R
Engine coolant level IIIIIIIIIIII
FUEL SYSTEM
Air filter CRCRCR
Fuel lines and hoses I
*2
Hoses and tubes for emissionI*2
Fuel filter R
IGNITION SYSTEM
Spark plugs Replace every 60,000 km
ELECTRICAL SYSTEM
Function of all lights IIIIIIIIIIII
CHASSIS and BODY
Brake lines, hoses and connections III
Brake fluid level I I II I
Brake fluid R
Disc brakes IIIIII
Tire (Rotation) Rotate every 10,000 km
Tire inflation pressure and tire wear IIIIII
Steering operation and linkages IIIIII
Power steering fluid level IIIIII
Front and rear suspension, ball joints and wheel
bearing axial play III
Driveshaft dust boots III
Bolts and nuts on chassis and body TTT
Exhaust system and heat shields III
All locks and hinges LLLLLL
Washer fluid level IIIIII
Maintenance and Care
Scheduled Maintenance
8-11
Mazda3_8BY6-EA-11F_Edition3 Page397
Thursday, March 1 2012 10:18 AM
Form No.8BY6-EA-11F
Page 399 of 528

Black plate (399,1)
(Cont.)Maintenance Interval Number of months or kilometers, whichever comes first
Months 39 42 45 48 51 54 57 60 63 66 69 72
×1000 km 65 70 75 80 85 90 95 100 105 110 115 120
ENGINE
Engine valve clearance Audibly inspect every 120,000 km, if noisy, adjust
Drive belts II
Engine oil RRRRRRRRRRRR
Engine oil filter RRRRRRRRRRRR
COOLING SYSTEM
Cooling system II
Engine coolant FL22 type
*1Replace at first 190,000 km or 10 years; after that, every
60,000 km or 3 years
Others R R
Engine coolant level IIIIIIIIIIII
FUEL SYSTEM
Air filter CRCRCR
Fuel lines and hoses I
*2I
Hoses and tubes for emission I*2I
Fuel filter R R
IGNITION SYSTEM
Spark plugs Replace every 60,000 km
ELECTRICAL SYSTEM
Function of all lights IIIIIIIIIIII
CHASSIS and BODY
Brake lines, hoses and connections III
Brake fluid level II I I
Brake fluid RR
Disc brakes IIIIII
Tire (Rotation) Rotate every 10,000 km
Tire inflation pressure and tire wear IIIIII
Steering operation and linkages IIIIII
Power steering fluid level IIIIII
Front and rear suspension, ball joints and wheel
bearing axial play III
Driveshaft dust boots III
Bolts and nuts on chassis and body TTT
Exhaust system and heat shields III
All locks and hinges LLLLLL
Washer fluid level IIIIII
Maintenance and Care
Scheduled Maintenance
8-13
Mazda3_8BY6-EA-11F_Edition3 Page399
Thursday, March 1 2012 10:18 AM
Form No.8BY6-EA-11F
Page 430 of 528

Black plate (430,1)
Light Bulbs
Overhead light (Front)/Map lightsOverhead light (Rear) Overhead light (Rear)
Front turn signal lights/Front side-
marker lights/ Parking lights
Xenon fusion bulb/Adaptive Front
Lighting System
Fog lights
Parking lights/
Adaptive Front Lighting
System (AFS)
Overhead light (Front)/Map lights
Front turn signal lights
/Front side-marker lights
/Parking lights
Head lights (Low beam)
Head lights (Low/High beam) Fog lights
Side turn signal light
Trunk light
Brake lights/Taillights Brake lights/Taillights
Rear turn signal lights Rear turn signal lights
Rear side marker lights
Rear side marker lights
Except Canada
Some models.
Reverse lights
Reverse lights
License plate lights License plate lights
High-mount brake light Halogen bulb
212
2
12
High-mount brake light
Luggage
compartment light
4 Door
5 Door
Canada
Daytime running lights
Head lights (High beam)/
Daytime running lights
Side turn signal lights
8-44
Maintenance and Care
Owner Maintenance
Mazda3_8BY6-EA-11F_Edition3 Page430
Thursday, March 1 2012 10:19 AM
Form No.8BY6-EA-11F
Page 436 of 528

Black plate (436,1)
Brake lights/Taillights (Rear side
marker lights)
LED type
Due to the complexity and difficulty of
the procedure, the LED bulbs must be
replaced by an Authorized Mazda Dealer.
NOTE
LED bulb replacement is not possible because
it is built into the unit. Replace the unit.
Bulb type
(4 Door)
1. Make sure the ignition is switched offand the headlight switch is off.
2. Pull the center of each plastic retainer and remove the retainers and the trunk
end trim.
InstallationRemoval
3. Turn the socket and bulb assembly
counterclockwise and remove it. 4. Disconnect the bulb from the socket.
5. Install the new bulb in the reverse order
of removal.
(5 Door)
1. Make sure the ignition is switched off and the headlight switch is off.
2. Remove the cover.
Left side
8-50
Maintenance and Care
Owner Maintenance
Mazda3_8BY6-EA-11F_Edition3 Page436
Thursday, March 1 2012 10:19 AM
Form No.8BY6-EA-11F
Page 439 of 528

Black plate (439,1)
2. Remove the cover.
3. Turn the socket and bulb assemblycounterclockwise and remove it.
4. Disconnect the bulb from the socket.
5. Install the new bulb in the reverse order of removal.
High-mount brake light
(4 Door)
1. Make sure the ignition is switched offand the headlight switch is off. 2. Pull the center of each plastic retainer
and remove the retainers and the trunk
lid trim.
InstallationRemoval
3. Turn the socket and bulb assembly
counterclockwise and remove it.
4. Disconnect the bulb from the socket.
5. Install the new bulb in the reverse order of removal.
(5 Door)
LED type
Due to the complexity and difficulty of
the procedure, the LED bulbs must be
replaced by an Authorized Mazda Dealer.
NOTE
LED bulb replacement is not possible because
it is built into the unit. Replace the unit.
Maintenance and Care
Owner Maintenance
8-53
Mazda3_8BY6-EA-11F_Edition3 Page439
Thursday, March 1 2012 10:19 AM
Form No.8BY6-EA-11F