Page 94 of 437

7.AUTO: Press to activate automatic control of the airflow direction
in the rear of the vehicle. The system will automatically determine the
airflow distribution in order to reach and maintain the desired
temperature.
8.REAR LOCK:Illuminates when the rear (auxiliary) climate system is
being controlled by the front controls. The rear (auxiliary) climate
controls will not work when this is illuminated.
9.
Rear driver side cooled seat control (if equipped):Press to
activate. Refer toRear seatsin theSeating and Safety Restraints
chapter for more information.
REAR WINDOW DEFROSTER
R
The rear defroster control is located on the climate control panel and
works to clear the rear window of fog and thin ice.
The ignition must be on to operate the rear window defroster.
The rear defroster turns off automatically after 10 minutes or when the
ignition is turned off. To manually turn off the defroster before
10 minutes have passed, press the control again.
Do not use razor blades or other sharp objects to clean the inside
of the rear window or to remove decals from the inside of the
rear window. This may cause damage to the heated grid lines and
will not be covered by your warranty.
CABIN AIR FILTER
Your vehicle is equipped with a cabin air filter, located behind the glove
box. The particulate air filtration system is designed to reduce the
concentration of airborne particles such as dust, spores and pollen in the
air being supplied to the interior of the vehicle. This system provides the
following benefits:
•Improves driving comfort by reducing particle concentration.
•Improves the interior compartment cleanliness.
•Protects the climate control components from particle deposits.
Note:A cabin air filter must be installed at all times to prevent foreign
objects from entering the system. Running the system without a filter in
place could result in degradation or damage to the system.
For replacement intervals, refer to theScheduled Maintenancechapter.
For more information regarding your filter, see your authorized dealer.
Climate Controls
94
2012 MKT(mkt)
Owners Guide, 1st Printing
USA(fus)
Page 113 of 437

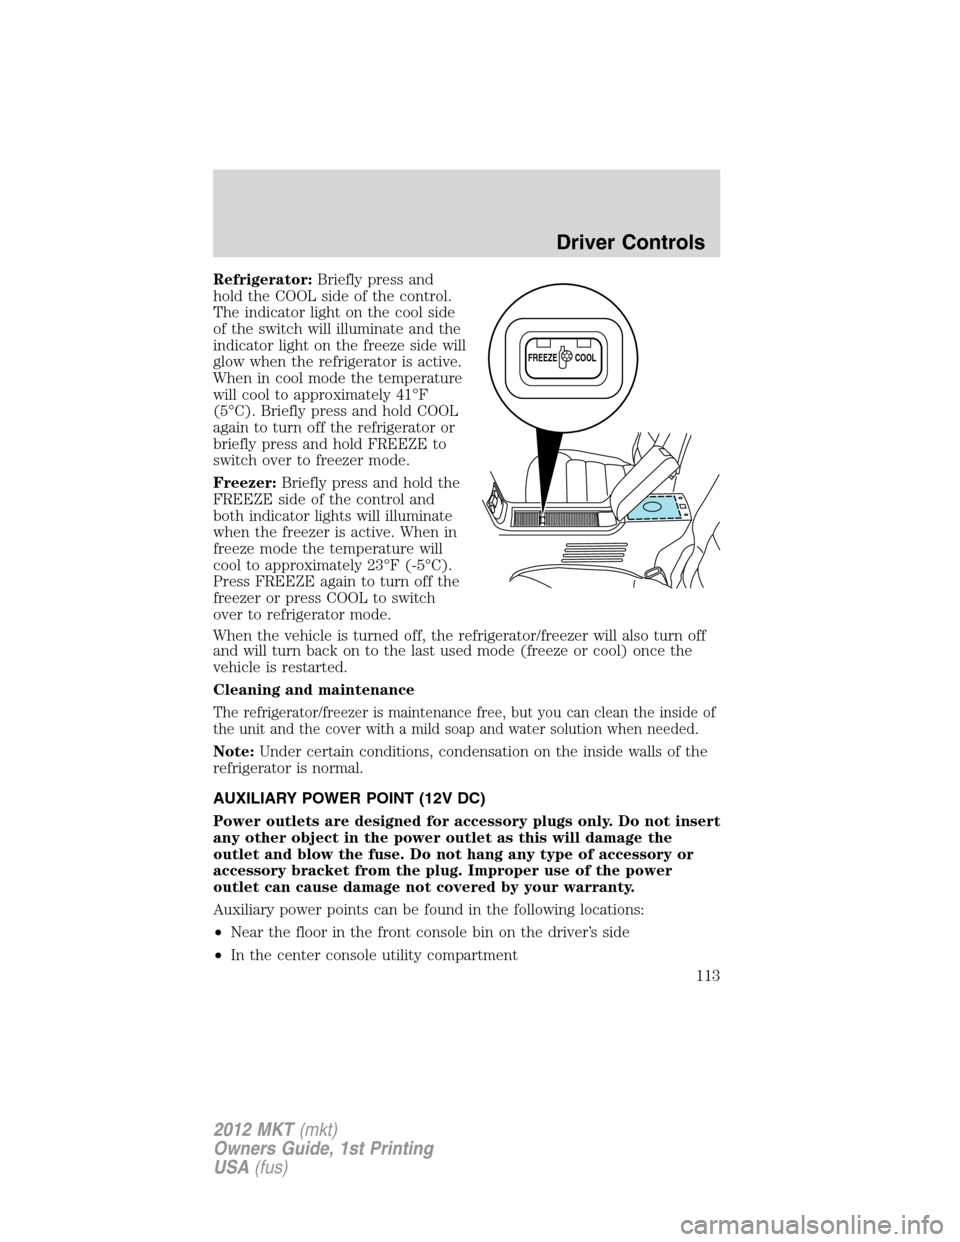
Refrigerator:Briefly press and
hold the COOL side of the control.
The indicator light on the cool side
of the switch will illuminate and the
indicator light on the freeze side will
glow when the refrigerator is active.
When in cool mode the temperature
will cool to approximately 41°F
(5°C). Briefly press and hold COOL
again to turn off the refrigerator or
briefly press and hold FREEZE to
switch over to freezer mode.
Freezer:Briefly press and hold the
FREEZE side of the control and
both indicator lights will illuminate
when the freezer is active. When in
freeze mode the temperature will
cool to approximately 23°F (-5°C).
Press FREEZE again to turn off the
freezer or press COOL to switch
over to refrigerator mode.
When the vehicle is turned off, the refrigerator/freezer will also turn off
and will turn back on to the last used mode (freeze or cool) once the
vehicle is restarted.
Cleaning and maintenance
The refrigerator/freezer is maintenance free, but you can clean the inside of
the unit and the cover with a mild soap and water solution when needed.
Note:Under certain conditions, condensation on the inside walls of the
refrigerator is normal.
AUXILIARY POWER POINT (12V DC)
Power outlets are designed for accessory plugs only. Do not insert
any other object in the power outlet as this will damage the
outlet and blow the fuse. Do not hang any type of accessory or
accessory bracket from the plug. Improper use of the power
outlet can cause damage not covered by your warranty.
Auxiliary power points can be found in the following locations:
•Near the floor in the front console bin on the driver’s side
•In the center console utility compartment
FREEZE
COOL
Driver Controls
113
2012 MKT(mkt)
Owners Guide, 1st Printing
USA(fus)
Page 320 of 437

Fuse/Relay
LocationFuse Amp
RatingProtected Circuits
9 15A Interior lights, Cargo lamps
10 15A Backlighting, Puddle lamps
11 10A All wheel drive (AWD)
12 7.5A Intelligent access (IA)
13 5A IA receiver, Exterior mirror
switch, Steering column position
switch, Driver seat module, Driver
door module, Keypad
14 10A Power liftgate module, SYNC�,
Rear entertainment
15 10A Climate control, Electronic finish
panel
16 15A Navigation display, ALM, Auxiliary
climate control
17 20A Global window open
18 20A Amplifier
19 25A Amplifier
20 15A Data link connector (OBD-2), 2nd
row power fold seat motors
21 15A Fog lamps
22 15A Park lamps, License plate lamps,
Illuminated liftgate applique
23 15A High beam headlamps, Auto high
beam relay, Fog lamp deactivation
relay
24 20A Horn
25 10A Demand lamps/Interior lamps, 2nd
row power fold seats, Powertrain
control module (GTDI) wake-up,
3rd row seat relay
26 10A Instrument panel cluster,
Heads-up display
Roadside Emergencies
320
2012 MKT(mkt)
Owners Guide, 1st Printing
USA(fus)
Page 321 of 437
Fuse/Relay
LocationFuse Amp
RatingProtected Circuits
27 20A Ignition Switch, IA
28 5A Radio mute
29 5A Instrument panel cluster
30 5A Transmission shifter
31 10A Steering angle sensor, Heads-up
display
32 10A Restraint control module
33 10A Adaptive lighting module
34 5A Front body run/start feeds
35 10A Body module run/start feeds
36 5A Not used (spare)
37 10A Powertrain control module
run/start, Fuel relay
38 20A Trailer tow park lamps
39 20A Audio control module
40 20A Cigarette lighter
41 15A Delayed accessory feeds
42 10A Not used (spare)
43 10A Auxiliary blower, Rear wiper, Rain
sensor
44 10A Trailer tow backup lamps
45 5A Front wiper, Front blower, Wiper
relay
46 7.5A Occupant classification sensor
(OCS), Passenger airbag
deactivation indicator (PADI),
Front control interface module
47 30A Circuit
BreakerNot used
48 Full ISO relay Delayed accessory relay
Roadside Emergencies
321
2012 MKT(mkt)
Owners Guide, 1st Printing
USA(fus)
Page 324 of 437

Fuse/Relay
LocationFuse Amp
RatingProtected Circuits
29 30A* Left rear smart window,
Panoramic roof module, Power
sunshade module
30 30A* Left front smart window
31 40A* Auxiliary blower motor
32 30A* Driver seat motor, Memory motor
power
33 30A* Run/start relay
34 30A* Power liftgate
35 40A* Front A/C blower
36 25A** Rear wiper module (secondary
fuse)
37 15A** Washer pump
38 10A** Trailer tow backup lamps
39 Diode Fuel pump motor diode
40 Diode One touch integrated start diode
41 G8VA relay Trailer tow park lamp
42 G8VA relay Trailer tow stop/turn lamp (left)
43 G8VA relay Trailer tow stop/turn lamp (right)
44 G8VA relay Backup lamps relay
45 20A** Trailer tow stop/turn lamps
(secondary fuse)
46 15A** PCM vehicle power 2, Vehicle
power 3
47 20A** PCM vehicle power 1
48 15A** PCM vehicle power 4 (coil on
plugs)
49 10A** Heated mirrors (secondary fuse)
50 HC micro relay Blower motor
51 HC micro relay Fog lamp deactivation
52 HC micro relay Starter
53 HC micro relay Adaptive cruise control
Roadside Emergencies
324
2012 MKT(mkt)
Owners Guide, 1st Printing
USA(fus)
Page 325 of 437

Fuse/Relay
LocationFuse Amp
RatingProtected Circuits
54 HC micro relay 3rd row power seats
55 HC micro relay Wipers (front)
56 HC micro relay Rear window defroster, Heated
mirrors
57 — Not used
58 — Not used
59 HC micro relay Auxiliary blower motor
60 HC micro relay Trailer tow battery charge
61 G8VA relay Refrigerator
62 G8VA relay Automatic high beams
63 HC micro relay Run/start
64 HC micro relay PCM
65 G8VA relay A/C clutch
66 G8VA relay Fuel pump
* Cartridge Fuses ** Mini Fuses
CHANGING THE TIRES
If you get a flat tire while driving, do not apply the brake heavily.
Instead, gradually decrease your speed. Hold the steering wheel firmly
and slowly move to a safe place on the side of the road.
Note:The tire pressure monitoring system (TPMS) indicator light will
illuminate when the spare tire is in use. To restore the full functionality
of the monitoring system, all road wheels equipped with tire pressure
monitoring sensors must be mounted on the vehicle.
Have a flat serviced by an authorized dealer in order to prevent damage to
the TPMS sensors, refer toTire pressure monitoring system (TPMS)in
theTires, Wheels and Loadingchapter. Replace the spare tire with a road
tire as soon as possible. During repairing or replacing of the flat tire, have
the authorized dealer inspect the TPMS sensor for damage.
WARNING:The use of tire sealants may damage your tire
pressure monitoring system (TPMS) and should not be used.
However, if you must use a sealant, the TPMS sensor and valve stem
on the wheel must be replaced by an authorized Ford dealer.
Roadside Emergencies
325
2012 MKT(mkt)
Owners Guide, 1st Printing
USA(fus)
Page 356 of 437
OPENING THE HOOD
1. Inside the vehicle, pull the hood
release handle located at the bottom
of the instrument panel near the
steering column.
2. Go to the front of the vehicle and
release the auxiliary latch using the
handle that is located under the
front passenger side of the hood.
3. Lift the hood until the lift
cylinders hold it open.
Maintenance and Specifications
356
2012 MKT(mkt)
Owners Guide, 1st Printing
USA(fus)
Page 398 of 437

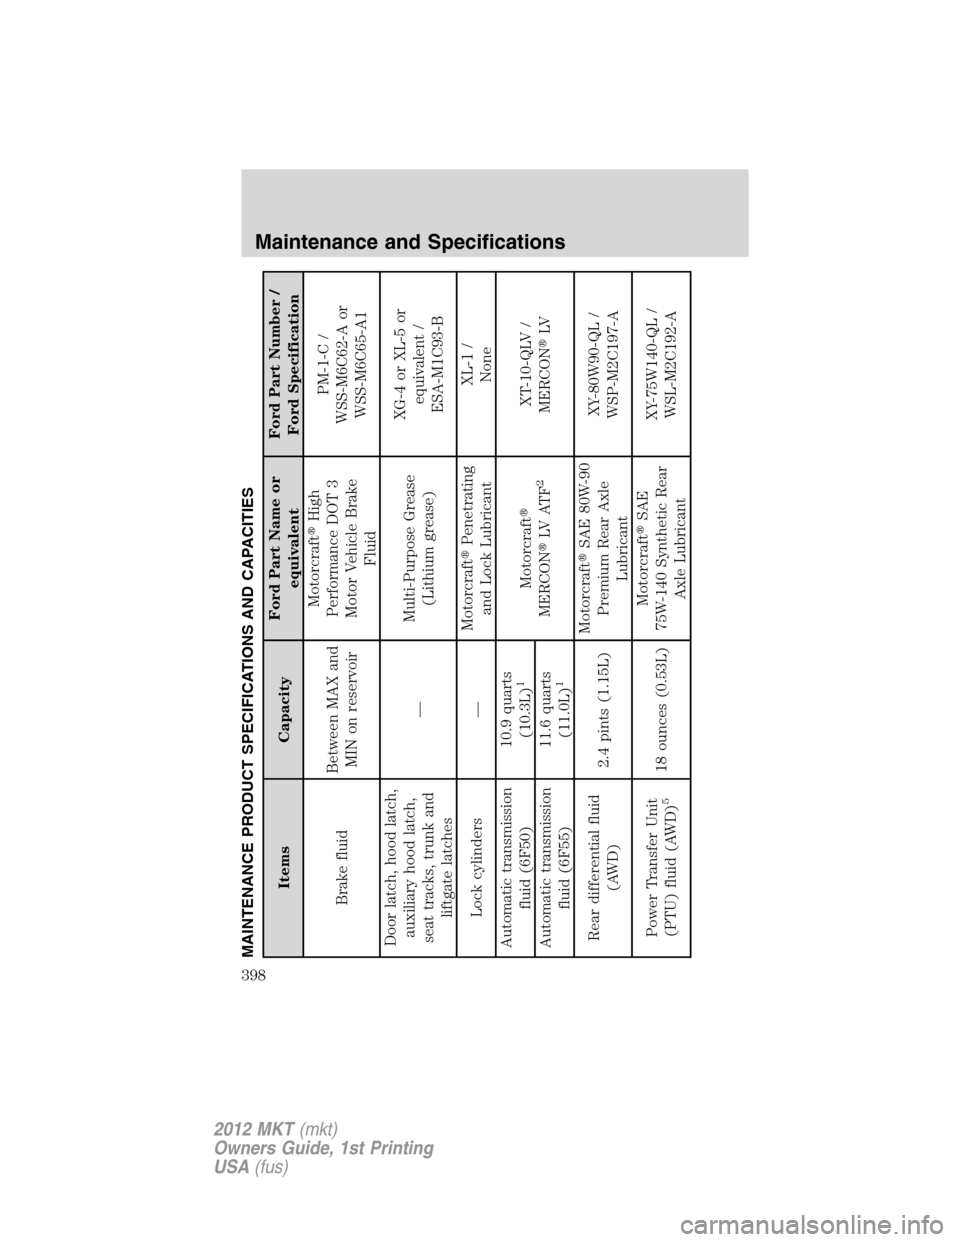
MAINTENANCE PRODUCT SPECIFICATIONS AND CAPACITIES
Items CapacityFord Part Name or
equivalentFord Part Number /
Ford Specification
Brake fluidBetween MAX and
MIN on reservoirMotorcraft�High
Performance DOT 3
Motor Vehicle Brake
FluidPM-1-C /
WSS-M6C62-A or
WSS-M6C65-A1
Door latch, hood latch,
auxiliary hood latch,
seat tracks, trunk and
liftgate latches—Multi-Purpose Grease
(Lithium grease)XG-4 or XL-5 or
equivalent /
ESA-M1C93-B
Lock cylinders —Motorcraft�Penetrating
and Lock LubricantXL-1 /
None
Automatic transmission
fluid (6F50)10.9 quarts
(10.3L)
1
Motorcraft�
MERCON�LV AT F
2
XT-10-QLV /
MERCON�LV
Automatic transmission
fluid (6F55)11.6 quarts
(11.0L)
1
Rear differential fluid
(AWD)2.4 pints (1.15L)Motorcraft�SAE 80W-90
Premium Rear Axle
LubricantXY-80W90-QL /
WSP-M2C197-A
Power Transfer Unit
(PTU) fluid (AWD)
5
18 ounces (0.53L)Motorcraft�SAE
75W-140 Synthetic Rear
Axle LubricantXY-75W140-QL /
WSL-M2C192-A
Maintenance and Specifications
398
2012 MKT(mkt)
Owners Guide, 1st Printing
USA(fus)