2012 LINCOLN MKS open hood
[x] Cancel search: open hoodPage 64 of 384

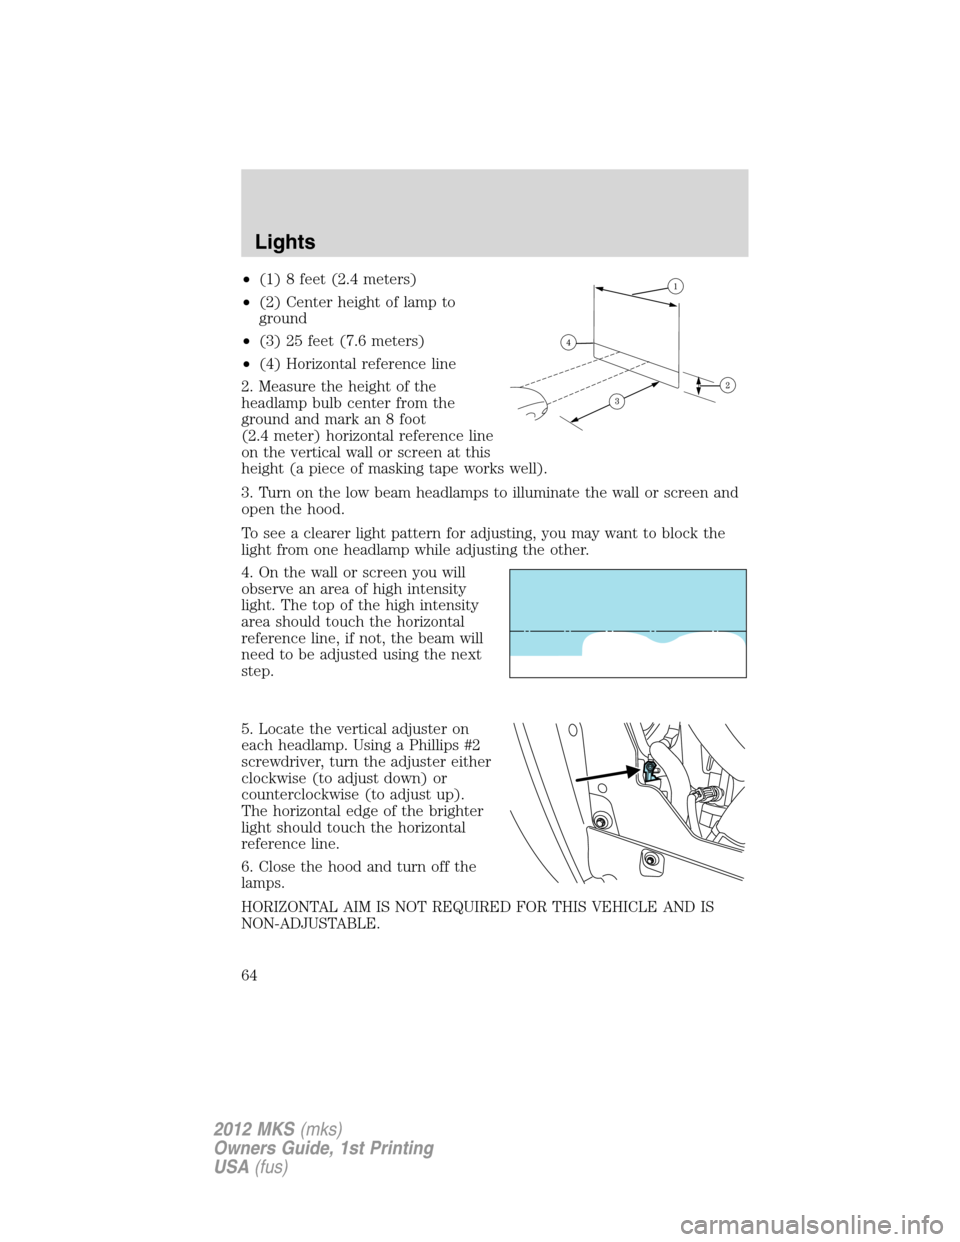
•(1) 8 feet (2.4 meters)
•(2) Center height of lamp to
ground
•(3) 25 feet (7.6 meters)
•(4) Horizontal reference line
2. Measure the height of the
headlamp bulb center from the
ground and mark an 8 foot
(2.4 meter) horizontal reference line
on the vertical wall or screen at this
height (a piece of masking tape works well).
3. Turn on the low beam headlamps to illuminate the wall or screen and
open the hood.
To see a clearer light pattern for adjusting, you may want to block the
light from one headlamp while adjusting the other.
4. On the wall or screen you will
observe an area of high intensity
light. The top of the high intensity
area should touch the horizontal
reference line, if not, the beam will
need to be adjusted using the next
step.
5. Locate the vertical adjuster on
each headlamp. Using a Phillips #2
screwdriver, turn the adjuster either
clockwise (to adjust down) or
counterclockwise (to adjust up).
The horizontal edge of the brighter
light should touch the horizontal
reference line.
6. Close the hood and turn off the
lamps.
HORIZONTAL AIM IS NOT REQUIRED FOR THIS VEHICLE AND IS
NON-ADJUSTABLE.
Lights
64
2012 MKS(mks)
Owners Guide, 1st Printing
USA(fus)
Page 68 of 384

Replacing front parking lamp/turn signal/sidemarker bulbs
1. Make sure headlamp switch is in the off position, then open the hood.
2. Reach in behind the headlamp assembly to access the bulb sockets
and connectors.
3. Locate the parking/turn signal
lamp electrical connector and
remove it by pulling it straight off.
4. Remove the bulb socket by
turning it counterclockwise and
pulling it straight out.
5. To remove the bulb, pull it
straight out of the bulb socket.
Install the new bulb(s) in reverse order.
Replacing rear brake/tail/turn and sidemarker lamp bulbs
The brake/tail/turn/side marker lamp and backup bulbs are located in the
tail lamp assembly. Follow the same steps to replace the bulbs.
Note:Your vehicle is equipped with a tail lamp assembly containing
integral multiple light emitting diodes (LED) for the stop/tail and
sidemarker functions. If replacement is required, see your authorized
dealer.
•(1)Turn signal bulbs
•(2)Backup lamp
•(3)Stop/tail and sidemarker
bulbs (LED)
1. Make sure the headlamp switch is
in the off position and open the
trunk.
2. Remove the cargo net fastener (if
equipped) and carefully pull the
carpet away to expose the backside
of the tail lamp assembly.
3. Remove the nut and washer assemblies, then pull the lamp assembly
away from the vehicle.
4. Remove the bulb socket by rotating it counterclockwise, then pulling it
out of the lamp assembly.
Lights
68
2012 MKS(mks)
Owners Guide, 1st Printing
USA(fus)
Page 125 of 384

PERIMETER ALARM SYSTEM
The perimeter alarm system will help protect your vehicle from
unauthorized entry.
When the following types of unauthorized entry occur:
•any door, the hood or the trunk is opened without using the keypad or
the remote entry transmitter,
•or if the ignition is turned on when using an invalid key,
the perimeter alarm will flash the turn signal lamps and sound the horn.
Arming the system
The system is ready to arm whenever the ignition is off. To arm the
system, do one of the following:
•Press the
control on the remote entry transmitter.
Note:If you press the
control twice on the remote entry
transmitter within three seconds, the horn will chirponceto let you
know that all doors, the hood and the trunk are closed. If any of these
are not closed, the horn will chirptwiceto warn you that they are still
open.
•Press the driver or passenger interior door lock control
while the
door is open, then close the door.
•Press and hold the 7•8 and 9•0 controls together on the keyless
entry pad to lock the doors (driver’s door must be closed).
After locking the doors using any of the methods above, the turn signal
lamps will flash once indicating that the perimeter alarm is in the
pre-armed mode and will become fully armed in 20 seconds.
Note:Pressing the power door unlock control within the 20-second,
pre-armed mode will disarm the system.
When fully armed (after the 20 sec pre-arm mode), any IA keys found
inside the vehicle are disabled/inoperable and will not start the engine.
Press
button to re-enable them.
Locks and Security
125
2012 MKS(mks)
Owners Guide, 1st Printing
USA(fus)
Page 167 of 384

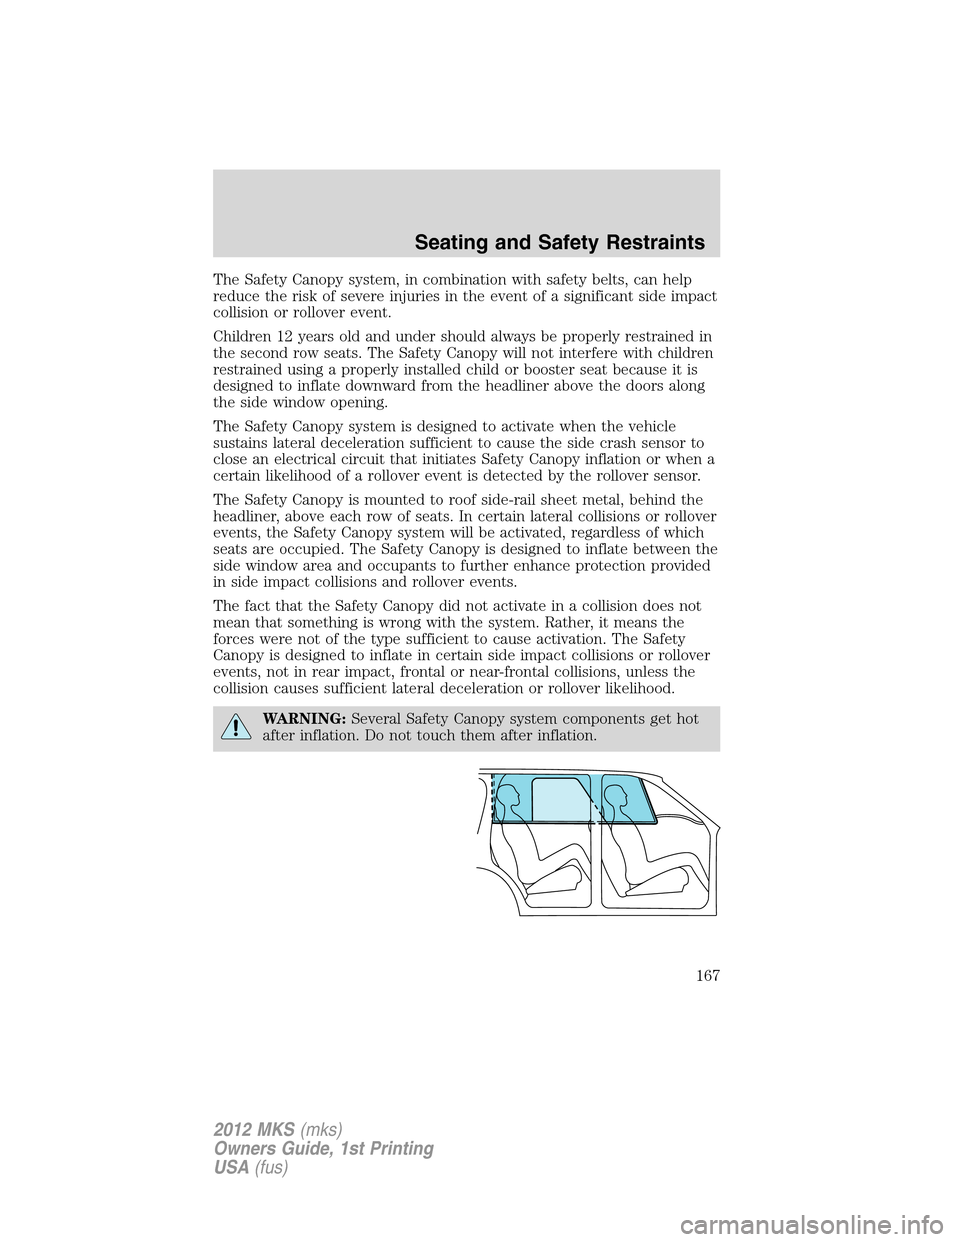
The Safety Canopy system, in combination with safety belts, can help
reduce the risk of severe injuries in the event of a significant side impact
collision or rollover event.
Children 12 years old and under should always be properly restrained in
the second row seats. The Safety Canopy will not interfere with children
restrained using a properly installed child or booster seat because it is
designed to inflate downward from the headliner above the doors along
the side window opening.
The Safety Canopy system is designed to activate when the vehicle
sustains lateral deceleration sufficient to cause the side crash sensor to
close an electrical circuit that initiates Safety Canopy inflation or when a
certain likelihood of a rollover event is detected by the rollover sensor.
The Safety Canopy is mounted to roof side-rail sheet metal, behind the
headliner, above each row of seats. In certain lateral collisions or rollover
events, the Safety Canopy system will be activated, regardless of which
seats are occupied. The Safety Canopy is designed to inflate between the
side window area and occupants to further enhance protection provided
in side impact collisions and rollover events.
The fact that the Safety Canopy did not activate in a collision does not
mean that something is wrong with the system. Rather, it means the
forces were not of the type sufficient to cause activation. The Safety
Canopy is designed to inflate in certain side impact collisions or rollover
events, not in rear impact, frontal or near-frontal collisions, unless the
collision causes sufficient lateral deceleration or rollover likelihood.
WARNING:Several Safety Canopy system components get hot
after inflation. Do not touch them after inflation.
Seating and Safety Restraints
167
2012 MKS(mks)
Owners Guide, 1st Printing
USA(fus)
Page 306 of 384

OPENING THE HOOD
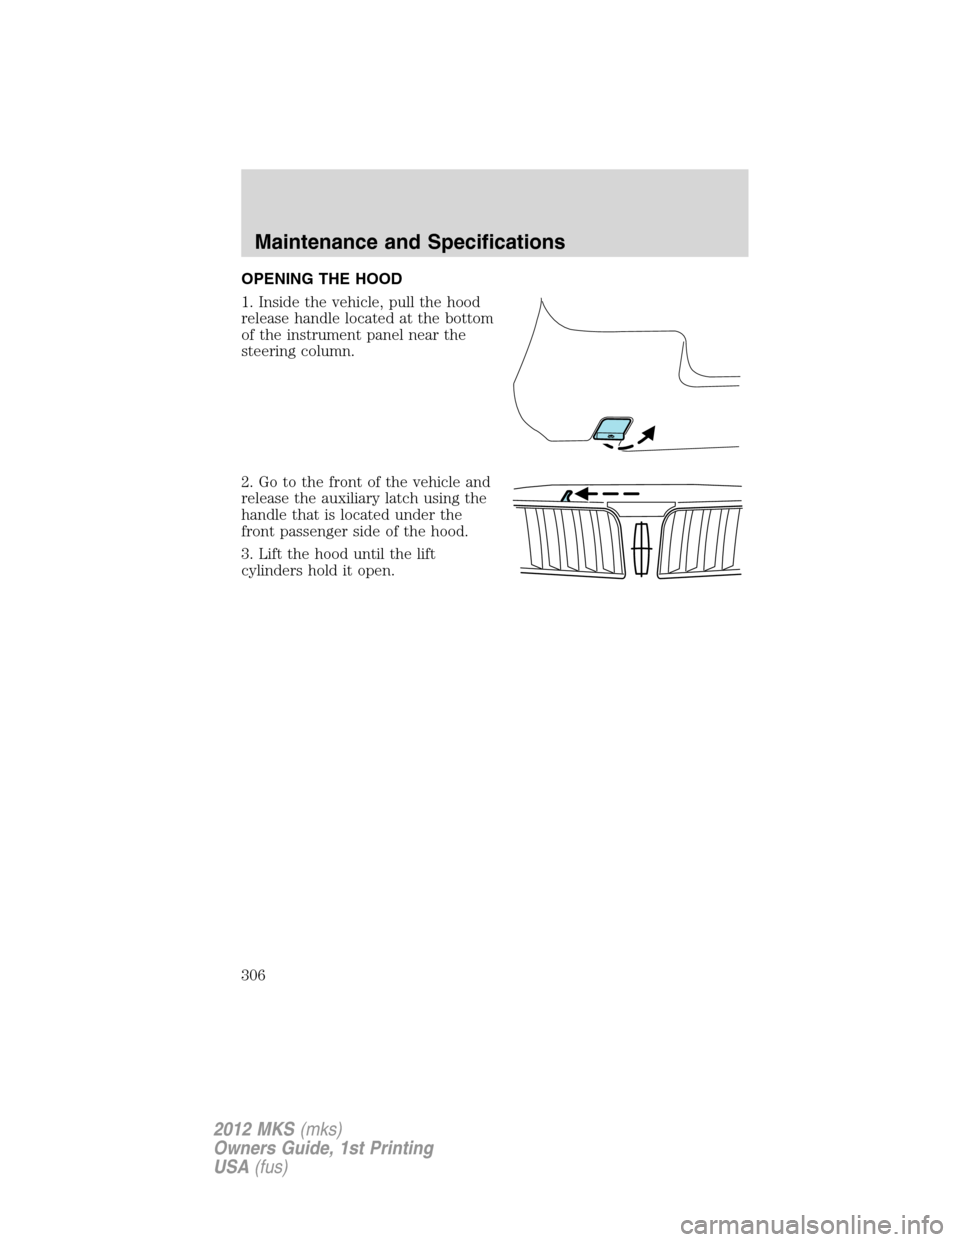
1. Inside the vehicle, pull the hood
release handle located at the bottom
of the instrument panel near the
steering column.
2. Go to the front of the vehicle and
release the auxiliary latch using the
handle that is located under the
front passenger side of the hood.
3. Lift the hood until the lift
cylinders hold it open.
Maintenance and Specifications
306
2012 MKS(mks)
Owners Guide, 1st Printing
USA(fus)
Page 310 of 384

CHANGING THE WIPER BLADES
1. Pull the wiper blade and arm
away from the glass.
2. Squeeze the locking tabs to
release the blade from the arm and
pull the blade away from the arm to
remove it.
3. Attach the new blade to the arm and snap it into place.
Replace wiper blades at least once per year for optimum performance.
Poor wiper quality can be improved by cleaning the wiper blades and the
windshield. Refer toWindows and wiper bladesin theCleaning
chapter.
To prolong the life of the wiper blades, it is highly recommended to
scrape off the ice on the windshield before turning on the wipers. The
layer of ice has many sharp edges and can damage the micro edge of the
wiper rubber element.
ENGINE OIL
Checking the engine oil
Refer to thescheduled maintenance informationfor the appropriate
intervals for checking the engine oil.
1. Make sure the vehicle is on level ground.
2. Turn the engine off and wait 15 minutes for the oil to drain into the
oil pan.
3. Set the parking brake and ensure the gearshift is securely latched in P
(Park).
4. Open the hood. Protect yourself from engine heat.
Maintenance and Specifications
310
2012 MKS(mks)
Owners Guide, 1st Printing
USA(fus)
Page 380 of 384

cleaning ...................................299
coolant .....................................316
fail-safe cooling .......................320
lubrication specifications .......345
refill capacities ........................345
service points ..................307–308
Engine block heater .................222
Engine oil ..................................310
checking and adding ..............310
dipstick ....................................310
filter, specifications ................344
refill capacities ........................345
specifications ..........................345
Event data recording ....................7
Exhaust fumes ..........................222
F
Fail safe cooling ........................320
Fleet MyKey programming ......101
Floor mats .............................98–99
Fluid capacities .........................345
Fog lamps ....................................59
Four-Wheel Drive vehicles
driving off road .......................259
Fuel ............................................322
calculating fuel
economy ............................20, 328
cap ...........................................324
capacity ...................................345
choosing the right fuel ...........325
detergent in fuel .....................326
filler funnel .............................327
filling your vehicle with
fuel ...........................322, 324, 328
filter, specifications ........322, 344
fuel pump shut-off ..................266
improving fuel economy ........328
octane rating ...................326, 349quality ......................................326
running out of fuel .........282, 327
safety information relating to
automotive fuels .....................322
Fuses ..........................................267
G
Garage door opener ....................94
Gas cap (see Fuel cap) ............324
Gas mileage
(see Fuel economy) .................328
Gauges .........................................17
H
Hazard flashers .........................266
Headlamps ...................................57
aiming ........................................63
autolamp system .......................58
bulb specifications ....................67
daytime running lights .............63
flash to pass ..............................62
high beam .................................59
turning on and off ....................57
Heated Seats .....................133–134
Heating
heating and air conditioning
system .................................49, 52
Homelink wireless control
system ..........................................94
Hood ..........................................306
I
Ignition ...............................218, 349
Illuminated visor mirror .............72
Index
380
2012 MKS(mks)
Owners Guide, 1st Printing
USA(fus)