Page 161 of 420

159
2-3. Operating the lights and windshield wipers
2
When driving
■Daytime running light system (Canada only)
To make your vehicle more visible to other drivers, the headlights and tail lights turn
on automatically whenever the engine is started and the parking brake is released.
■Automatic light off system
●When the headlights come on: The headlights and tail lights turn off 30 seconds
after a door is opened and closed if the ignition switch is turned to the “ACC” or
“LOCK” position. (The light turns off immediately if on the key is pressed
after both side doors are locked.)
●When only the tail lights come on: The tail lights turn off automatically if the igni-
tion switch is turned to the “ACC” or “LOCK” position and the driver’s door is
opened.
To turn the lights on again, turn the ignition switch to the “ON” position, or turn the
light switch to once and then back to or
.
NOTICE
■To prevent battery discharge
Do not leave the lights on longer than necessary when the engine is not running.
Page 176 of 420

174
2-4. Using other driving systems
Launch control
When set, launch control enables the vehicle to accelerate from a standing
start at 4000 rpm. Launch control uses overall optimized control that consid-
ers vehicle acceleration performance, st ability and clutch durability. (Do not
use launch control on public roads.)
■ Setting the system
Ensure that you are seated well ba ck in the driver’s seat with the
seat belt fastened.
Make sure that the passenger is al so seated well back with their seat
belt fastened.
Start the engine. Firmly depress the brake pedal with your left
foot and release the parking brake.
Continue to depress the brake pedal.
Select SPORT driving mode.
Select shift speed level 7.
Pull the “+” paddle shift switch to select 1st gear.
Pull the “-” paddle shift swit ch and hold it for 5 seconds.
“LAUNCH” will be displayed on the meter.
Release the “-” paddle shift switch.
Depress the accelerator pedal firmly.
Continue to depress the accelerato r pedal. The engine speed will be
automatically maintained at 4000 rpm. The vehicle is then ready for
launch.
Release the brake pedal.
The vehicle will launch forward.
Once the accelerator pedal is released completely, launch control will be
canceled and SPORT driving mode will be engaged.
STEP1
STEP2
STEP3
STEP4
STEP5
STEP6
STEP7
STEP8
STEP9
Page 185 of 420
183
2-5. Driving information
2
When driving
Dinghy towing
The LFA can be dinghy towed in a forward direction (with 4 wheels on the
ground) behind a motor home.
Towing your vehicle with 4 wheels on the groundTo prevent damage to your vehicle, perform the following procedures
before towing: Turn the ignition switch to the “ON” position.
Select Neutral.
Release the parking brake.
Turn the ignition switch to the “ACC” position.
Ensure that the audio system and other powered devices have been
turned off.
After towing, leave the engine in idle for at least 3 minutes before driving
the vehicle.
■Necessary equipment and accessories
Specialized equipment and accessories are required for dinghy towing. Contact
the service branch of the motor home manufacturer regarding recommended
equipment.
STEP1
STEP2
STEP3
STEP4
Page 245 of 420
243
4-2. Maintenance
4
Maintenance and care
Vehicle interior
ItemsCheck points
Accelerator pedal • The accelerator pedal should move
smoothly (without uneven pedal
effort or catching).
Brake pedal • Does the brake pedal move
smoothly?
• Does the brake pedal have appro- priate clearance from the floor?
( P. 3 6 4 )
• Does the brake pedal have the cor- rect amount of free play?
( P. 3 6 4 )
Brakes • The vehicle should not pull to one
side when the brakes are applied.
• The brakes should work effectively.
• The brake pedal should not feel
spongy.
• The brake pedal should not get too close to the floor when the brakes
are applied.
Indicators/buzzers • Do the indicators and buzzers
function properly?
Lights • Do all the lights come on?
Pa r k i n g b r a ke • When parked on a slope and the
parking brake is on, is the vehicle
securely stopped?
Seat belts • Do the seat belts operate
smoothly?
• The seat belts should not be dam- aged.
Page 256 of 420

254
4-3. Do-it-yourself maintenance
CAUTION
■When raising your vehicle
Make sure to observe the following precautions to reduce the possibility of death or
serious injury:
●When using a floor jack, follow the instructions of the manual provided with the
jack.
●Do not put any part of your body underneath the vehicle when it is supported
only by the floor jack.
●Always use floor jack and/or automotive jack stands on a solid, flat, level surface.
●Do not start the engine while the vehicle is supported by the floor jack.
●Stop the vehicle on level, firm ground, firmly set the parking brake and select
Reverse.
●Make sure to set the floor jack or automotive jack stand properly at the jack point.
Raising the vehicle with an improperly positioned floor jack or automotive jack
stand will damage the vehicle and may cause the vehicle to fall off the floor jack or
automotive jack stand.
●Do not raise the vehicle while someone is in the vehicle.
●When raising the vehicle, do not place any objects on top of or underneath the
floor jack.
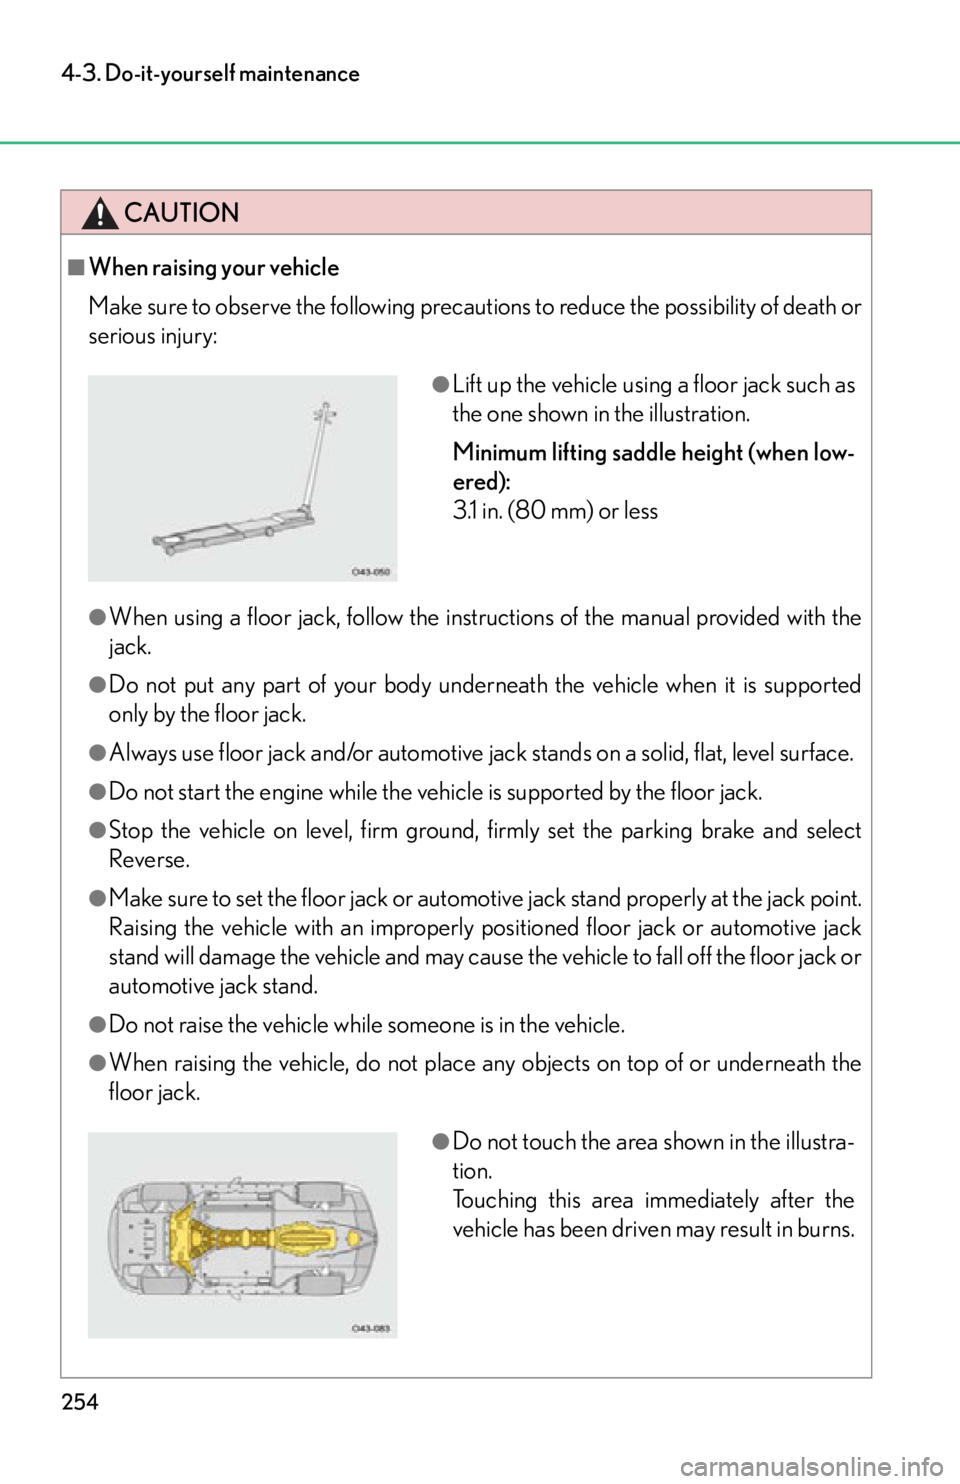
●Lift up the vehicle using a floor jack such as
the one shown in the illustration.
Minimum lifting saddle height (when low-
ered):
3.1 in. (80 mm) or less
●Do not touch the area shown in the illustra-
tion.
Touching this area immediately after the
vehicle has been driven may result in burns.
Page 299 of 420
297
4-3. Do-it-yourself maintenance
4
Maintenance and care
■ Luggage compartment
FuseAmpereCircuit
1VSSR 5 A Electric power control system
2RR-IG110 AActive rear wing, electric cooling fans,
electronic parking brake, electroni-
cally controlled brake system, seat
belts, navigation system, rear window
defogger, back-up lights
3WASH
20 A Windshield washer
4F/OPN 10 A Fuel filler door opener
5TA I L 1 0 AParking lights, front side marker lights,
rear side marker lights, license plate
lights, stop/tail lights
6RR FOG 7.5 A
7AMP RH 30 A Audio system
8AMP LH 30 A Audio system
9OIL PMP 25 AASG (Automated Sequential Gear-
box)
10RR ECU-B 7.5 AActive rear wing, electronic parking
brake
11ASG-IG2 7.5 AASG (Automated Sequential Gear-
box)
Page 303 of 420

When trouble arises5
301
5-1. Essential informationEmergency flashers.............. 302
If your vehicle needs to be towed................................ 303
If you think something is wrong ..................................... 308
Fuel pump shut off system .................................... 309
Event data recorder ............... 310 5-2. Steps to take in an
emergency
If a warning light turns on or a warning buzzer
sounds... .................................. 312
If a warning message is displayed................................ 322
If you have a flat tire............... 332
If the engine will not start .... 343
If you lose your keys/ wireless remote
control transmitter ............. 344
If the parking brake cannot be released ............. 345
If the vehicle battery is discharged ............................ 348
If your vehicle overheats ...... 351
If the vehicle becomes stuck........................................ 354
If your vehicle has to be stopped in an
emergency ............................ 355
Page 308 of 420
306
5-1. Essential information
Using a flatbed truckUse a flatbed truck suitable for vehicles with low ground clearance. To
prevent body damage, do not tow with a wheel-lift or sling type truck. We
recommend having your Lexus dealer or a commercial towing service
load and unload the vehicle whenever possible.
■ Before loading the vehicle on a flatbed truck
Deactivate the tilt sensor. ( P. 56)
■ After the vehicle is loaded
Select Neutral, apply the parking brake and turn the ignition
switch to the “LOCK” position.
Use wheel chocks for all 4 wheels to prevent the vehicle from rolling.
Secure the vehicle by strapping
the tires to the deck of the tow
truck as shown.
STEP1
STEP2