Page 233 of 592
233
3-2. Using the audio system
3
Interior features
■Scanning XM® Satellite Radio channels
● Scanning channels in the current category
Press .
When the desired channel is reached, press again.
● Scanning preset channels
Press and hold until you hear a beep.
When the desired channel is reached, press again.
■ Displaying text information
Press .
The display will show up to 10 characters.
The display changes as follows each time is pressed.
● CH NAME
● TITLE (SONG/PROGRAM TITLE)
● NAME (ARTIST NAME/FEATURE)
● CH NUMBER
STEP1
STEP2
STEP1
STEP2
Page 235 of 592

235
3-2. Using the audio system
3
Interior features
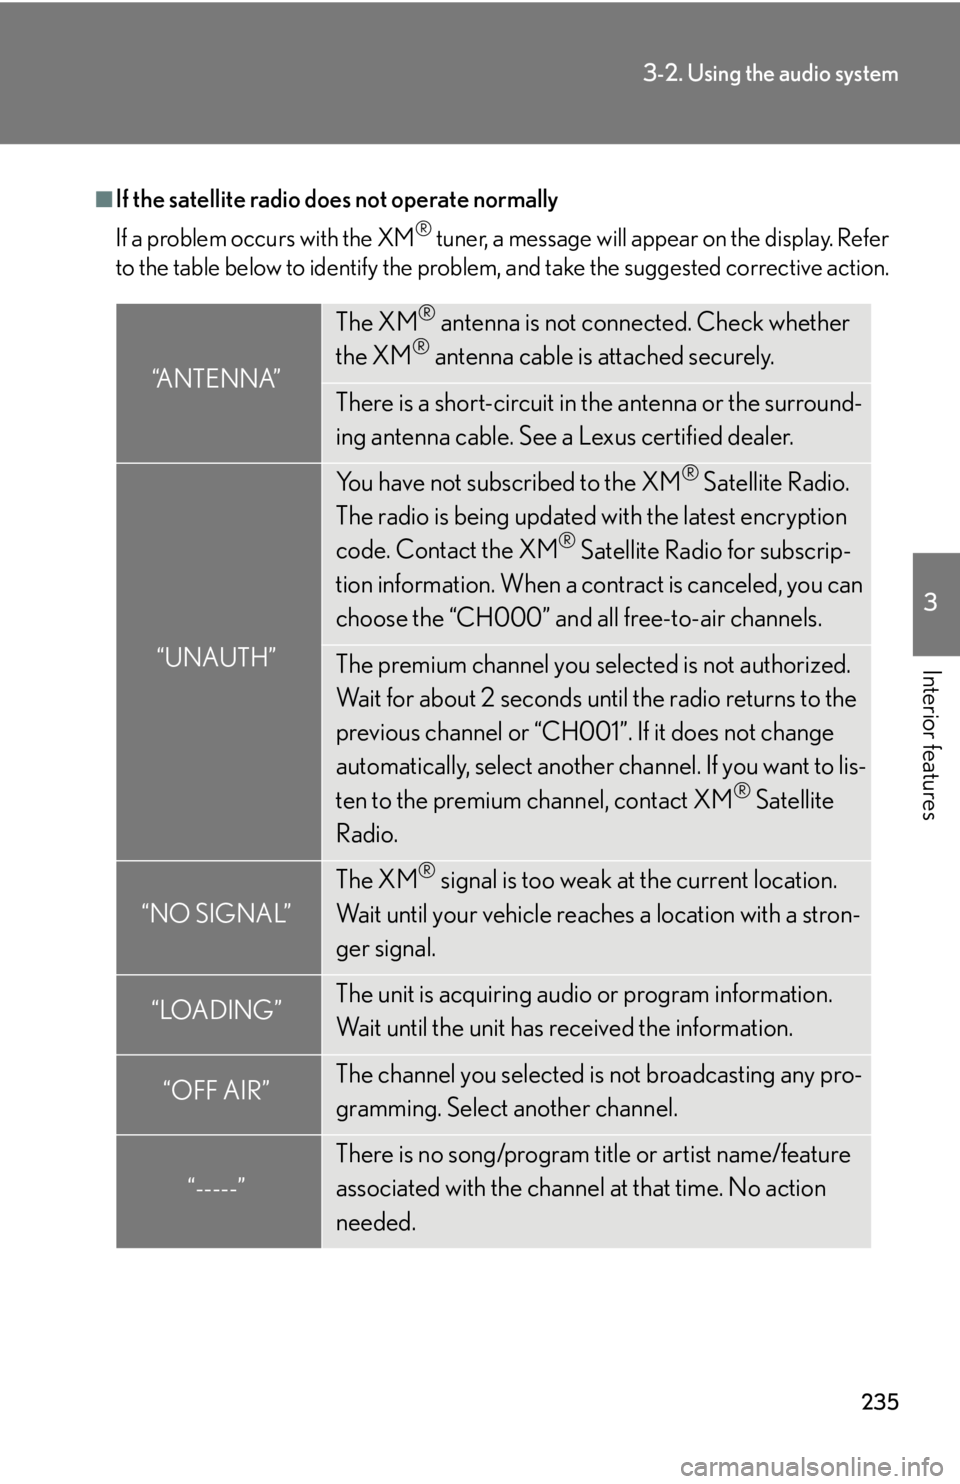
■If the satellite radio does not operate normally
If a problem occurs with the XM
® tuner, a message will appear on the display. Refer
to the table below to identify the problem, and take the suggested corrective action.
“ANTENNA”
The XM® antenna is not connected. Check whether
the XM® antenna cable is attached securely.
There is a short-circuit in the antenna or the surround-
ing antenna cable. See a Lexus certified dealer.
“UNAUTH”
You have not subscribed to the XM® Satellite Radio.
The radio is being updated with the latest encryption
code. Contact the XM
® Satellite Radio for subscrip-
tion information. When a co ntract is canceled, you can
choose the “CH000” and all free-to-air channels.
The premium channel you selected is not authorized.
Wait for about 2 seconds until the radio returns to the
previous channel or “CH001”. If it does not change
automatically, select another channel. If you want to lis-
ten to the premium channel, contact XM
® Satellite
Radio.
“NO SIGNAL”
The XM® signal is too weak at the current location.
Wait until your vehicle reaches a location with a stron-
ger signal.
“LOADING”The unit is acquiring audio or program information.
Wait until the unit has received the information.
“OFF AIR”The channel you selected is not broadcasting any pro-
gramming. Select another channel.
“-----”
There is no song/program title or artist name/feature
associated with the channel at that time. No action
needed.
Page 240 of 592
240
3-2. Using the audio system
Selecting a CD■ To select a CD to play
To select the desired CD, press “ ” or “ ” on or .
■ To scan loaded CDs (type A only)
Press and hold
until you hear a beep.
The first ten seconds of the first track on each CD will be played.
Press again when the desired CD is reached.
Random playback
■ Current CD
Press (RAND).
■ All CDs
Press and hold (RAND) until you hear a beep.
Repeat play
■ To repeat a track
Press (RPT).
■ To repeat all of the tracks on a CD
Press and hold (RPT) until you hear a beep.
Playing and pausing tracks
To play or pause a track, press ( ).
Switching the displayPress .
Each time is pressed, the display changes in the order of Track no./
Elapsed time CD title Track title.
STEP1
STEP2
Page 247 of 592

247
3-2. Using the audio system
3
Interior features
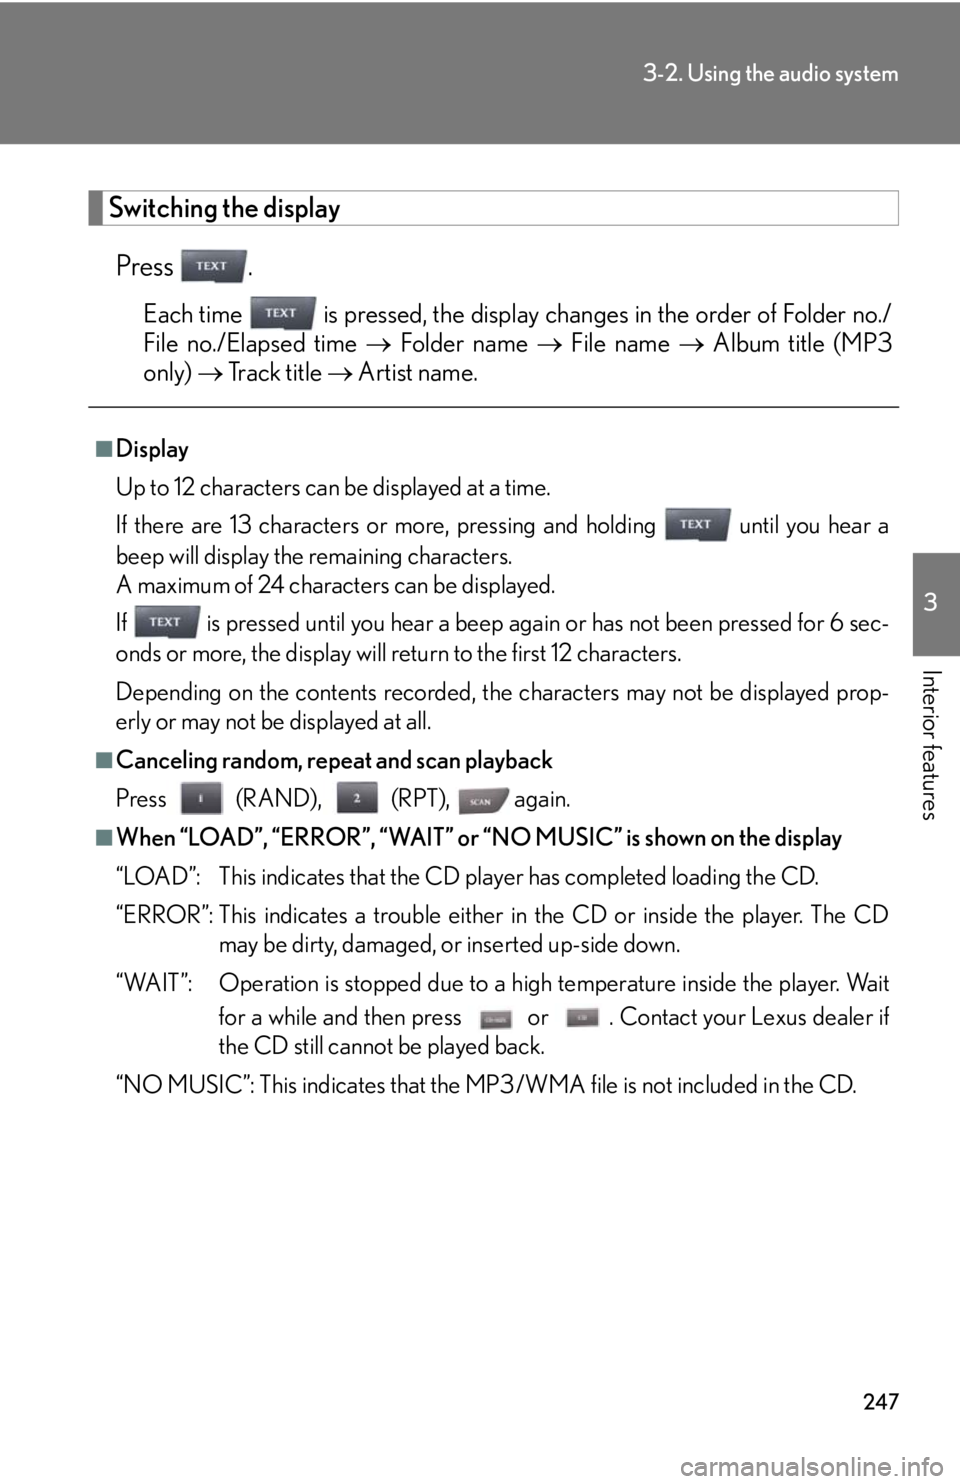
Switching the displayPress .
Each time is pressed, the display changes in the order of Folder no./
File no./Elapsed time Folder name File name Album title (MP3
only) Track title Artist name.
■Display
Up to 12 characters can be displayed at a time.
If there are 13 characters or more, pressing and holding until you hear a
beep will display the remaining characters.
A maximum of 24 characters can be displayed.
If is pressed until you hear a beep again or has not been pressed for 6 sec-
onds or more, the display will return to the first 12 characters.
Depending on the contents recorded, the characters may not be displayed prop-
erly or may not be displayed at all.
■Canceling random, repeat and scan playback
Press (RAND), (RPT), again.
■When “LOAD”, “ERROR”, “WAIT” or “NO MUSIC” is shown on the display
“LOAD”: This indicates that the CD pl ayer has completed loading the CD.
“ERROR”: This indicates a trouble either in the CD or inside the player. The CD may be dirty, damaged, or inserted up-side down.
“WAIT”: Operation is stopped due to a hi gh temperature inside the player. Wait
for a while and then press or . Contact your Lexus dealer if
the CD still cannot be played back.
“NO MUSIC”: This indicates that the MP3/WMA file is not included in the CD.
Page 256 of 592
256
3-2. Using the audio system
Selecting songsTurn or press “ ” or “ ” on to select the desired song.
Playing and pausing songs
To play or pause a song, press ( ).
Fast-forwarding and rewinding songs
To fast-forward or rewind, press and hold “ ” or “ ” on until you
hear a beep.
Shuffle playback ■ Playing songs from one playlist or album in random order
Press (RAND).
■ Playing songs from all the playlists or albums in random order
Press and hold (RAND) until you hear a beep.
Repeat play
Press (RPT).
Switching the displayPress .
Each time is pressed, the display changes in the order of Elapsed time
Album title Track title Artist name.
Page 264 of 592

264
3-2. Using the audio system
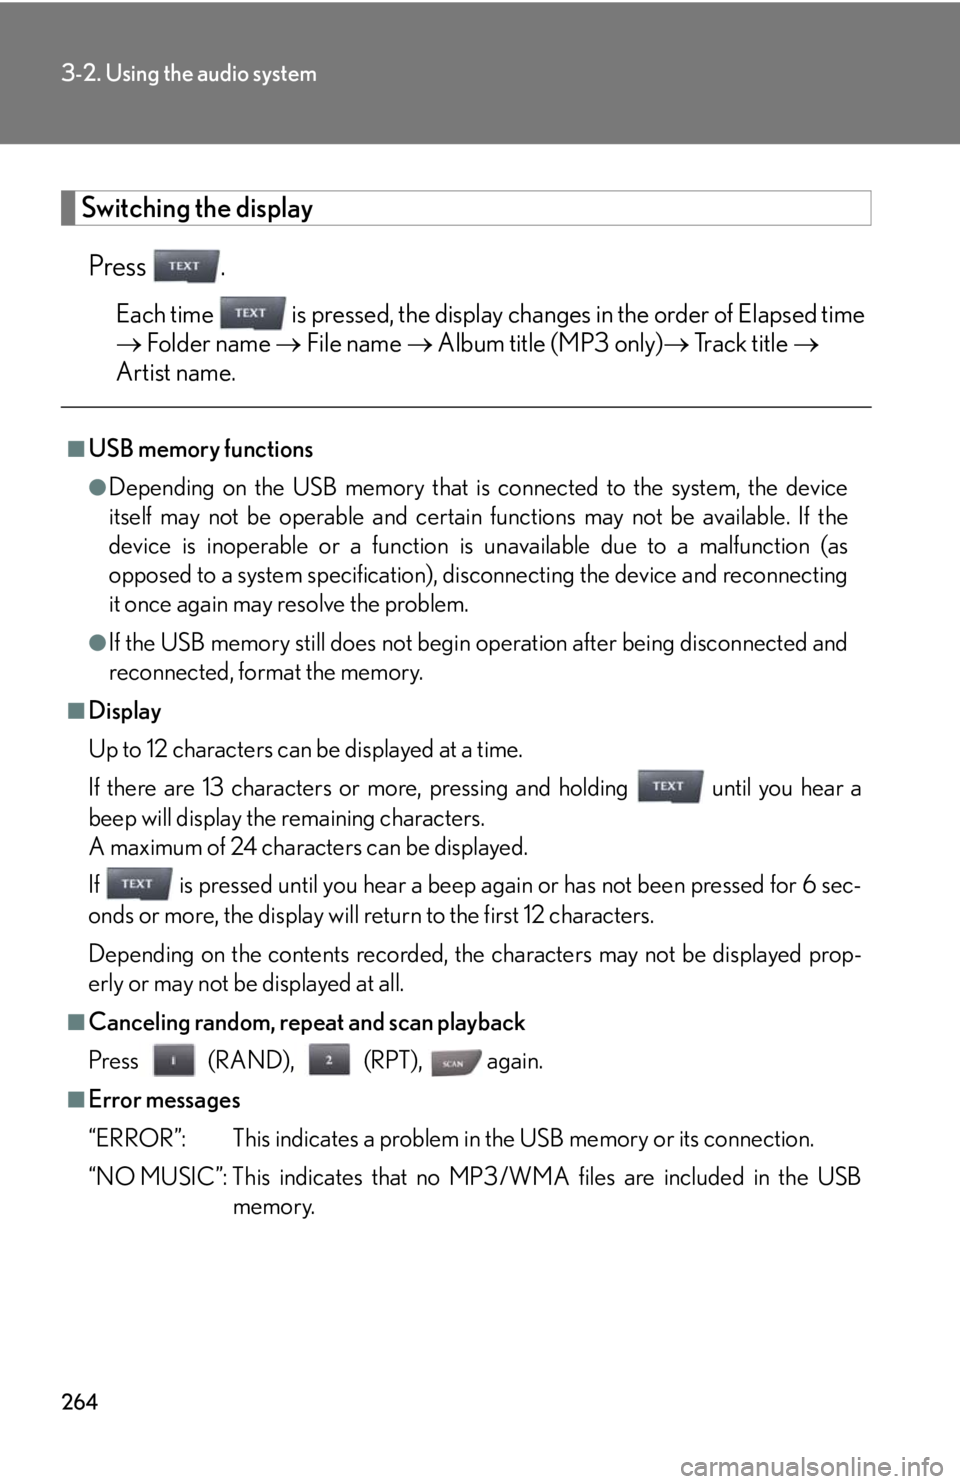
Switching the displayPress .
Each time is pressed, the display changes in the order of Elapsed time
Folder name File name Album title (MP3 only) Track title
Artist name.
■USB memory functions
●Depending on the USB memory that is connected to the system, the device
itself may not be operable and certain functions may not be available. If the
device is inoperable or a function is unavailable due to a malfunction (as
opposed to a system specification), di sconnecting the device and reconnecting
it once again may resolve the problem.
●If the USB memory still does not begin operation after being disconnected and
reconnected, format the memory.
■Display
Up to 12 characters can be displayed at a time.
If there are 13 characters or more, pressing and holding until you hear a
beep will display the remaining characters.
A maximum of 24 characters can be displayed.
If is pressed until you hear a beep again or has not been pressed for 6 sec-
onds or more, the display will return to the first 12 characters.
Depending on the contents recorded, the characters may not be displayed prop-
erly or may not be displayed at all.
■Canceling random, repeat and scan playback
Press (RAND), (RPT), again.
■Error messages
“ERROR”: This indicates a problem in the USB memory or its connection.
“NO MUSIC”: This indicates that no MP 3/WMA files are included in the USB
memory.
Page 270 of 592
270
3-2. Using the audio system
Adjusting the Automatic Sound Levelizer (ASL)Press .
The ASL switches between on and off modes each time is
pressed.
ASL automatically adjusts the volume an d tone quality according to the noise
level as you drive your vehicle.
Adjusting sound quality and volume balance
■ Changing sound quality modes
Press .
Pressing changes the sound mode in the following order:
“BAS” “MID” “TRE” “FAD” “BAL”
■ Adjusting sound quality
Press or to adjust the level.
*: The sound quality level is adjusted individually in each audio mode.
Mode
displayedSound qual- ity modeLevelPress Press
“BAS”*Bass-5 to 5
LowHigh“MID”*Mid-range-5 to 5
“TRE”*Tr e b l e-5 to 5
“FAD”
Front/rear
volume
balance
F7 to R7Shifts to rearShifts to front
“BAL”
Left/right
volume
balance
L7 to R7Shifts to leftShifts to right
Page 274 of 592
274
3-2. Using the audio system
Changing the audio sourcePress when the audio system is turned on. The audio source
changes as follows each time is pressed. If no discs are inserted in
the player, or if the external device is not connected, that mode will be
skipped.
Type A:
FM1 FM2 SAT1 SAT2 SAT3 CD player
Bluetooth
®audio AUX iPod or USB memory AM
Type B:
FM1 FM2 CD player Bluetooth
®audio AUX
iPod or USB memory AM
Adjusting the volume
Press “+” on to increase the volu me and “-” to decrease the vol-
ume.
Hold down to continue increa sing or decreasing the volume.
Selecting a radio station
Press to select radio mode.
Press “”or “ ” on to select a radio station.
To scan for receivable stations, press and hold until you hear a
beep.
Selecting a track/file or song
Press to select CD, Bluetooth
® audio, iPod or USB mem-
ory mode.
Press “ ” or “ ” on to select the desired track/file or song.
STEP1
STEP2
STEP1
STEP2