Page 190 of 393
AUDIO/VIDEO SYSTEM
189
(b) Turning the system on and off
“AUDIO”:Push this button to display
touch− screen buttons for audio system
(audio control mode).
“PWR·VOL”: Push this knob to turn the
audio system on and off. Turn this knob to
adjust the volume. The system turns on in
the last mode used.
You can select the function that enables
automatic return to the previous screen
from the audio screen. See page 298 for
details. (c) Switching between functions
"
DVD changer (Type A) image
Push the “AM·FM”, “AM”, “FM”, “SAT”,
“DISC”, “CD”, “AUX·USB” or “AUX”
button to turn on the desired mode.
ISF/IS NAVI (U)
Finish
7
Page 191 of 393
AUDIO/VIDEO SYSTEM
190
1. Push the “AUDIO” button.
2. Touch “AM”, “FM”, “SAT”, “CD”,
“CD/DVD”, “BT”, “AUX” or “USB” tab
to turn on the desired mode.
Push these buttons or tabs if you want to
switch from one mode to another.
If the disc is not set, the CD changer/DVD
changer does not turn on.
You can turn off the CD changer/DVD
changer by ejecting a disc.
ISF/IS NAVI (U)
Finish
Page 192 of 393
AUDIO/VIDEO SYSTEM
191
The screen buttons for radio, CD
changer, DVD changer, Bluetoothrau-
dio player, AUX, USB memory and iPod
operation are displayed on the screen
when the audio control mode is se-
lected.
Touch the tab to select the desired mode
when the audio control mode is selected.
INFORMATION
You cannot operate dimmed screen
buttons.
ISF/IS NAVI (U)
Finish
7
Page 197 of 393

AUDIO/VIDEO SYSTEM
196
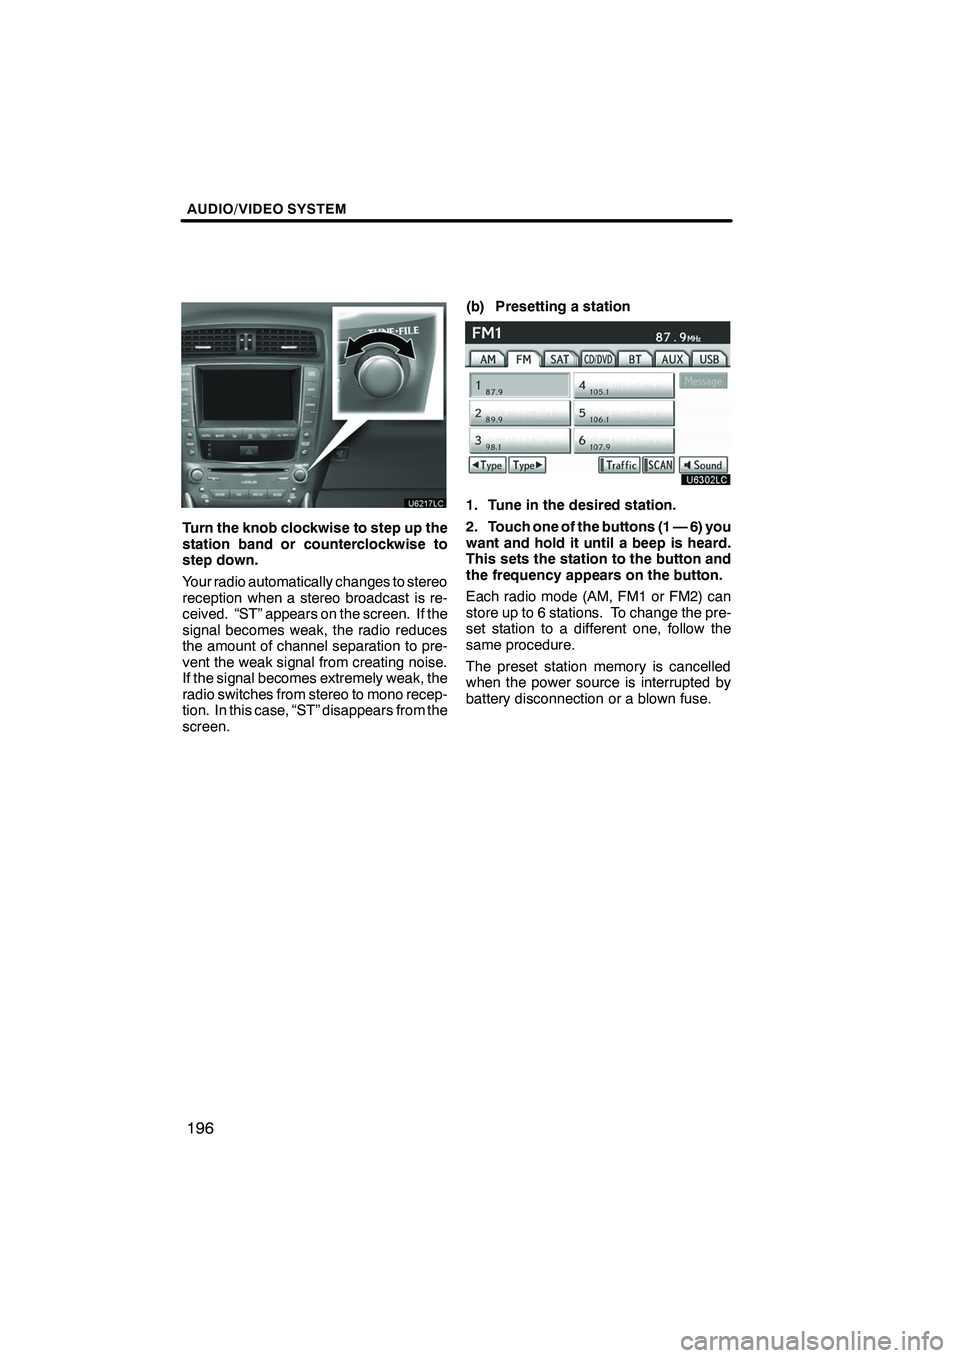
Turn the knob clockwise to step up the
station band or counterclockwise to
step down.
Your radio automatically changes to stereo
reception when a stereo broadcast is re-
ceived. “ST” appears on the screen. If the
signal becomes weak, the radio reduces
the amount of channel separation to pre-
vent the weak signal from creating noise.
If the signal becomes extremely weak, the
radio switches from stereo to mono recep-
tion. In this case, “ST” disappears from the
screen.(b) Presetting a station
1. Tune in the desired station.
2. Touch one of the buttons (1 — 6) you
want and hold it until a beep is heard.
This sets the station to the button and
the frequency appears on the button.
Each radio mode (AM, FM1 or FM2) can
store up to 6 stations. To change the pre-
set station to a different one, follow the
same procedure.
The preset station memory is cancelled
when the power source is interrupted by
battery disconnection or a blown fuse.
ISF/IS NAVI (U)
Finish
Page 203 of 393

AUDIO/VIDEO SYSTEM
202
(e) Presetting a channel
1. Tune in the desired channel.
2. Touch one of the channel selector
buttons (1 — 6) and hold it until a beep
is heard.
This sets the channels to the button and
the name and number of the channel ap-
pears on the button.
Each button can store three SAT channels.
To change the preset channel to a different
one, follow the same procedure.
The preset channel memory is cancelled
when the power source is interrupted by
battery disconnection or a blown fuse.(f) Selecting a channel
Tune in the desired channel using one of
the following methods.
Preset tuning:
Touch the channel selec-
tor button (1 — 6) or push the “
”or “”
button of “CH/DISC” for the channel you
want. The button (1 — 6) is highlighted and
channel number appears on the display.
To select channel within the current
category: Push the“
”or “”button of
“SEEK/TRACK” . The radio will step up or
down the channel within the current chan-
nel category.
To scan the currently selected channel
category: Touch“SCAN” briefly. “SCAN”
appears on the display. The radio will find
the next channel in the same channel cate-
gory, stay there for a few seconds, and
then scan again. To select a channel,
touch “SCAN” a second time.
To scan the preset channels: Touch
“SCAN” and hold it until you hear a beep.
“P.SCAN” appears on the display. The ra-
dio will find the next preset channel, stay
there for a few seconds, and then move to
the next preset channel. To select a chan-
nel, touch “SCAN”a second time.
ISF/IS NAVI (U)
Finish
Page 236 of 393
AUDIO/VIDEO SYSTEM
235
CHANGING THE ANGLE
The angle can be selected for discs that
are multi−angle compatible when the
angle mark appears on the screen.
Each time you touch “Change”, the
angle is selected from the ones stored
in the discs and changed.
When you touch
, and the previous
screen returns. SETUP MENU
There are initial setting buttons on the
“Setup Menu” screen.
After you change the initial setting, touch
. The initial setting screen will be
turned off and return to the picture
previously.
When “Default” is touched, all menus are
initialized.
The initial setting can be changed.
ISF/IS NAVI (U)
Finish
7
Page 273 of 393

AIR CONDITIONING
272
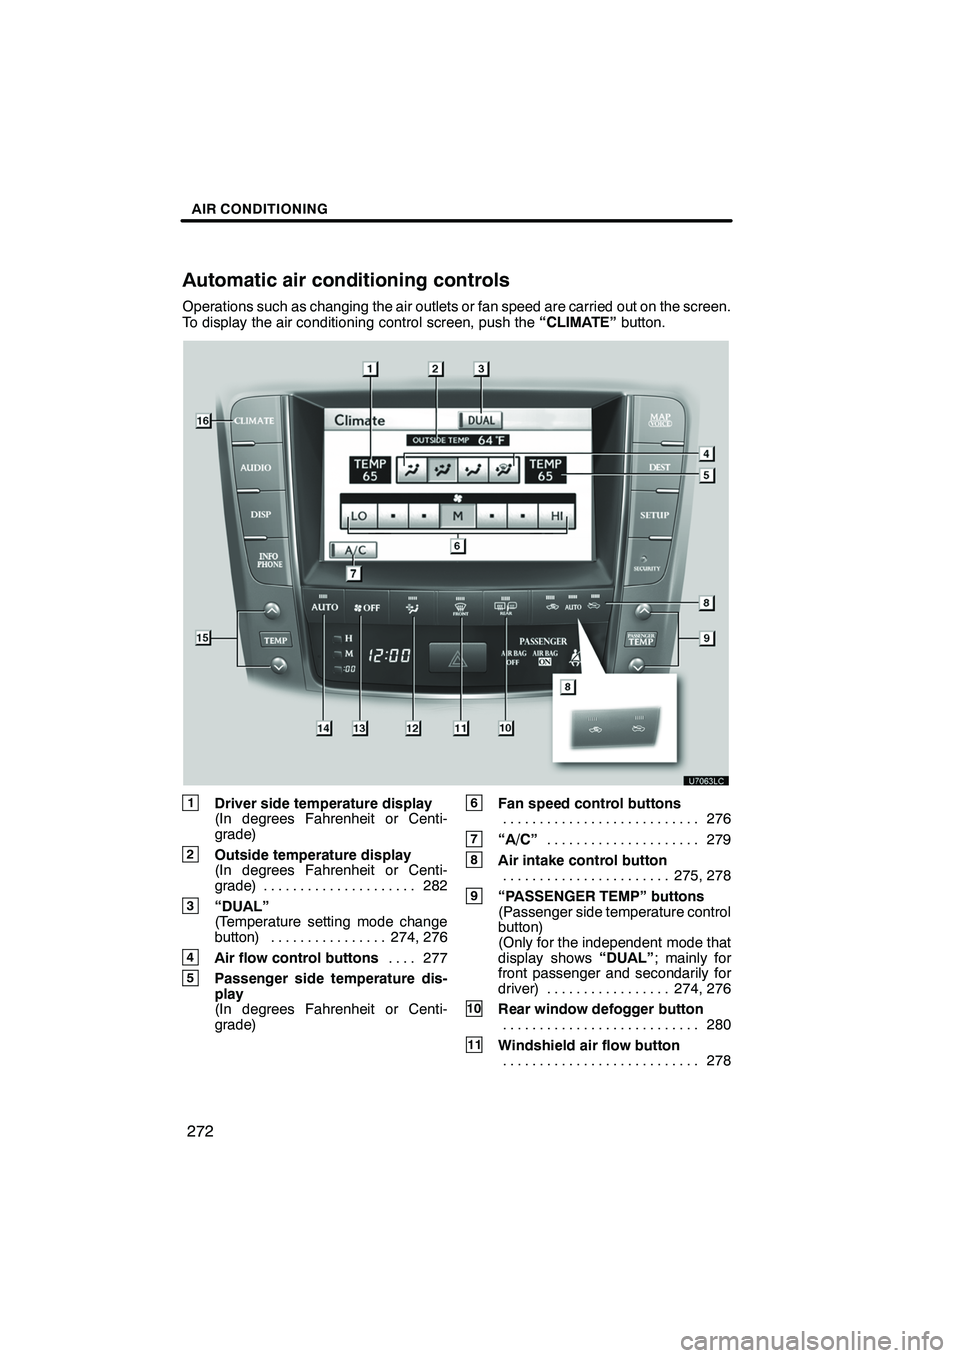
Operations such as changing the air outlets or fan speed are carried out on the screen.
To display the air conditioning control screen, push the“CLIMATE”button.
1Driver side temperature display
(In degrees Fahrenheit or Centi-
grade)
2Outside temperature display
(In degrees Fahrenheit or Centi-
grade) 282.....................
3“DUAL”
(Temperature setting mode change
button) 274, 276 ................
4Air flow control buttons 277
....
5Passenger side temperature dis-
play
(In degrees Fahrenheit or Centi-
grade)
6Fan speed control buttons
276
...........................
7“A/C” 279
.....................
8Air intake control button
275, 278
.......................
9“PASSENGER TEMP” buttons
(Passenger side temperature control
button)
(Only for the independent mode that
display shows “DUAL”; mainly for
front passenger and secondarily for
driver) 274, 276 .................
10Rear window defogger button
280
...........................
11Windshield air flow button
278
...........................
ISF/IS NAVI (U)
Finish
Automatic air conditioning controls
Page 274 of 393
AIR CONDITIONING
273
12Micro dust and pollen filter button281
...........................
13“OFF” button 274, 276
..........
14“AUTO” button 274
............
15“TEMP” buttons
(Driver side temperature control but-
ton) (At the independent mode that
display shows “DUAL”; mainly for
driver and secondarily for front pas-
senger)
(At the linked mode that display does
not show “DUAL”; for driver)
274, 276
.......................
16“CLIMATE” button
(Air conditioning operation screen
display button) 273 .............. (a) Climate control
Air outlets and fan speed are automati-
cally adjusted according to the temper-
ature setting.
The “ENGINE START STOP” switch must
be in IGNITION ON mode.
Push the “CLIMATE” button to display
the air conditioning control screen.
NOTICE
To prevent the battery from being dis-
charged, do not leave the air condi-
tioning on longer than necessary
when the engine is not running.
ISF/IS NAVI (U)
Finish
8