Page 14 of 78
14
■Changing shift ranges in the D position
Operating the paddle shift switches allows shift ranges to be selected to suit the driving con-
ditions.
Pull the “-” paddle shift switch toward you.The indicator in the meter cluster will
change to display the selected shift range.
Higher shift range:
Pull the “+” paddle shift switch toward you.
Lower shift range:
Pull the “-” paddle shift switch toward you.
Pulling and holding the “+” paddl e shift switch for a certain period of time allows you to
return to normal D position dr iving. If the accelerator pedal is depressed for more than a
certain period of time in one range, shift range selection in the D position will be automati-
cally deactivated.
Page 15 of 78
15
■Changing gears in the M position
Operating the shift lever or paddle shift switch es allows a gear to be selected and held,
enabling you to time gear shifts as you please while driving.
Shift the shift lever to M.The indicator in the meter cluster will
change to display the selected gear.
To u p s h i f t :
Move the shift lever in the “+” direction, or
pull the “+” paddle shift switch toward you.
To d o w n s h i f t :
Move the shift lever in the “-” direction, or
pull the “-” paddle shift switch toward you.
In M mode, the gear will change only when the shift lever or paddle shift switches are oper-
ated. However, when the vehicle speed drops the gear will be automatically downshifted.
Page 20 of 78
20
Cruise Control (If Equipped)
■Setting the speed
Press the “ON-OFF” button.
The system will turn on.
Accelerate or decelerate to the desired
speed, and then push the lever down. This sets the speed in the cruise control
memory.
■Canceling
To temporarily cancel the cruise control, pull
the lever toward you. To resume the cruise
control, push the lever up.
To turn the system off, press the “ON-OFF”
button.
■Adjusting the speed setting
To i n c r e a s e s p e e d : push the lever up.
To decrease speed : push the lever down.
Release the lever when the desired speed is
reached.
Cruise control allows the driver to maintain a constant speed without having to operate the
accelerator pedal.
Use for highway driving or when traveling at a constant speed for long periods of time.
1
2
Page 21 of 78

21
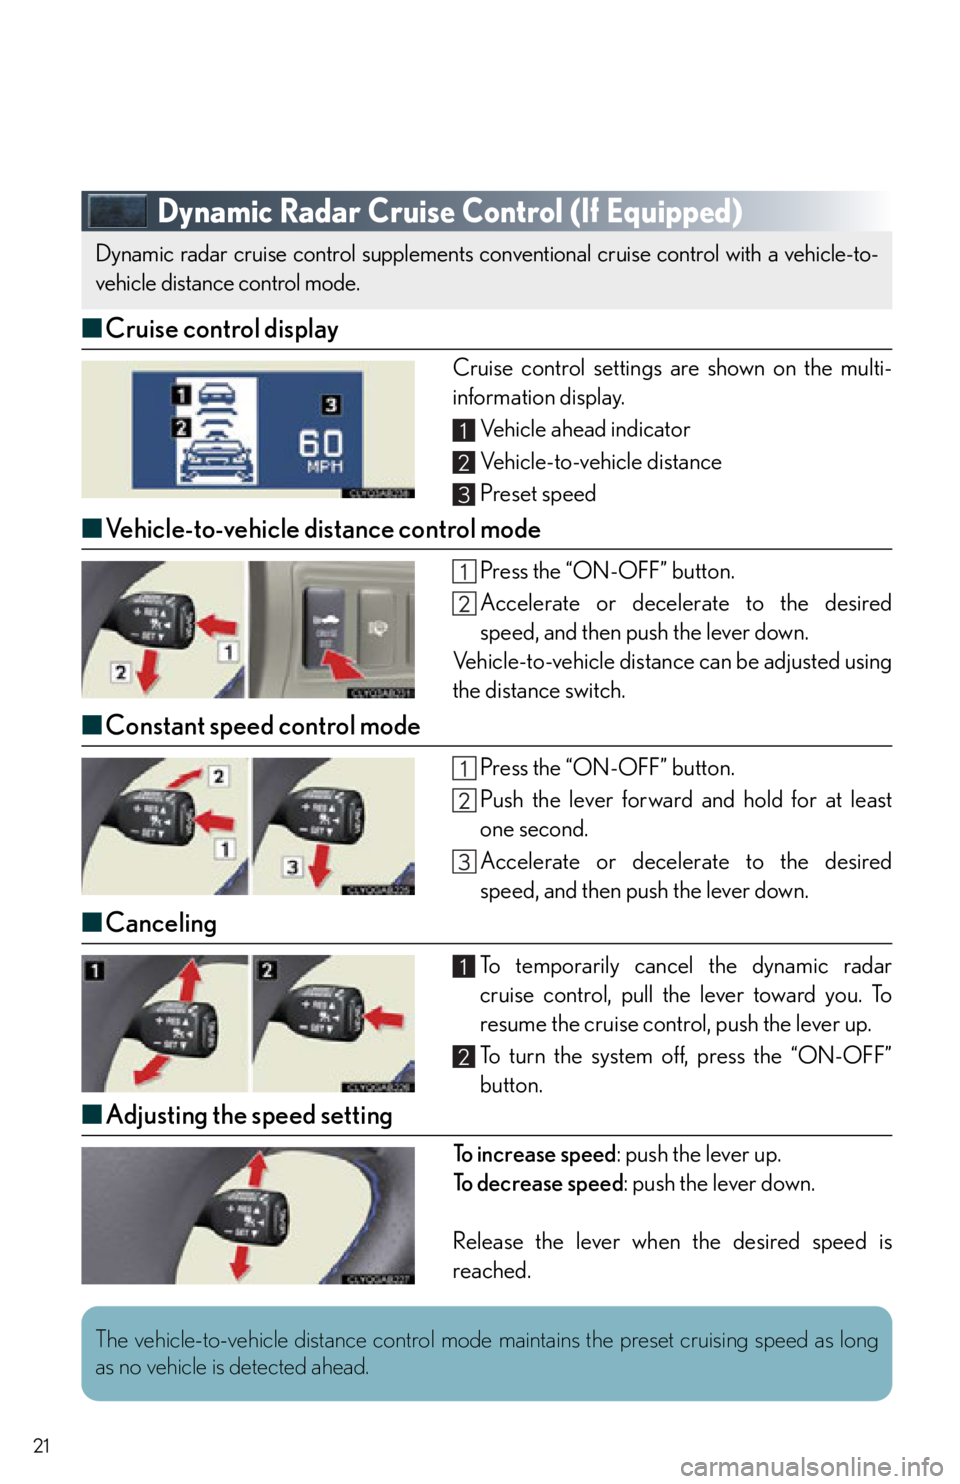
Dynamic Radar Cruise Control (If Equipped)
■Cruise control display
Cruise control settings are shown on the multi-
information display.
Vehicle ahead indicator
Vehicle-to-vehicle distance
Preset speed
■Vehicle-to-vehicle distance control mode
Press the “ON-OFF” button.
Accelerate or decelerate to the desired
speed, and then push the lever down.
Vehicle-to-vehicle distance can be adjusted using
the distance switch.
■ Constant speed control mode
Press the “ON-OFF” button.
Push the lever forward and hold for at least
one second.
Accelerate or decelerate to the desired
speed, and then push the lever down.
■Canceling
To temporarily cancel the dynamic radar
cruise control, pull the lever toward you. To
resume the cruise control, push the lever up.
To turn the system off, press the “ON-OFF”
button.
■Adjusting the speed setting
To increase speed : push the lever up.
To d e c r e a s e s p e e d : push the lever down.
Release the lever when the desired speed is
reached.
Dynamic radar cruise control su pplements conventional cruise control with a vehicle-to-
vehicle distance control mode.
1
2
3
1
2
The vehicle-to-vehicle distance control mode maintains the preset cruising speed as long
as no vehicle is detected ahead.
Page 22 of 78
22
Headlights
Ty p e AThe daytime running lights turn on.
The instrument panel, side marker, tail, day-
time running lights and license plate lights turn
on.
The headlights and all lights listed above
(except daytime running lights) turn on.
The headlights, parking lights/daytime running
lights and other lights turn on/off automatically
in accordance with ambient light levels.
Ty p e B The daytime running lights turn on.
The instrument panel, side marker, tail, day-
time running lights and license plate lights turn
on.
The headlights and all lights listed above
(except daytime running lights) turn on.
The headlights, parking lights/daytime running
lights and other lights turn on/off automatically
in accordance with ambient light levels.
To engage the high beams, push the lever forward.
To flash the high beams temporarily, pull the lever
toward you.
Canada
U.S.A.
1
2
3
4
1
2
3
4
Page 62 of 78

62
●Emergency Assistance Button ( “SOS”)
In the event of an emergency on the road, push the “SOS” button to reach the Safety
Connect response cent er. The answering agent will determine your vehicle’s location,
assess the emergency, and dispatch the necessary assistance required. If you accidentally press the “SOS” button, tell the response-center agent that you are
not experiencing an emergency.
● Enhanced Roadside Assistance
Subscribers can press the “SOS” button to reach a Safety Connect response-center
agent, who can help with a wide range of needs, such as: towing, flat tire, fuel delivery, etc.
For a description of the Enhanced Roadside Assistance servic es and their limitations,
please see the Safety Connect Terms and Co nditions, which are available at Lexus.com.
■Subscription
After you have signed the Telematics Subscription Service Agreement and are enrolled,
you can begin receiving services.
A variety of subscription terms is available for purchase. Contact your Lexus dealer, call 1-
800-25-LEXUS (1-800-255-3987) or push the “SOS” button in your vehicle for further
subscription details.