Page 201 of 391

AUDIO/VIDEO SYSTEM
200
(e) Presetting a channel
1. Tune in the desired channel.
2. Touch one of the channel selector
buttons (1 — 6) and hold it until a beep
is heard.
This sets the channels to the button and
the name and number of the channel ap-
pears on the button.
Each button can store three SAT channels.
To change the preset channel to a different
one, follow the same procedure.
The preset channel memory is cancelled
when the power source is interrupted by
battery disconnection or a blown fuse.(f) Selecting a channel
Tune in the desired channel using one of
the following methods.
Preset tuning:
Touch the channel selec-
tor button (1 — 6) or push the “
”or “”
button of “CH/DISC” for the channel you
want. The button (1 — 6) is highlighted and
channel number appears on the display.
To select channel within the current
category: Push the“
”or “”button of
“SEEK/TRACK” . The radio will step up or
down the channel within the current chan-
nel category.
To scan the currently selected channel
category: Touch“SCAN” briefly. “SCAN”
appears on the display. The radio will find
the next channel in the same channel cate-
gory, stay there for a few seconds, and
then scan again. To select a channel,
touch “SCAN” a second time.
To scan the preset channels: Touch
“SCAN” and hold it until you hear a beep.
“P.SCAN” appears on the display. The ra-
dio will find the next preset channel, stay
there for a few seconds, and then move to
the next preset channel. To select a chan-
nel, touch “SCAN”a second time.
ES350 NAVI (U)
Finish
Page 207 of 391
AUDIO/VIDEO SYSTEM
206
3. Insert the next disc after the orange
indicators change to green and stay on
and the CD changer door opens.
4. Repeat this procedure until you in-
sert all the discs.
To cancel the operation, push the“LOAD”
button briefly.
If you do not insert the discs within 15 sec-
onds after pushing the “LOAD”button, the
beep will sound and the operation will be
canceled automatically.
NOTICE
Do not insert one disc stacked on top
of another one or feed them in contin-
uously, to prevent discs from getting
stuck in the changer.
INFORMATION
Under extremely cold conditions, the
display may react slowly.
(b) Ejecting discs
DA single disc alone:
1. Push the “”or“” button of “CH/
DISC” or touch the disc number button
on the “Change Discs” screen to high-
light the disc number you want to eject.
To display the “Change Discs” screen,
touch “Change Discs” on each audio
control screen.
ES350 NAVI (U)
Finish
Page 210 of 391
AUDIO/VIDEO SYSTEM
209
(d) Selecting a desired disc
On the screen:
Touch “CD” tab, then touch “Change
Discs”.
The selected disc number is highlighted.
The changer will start playing the selected
disc from the first track.
On the audio panel:
Push the “
”or“” button of “CH/
DISC”.
When you release the button, the changer
will start playing the selected disc from the
first track. (e) Playing an audio disc
Touch “CD” tab, then touch “Change
Discs”. Choose an audio disc number
to display this screen.
ES350 NAVI (U)
Finish
7
Page 222 of 391
AUDIO/VIDEO SYSTEM
221
(b) Ejecting discs
DA single disc alone:
1. Push the “”or“” button of “CH/
DISC” or touch the disc number button
on the “Change Discs” screen to high-
light the disc number you want to eject.
To display the “Change Discs” screen,
touch “Change Discs” on each audio
control screen.
2. Push the “” button for the disc
briefly.
At this time, the orange indicators of the
slot start blinking and the disc is ejected.
3. After the blinking indicators stay on,
remove the disc.
ES350 NAVI (U)
Finish
7
Page 224 of 391

AUDIO/VIDEO SYSTEM
223
(c) Playing a disc
Push the “DISC” button, or push the
“AUDIO” button to display audio
screen and touch “CD/DVD” tab if the
discs are already loaded in the changer.
The discs set in the changer are played
continuously, starting with the last disc you
inserted. The disc number of the disc cur-
rently being played, the track or title and
chapter number and the time from the be-
ginning of the program appear on the
screen.
Audio CD only —
When play of one disc ends, the first track
of the following disc starts. When play of
the final disc ends, play of the first disc
starts again.
The changer will skip any empty disc trays.(d) Selecting a desired disc
On the screen:
Touch “CD/DVD” tab, then touch
“Change Discs”.
The selected disc number is highlighted.
The changer will start playing the selected
disc from the first track.
On the audio panel:
Push the “
”or“” button of “CH/
DISC”.
When you release the button, the changer
will start playing the selected disc from the
first track.
ES350 NAVI (U)
Finish
7
Page 261 of 391

AUDIO/VIDEO SYSTEM
260
NOTICE
To ensure correct audio/video sys-
tem operations:
DBe careful not to spill beverages
over the audio/video system.
DDo not put anything other than an
appropriate discs into the CD
changer or DVD changer.
DThe use of a cellular phone inside
or near the vehicle may cause a
noise from the speakers of the au-
dio/video system which you are lis-
tening to. However, this does not
indicate a malfunction.
DRadio reception
Usually, a problem with radio reception
does not mean there is a problem with your
radio — it is just the normal result of condi-
tions outside the vehicle.
For example, nearby buildings and terrain
can interfere with FM reception. Power
lines or telephone wires can interfere with
AM signals. And of course, radio signals
have a limited range. The farther you are
from a station, the weaker its signal will be.
In addition, reception conditions change
constantly as your vehicle moves.
Here are some common reception prob-
lems that probably do not indicate a prob-
lem with your radio: FM
Fading and drifting stations — Generally,
the effective range of FM is about 25 miles
(40 km). Once outside this range, you may
notice fading and drifting, which increase
with the distance from the radio transmit-
ter. They are often accompanied by distor-
tion.
Multi−
path — FM signals are reflective,
making it possible for two signals to reach
your antenna at the same time. If this hap-
pens, the signals will cancel each other
out, causing a momentary flutter or loss of
reception.
Static and fluttering — These occur when
signals are blocked by buildings, trees, or
other large objects. Increasing the bass
level may reduce static and fluttering.
Station swapping — If the FM signal you
are listening to is interrupted or weakened,
and there is another strong station nearby
on the FM band, your radio may tune in the
second station until the original signal can
be picked up again.
AM
Fading — AM broadcasts are reflected by
the upper atmosphere — especially at
night. These reflected signals can inter-
fere with those received directly from the
radio station, causing the radio station to
sound alternately strong and weak.
Station interference — When a reflected
signal and a signal received directly from
a radio station are very nearly the same
frequency, they can interfere with each
other, making it difficult to hear the broad-
cast.
Static — AM is easily affected by external
sources of electrical noise, such as high
tension power lines, lightening, or electri-
cal motors. This results in static.
ES350 NAVI (U)
Finish
Audio/video system
operating hints
Page 265 of 391

AUDIO/VIDEO SYSTEM
264
"Labeled discs
NOTICE
DDo not use special shaped, trans-
parent/translucent, low quality or
labeled discs such as those shown
in the illustrations. The use of such
discs may damage the player or
changer, or it may be impossible to
eject the disc.
DThis system is not designed for use
of Dual Disc. Do not use Dual Disc
because it may cause damage to
the changer.
DDo not use a disc with protection
ring. The use of such disc may
damage the changer, or it may be
impossible to eject the disc.
"Correct "Wrong
DHandle discs carefully, especially
when you are inserting them. Hold
them on the edge and do not bend the-
m. Avoid getting fingerprints on them,
particularly on the shiny side.
DDirt, scratches, warping, pin holes, or
other disc damage could cause the
player to skip or to repeat a section of
a track. (To see a pin hole, hold the disc
up to the light.)
DRemove discs from the players when
you are not using them. Store them in
their plastic cases away from moisture,
heat, and direct sunlight.
ES350 NAVI (U)
Finish
Page 268 of 391

AUDIO/VIDEO SYSTEM
267
6U5161aX
001.mp3
002.wmaFolder 1003.mp3
Folder 2
004.mp3
005.wma
Folder 3006.mp3
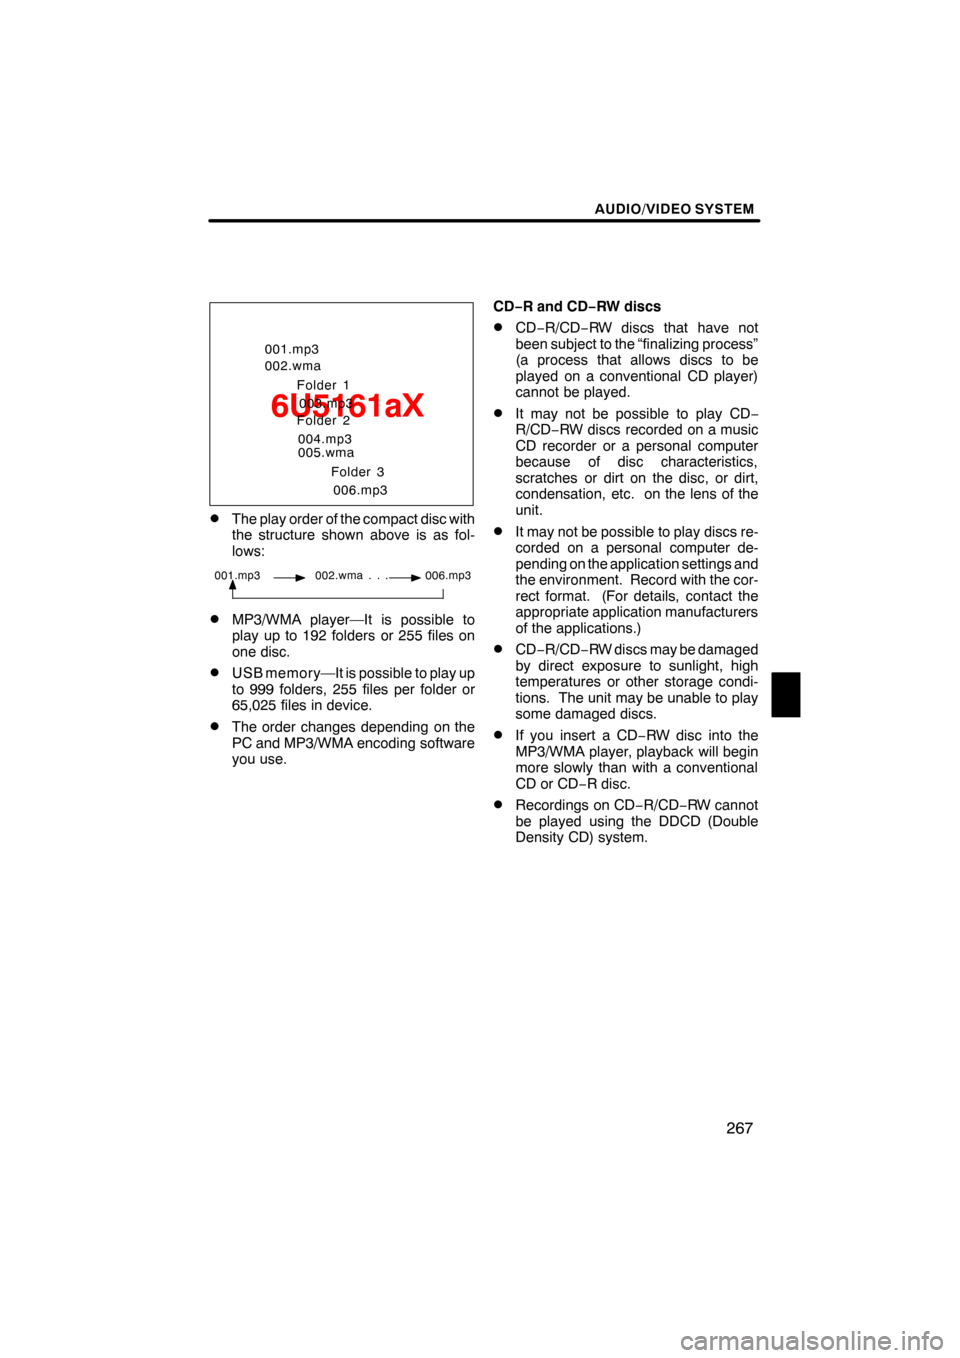
DThe play order of the compact disc with
the structure shown above is as fol-
lows:
001.mp3 002.wma . . . 006.mp3
DMP3/WMA player—It is possible to
play up to 192 folders or 255 files on
one disc.
DUSB memory—It is possible to play up
to 999 folders, 255 files per folder or
65,025 files in device.
DThe order changes depending on the
PC and MP3/WMA encoding software
you use. CD−
R and CD− RW discs
DCD−R/CD− RW discs that have not
been subject to the “finalizing process”
(a process that allows discs to be
played on a conventional CD player)
cannot be played.
DIt may not be possible to play CD −
R/CD− RW discs recorded on a music
CD recorder or a personal computer
because of disc characteristics,
scratches or dirt on the disc, or dirt,
condensation, etc. on the lens of the
unit.
DIt may not be possible to play discs re-
corded on a personal computer de-
pending on the application settings and
the environment. Record with the cor-
rect format. (For details, contact the
appropriate application manufacturers
of the applications.)
DCD− R/CD− RW discs may be damaged
by direct exposure to sunlight, high
temperatures or other storage condi-
tions. The unit may be unable to play
some damaged discs.
DIf you insert a CD −RW disc into the
MP3/WMA player, playback will begin
more slowly than with a conventional
CD or CD −R disc.
DRecordings on CD −R/CD− RW cannot
be played using the DDCD (Double
Density CD) system.
ES350 NAVI (U)
Finish
7