Page 78 of 307

Once the doors have been locked via the remote
control or the key pawl, it will no longer be
possible to unlock them by pressing button
.
In the absence of electrical power supply (blown
fuse, battery disconnected, etc.) it is still possible
to lock the doors manually.
IMPORTANT With central locking active, pulling
the internal opening lever of the passenger side
door unlocks the door (the LED stays on). Pulling
the internal opening lever of the driver side door
activates central unlocking.
IMPORTANT The rear doors cannot be opened
from the inside when the child-lock system is
engaged (see the description in the following
paragraph).
CHILD-LOCKS
This system prevents the rear doors from being
opened from the inside.
This device A fig. 55 can only be engaged with the
doors open:
❒position 1 - device engaged (door locked);
❒position 2 - device not engaged (door may be
opened from the inside).
The device remains on even if the doors are
unlocked electrically.
IMPORTANT The rear doors cannot be opened
from the inside when the child-lock system is
engaged.
fig. 55
L0F0080
76GETTING TO
KNOW YOUR CAR
SAFETY
STARTING AND
DRIVING
WARNING LIGHTS
AND MESSAGES
IN AN EMERGENCY
SERVICING AND
MAINTENANCE
TECHNICAL
SPECIFICATIONS
INDEX
Page 79 of 307

WARNING
Always use this device when carrying
children. After engaging the child
lock on both rear doors, check for effective
engagement by trying to open a door with
the internal handle.
PASSENGER SIDE FRONT DOOR AND REAR
DOOR EMERGENCY LOCKING DEVICE
The passenger side front door and the rear doors
have a device to lock them when there is no power.
In this case proceed as follows:
❒engage the metal insert of the ignition key in
position Afig. 56 (passenger side front door)
or B fig. 55 (rear doors);
❒turn the key clockwise and then remove it from
housing Afig. 56 or B fig. 55.The door lock knob can be realigned (only when
the battery charge has been restored) as follows:
❒press the
button on the remote control;
❒press button
for locking/unlocking the doors;
❒open a front door by inserting the key into the
key pawl;
❒operate the internal door handle.
If the child lock was engaged and the
previously described locking
procedure carried out, operating the
internal handle will not open the door but will
only realign the door lock knobs. To open the
door, the outside handle must be used. The
door central locking/unlocking button
is
not disabled by the engagement of the
emergency lock.
IMPORTANT If the battery is disconnected or the
protection fuse blows, the door opening/closing
mechanism must be reinitialised as follows:
❒close all the doors;
❒press button
on the remote control or button
for locking/unlocking the doors on the
instrument panel;
❒press button
on the remote control or button
for locking/unlocking the doors on the
instrument panel.
fig. 56
L0F0215
77GETTING TO
KNOW YOUR CARSAFETY
STARTING AND
DRIVING
WARNING LIGHTS
AND MESSAGES
IN AN EMERGENCY
SERVICING AND
MAINTENANCE
TECHNICAL
SPECIFICATIONS
INDEX
Page 82 of 307

Electric window system initialisation
The initialisation procedure must be carried out
with the doors closed and for each door, as
described below:
❒fully close the window to initialise manually;
❒after the window has reached the upper end of
travel, hold down the closing control for at
least 1 second.
LUGGAGE COMPARTMENTThe luggage compartment unlocking is electrically
operated and is deactivated when the car is in
motion.
OPENING
When unlocked, the luggage compartment can be
opened from outside the car using the power
handle A fig. 58 located under the tailgate edge
until the unlocking click is heard or pressing
the
button on the remote control.
The direction indicators will blink twice and an
internal light will switch on when the luggage
compartment is opened: the light switches off
automatically when the luggage compartment is
closed. The light switches off automatically after a
few minutes if the tailgate is left open.
fig. 58
L0F0031
80GETTING TO
KNOW YOUR CAR
SAFETY
STARTING AND
DRIVING
WARNING LIGHTS
AND MESSAGES
IN AN EMERGENCY
SERVICING AND
MAINTENANCE
TECHNICAL
SPECIFICATIONS
INDEX
Page 83 of 307

Proceed as follows:
❒remove the rear head restraints and completely
fold back the seats (see the paragraph
“Expanding the luggage compartment”);
❒adjust lever A fig. 59.
WARNING
Be careful not to hit object on the
storage shelf when you open the
luggage compartment tailgate.CLOSURE
Pull the tab A fig. 60 and lower the tailgate by
pressing next to the lock until it clicks.
The direction indicators will blink twice and an
internal light will switch on when the luggage
compartment is opened: the light switches off
automatically when the luggage compartment is
closed. The light switches off automatically after a
few minutes if the tailgate is left open.
IMPORTANT Before closing the luggage
compartment make sure that you have the keys.
The luggage compartment is locked automatically.
LUGGAGE COMPARTMENT INITIALISATION
IMPORTANT If the battery is disconnected or the
protection fuse blows, the luggage compartment
opening/closing mechanism must be reinitialised
as follows:
fig. 59
L0F0041
fig. 60
L0F0193
81GETTING TO
KNOW YOUR CARSAFETY
STARTING AND
DRIVING
WARNING LIGHTS
AND MESSAGES
IN AN EMERGENCY
SERVICING AND
MAINTENANCE
TECHNICAL
SPECIFICATIONS
INDEX
Emergency opening from inside
Page 90 of 307

ADJUSTING THE HEADLIGHTS WHEN
ABROAD
Dipped headlights are adjusted to drive in the
country where the vehicle was originally
purchased. When travelling in countries with
opposite driving direction, to avoid dazzling the
drivers on the other side of the road, you need
to cover areas of the headlight according to the
Highway code of the country you are travelling in.
ABS SYSTEMABS is an integral part of the braking system
which prevents, whatever the road conditions and
force applied to the brake pedal, the wheels from
locking and consequently sliding under braking,
thus ensuring that the car remains under control
even during emergency braking.
The EBD system (Electronic Braking Force
Distribution) completes the system allowing the
brake force to be distributed between the front
and rear wheels.
IMPORTANT To obtain the maximum efficiency
of the braking system, a bedding-in period of
about 500 km is needed: during this period it is
better to avoid sharp, repeated and prolonged
braking.
WARNING
The ABS gets the most from the
available grip, but it cannot improve
it; you should therefore take every care when
driving on slippery surfaces and not take
unnecessary risks.
88GETTING TO
KNOW YOUR CAR
SAFETY
STARTING AND
DRIVING
WARNING LIGHTS
AND MESSAGES
IN AN EMERGENCY
SERVICING AND
MAINTENANCE
TECHNICAL
SPECIFICATIONS
INDEX
Page 101 of 307

WARNING
Before starting any servicing
operation, stop the engine and
remove the key from the ignition switch to
operate the steering lock, particularly when
the wheels do not touch the ground. If this
is not possible (for example if the key needs
to be turned to MAR-ON or the engine must
be running), remove the main fuse that
protects the electric power steering.
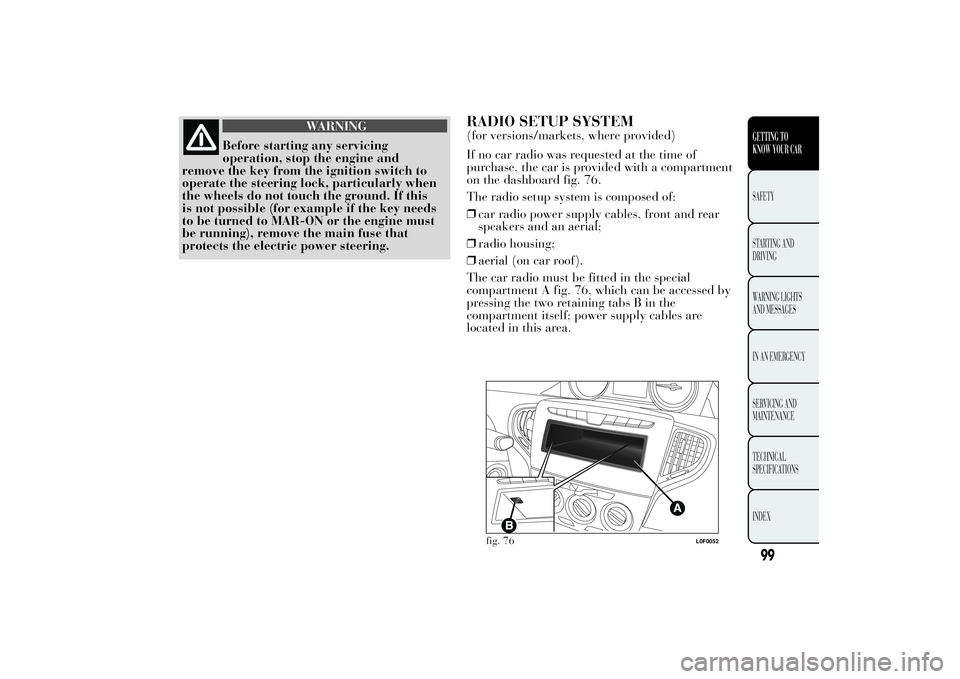
RADIO SETUP SYSTEM(for versions/markets, where provided)
If no car radio was requested at the time of
purchase, the car is provided with a compartment
on the dashboard fig. 76.
The radio setup system is composed of:
❒car radio power supply cables, front and rear
speakers and an aerial;
❒radio housing;
❒aerial (on car roof).
The car radio must be fitted in the special
compartment A fig. 76, which can be accessed by
pressing the two retaining tabs B in the
compartment itself; power supply cables are
located in this area.
fig. 76
L0F0052
99GETTING TO
KNOW YOUR CARSAFETY
STARTING AND
DRIVING
WARNING LIGHTS
AND MESSAGES
IN AN EMERGENCY
SERVICING AND
MAINTENANCE
TECHNICAL
SPECIFICATIONS
INDEX
Page 119 of 307

For diesel engines, use only diesel fuel
for motor vehicles in accordance with
EN590 European specifications. The
use of other products or mixtures may damage
the engine beyond repair and consequently
invalidate the warranty, depending on the
damage caused. If you accidentally refuel with
another type of fuel, do not start the engine,
and drain the fuel tank. If the engine has been
run, even for only a very short time, you will
need to have the entire fuel system emptied in
addition to the tank.
REFUELLING CAPACITY
To fill the tank completely, top up twice after the
pump switches off. Further top-ups could cause
faults in the fuel feeding system.
REFUELLING PROCEDURE FOR VERSIONS
EQUIPPED WITH FUEL TANK PLUG
(for versions/markets, where provided)
Refuel as follows:
❒open the flap A fig. 87 pulling it outwards;
❒keep the plug B still, insert the ignition key in
the lock and turn it anticlockwise;
❒Turn the plug anticlockwise and remove it.
The plug has a device C fig. 87 that attaches it to
the flap so that it cannot be lost. When refilling,
attach the plug to the flap, as shown.After refuelling, fit the plug B fig. 87 (complete
with key) and turn it clockwise until it clicks once
or more. Turn the key clockwise and remove it.
Close the flap A.
The sealing may cause a slight pressure increase in
the tank. A little breathing off, while unscrewing
the plug or introducing the gun in the versions
equipped with "Smart Fuel", is therefore
absolutely normal.
fig. 87
L0F0240
117GETTING TO
KNOW YOUR CARSAFETY
STARTING AND
DRIVING
WARNING LIGHTS
AND MESSAGES
IN AN EMERGENCY
SERVICING AND
MAINTENANCE
TECHNICAL
SPECIFICATIONS
INDEX
Page 123 of 307

SAFETY
SEAT BELTSUSING THE SEAT BELTS
The belt should be worn keeping the torso straight
and rested against the backrest.
To fasten the seat belts, hold the tongue A fig. 92
and insert it into the buckle B, until the locking
click is heard. On removal, if it jams, let it rewind
for a short stretch, then pull it out again without
jerking.To unfasten the seat belts, press button C. Guide
the seat belt with your hand while it is rewinding,
to prevent it from twisting. Through the reel,
the belt automatically adapts to the body of the
passenger wearing it, allowing freedom of
movement.
WARNING
Never press button C fig. 92 when
travelling.
The reel may lock when the car is parked on a
steep slope: this is perfectly normal. Furthermore,
the reel mechanism locks the belt if it is pulled
sharply or in the event of sudden braking,
collisions and high-speed bends.
The rear seat is fitted with inertia seat belts with
three anchor points and a reel. Fasten the rear seat
belts as shown in fig. 93 (4-seater versions) or
(5-seater versions) fig. 94.
fig. 92
L0F0059
121GETTING TO KNOW
YOUR CARSAFETYSTARTING AND
DRIVING
WARNING LIGHTS
AND MESSAGES
IN AN EMERGENCY
SERVICING AND
MAINTENANCE
TECHNICAL
SPECIFICATIONS
INDEX