Page 39 of 218

38
SAFETY
STARTING
AND DRIVING
WARNING
LIGHTS AND
MESSAGES
IN AN
EMERGENCY
MAINTENANCE
AND CARE
TECHNICAL
SPECIFICA-
TIONS
INDEX
DASHBOARD
AND
CONTROLS
Adjusting backrest inclination
Operate the lever D-fig. 32in the di-
rection of the arrow, take the backrest
to the required position and then re-
lease it.
Lumbar adjustment
(for versions/markets, where provided)
To adjust the support between back
and backrest, turn knob C-fig. 32
clockwise to increase the lumbar sup-
port or anticlockwise to decrease it.
ADJUSTING THE
SEATS
FRONT SEATS
Fore/aft adjustment
Lift lever A-fig. 31and push the seat
forwards and backwards to reach the
required position: your arms should
rest on the steering wheel rim while
you are driving.
Check that the seat is locked well on
the guides by trying to push it for-
wards and backwards.
Adjusting the height
(driver’s seat)
(for versions/markets, where provided)
Move lever B-fig. 31upwards or
downwards to achieve the required
height.
IMPORTANT Sit in the driver’s seat
with the car not moving to adjust.
fig. 31L0D0041mfig. 32L0D0042m
Make sure that the seats
are correctly secured after
making the adjustments.
WARNING
Page 40 of 218

39
SAFETY
STARTING
AND DRIVING
WARNING
LIGHTS AND
MESSAGES
IN AN
EMERGENCY
MAINTENANCE
AND CARE
TECHNICAL
SPECIFICA-
TIONS
INDEX
DASHBOARD
AND
CONTROLS
Armrest adjustment fig. 33
(for versions/markets, where provided)
To use the armrest, move it from po-
sition1to position 2.
Arranging the passenger seat in
table position
Move the armrest (for versions/
markets, where provided) to vertical
position.
From the driver’s seat or from the rear
seats, operate the lever A-fig. 34in
the direction of the arrow, fold the
backrest fig. 35onto the cushion and
then release it. In this position, the
backrest may be used as a table. Heated seats
(for versions/markets, where provided)
Press buttons B-fig. 36to heat the
driver’s seat C-fig. 36and to heat the
passenger’s seat.
The LED in the button will light up
when heating is on.
Arranging the driver’s seat
in table position
To arrange the driver’s seat in table
position, remove the head restraint
(see “Extracting the head restraint”
in the “Head restraint” chapter) and
proceed as shown above.
fig. 33L0D0043mfig. 34L0D0044m
fig. 35L0D0045m
fig. 36L0D0046m
Page 85 of 218

84
SAFETY
STARTING
AND DRIVING
WARNING
LIGHTS AND
MESSAGES
IN AN
EMERGENCY
MAINTENANCE
AND CARE
TECHNICAL
SPECIFICA-
TIONS
INDEX
DASHBOARD
AND
CONTROLS
When travelling in countries on the
other side of the road, cover the head-
light as shown in the figure. Use non-
transparent adhesive for this purpose.
The figures show how to change from
left-hand drive to right-hand drive. Adjusting headlight alignment
fig. 110
To adjust, press buttons
eÒon the
control panel. The display shows the
positions during the adjustment oper-
ation.
Position0- one or two occupants on
front seats. – Position 1- five occu-
pants – Position 2- five people + load
in the boot – Position 3- driver +
maximum permitted load all in boot.
IMPORTANT Check beam alignment
every time the load carried changes.
HEADLIGHT ADJUSTMENT
WHEN TRAVELLING ABROAD
fig. 111-112
The dipped headlamps are adjusted
for service in the country where the
car was originally purchased.
HEADLIGHTS
BEAM DIRECTION
Correction direction of the headlights
is essentially for the comfort and
safety of the driver and the other road
users. The headlights must be cor-
rectly directed to ensure the best vis-
ibility conditions when the headlights
are on. Contact Lancia Dealership to
have the headlights properly adjusted.
HEADLIGHT CORRECTOR
This device works with the key at
MARand the dipped beam headlights
on. The car will slant backwards
when it is loaded, raising the light
beam. The beams must therefore be
directed again in this case.
Never operate the sunroof
when roof bars are fitted.
fig. 110L0D0393mfig. 111L0D0118m
fig. 112L0D0119m
Page 98 of 218

97
STARTING
AND DRIVING
WARNING
LIGHTS AND
MESSAGES
IN AN
EMERGENCY
MAINTENANCE
AND CARE
TECHNICAL
SPECIFICA-
TIONS
INDEX
DASHBOARD
AND
CONTROLS
SAFETY
S.B.R. system
The car is fitted with a Seat Belt Re-
minder system (S.B.R.), consisting of
a buzzer and a flashing warning light
warns the driver that the seat belt
must be fastened.
The buzzer can be deactivated (until
the next engine stop) as follows:
❒fasten the driver’s seat belt;
❒turn the ignition key to MAR;
❒wait for over 20 seconds and then
release one of the seat belts.
For permanent deactivation, contact
a Lancia Dealership.
The S.B.R. can only be reactivated us-
ing the setup menu (see the “Warning
lights and messages” chapter, “Seat
belt reminder” paragraph).ADJUSTING THE FRONT SEAT
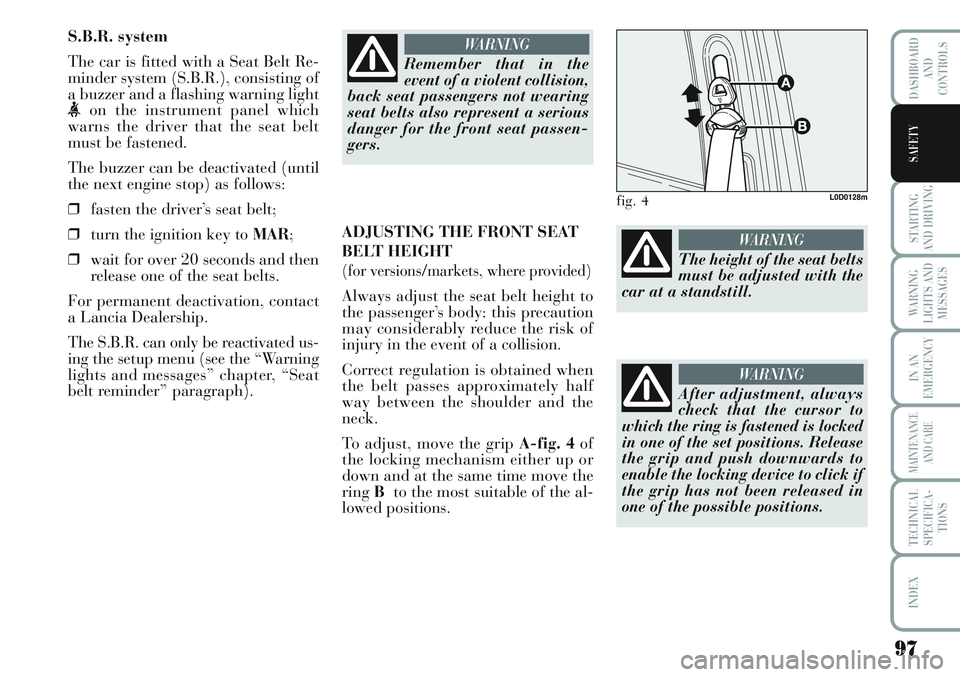
BELT HEIGHT
(for versions/markets, where provided)
Always adjust the seat belt height to
the passenger’s body: this precaution
may considerably reduce the risk of
injury in the event of a collision.
Correct regulation is obtained when
the belt passes approximately half
way between the shoulder and the
neck.
To adjust, move the grip A-fig. 4of
the locking mechanism either up or
down and at the same time move the
ringBto the most suitable of the al-
lowed positions.
Remember that in the
event of a violent collision,
back seat passengers not wearing
seat belts also represent a serious
danger for the front seat passen-
gers.
WARNING
fig. 4L0D0128m
The height of the seat belts
must be adjusted with the
car at a standstill.
WARNING
After adjustment, always
check that the cursor to
which the ring is fastened is locked
in one of the set positions. Release
the grip and push downwards to
enable the locking device to click if
the grip has not been released in
one of the possible positions.
WARNING