2012 KIA Sportage ECO mode
[x] Cancel search: ECO modePage 176 of 387
Features of your vehicle
86
4
✽
✽
NOTICE
• When using the air conditioning sys-
tem, monitor the temperature gauge
closely while driving up hills or in
heavy traffic when outside tempera-
tures are high. Air conditioning sys-
tem operation may cause engine over-
heating. Continue to use the blower
fan but turn the air conditioning sys-
tem off if the temperature gauge indi-
cates engine overheating.
• When opening the windows in humid weather air conditioning may create
water droplets inside the vehicle.
Since excessive water droplets may
cause damage to electrical equipment,
air conditioning should only be used
with the windows closed.
Air conditioning system operation tips
If the vehicle has been parked in direct
sunlight during hot weather, open the
windows for a short time to let the hot
air inside the vehicle escape.
To help reduce moisture inside of the windows on rainy or humid days,
decrease the humidity inside the vehi-
cle by operating the air conditioning
system.
During air conditioning system opera- tion, you may occasionally notice a
slight change in engine speed as the
air conditioning compressor cycles.
This is a normal system operation
characteristic.
Use the air conditioning system every month only for a few minutes to ensure
maximum system performance. When using the air conditioning sys-
tem, you may notice clear water drip-
ping (or even puddling) on the ground
under the passenger side of the vehi-
cle. This is a normal system operation
characteristic.
Operating the air conditioning system in the recirculated air position provides
maximum cooling, however, continual
operation in this mode may cause the
air inside the vehicle to become stale.
During cooling operation, you may occasionally notice a misty air flow
because of rapid cooling and humid air
intake. This is a normal system opera-
tion characteristic.
Page 182 of 387
Features of your vehicle
92
4
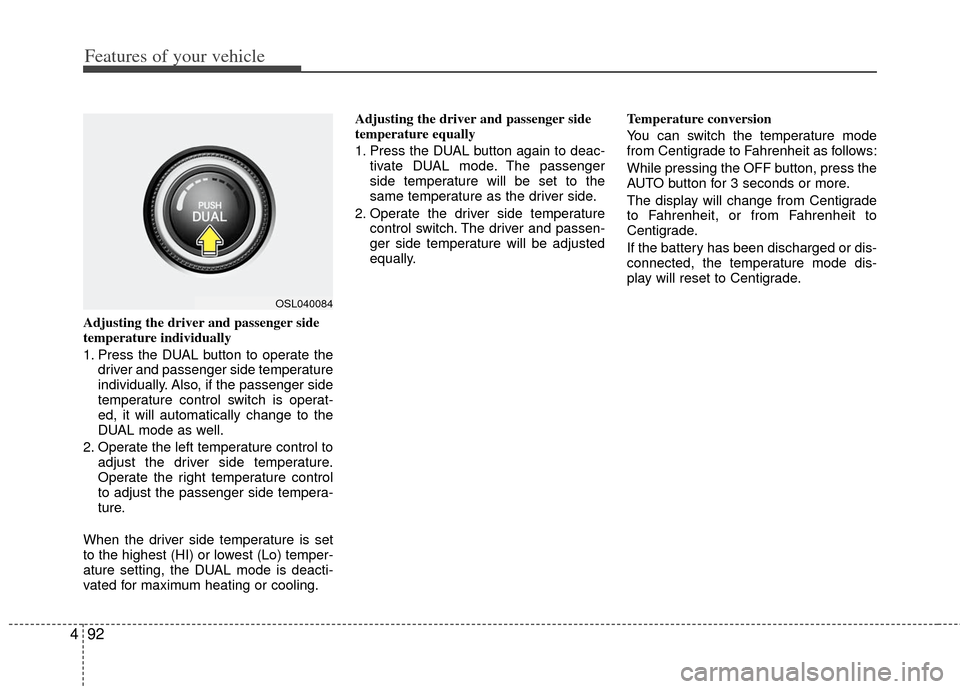
Adjusting the driver and passenger side
temperature individually
1. Press the DUAL button to operate the
driver and passenger side temperature
individually. Also, if the passenger side
temperature control switch is operat-
ed, it will automatically change to the
DUAL mode as well.
2. Operate the left temperature control to adjust the driver side temperature.
Operate the right temperature control
to adjust the passenger side tempera-
ture.
When the driver side temperature is set
to the highest (HI) or lowest (Lo) temper-
ature setting, the DUAL mode is deacti-
vated for maximum heating or cooling. Adjusting the driver and passenger side
temperature equally
1. Press the DUAL button again to deac-
tivate DUAL mode. The passenger
side temperature will be set to the
same temperature as the driver side.
2. Operate the driver side temperature control switch. The driver and passen-
ger side temperature will be adjusted
equally. Temperature conversion
You can switch the temperature mode
from Centigrade to Fahrenheit as follows:
While pressing the OFF button, press the
AUTO button for 3 seconds or more.
The display will change from Centigrade
to Fahrenheit, or from Fahrenheit to
Centigrade.
If the battery has been discharged or dis-
connected, the temperature mode dis-
play will reset to Centigrade.
OSL040084
Page 187 of 387
497
Features of your vehicle
Defogging logic
To reduce the possibility of fogging up
the inside of the windshield, the air intake
or air conditioning is controlled automati-
cally according to certain conditions such
as or position. To cancel or
return to the defogging logic, do the fol-
lowing.
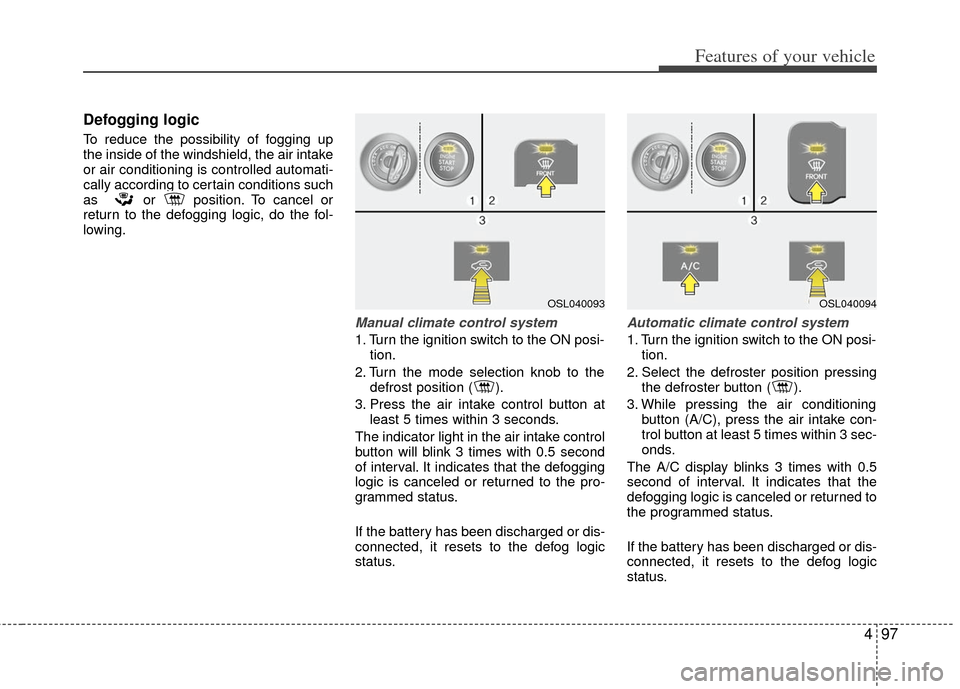
Manual climate control system
1. Turn the ignition switch to the ON posi-tion.
2. Turn the mode selection knob to the defrost position ( ).
3. Press the air intake control button at least 5 times within 3 seconds.
The indicator light in the air intake control
button will blink 3 times with 0.5 second
of interval. It indicates that the defogging
logic is canceled or returned to the pro-
grammed status.
If the battery has been discharged or dis-
connected, it resets to the defog logic
status.
Automatic climate control system
1. Turn the ignition switch to the ON posi- tion.
2. Select the defroster position pressing the defroster button ( ).
3. While pressing the air conditioning button (A/C), press the air intake con-
trol button at least 5 times within 3 sec-
onds.
The A/C display blinks 3 times with 0.5
second of interval. It indicates that the
defogging logic is canceled or returned to
the programmed status.
If the battery has been discharged or dis-
connected, it resets to the defog logic
status.
OSL040093OSL040094
Page 199 of 387
4109
Features of your vehicle
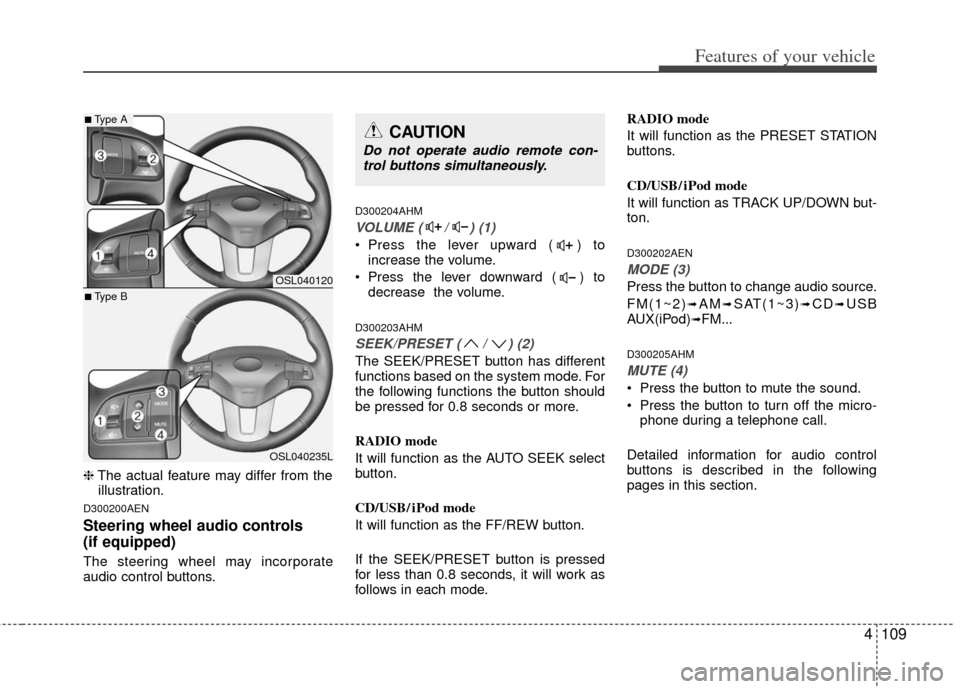
❈The actual feature may differ from the
illustration.
D300200AEN
Steering wheel audio controls
(if equipped)
The steering wheel may incorporate
audio control buttons.
D300204AHM
VOLUME ( / ) (1)
• Press the lever upward ( ) to increase the volume.
Press the lever downward ( ) to decrease the volume.
D300203AHM
SEEK/PRESET ( / ) (2)
The SEEK/PRESET button has different
functions based on the system mode. For
the following functions the button should
be pressed for 0.8 seconds or more.
RADIO mode
It will function as the AUTO SEEK select
button.
CD/USB/ iPod mode
It will function as the FF/REW button.
If the SEEK/PRESET button is pressed
for less than 0.8 seconds, it will work as
follows in each mode. RADIO mode
It will function as the PRESET STATION
buttons.
CD/USB/ iPod mode
It will function as TRACK UP/DOWN but-
ton.
D300202AEN
MODE (3)
Press the button to change audio source.
FM(1~2)
➟AM➟SAT(1~3)➟CD➟USB
AUX(iPod)➟FM...
D300205AHM
MUTE (4)
Press the button to mute the sound.
Press the button to turn off the micro- phone during a telephone call.
Detailed information for audio control
buttons is described in the following
pages in this section.
OSL040120
OSL040235L
■Type A
■Type B
CAUTION
Do not operate audio remote con- trol buttons simultaneously.
Page 206 of 387
Features of your vehicle
116
4
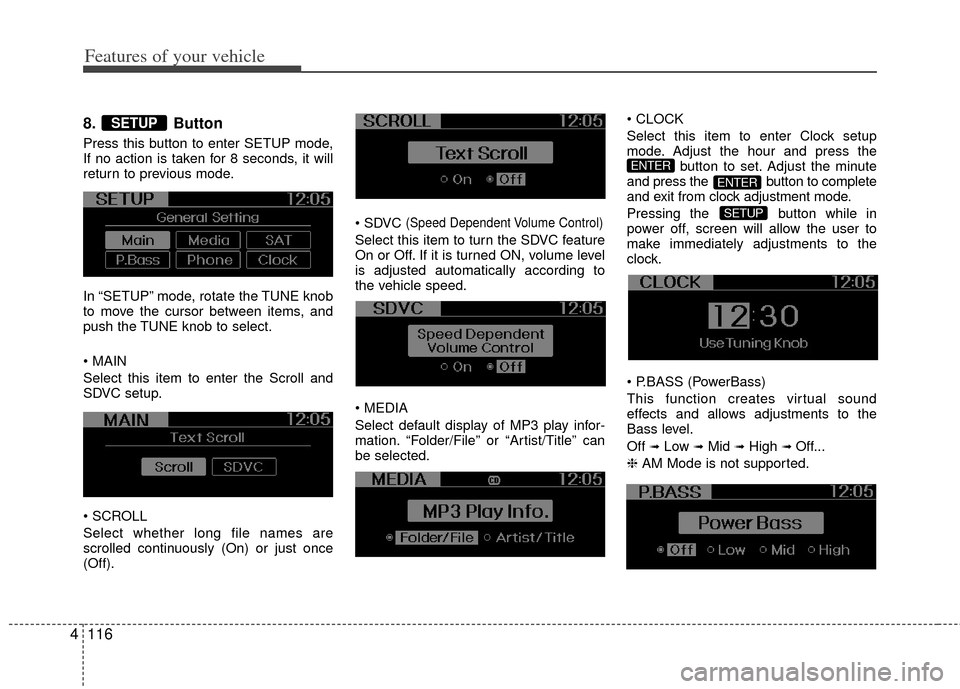
8. Button
Press this button to enter SETUP mode,
If no action is taken for 8 seconds, it will
return to previous mode.
In “SETUP” mode, rotate the TUNE knob
to move the cursor between items, and
push the TUNE knob to select.
Select this item to enter the Scroll and
SDVC setup.
Select whether long file names are
scrolled continuously (On) or just once
(Off).
(Speed Dependent Volume Control)
Select this item to turn the SDVC feature
On or Off. If it is turned ON, volume level
is adjusted automatically according to
the vehicle speed.
Select default display of MP3 play infor-
mation. “Folder/File” or “Artist/Title” can
be selected.
Select this item to enter Clock setup
mode. Adjust the hour and press the
button to set. Adjust the minute
and press the button to complete
and exit from clock adjustment mode.
Pressing the button while in
power off, screen will allow the user to
make immediately adjustments to the
clock.
(PowerBass)
This function creates virtual sound
effects and allows adjustments to the
Bass level.
Off
➟Low ➟Mid ➟High ➟ Off...
❈ AM Mode is not supported.
SETUP
ENTER
ENTER
SETUP
Page 208 of 387
Features of your vehicle
118
4
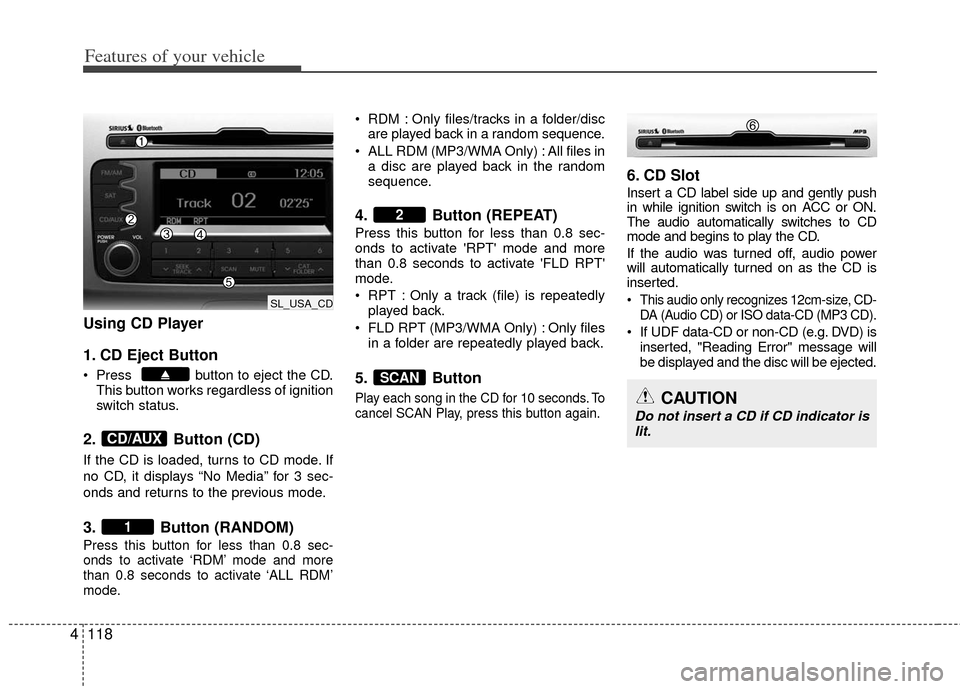
Using CD Player
1. CD Eject Button
Press button to eject the CD.
This button works regardless of ignition
switch status.
2. Button (CD)
If the CD is loaded, turns to CD mode. If
no CD, it displays “No Media” for 3 sec-
onds and returns to the previous mode.
3. Button (RANDOM)
Press this button for less than 0.8 sec-
onds to activate ‘RDM’ mode and more
than 0.8 seconds to activate ‘ALL RDM’
mode.
RDM : Only files/tracks in a folder/disc
are played back in a random sequence.
ALL RDM (MP3/WMA Only) : All files in a disc are played back in the random
sequence.
4. Button (REPEAT)
Press this button for less than 0.8 sec-
onds to activate 'RPT' mode and more
than 0.8 seconds to activate 'FLD RPT'
mode.
RPT : Only a track (file) is repeatedlyplayed back.
FLD RPT (MP3/WMA Only) : Only files in a folder are repeatedly played back.
5. Button
Play each song in the CD for 10 seconds. To
cancel SCAN Play, press this button again.
6. CD Slot
Insert a CD label side up and gently push
in while ignition switch is on ACC or ON.
The audio automatically switches to CD
mode and begins to play the CD.
If the audio was turned off, audio power
will automatically turned on as the CD is
inserted.
This audio only recognizes 12cm-size, CD- DA (Audio CD) or ISO data-CD (MP3 CD).
If UDF data-CD or non-CD (e.g. DVD) isinserted, "Reading Error" message will
be displayed and the disc will be ejected.
SCAN
2
1
CD/AUX
CAUTION
Do not insert a CD if CD indicator islit.
SL_USA_CD
Page 209 of 387
4119
Features of your vehicle
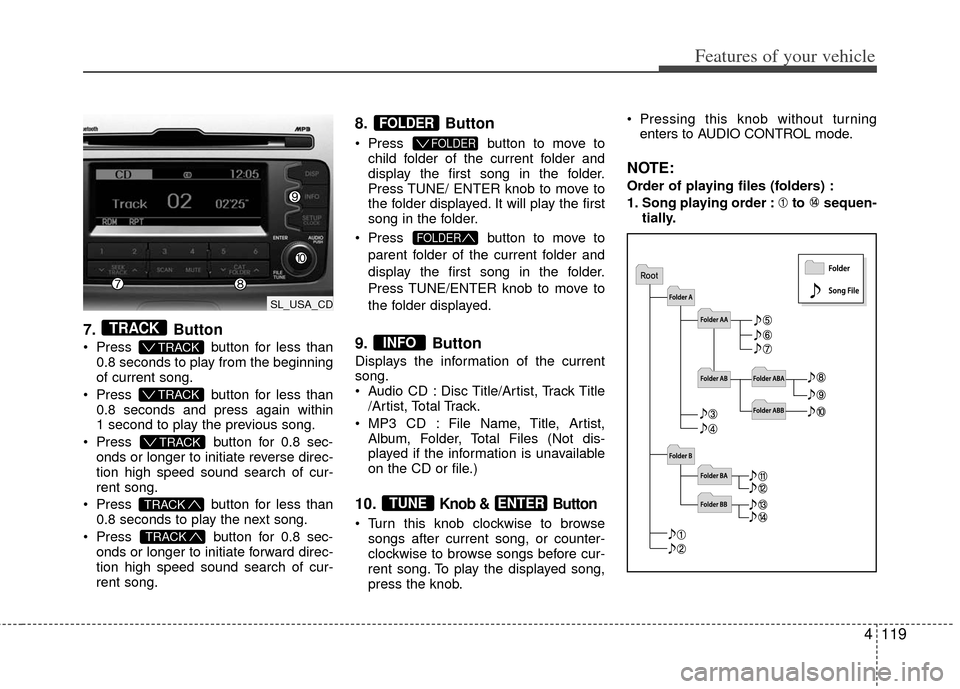
7.Button
Press button for less than
0.8 seconds to play from the beginning
of current song.
Press button for less than
0.8 seconds and press again within
1 second to play the previous song.
Press button for 0.8 sec-
onds or longer to initiate reverse direc-
tion high speed sound search of cur-
rent song.
Press button for less than
0.8 seconds to play the next song.
Press button for 0.8 sec-
onds or longer to initiate forward direc-
tion high speed sound search of cur-
rent song.
8. Button
Press button to move to
child folder of the current folder and
display the first song in the folder.
Press TUNE/ ENTER knob to move to
the folder displayed. It will play the first
song in the folder.
Press button to move to
parent folder of the current folder and
display the first song in the folder.
Press TUNE/ENTER knob to move to
the folder displayed.
9. Button
Displays the information of the current
song.
Audio CD : Disc Title/Artist, Track Title /Artist, Total Track.
MP3 CD : File Name, Title, Artist, Album, Folder, Total Files (Not dis-
played if the information is unavailable
on the CD or file.)
10.Knob & Button
Turn this knob clockwise to browsesongs after current song, or counter-
clockwise to browse songs before cur-
rent song. To play the displayed song,
press the knob. Pressing this knob without turning
enters to AUDIO CONTROL mode.
NOTE:
Order of playing files (folders) :
1. Song playing order : to sequen- tially.
ENTERTUNE
INFO
FOLDER
FOLDER
FOLDER
TRACK
TRACK
T TRACK
T TRACK
T TRACK
TRACK
SL_USA_CD
Page 211 of 387
4121
Features of your vehicle
CAUTION IN USING
USB DEVICE
To use an external USB device,
make sure the device is not con-nected when starting up the vehi-cle. Connect the device afterstarting up.
If you start the engine when the USB device is connected, it maydamage the USB device. (USBflashdrives are very sensitive toelectric shock.)
If the engine is started up or turned off while the external USBdevice is connected, the externalUSB device may not work.
It may not play inauthentic MP3 or WMA files.
1) It can only play MP3 files with the compression rate between8Kbps~320Kbps.
2) It can only play WMA music files with the compression ratebetween 8Kbps~320Kbps.
Take precautions for static electrici- ty when connecting or disconnect-ing the external USB device.
(Continued)
(Continued) An encrypted MP3 PLAYER is not recognizable.
Depending on the condition of the external USB device, the con-nected external USB device canbe unrecognizable.
When the formatted byte/sector setting of External USB device isnot either 512BYTE or 2048BYTE,then the device will not be recog- nized.
Use only a USB device formatted to FAT 12/16/32.
USB devices without USB I/F authentication may not be recog-nizable.
Make sure the USB connection terminal does not come in contactwith the human body or otherobjects.
If you repeatedly connect or dis- connect the USB device in a shortperiod of time, it may break thedevice.
You may hear a strange noise when connecting or disconnect-ing a USB device.
(Continued)(Continued) If you disconnect the external USB device during playback in USBmode, the external USB device canbe damaged or may malfunction. Therefore, disconnect the externalUSB device when the audio is turned off or in another mode. (e.g,Radio, SIRIUS or CD)
Depending on the type and capac- ity of the external USB device orthe type of the files stored in thedevice, there is a difference in the time taken for recognition of thedevice.
Do not use the USB device for pur- poses other than playing musicfiles.
Use of USB accessories such as rechargers or heaters using USBI/F may lower performance orcause trouble.
If you use devices such as a USB hub purchased separately, thevehicle’s audio system may not recognize the USB device. In thatcase, connect the USB devicedirectly to the multimedia termi- nal of the vehicle.
(Continued)