Page 348 of 387
Maintenance
30
7
G190300AAM
Reset items
Items should be reset after the battery
has been discharged or the battery has
been disconnected.
Auto up/down window (See section 4)
Sunroof (See section 4)
Trip computer (See section 4)
Climate control system
(See section 4)
Clock (See section 4)
Audio (See section 4)
WARNING
Before performing maintenance or recharging the battery, turn off
all accessories and stop the
engine.
The negative battery cable must be removed first and installed
last when the battery is discon-
nected.
Page 353 of 387

735
Maintenance
G200600AHM-EU
Tire replacement
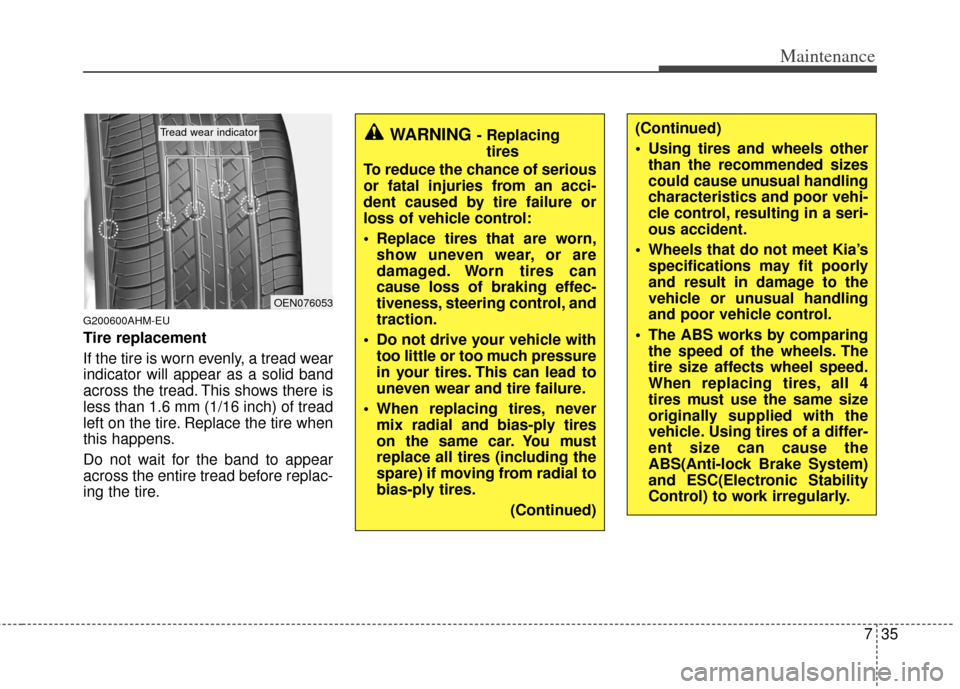
If the tire is worn evenly, a tread wear
indicator will appear as a solid band
across the tread. This shows there is
less than 1.6 mm (1/16 inch) of tread
left on the tire. Replace the tire when
this happens.
Do not wait for the band to appear
across the entire tread before replac-
ing the tire.
OEN076053
Tread wear indicatorWARNING - Replacingtires
To reduce the chance of serious
or fatal injuries from an acci-
dent caused by tire failure or
loss of vehicle control:
Replace tires that are worn, show uneven wear, or are
damaged. Worn tires can
cause loss of braking effec-
tiveness, steering control, and
traction.
Do not drive your vehicle with too little or too much pressure
in your tires. This can lead to
uneven wear and tire failure.
When replacing tires, never mix radial and bias-ply tires
on the same car. You must
replace all tires (including the
spare) if moving from radial to
bias-ply tires.
(Continued)(Continued)
Using tires and wheels otherthan the recommended sizes
could cause unusual handling
characteristics and poor vehi-
cle control, resulting in a seri-
ous accident.
Wheels that do not meet Kia’s specifications may fit poorly
and result in damage to the
vehicle or unusual handling
and poor vehicle control.
The ABS works by comparing the speed of the wheels. The
tire size affects wheel speed.
When replacing tires, all 4
tires must use the same size
originally supplied with the
vehicle. Using tires of a differ-
ent size can cause the
ABS(Anti-lock Brake System)
and ESC(Electronic Stability
Control) to work irregularly.
Page 364 of 387

Maintenance
46
7
G210101AHM-C1
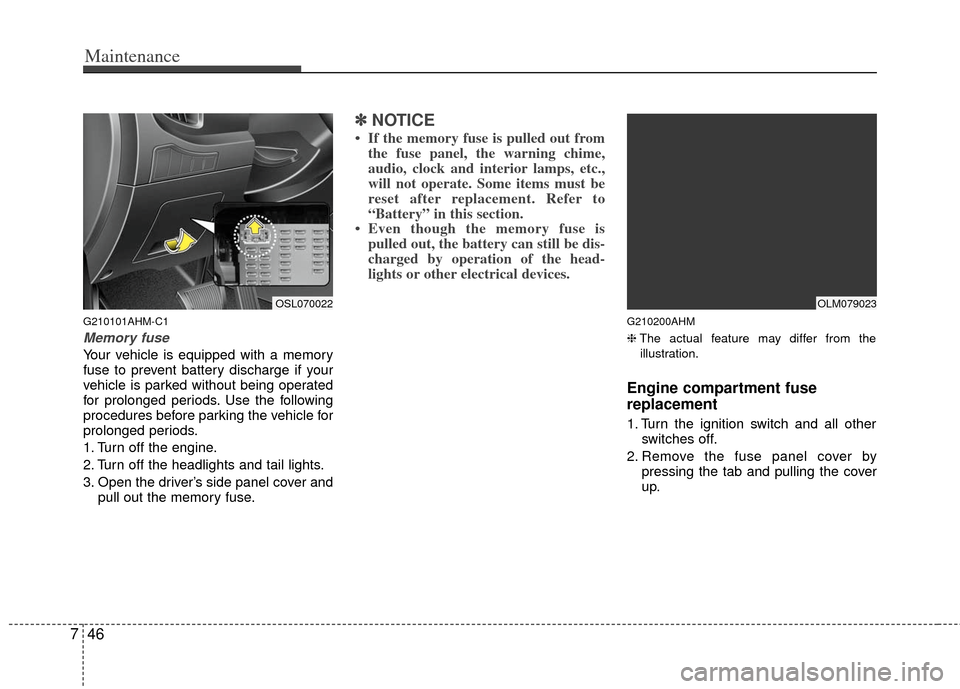
Memory fuse
Your vehicle is equipped with a memory
fuse to prevent battery discharge if your
vehicle is parked without being operated
for prolonged periods. Use the following
procedures before parking the vehicle for
prolonged periods.
1. Turn off the engine.
2. Turn off the headlights and tail lights.
3. Open the driver’s side panel cover and
pull out the memory fuse.
✽ ✽NOTICE
• If the memory fuse is pulled out from
the fuse panel, the warning chime,
audio, clock and interior lamps, etc.,
will not operate. Some items must be
reset after replacement. Refer to
“Battery” in this section.
• Even though the memory fuse is pulled out, the battery can still be dis-
charged by operation of the head-
lights or other electrical devices.
G210200AHM
❈ The actual feature may differ from the
illustration.
Engine compartment fuse
replacement
1. Turn the ignition switch and all other switches off.
2. Remove the fuse panel cover by pressing the tab and pulling the cover
up.
OSL070022OLM079023
Page 368 of 387

Maintenance
50
7
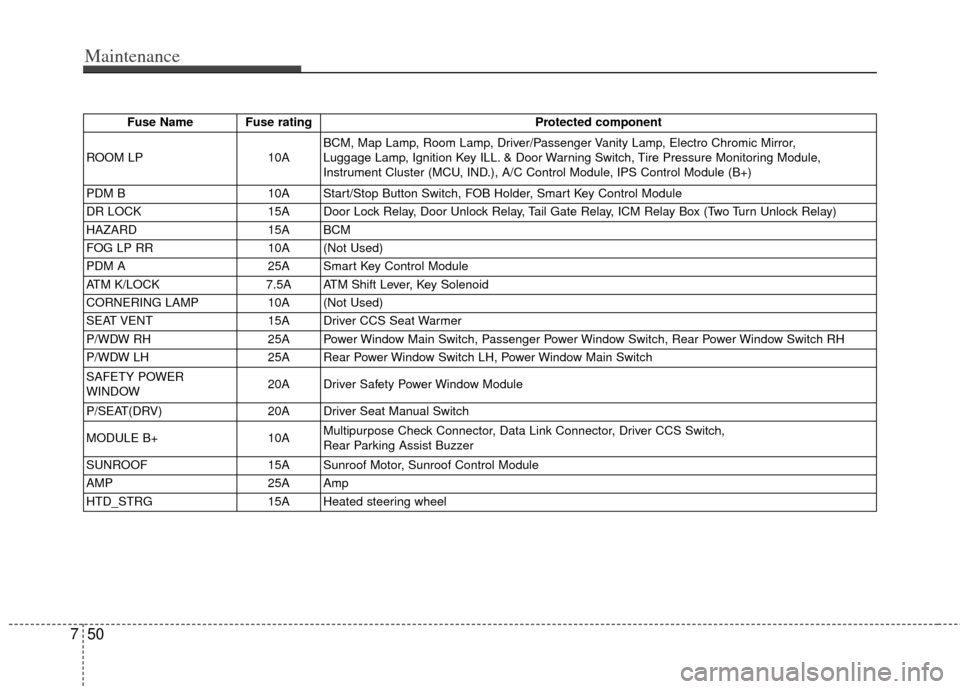
Fuse Name Fuse rating Protected component
ROOM LP 10ABCM, Map Lamp, Room Lamp, Driver/Passenger Vanity Lamp, Electro Chromic Mirror,
Luggage Lamp, Ignition Key ILL. & Door Warning Switch, Tire Pressure Monitoring Module,
Instrument Cluster (MCU, IND.), A/C Control Module, IPS Control Module (B+)
PDM B 10A Start/Stop Button Switch, FOB Holder, Smart Key Control Module
DR LOCK 15A Door Lock Relay, Door Unlock Relay, Tail Gate Relay, ICM Relay Box (Two Turn Unlock Relay)
HAZARD 15A BCM
FOG LP RR 10A (Not Used)
PDM A 25A Smart Key Control Module
ATM K/LOCK 7.5A ATM Shift Lever, Key Solenoid
CORNERING LAMP 10A (Not Used)
SEAT VENT 15A Driver CCS Seat Warmer
P/WDW RH 25A Power Window Main Switch, Passenger Power Window Switch, Rear Power Window Switch RH
P/WDW LH 25A Rear Power Window Switch LH, Power Window Main Switch
SAFETY POWER
WINDOW 20A Driver Safety Power Window Module
P/SEAT(DRV) 20A Driver Seat Manual Switch
MODULE B+ 10AMultipurpose Check Connector, Data Link Connector, Driver CCS Switch,
Rear Parking Assist Buzzer
SUNROOF 15A Sunroof Motor, Sunroof Control Module
AMP 25A Amp
HTD_STRG 15A Heated steering wheel
Page 369 of 387

751
Maintenance
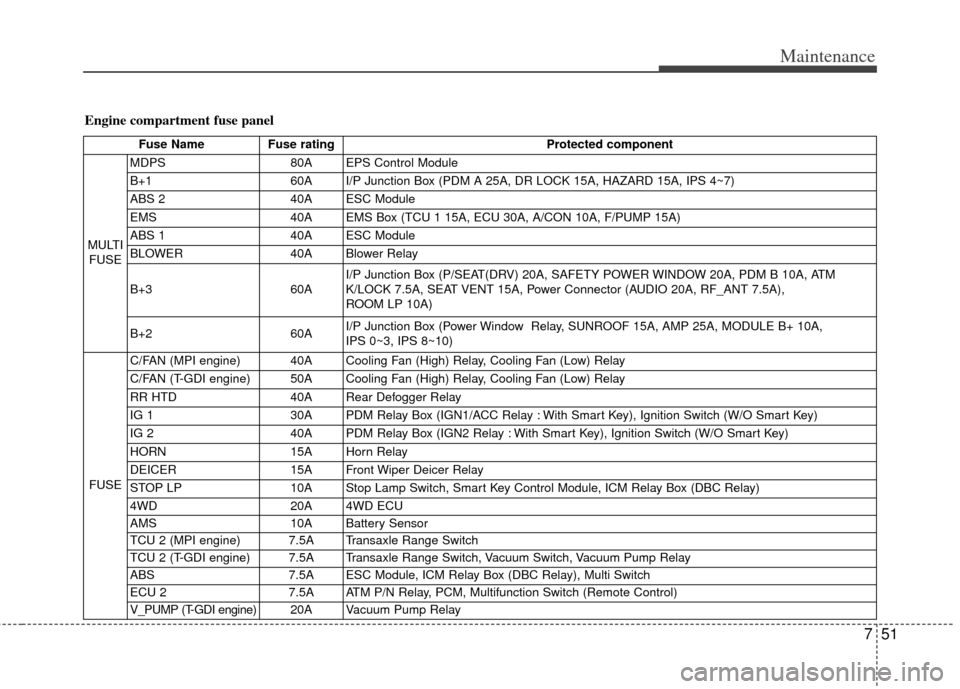
Engine compartment fuse panel
Fuse NameFuse rating Protected component
MULTI FUSE MDPS
80A EPS Control Module
B+1 60A I/P Junction Box (PDM A 25A, DR LOCK 15A, HAZARD 15A, IPS 4~7)
ABS 2 40A ESC Module
EMS 40A EMS Box (TCU 1 15A, ECU 30A, A/CON 10A, F/PUMP 15A)
ABS 1 40A ESC Module
BLOWER 40A Blower Relay
B+3 60AI/P Junction Box (P/SEAT(DRV) 20A, SAFETY POWER WINDOW 20A, PDM B 10A, ATM
K/LOCK 7.5A, SEAT VENT 15A, Power Connector (AUDIO 20A, RF_ANT 7.5A),
ROOM LP 10A)
B+2 60AI/P Junction Box (Power Window Relay, SUNROOF 15A, AMP 25A, MODULE B+ 10A,
IPS 0~3, IPS 8~10)
FUSE C/FAN (MPI engine) 40A Cooling Fan (High) Relay, Cooling Fan (Low) Relay
C/FAN (T-GDI engine) 50A Cooling Fan (High) Relay, Cooling Fan (Low) Relay
RR HTD
40A Rear Defogger Relay
IG 1 30A PDM Relay Box (IGN1/ACC Relay : With Smart Key), Ignition Switch (W/O Smart Key)
IG 2 40A PDM Relay Box (IGN2 Relay : With Smart Key), Ignition Switch (W/O Smart Key)
HORN 15A Horn Relay
DEICER 15A Front Wiper Deicer Relay
STOP LP 10A Stop Lamp Switch, Smart Key Control Module, ICM Relay Box (DBC Relay)
4WD 20A 4WD ECU
AMS 10A Battery Sensor
TCU 2 (MPI engine) 7.5A Transaxle Range Switch
TCU 2 (T-GDI engine) 7.5A Transaxle Range Switch, Vacuum Switch, Vacuum Pump Relay
ABS 7.5A ESC Module, ICM Relay Box (DBC Relay), Multi Switch
ECU 2 7.5A ATM P/N Relay, PCM, Multifunction Switch (Remote Control)
V_PUMP (T-GDI engine) 20A V acuum Pump Relay
Page 387 of 387
H030000APB
The tires supplied on your new vehicle
are chosen to provide the best perform-
ance for normal driving.
The tire label located on the driver's side
center pillar gives the tire pressures rec-
ommended for your vehicle.
❈The actual feature may differ from the illus-
tration.
H04000AUN
The engine number is stamped on the
engine block as shown in the drawing.
ENGINE NUMBER
OLM089008N
TIRE SPECIFICATION AND
PRESSURE LABEL
OLM089003
OSL081003N
MPI engine
T-GDI engine
88
Specifications & Consumer information