Page 25 of 393
Safety features of your vehicle
23
SEATS
Front seat
(1) Forward and backward
(2) Seatback angle
(3) Seat cushion height (Driver’sseat)*
(4) Seat warmer*
(5) Headrest
(6) Armrest (Driver’s seat)*
Rear seats
(7) Folding the seatback
(8) Headrest
* if equipped
OAM032001
Page 28 of 393
35
Safety features of your vehicle
Seatback angle
To recline the seatback:
1. Lean forward slightly and lift up theseatback recline lever.
2. Carefully lean back on the seat and adjust the seatback of the
seat to the position you desire.
3. Release the lever and make sure the seatback is locked in place.
(The lever MUST return to its orig-
inal position for the seatback to
lock.)
Seat height (for driver’s seat)
(if equipped)
To change the height of the seat,
push the lever upwards or down-
wards.
To lower the seat cushion, push down the lever several times.
To raise the seat cushion, pull up the lever several times.
OAM039004OAM039003
WARNING - Unexpected
Seat Movement
After adjusting a manual seat,
always check that it is locked by
shifting your weight to the front
and back. Sudden or unexpect-
ed movement of the driver's
seat could cause you to lose
control of the vehicle.
Page 29 of 393

Safety features of your vehicle
63
Headrest
The driver's and front passenger's
seats are equipped with a headrest
for the occupant's safety and com-
for t.
The headrest not only provides com-
fort for the driver and front passen-
ger, but also helps protect the head
and neck in the event of a collision.
For maximum effectiveness in case
of an accident, the headrest should
be adjusted so the middle of the
headrest is at the same height of the
center of gravity of an occupant's
head. Generally, the center of gravity
of most people's head is similar with
the height of the top of their eyes.Also, adjust the headrest as close to
your head as possible.
For this reason, the use of a cushion
that holds the body away from the
seatback is not recommended.
Forward and rearward adjustment
The headrest may be adjusted for-
ward to 4 different positions by
pulling the headrest forward to the
desired detent. To adjust the head-
rest to it’s furthest rearward position,
pull it fully forward to the farthest
position and release it. Adjust the
headrest so that it properly supports
the head and neck.
OAM039005OPA039052
WARNING - Headrest
removal/adjustment
Do not operate the vehicle
with the headrests removed.
Headrests can provide critical
neck and head support in a
crash.
Do not adjust the headrest height while the vehicle is in
motion. Driver may lose con-
trol of the vehicle.
Page 30 of 393
37
Safety features of your vehicle
Adjusting the height up and down
To raise the headrest, pull it up to the
desired position (1). To lower the
headrest, push and hold the release
button (2) on the headrest support
and lower the headrest to the desired
position (3).Removal and installation
To remove the headrest, raise it as
far as it can go then press the
release button (1) while pulling the
headrest up (2).
To reinstall the headrest, put the
headrest poles (3) into the holes
while pressing the release button (1).
Then adjust it to the appropriate
height.
Make sure the headrest locks in
position after adjusting it to properly
protect the occupants.Active headrest
The active headrest is designed to
move forward and upward during a
rear impact. This helps to prevent the
driver's and front passenger’s heads
from moving backward and thus
helps minimize neck injuries.
HNF2041-1OAM039007OAM039006
Page 35 of 393

Safety features of your vehicle
12
3
Headrest
The rear seat(s) is equipped with
headrests in all the seating positions
for the occupant's safety and com-
for t.
The headrest not only provides com-
fort for passengers, but also helps
protect the head and neck in the
event of a collision.
For maximum effectiveness in case
of an accident, the headrest should
be adjusted so the middle of the
headrest is at the same height of the
center of gravity of an occupant's
head. Generally, the center of gravity
of most people's head is similar with
the height as the top of their eyes. Also adjust the headrest as close to
your head as possible. For this rea-
son, the use of a cushion that holds
the body away from the seatback is
not recommended.
OPA039053
WARNING - Headrest
removal
Do not operate the vehicle with
the headrests removed.
Headrests can provide critical
neck and head support in a
crash.
WARNING - Rear seatback
When returning the rear seat-
back from a folded to an upright
position, hold the seatback and
return it slowly. Ensure that the
seatback is completely locked
into its upright position by
pushing on the top of the seat-
back. In an accident or sudden
stop, the unlocked seatback
could allow cargo to move for-
ward with great force and enter
the passenger compartment.
WARNING - Cargo
Do not place heavy objects in
the rear seats, since they can-
not be properly secured and
may hit vehicle occupants in a
frontal collision.
Page 36 of 393
313
Safety features of your vehicle
Adjusting the height up and down
To raise the headrest, pull it up to the
desired position (1). To lower the
headrest, push and hold the release
button (2) on the headrest support
and lower the headrest to the desired
position (3).Removal and installation
To remove the headrest, raise it as
far as it can go then press the
release button (1) while pulling the
headrest up (2).
To reinstall the headrest, put the
headrest poles (3) into the holes
while pessing the release button (1).
Then adjust it to the appropriate
height and ensure that it locks in
position.
OUN026043OUN028044
Page 39 of 393

Safety features of your vehicle
16
3
It will also lock if you try to lean for-
ward too quickly.
If you are not able to smoothly pull
enough of the seat belt from the
retractor, firmly pull the belt out and
release it. Then you will be able to
pull the belt out smoothly.
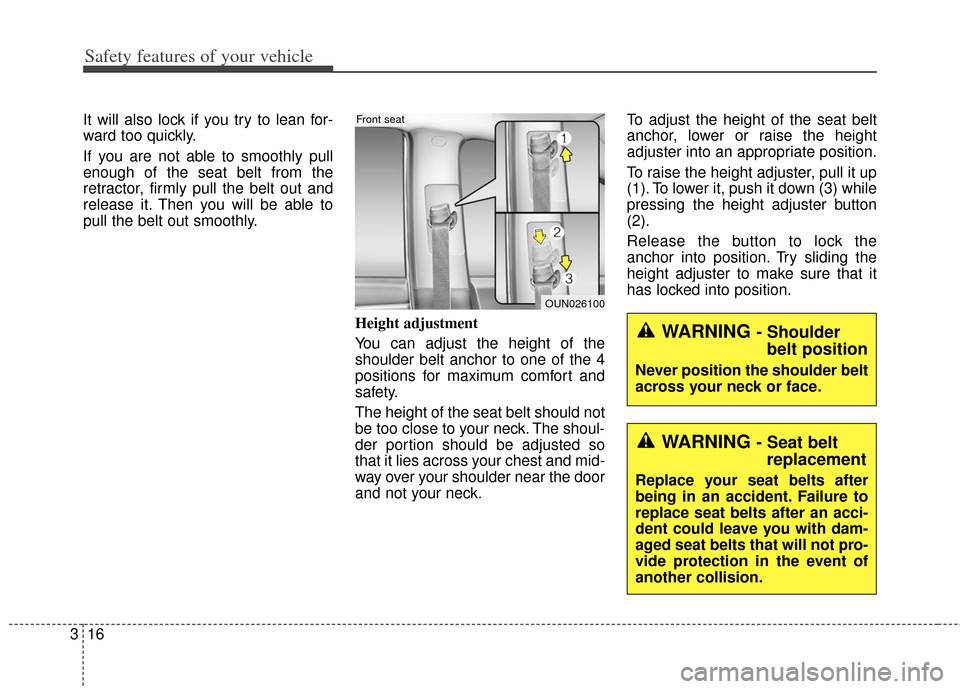
Height adjustment
You can adjust the height of the
shoulder belt anchor to one of the 4
positions for maximum comfort and
safety.
The height of the seat belt should not
be too close to your neck. The shoul-
der portion should be adjusted so
that it lies across your chest and mid-
way over your shoulder near the door
and not your neck.To adjust the height of the seat belt
anchor, lower or raise the height
adjuster into an appropriate position.
To raise the height adjuster, pull it up
(1). To lower it, push it down (3) while
pressing the height adjuster button
(2).
Release the button to lock the
anchor into position. Try sliding the
height adjuster to make sure that it
has locked into position.
OUN026100
Front seat
WARNING - Shoulder
belt position
Never position the shoulder belt
across your neck or face.
WARNING - Seat beltreplacement
Replace your seat belts after
being in an accident. Failure to
replace seat belts after an acci-
dent could leave you with dam-
aged seat belts that will not pro-
vide protection in the event of
another collision.
Page 48 of 393

325
Safety features of your vehicle
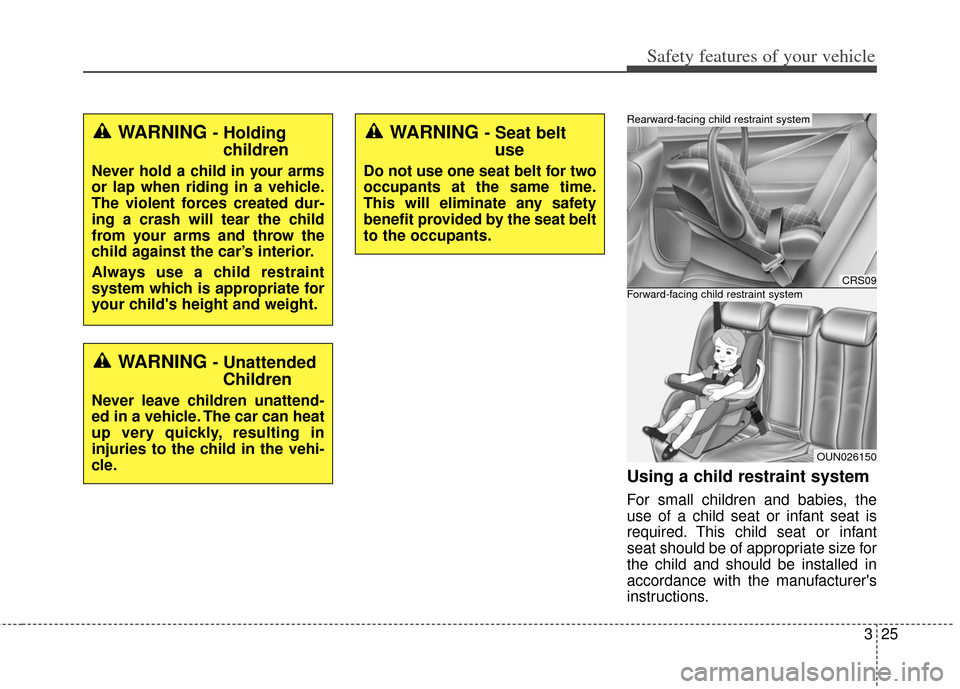
Using a child restraint system
For small children and babies, the
use of a child seat or infant seat is
required. This child seat or infant
seat should be of appropriate size for
the child and should be installed in
accordance with the manufacturer's
instructions.
CRS09
OUN026150
Forward-facing child restraint system
Rearward-facing child restraint system
WARNING - Holdingchildren
Never hold a child in your arms
or lap when riding in a vehicle.
The violent forces created dur-
ing a crash will tear the child
from your arms and throw the
child against the car’s interior.
Always use a child restraint
system which is appropriate for
your child's height and weight.
WARNING - UnattendedChildren
Never leave children unattend-
ed in a vehicle. The car can heat
up very quickly, resulting in
injuries to the child in the vehi-
cle.
WARNING - Seat beltuse
Do not use one seat belt for two
occupants at the same time.
This will eliminate any safety
benefit provided by the seat belt
to the occupants.