2012 KIA Sedona Buttons
[x] Cancel search: ButtonsPage 207 of 370

Features of your vehicle
190
3
Digital clock
Whenever the battery terminals, related
fuses are disconnected, you must reset
the time.
When the ignition switch is in the ACC or
ON position, the clock buttons operate as
follows:
HOUR:
Pressing the “H” button with your fin-
ger, a pencil or similar object will
advance the time displayed by one
hour.
MINUTE:
Pressing the “M” button with your fin-
ger, a pencil or similar object will
advance the time displayed by one
minute.
To change the 12 hour format to the 24
hour format, press the “H” and “M” but-
tons for more than 3 seconds.
For example, if the “H” and “M” buttons is
pressed for more than 3 seconds while
the time is 10:15 p.m., the display will be
changed to 22:15.
Floor mat anchor(s) (if equipped)
When using a floor mat on the front floor
carpet, make sure it attaches to the floor
mat anchor(s) in your vehicle. This keeps
the floor mat from sliding forward.
OVQ038092NOXM049228
■Type A■Type B
Page 209 of 370

Aux, USB and iPod port
(if equipped)
If your vehicle has an aux and/or
USB(universal serial bus) port or iPod
port, you can use an aux port to connect
audio devices and an USB port to plug in
an USB and also an iPod port to plug in
an iPod.
✽ ✽NOTICE
When using a portable audio device
connected to the power outlet, noise may
occur during playback. If this happens,
use the power source of the portable
audio device.
* iPod®is a trademark of Apple Inc. The steering wheel audio remote control
button is installed to promote safe driv-
ing.
✽ ✽
NOTICE
Do not operate audio remote control
buttons simultaneously.
MODE
Press the button to change audio source.
FM(1~2)
➟AM➟SAT(1~3)➟CD➟USB➟AUX(iPod)➟FM(1~2)...
VOL (▲/▼)
Press the VOL (▲) button to increase
volume.
Press the VOL (▼) button to decease volume.
CALL( )
Places and transfers calls.
END( )
Ends calls or cancels functions.
TALK( )
Activates voice recognition.
3192
Features of your vehicle
AUDIO REMOTE CONTROL (IF EQUIPPED)
KMC_VQ11_ADO_HR(EU)OVQ029448
Page 214 of 370

3197
Features of your vehicle
1. FM/AM Button
2. SEEK Button
3. POWER Button & VOLUME Knob
4. SCAN Button
5. MUTE Button
6. SETUP Button
7. TUNE & AUDIO Control Knob
8. PRESET Buttons
RADIO, SET UP, VOLUME and AUDIO CONTROL
CD Player : PA710S
VQ_PA710S_RADIO / VQ_760S_RADIO
CD Changer : PA760S
Page 216 of 370

3199
Features of your vehicle
7. TUNE & AUDIO Control Knob
Rotate the knob clockwise or counter
clock wise to increase or decrease from
current frequency.
(AM 10 kHz, FM 200 kHz)
Pressing the button changes the BASS,
MIDDLE, TREBLE, FADER and BAL-
ANCE TUNE mode. The mode selected
is shown on the display. After selecting
each mode, rotate the Audio control knob
clockwise or counterclockwise.
Press this button while holding [SETUP]
button to activate / inactivate the item to.
Select SETUP item using left and right
function of the Tune button.
• BASS Control
To increase the BASS, rotate the knob
clockwise, while to decrease the BASS,
rotate the knob counterclockwise.
To increase the MIDDLE, rotate the knob
clockwise, while to decrease the MID-
DLE, rotate the knob counterclockwise. Control
To increase the TREBLE, rotate the knob
clockwise, while to decrease the TRE-
BLE, rotate the knob counterclockwise.
Turn the control knob clockwise to
emphasize rear speaker sound (front
speaker sound will be attenuated). When
the control knob is turned counterclock-
wise, front speaker sound will be empha-
sized (rear speaker sound will be attenu-
ated).
Rotate the knob clockwise to emphasize
right speaker sound (left speaker sound
will be attenuated). When the control
knob is turned counter clockwise, left
speaker sound will be emphasized (right
speaker sound will be attenuated).
8. PRESET Buttons
onds to play the station saved in each
button.
seconds or longer to save the current
station to the respective button with a
beep.
Page 219 of 370

Features of your vehicle
202
3
To load more than one disc but less
than six, complete Steps 1 and 2.
When you have finished loading discs,
press LOAD button to cancel the loading
function or wait for 10 seconds. The CD
player will begin to play the last CD
loaded. As each CD starts to play, the
DISC number will appear on the display.
✽ ✽ NOTICE
The disc player takes up to six discs. Do
not try to load more than six.
5. TRACK Button
] button for less than
0.8 seconds to play from the beginning
of current song.
] button for less than 0.8 seconds and press again within 1
second to play the previous song.
] button for 0.8 sec- onds or longer to initiate reverse direc-
tion high speed sound search of cur-
rent song.
] button for less than 0.8 seconds to play the next song.
] button for 0.8 sec- onds or longer to initiate forward direc-
tion high speed sound search of cur-
rent song.
6. INFO Button
Displays the information of the current
song.
CDDA : DISC TITLE
➟ DISC ARTIST ➟TRACK TITLE ➟ TRACK ARTIST ➟TOTAL TRACK ➟ DISC TITLE...
MP3/WMA : FILE NAME
➟TITLE➟ARTIST➟ALBUM➟FOLDER➟TOTAL FILE...
(Not displayed if the information is
unavailable on the CD or file.)
7. SEARCH Knob & ENTER Button
songs after current song, or counter-
clockwise to browse songs before cur-
rent song. To play the displayed song,
press the knob.
enters to AUDIO CONTROL mode.
8. REPEAT Button
Press this button for less than 0.8 sec-
onds to activate ‘RPT’ mode and more
than 0.8 seconds to activate ‘FLD RPT’
mode.
Only a track (file) is repeatedlyplayed back.
Only files are repeatedly played back.
9. RANDOM Button
Press this button for less than 0.8 sec-
onds to activate ‘RDM’ mode and more
than 0.8 seconds to activate ‘ALL RDM’
mode.
Only files/tracks in a folder/disc are played back in a random sequence.
All files in a disc are played back in the random
sequence.
10. SCAN Button
Play each song in the CD for 10 seconds.
To cancel SCAN Play, press this button
again.
11. DISC Buttons
] Change Button Changesdisc to the previous disc.
] Change Button Changes disc to the next disc.
12. CD Button
If there is a CD in the CD DECK it switch-
es to CD mode.
If there is no CD, then the message “NO
CD” will become displayed on the LCD
for 3 seconds and returns to the previous
mode.
Page 225 of 370

Features of your vehicle
208
3
✽
✽
NOTICE FOR USING THE
iPod®DEVICE
• Some iPod models might not sup-
port the communication protocol
and the files will not be played.
Supported iPod models:
- iPod Mini
- iPod 4th(Photo) ~ 6th(Classic)
generation
- iPod Nano 1st~4th generation
- iPod Touch 1st~2nd generation
• The order of search or playback of songs in the iPod can be different
from the order searched in the
audio system.
• If the iPod disabled due to its own malfunction, reset the iPod. (Reset:
Refer to iPod manual)
• An iPod may not operate normally on low battery.
• Some iPod devices, such as the iPhone, can be connected through the
Bluetooth
®interface. The device
must have audio Bluetooth®capabili-
ty (such as for stereo headphone
Bluetooth
®). The device can play, but
it will not be controlled by the audio
system.
CAUTION IN USING THE
iPod®DEVICE
The KIA iPod Power Cable is
needed in order to operate iPodwith the audio buttons on theaudio system. The USB cable pro- vided by Apple may cause mal-function and should not be used for KIA vehicles.
❋ The KIA iPod Power Cable maybe purchased through your KIADealership.
When connecting iPod with the iPod Power Cable, insert the con-nector to the multimedia socketcompletely. If not inserted com-pletely, communications between iPod and audio may be interrupted.
When adjusting the sound effects of the iPod and the audio system, thesound effects of both devices willoverlap and might reduce or distortthe quality of the sound.
Deactivate (turn off) the equalizer function of an iPod when adjust-ing the audio system’s volume,and turn off the equalizer of theaudio system when using theequalizer of an iPod.
(Continued)
(Continued) When the iPod cable is connected, the system can be switched to AUXmode even without iPod deviceand may cause noise. Disconnect
the iPod cable when you are not using the iPod device.
When not using iPod with car audio, detach the iPod cable fromiPod. Otherwise, iPod may remainin accessory mode, and may notwork properly.
When connecting the iPod, use theUSB/AUX terminals.
When disconnecting the iPod, disconnect both the USB/AUX ter-minal.
The iPod exclusive cable must be connected to both the USB/AUXterminals for iPod charging and operations to be supported.
Detachable USB/AUXAll-in-one USB/AUX
Page 229 of 370

Features of your vehicle
212
3
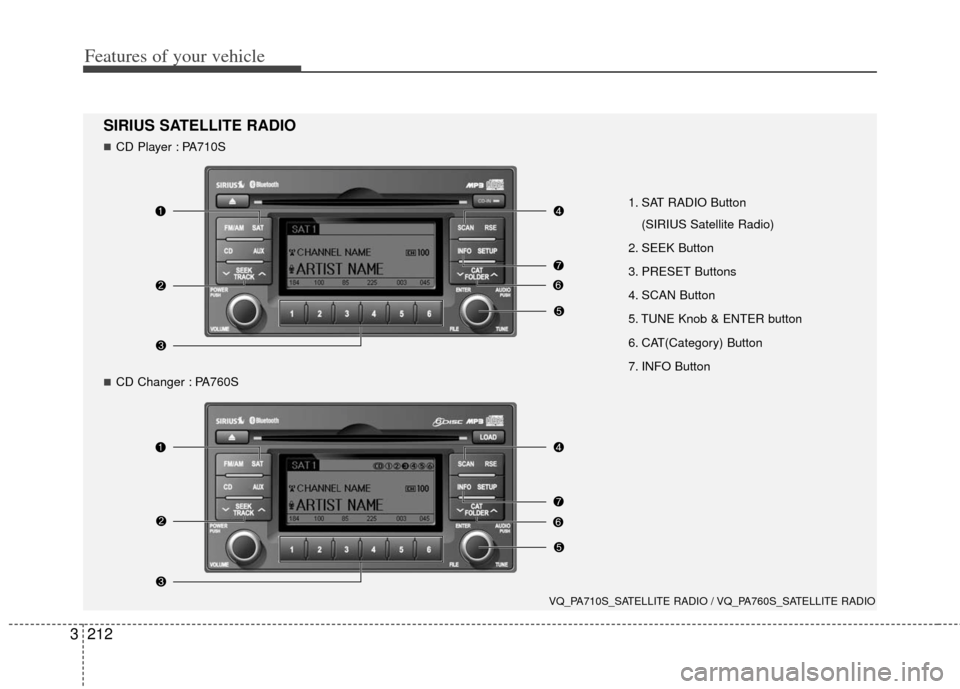
1. SAT RADIO Button
(SIRIUS Satellite Radio)
2. SEEK Button
3. PRESET Buttons
4. SCAN Button
5. TUNE Knob & ENTER button
6. CAT(Category) Button
7. INFO Button
VQ_PA710S_SATELLITE RADIO / VQ_PA760S_SATELLITE RADIO
SIRIUS SATELLITE RADIO
CD Player : PA710S
CD Changer : PA760S
Page 230 of 370

3213
Features of your vehicle
Using SIRIUS Satellite Radio
Your Kia vehicle is equipped with a 3
month complimentary period of SIRIUS
Satellite Radio so you have access to over
130 channels of music, information, and
entertainment programming.
Activation
In order to extend or reactivate your sub-
scription to SIRIUS Satellite Radio, you
will need to contact SIRIUS Customer
Care at 1-888-539-7474. Have your 12
digit SID (Sirius Identification Number)/ESN
(Electronic Serial Number) ready. To
retrieve the SID/ESN, turn on the radio,
press the [SAT] button and tune to chan-
nel zero. Please note that the vehicle will
need to be turned on, in Sirius mode, and
have an unobstructed view of the sky in
order for the radio to receive the activa-
tion signal.
1. SAT Button (SIRIUS Satellite Radio)
Press the [SAT] button to switch to SIR-
IUS Satellite Radio. It cycles through the
different bands as noted below.
SAT1
➟ SAT2 ➟ SAT3 ➟ SAT1...
2. SEEK Button
Press [ SEEK ] button for less
than 0.8 seconds to select previous or
next channel.
Press [ SEEK ] button for 0.8 seconds or longer to continuously
move to previous or next channel.
If "CATEGORY" Icon is displayed at the top of the screen, channel up/down
is done through the channels within
current category.
3. PRESET Buttons
Press [1]~[6] buttons less than 0.8 sec-onds to play the channel saved in each
button.
Press [1]~[6] buttons for 0.8 seconds or longer to save current channel to the
respective button with a beep.
4. SCAN Button
When the [SCAN] button is pressed, itautomatically scans the radio stations
upwards.
The SCAN feature steps through every channel, starting from the initial chan-
nel, for ten seconds.
Press the [SCAN] button again to stop the scan feature and to listen to the
currently selected channel.
If "CATEGORY" Icon is displayed at the top of the screen, channel chang-
ing is done through the channels with-
in current category.
5. TUNE knob & ENTER button
Rotate clockwise to increase the chan-nel number or to scroll down the cate-
gory list.
Rotate counterclockwise to decrease the channel number or to scroll up the
category list.
Press this to make selection of chan- nels or items.