2012 KIA Rio cargo
[x] Cancel search: cargoPage 6 of 385

I3
Index
Cargo capacity ··················\
··················\
··················\
·········5-52
Cargo weight ··················\
··················\
··················\
············5-56
Center console storage ··················\
··················\
···············4-92
Central door lock switch··················\
··················\
············4-17
Certification label ··················\
··················\
···············5-54, 8-7
Changing tires ··················\
··················\
··················\
··········6-14
Checking tire inflation pressure··················\
··················\
·7-38
Child restraint system ··················\
··················\
················3-22Lower anchor ··················\
··················\
··················\
·········3-27
Seat belt ··················\
··················\
··················\
·················3-24\
Tether anchor system ··················\
··················\
···············3-26
Child-protector rear door lock ··················\
··················\
···4-18
Cigarette lighter ··················\
··················\
··················\
·······4-96
Climate control air filter ··················\
··················\
···4-81, 7-32
Clock (Digital) ··················\
··················\
··················\
·········4-99
Clothes hanger ··················\
··················\
··················\
·······4-100
Combined instrument, see instrument cluster ···············4-41
Compact spare tire ··················\
··················\
··················\
···6-19
Compact spare tire replacement ··················\
··················\
7-41
Coolant ··················\
··················\
··················\
··················\
···7-26
Cooling fluid, see engine coolant ··················\
················7-26
Crankcase emission control system ··················\
·············7-66
Cruise control system ··················\
··················\
················5-32
Cup holder ··················\
··················\
··················\
···············4-97
Curtain air bag ··················\
··················\
··················\
·········3-45 Dashboard illumination, see instrument panel
illumination··················\
··················\
··················\
············4-42
Dashboard, see instrument cluster ··················\
···············4-41
Defogging (Windshield) ··················\
··················\
············4-90
Defogging logic (Windshield) ··················\
··················\
···4-91
Defroster (Rear window) ··················\
··················\
···········4-80
Defrosting (Windshield) ··················\
··················\
············4-90
Digital clock··················\
··················\
··················\
·············4-99
Dimensions ··················\
··················\
··················\
················8-2
Display illumination, see instrument panel illumination··················\
··················\
··················\
············4-42
Displays, see instrument cluster ··················\
··················\
4-41
Door locks··················\
··················\
··················\
················4-15 Central door lock switch ··················\
··················\
·········4-17
Child-protector rear door lock ··················\
··················\
·4-18
Drinks holders, see cup holders··················\
··················\
·4-97
Driver's 3-point seat belt ··················\
··················\
············3-14
Driver's and passenger's front air bag ··················\
··········3-41
Driving at night ··················\
··················\
··················\
········5-45
Driving in flooded areas ··················\
··················\
············5-46
Driving in the rain··················\
··················\
··················\
····5-46D
Page 12 of 385

I9
Index
Luggage net ··················\
··················\
··················\
···········4-93
Luggage tray ··················\
··················\
··················\
··········4-94
Sunroof··················\
··················\
··················\
··················\
···4-31
Sunvisor ··················\
··················\
··················\
··················\
·4-98
Tachometer··················\
··················\
··················\
···············4-42
Tailgate··················\
··················\
··················\
··················\
···4-20 Emergency safety release ··················\
··················\
········4-21
Telescoping steering ··················\
··················\
··················\
4-36
Tether anchor system ··················\
··················\
·················3-26\
Theft-alarm system ··················\
··················\
··················\
··4-12
Tie-down hook ··················\
··················\
··················\
·········6-30
Tilt steering ··················\
··················\
··················\
··············4-36
Tire and loading information label ··················\
··············5-51
Tire mobility kit ··················\
··················\
··················\
·······6-21
Tire pressure monitoring system (TPMS) ··················\
·····6-8
Tire specification and pressure label ··················\
·············8-8
Tires and wheels ··················\
··················\
··················\
7-37,8-4 Checking tire inflation pressure ··················\
················7-38
Compact spare tire replacement ··················\
················7-41
Recommended cold tire inflation pressures ················7-37
Tire care ··················\
··················\
··················\
·················7-37\
Tire maintenance ··················\
··················\
··················\
···7-42
Tire replacement ··················\
··················\
··················\
····7-41
Tire rotation ··················\
··················\
··················\
···········7-39
Tire sidewall labeling ··················\
··················\
··············7-42 Tire traction ··················\
··················\
··················\
···········7-42
Wheel alignment and tire balance ··················\
·············7-40
Wheel replacement ··················\
··················\
··················\
7-42
Towing ··················\
··················\
··················\
··················\
···6-27
Towing Tie-down hook ··················\
··················\
··················\
·······6-30
Towing capacity ··················\
··················\
··················\
·······5-52
Transaxle Automatic transaxle ··················\
··················\
·················5-15\
Manual transaxle ··················\
··················\
··················\
···5-12
Trip computer ··················\
··················\
··················\
··········4-45
User settings··················\
··················\
··················\
·············4-49
Vehicle break-in process ··················\
··················\
··············1-4
Vehicle capacity weight ··················\
··················\
·············5-51
Vehicle certification label ··················\
··················\
············8-7
Vehicle curb weight ··················\
··················\
··················\
·5-56
Vehicle identification number (VIN) ··················\
·············8-7
Vehicle load limit ··················\
··················\
··················\
·····5-51 Cargo capacity ··················\
··················\
··················\
·······5-52
Certification label ··················\
··················\
··················\
··5-54
Seating capacity ··················\
··················\
··················\
·····5-52
Steps For Determining Correct Load Limit ················5-52
T
U
V
Page 13 of 385

Index
10I
Tire and loading information label ··················\
············5-51
Towing capacity··················\
··················\
··················\
·····5-52
Vehicle capacity weight ··················\
··················\
···········5-51
Vehicle stability management ··················\
··················\
····5-29
Volume/weight ··················\
··················\
··················\
···········8-4 Base curb weight ··················\
··················\
··················\
···5-56
Cargo weight ··················\
··················\
··················\
·········5-56
GAW (Gross axle weight) ··················\
··················\
·······5-56
GAWR (Gross axle weight rating) ··················\
············5-56
GVW (Gross vehicle weight) ··················\
··················\
··5-56
GVWR (Gross vehicle weight rating) ··················\
·······5-56
Vehicle curb weight ··················\
··················\
·················5-56\
Warning and indicators ··················\
··················\
··············4-53
Washer fluid ··················\
··················\
··················\
·············7-30
Weight/volume ··················\
··················\
··················\
···········8-4
Wheel alignment and tire balance ··················\
···············7-40
Wheel replacement ··················\
··················\
··················\
··7-41 Windows ··················\
··················\
··················\
··················\
4-22
Auto down window ··················\
··················\
·················4-23\
Auto up/down window ··················\
··················\
············4-24
Power window lock button ··················\
··················\
······4-25
Windshield defrosting and defogging··················\
··········4-90 Defogging logic ··················\
··················\
··················\
·····4-91
Winter driving ··················\
··················\
··················\
··········5-48 Snow tires ··················\
··················\
··················\
··············5-48
Wiper blades ··················\
··················\
··················\
············7-32
Wipers and washers ··················\
··················\
··················\
·4-74
W
Page 32 of 385

Safety features of your vehicle
10
3
Removal and installation
To remove the headrest, raise it as far as
it can go then press the release button
(1) while pulling the headrest upward (2).
To reinstall the headrest, put the head-
rest poles (3) into the holes while press-
ing the release button (1). Then adjust it
to the appropriate height and ensure that
it locks in position.
Make sure the headrest locks in position
after adjusting.
Folding the rear seat
The rear seatbacks may be folded to
facilitate carrying long items or to
increase the luggage capacity of the
vehicle.
To fold down the rear seatback:
1. Insert the rear seat belt metal tab intothe holder to prevent the seat belt form
being damaged.
2. Set the front seatback to the upright position and if necessary, slide the
front seat forward.
3. Lower the rear headrests to lowest position.
OUB031017N
WARNING
Never allow passengers sit on top
of the folded down seatback while
the vehicle is moving. This is not a
proper seating position and no seat
belts are available for use. This
could result in serious injury or
death in case of an accident or sud-
den stop.
WARNING - Objects
Objects carried on the folded down
seatback should not extend higher
than the top of the front seatbacks.
This could allow cargo to slide for-
ward and cause injury or damage
during sudden stops.
OTA030013
Page 33 of 385

311
Safety features of your vehicle
4. Pull the lock release lever (1) and foldthe rear seatback forward and down
firmly.
If the seat belt locks after unfolding the
rear seatback, pull out the locked seat
belt, release it then pull it out again. To unfold the rear seat
1. To use the rear seat, lift and pull the
seatback backward. Pull the seatback
firmly until it clicks into place. Make
sure the seatback is locked in place.
When you return the seatback to its
upright position, always be sure it has
locked into position by pushing on the
top of the seatback.
If you can not see the red line at the
bottom of folding lever, it means the
seatback is locked completely.
2. Return the rear seat belt to the proper position.
3. When the seatback is completely installed, check the seatback folding
lever again.
When returning the rear seatbacks to the
upright position, remember to return the
rear shoulder belts to their proper posi-
tion.
OUB031018N
WARNING - Rear seatback
When returning the rear seatback
from a folded to an upright posi-
tion, hold the seatback and return it
slowly. Ensure that the seatback is
completely locked into its upright
position by pushing on the top of
the seatback. In an accident or sud-
den stop, the unlocked seatback
could allow cargo to move forward
with great force and enter the pas-
senger compartment.
WARNING- Cargo
Do not place heavy objects in the
rear seats, since they cannot be
properly secured and may hit vehi-
cle occupants in a frontal collision.
Page 96 of 385

421
Features of your vehicle
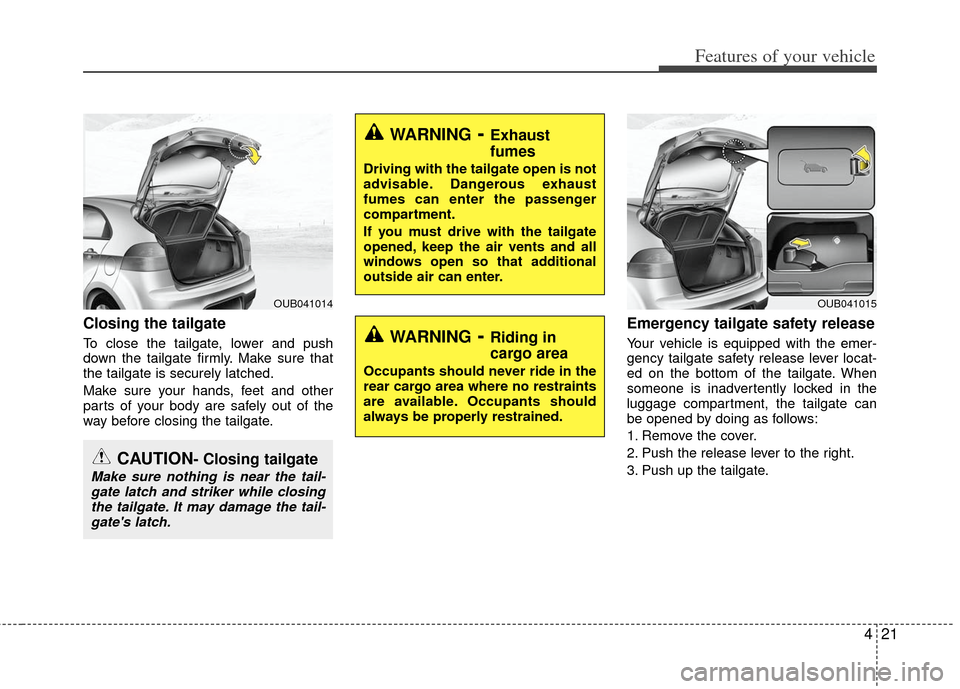
Closing the tailgate
To close the tailgate, lower and push
down the tailgate firmly. Make sure that
the tailgate is securely latched.
Make sure your hands, feet and other
parts of your body are safely out of the
way before closing the tailgate.
Emergency tailgate safety release
Your vehicle is equipped with the emer-
gency tailgate safety release lever locat-
ed on the bottom of the tailgate. When
someone is inadvertently locked in the
luggage compartment, the tailgate can
be opened by doing as follows:
1. Remove the cover.
2. Push the release lever to the right.
3. Push up the tailgate.
CAUTION- Closing tailgate
Make sure nothing is near the tail-gate latch and striker while closingthe tailgate. It may damage the tail-gate's latch.
OUB041014
WARNING- Exhaust
fumes
Driving with the tailgate open is not
advisable. Dangerous exhaust
fumes can enter the passenger
compartment.
If you must drive with the tailgate
opened, keep the air vents and all
windows open so that additional
outside air can enter.
WARNING- Riding in
cargo area
Occupants should never ride in the
rear cargo area where no restraints
are available. Occupants should
always be properly restrained.
OUB041015
Page 168 of 385

493
Features of your vehicle
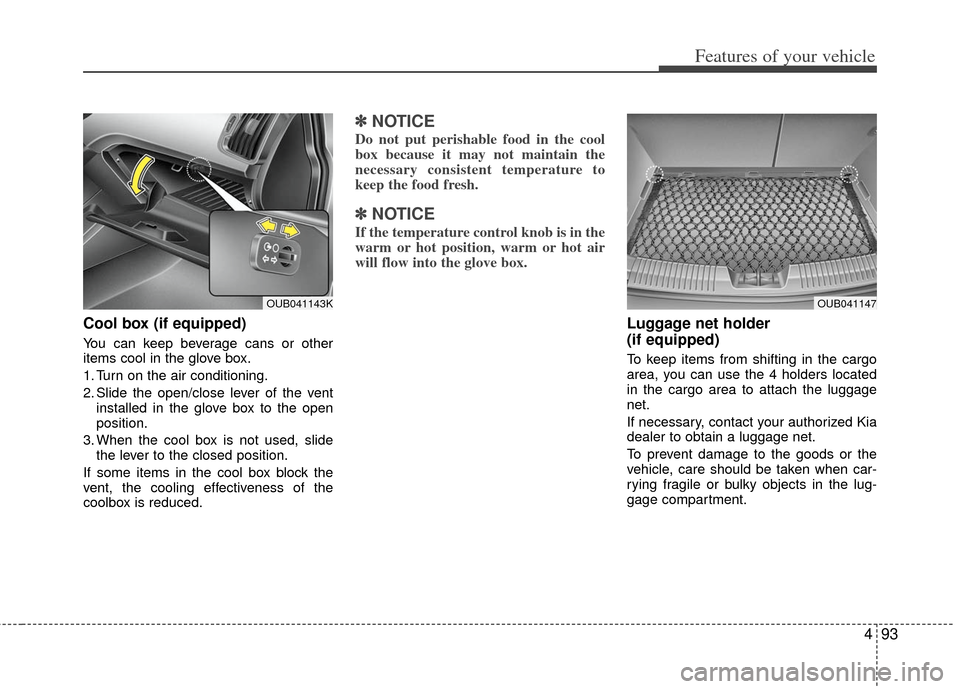
Cool box (if equipped)
You can keep beverage cans or other
items cool in the glove box.
1. Turn on the air conditioning.
2. Slide the open/close lever of the ventinstalled in the glove box to the open
position.
3. When the cool box is not used, slide the lever to the closed position.
If some items in the cool box block the
vent, the cooling effectiveness of the
coolbox is reduced.
✽ ✽ NOTICE
Do not put perishable food in the cool
box because it may not maintain the
necessary consistent temperature to
keep the food fresh.
✽ ✽NOTICE
If the temperature control knob is in the
warm or hot position, warm or hot air
will flow into the glove box.
Luggage net holder
(if equipped)
To keep items from shifting in the cargo
area, you can use the 4 holders located
in the cargo area to attach the luggage
net.
If necessary, contact your authorized Kia
dealer to obtain a luggage net.
To prevent damage to the goods or the
vehicle, care should be taken when car-
rying fragile or bulky objects in the lug-
gage compartment.
OUB041143KOUB041147
Page 170 of 385

495
Features of your vehicle
OUB041148
OUB041150OUB041178
OUB041149
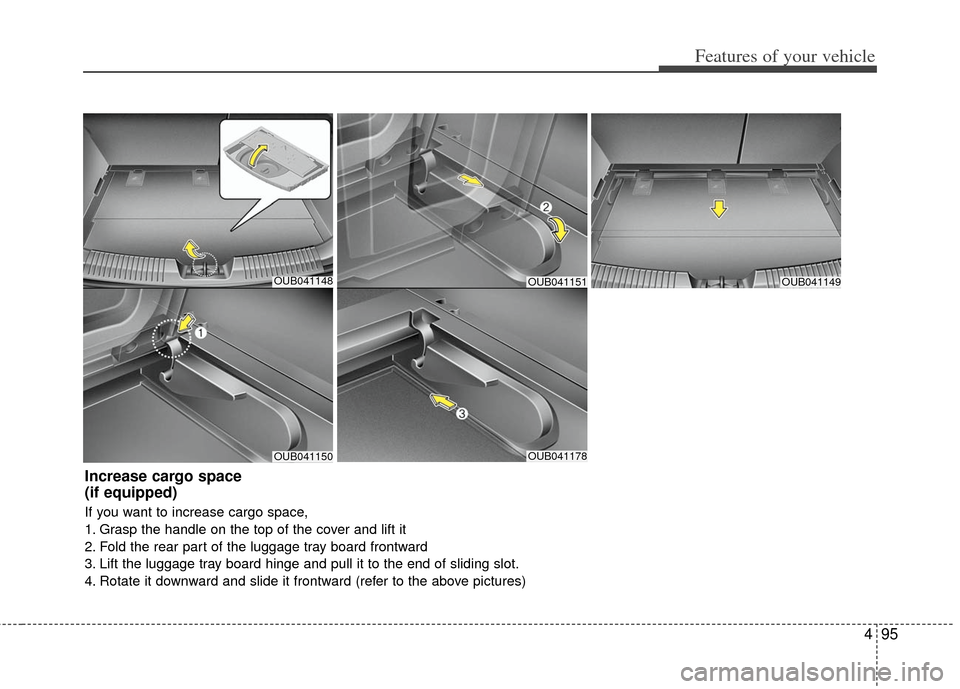
Increase cargo space
(if equipped)
If you want to increase cargo space,
1. Grasp the handle on the top of the cover and lift it
2. Fold the rear part of the luggage tray board frontward
3. Lift the luggage tray board hinge and pull it to the end of sliding slot.
4. Rotate it downward and slide it frontward (refer to the above pictures)
OUB041151