Page 705 of 840

Driving your vehicle
38
5
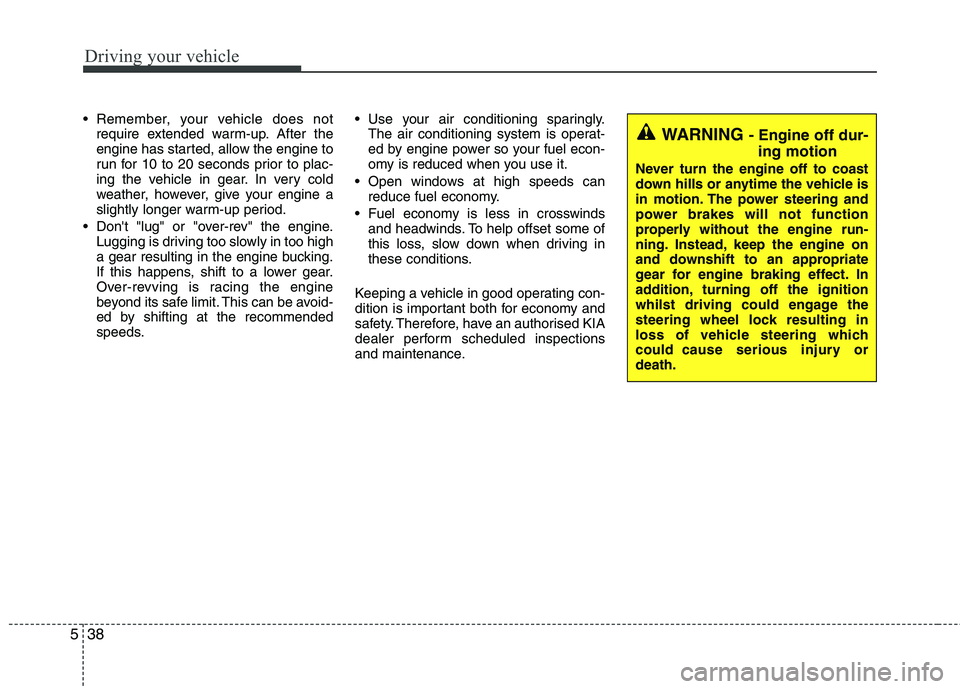
Remember, your vehicle does not
require extended warm-up. After the
engine has started, allow the engine to
run for 10 to 20 seconds prior to plac-
ing the vehicle in gear. In very cold
weather, however, give your engine a
slightly longer warm-up period.
Don't "lug" or "over-rev" the engine. Lugging is driving too slowly in too high
a gear resulting in the engine bucking.
If this happens, shift to a lower gear.
Over-revving is racing the engine
beyond its safe limit. This can be avoid-
ed by shifting at the recommended
speeds. Use your air conditioning sparingly.
The air conditioning system is operat-
ed by engine power so your fuel econ-
omy is reduced when you use it.
Open windows at high speeds can reduce fuel economy.
Fuel economy is less in crosswinds and headwinds. To help offset some of
this loss, slow down when driving in
these conditions.
Keeping a vehicle in good operating con-
dition is important both for economy and
safety. Therefore, have an authorised KIA
dealer perform scheduled inspections
and maintenance.
WARNING - Engine off dur-
ing motion
Never turn the engine off to coast
down hills or anytime the vehicle is
in motion. The power steering and
power brakes will not function
properly without the engine run-
ning. Instead, keep the engine on
and downshift to an appropriate
gear for engine braking effect. In
addition, turning off the ignition
whilst driving could engage the
steering wheel lock resulting in
loss of vehicle steering which
could cause serious injury ordeath.
Page 713 of 840

Driving your vehicle
46
5
To keep locks from freezing
To keep the locks from freezing, squirt an
approved de-icer fluid or glycerine into
the key opening. If a lock is covered with
ice, squirt it with an approved de-icing
fluid to remove the ice. If the lock is
frozen internally, you may be able to thaw
it out by using a heated key. Handle the
heated key with care to avoid injury.
Use approved window washer
anti-freeze in system
To keep the water in the window washer
system from freezing, add an approved
window washer anti-freeze solution in
accordance with instructions on the con-
tainer. Window washer anti-freeze is
available from an authorised KIA dealer
and most auto parts outlets. Do not useengine coolant or other types of anti-
freeze as these may damage the paintfinish. Don't let your parking brake
freeze
Under some conditions your parking
brake can freeze in the engaged position.
This is most likely to happen when there
is an accumulation of snow or ice around
or near the rear brakes or if the brakes
are wet. If there is a risk the parking
brake may freeze, apply it only temporar-
ily whilst you put the shift lever in P (Park)
and block the rear wheels so the vehicle
cannot roll. Then release the parking
brake.
Don't let ice and snow accumu- late underneath
Under some conditions, snow and ice
can build up under the fenders and inter-
fere with the steering. When driving in
severe winter conditions where this may
happen, you should periodically check
underneath the car to be sure the move-
ment of the front wheels and the steering
components is not obstructed.Carry emergency equipment
Depending on the severity of the weath-
er where you drive your car, you should
carry appropriate emergency equipment.
Some of the items you may want to carry
include tyre chains, tow straps or chains,
flashlight, emergency flares, sand, a
shovel, jumper cables, a window scraper,
gloves, ground cloth, coveralls, a blanket,etc.
Page 781 of 840

Maintenance
34
7
WIPER BLADES
Blade inspection
✽✽ NOTICE
Commercial hot waxes applied by auto-
matic car washes have been known to
make the windscreen difficult to clean.
Contamination of either the windscreen
or the wiper blades with foreign matter
can reduce the effectiveness of the wind-
screen wipers. Common sources of con-
tamination are insects, tree sap, and hot
wax treatments used by some commer-
cial car washes. If the blades are not wip-
ing properly, clean both the window and
the blades with a good cleaner or mild
detergent, and rinse thoroughly with
clean water. Blade replacement When the wipers no longer clean ade-
quately, the blades may be worn or
cracked, and require replacement.
1JBA5122/HCAUTION
To prevent damage to the wiper
blades, do not use petrol, kerosene,
paint thinner, or other solvents onor near them.
CAUTION
To prevent damage to the wiper arms or other components, do not attempt to move the wipers manual-ly.
CAUTION
The use of a non-specified wiper
blade could result in wiper malfunc-tion and failure.
Page 782 of 840
735
Maintenance
Front windscreen wiper blade
1. Raise the wiper arm and turn the wiperblade assembly to expose the plastic
locking clip.
2. Compress the clip and slide the bladeassembly downward.
3. Lift it off the arm.
4. Install the blade assembly in the reverse order of removal.
Rear window wiper blade
1. Raise the wiper arm and pull out thewiper blade assembly.
1LDA5023/H
CAUTION
Do not allow the wiper arm to fall
against the windscreen, since it may chip or crack the windscreen.
1JBA7037/H
1JBA7038/H
OHM078062
Page 786 of 840

739
Maintenance
Reset items
Items should be reset after the battery
has been discharged or the battery hasbeen disconnected.
Auto up/down window (See section 4)
Sunroof (See section 4)
Trip computer (See section 4)
Climate control system (See section 4)
Clock (See section 4)
Audio (See section 4)
WARNING
Before performing maintenance or recharging the battery, turn off all accessories and stop the
engine.
The negative battery cable must be removed first and installed
last when the battery is discon-nected.
Operation related to the battery should be done in an authorised
KIA dealer.
CAUTION
Keep the battery away from water
or any liquid.
For your safety, use the authentic- ity by approved authorised KIAdealer, when you replace the bat-tery.
WARNING - Recharging
battery
When recharging the battery,
observe the following precautions:
The battery must be removed from the vehicle and placed in an area with good ventilation.
Do not allow cigarettes, sparks, or flame near the battery.
Watch the battery during charg- ing, and stop or reduce the charg-
ing rate if the battery cells begin
gassing (boiling) violently or if
the temperature of the electrolyte
of any cell exceeds 49°C (120°F).
Wear eye protection when check- ing the battery during charging.
Disconnect the battery charger in the following order.
1. Turn off the battery charger main switch.
2. Unhook the negative clamp from the negative battery terminal.
3. Unhook the positive clamp from the positive battery terminal.
Page 802 of 840

755
Maintenance
Fuse NameSymbolFuse ratingProtected Component
ROOM110ALuggage Lamp, A/C Control Module, BCM/TACM, Auto Light & Photo Sensor, Cup Holder
ILL., Instrument Cluster, Ignition Key ILL. & Door Warning Switch, Driver Vanity Lamp,
Overhead Console Lamp (With Sunroof), Room Lamp(W/O Sunroof)
AUDIO20AAudio (W/O ISG), Low DC-DC Convertor (With ISG)
P WDW LH25ARear Power Window Switch LH, Power Window Main Switch, Passenger Safety Power
Window Module, Passenger Power Window Switch
P WDW RH25ARear Power Window Switch RH, Power Window Main Switch, Driver Power Window Switch
HTD MIRR10ADiver/Passenger Power Outside Mirror, ECM/PCM, A/C Control Module
A/CON10AA/C Control Module
BLOWER10AECM/PCM, Blower Switch, Blower Resistor
DOOR LOCK20ADoor Lock/Unlock Relay, Tailgate Unlock Relay
SAFETY P/WDW25ADriver Safety Power Window Module
S/HTD15ADriver/Passenger Seat Heater
TAIL LH10AInstrument Cluster, Rear Combination Lamp LH, License Lamp, Rear Bumper Lamp, Projection Lamp LH, Head Lamp LH
TAIL RH10ARear Combination Lamp LH, License Lamp, ILL.(+), Rear Bumper Lamp, Projection Lamp LH, Head Lamp LH
START10AIgnition Lock Switch, ECM/PCM, PCB fuse & Relay Box (Start Relay)
Instrument panel (Driver’s side fuse panel)
Page 803 of 840
Maintenance
56
7
Fuse NameSymbolFuse ratingProtected Component
H/LP RH10AInstrument Cluster, Head Lamp RH
HAZARD15AHazard Relay, Flasher Unit, Hazard Switch
PDM125ASmart Key Control Module
S/ROOF15ASunroof Motor
PDM310ASmart Key Control Module, Immobiliser Module, Start/Stop Button Switch
TCU15APulse Generator 'A'/'B', Vehicle Speed Sensor, Transaxle Range Switch
IGN COIL15AIgnition Coil, Condenser
IGN210ABCM/TACM, A/C Control Module, Sunroof Motor, Rear Defogger Timer, Dual Pressure
Switch, Head Lamp Levelling Device Actuator LH/RH, I/P Junction Box (Power Window
Relay)
F/WPR25AFront Wiper Motor, Multifunction Switch
R/FOG10ARear Fog Lamp Relay
F/FOG10AFront Fog Lamp Relay
DRL10ABCM/TACM
STOP LAMP10AStop Lamp Relay, PCB Fuse & Relay Box (HAC Relay), Stop Lamp Switch, Data Link
Connector, Smart Key Control Module, Power Window Relay
CLUSTER10ABCM, TACM, Seat Belt Timer, A/C Control Module, Instrument Cluster
Page 805 of 840

Maintenance
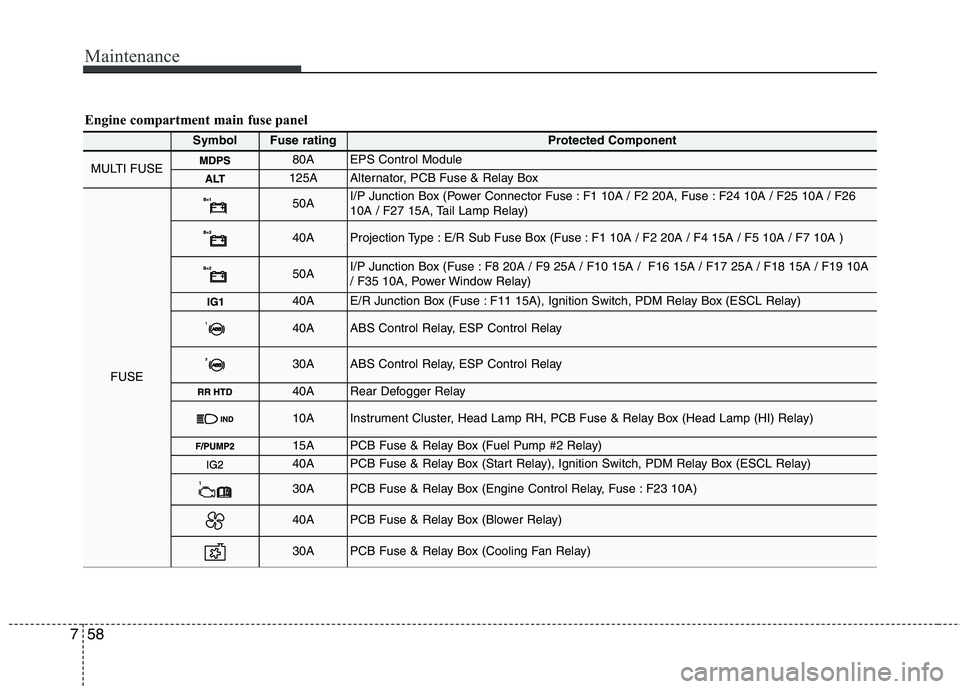
58
7
SymbolFuse ratingProtected Component
MULTI FUSE80AEPS Control Module
125AAlternator, PCB Fuse & Relay Box
FUSE
50AI/P Junction Box (Power Connector Fuse : F1 10A / F2 20A, Fuse : F24 10A / F25 10A / F26
10A / F27 15A, Tail Lamp Relay)
40AProjection Type : E/R Sub Fuse Box (Fuse : F1 10A / F2 20A / F4 15A / F5 10A / F7 10A )
50AI/P Junction Box (Fuse : F8 20A / F9 25A / F10 15A / F16 15A / F17 25A / F18 15A / F19 10A
/ F35 10A, Power Window Relay)
40AE/R Junction Box (Fuse : F11 15A), Ignition Switch, PDM Relay Box (ESCL Relay)
40AABS Control Relay, ESP Control Relay
30AABS Control Relay, ESP Control Relay
40ARear Defogger Relay
10AInstrument Cluster, Head Lamp RH, PCB Fuse & Relay Box (Head Lamp (HI) Relay)
15APCB Fuse & Relay Box (Fuel Pump #2 Relay)
40APCB Fuse & Relay Box (Start Relay), Ignition Switch, PDM Relay Box (ESCL Relay)
30APCB Fuse & Relay Box (Engine Control Relay, Fuse : F23 10A)
40APCB Fuse & Relay Box (Blower Relay)
30APCB Fuse & Relay Box (Cooling Fan Relay)
Engine compartment main fuse panel