Page 14 of 353

Your vehicle at a glance
22
INTERIOR OVERVIEW
B010000ATD-EU
1. Door lock/unlock button ....................4-13
2. Outside rearview mirror control switch* ...............................................4-37
3. Power window lock button* ...............4-21
4. Central door lock switch* ..................4-13
5. Power window switches* ...................4-20
6. Instrument panel illumination control knob* .................................................4-40
7. ESC OFF button* ..............................5-28
8. Front wiper deicer button*.................4-68
9. Steering wheel tilt lever* ...................4-33
10. Hood release lever .........................4-23
11. Clutch pedal* ....................................5-9
12. Brake pedal .....................................5-23
13. Accelerator pedal ..............................5-9
14. Trunk lid release lever (4 door, 2 door) ...............................4-16
15. Fuel filler lid release lever ...............4-25
* : if equipped
OTD019001N
Page 20 of 353

Safety features of your vehicle
43
Front seat adjustment
C010101AHM
Forward and backward
To move the seat forward or backward:
1. Pull the seat slide adjustment lever upand hold it.
2. Slide the seat to the position you desire.
3. Release the lever and make sure the seat is locked in place.
Adjust the seat before driving, and make
sure the seat is locked securely by trying
to move forward and backward without
using the lever. If the seat moves, it is not
locked properly.
C010102AHM
Seatback angle
To recline the seatback:
1. Lean forward slightly and lift up the seatback recline lever.
2. Carefully lean back on the seat and adjust the seatback of the seat to the
position you desire.
3. Release the lever and make sure the seatback is locked in place. (The lever
MUST return to its original position for
the seatback to lock.)
OTD039003OTD039002
WARNING
After adjusting the seat, always
check that it is securely locked into
place by attempting to move the
seat forward or reverse without
using the lock release lever.
Sudden or unexpected movement
of the driver's seat could cause you
to lose control of the vehicle result-
ing in an accident.
Page 22 of 353
Safety features of your vehicle
63
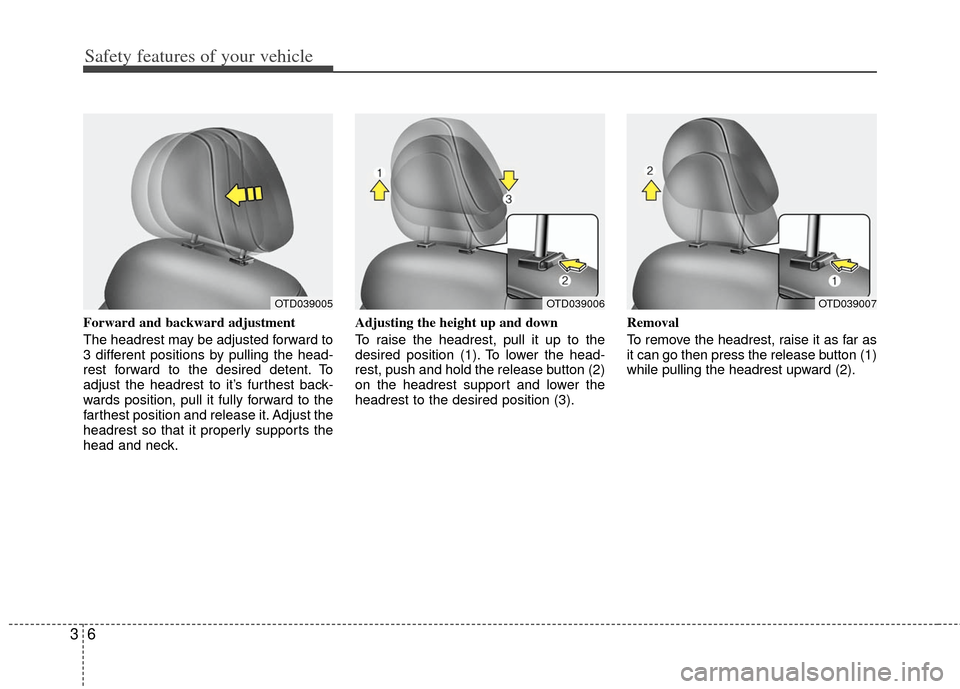
Forward and backward adjustment
The headrest may be adjusted forward to
3 different positions by pulling the head-
rest forward to the desired detent. To
adjust the headrest to it’s furthest back-
wards position, pull it fully forward to the
farthest position and release it. Adjust the
headrest so that it properly supports the
head and neck.Adjusting the height up and down
To raise the headrest, pull it up to the
desired position (1). To lower the head-
rest, push and hold the release button (2)
on the headrest support and lower the
headrest to the desired position (3).
Removal
To remove the headrest, raise it as far as
it can go then press the release button (1)
while pulling the headrest upward (2).
OTD039006OTD039005OTD039007
Page 23 of 353

37
Safety features of your vehicle
Reinstall
To reinstall the headrest, put the head-
rest poles (3) into the holes while press-
ing the release button (2). Then adjust (1)
it to the appropriate height.Active headrest (if equipped)
The active headrest is designed to move
forward and upward during a rear impact.
This helps to prevent the driver's and
front passenger’s head from moving
backward and thus helps prevent neck
injuries.C010107ATD
Seat warmer (if equipped)
The seat warmers are provided to warm
the front seats during cold weather. With
the ignition switch in the ON position,
push either of the switches to warm the
driver's seat or the front passenger's
seat.
During mild weather or under conditions
where the operation of the seat warmer
is not needed, keep the switches in the
OFF position.
WARNING
Make sure the headrest locks in
position after adjusting it to proper-
ly protect the occupants.
OTD039008HNF2041-1OTD031009
WARNING
A gap between the seat and the
headrest release button may
appear when seating on the seat or
when you push or pull the seat. Be
careful not to get your finger, etc.
caught in the gap.
Page 26 of 353
Safety features of your vehicle
10
3
To fold the rear seatback :
■
■
4 door, 2 door vehicle
1. Set the front seatback to the upright position and if necessary slide the
front seat forward.
2. Lower the rear headrest to the lowest position.
3. Open the trunk.
4. Pull out the lock release knob.
5. Fold the seatback forward and downfirmly. 6. To use the rear seat, lift and push the
seatback backward firmly until it clicks
into place.
7. Return the rear seat belt to the proper position.
✽ ✽NOTICE
If the seat belt locks after unfolding the
rear seatback, pull out the locked seat
belt, release it then pull it out again.
OHD036025
OHD036118
OHD036119
Page 27 of 353
311
Safety features of your vehicle
■
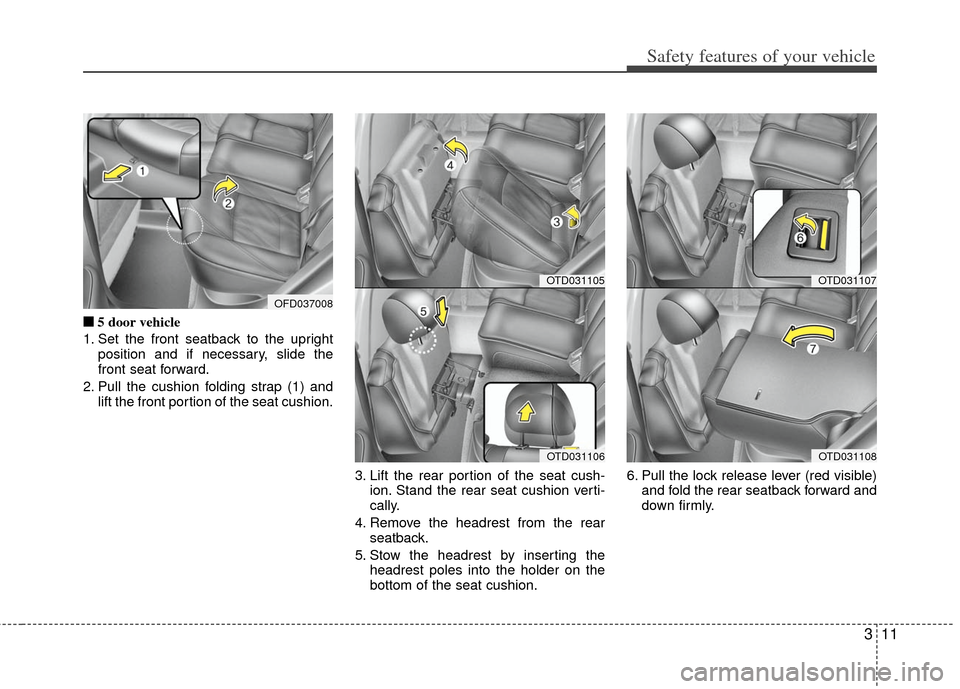
■5 door vehicle
1. Set the front seatback to the upright position and if necessary, slide the
front seat forward.
2. Pull the cushion folding strap (1) and lift the front portion of the seat cushion.
3. Lift the rear portion of the seat cush-ion. Stand the rear seat cushion verti-
cally.
4. Remove the headrest from the rear seatback.
5. Stow the headrest by inserting the headrest poles into the holder on the
bottom of the seat cushion. 6. Pull the lock release lever (red visible)
and fold the rear seatback forward and
down firmly.
OTD031105
OTD031106
OFD037008
OTD031107
OTD031108
Page 30 of 353
Safety features of your vehicle
14
3
Adjusting the height up and down
(if equipped)
To raise the headrest, pull it up to the
desired position (1). To lower the head-
rest, push and hold the release button (2)
on the headrest support and lower the
headrest to the desired position (3). Removal
To remove the headrest, raise it as far as
it can go then press the release button
(1) while pulling the headrest upward (2).
To reinstall the headrest, put the head-
rest poles (3) into the holes while press-
ing the release button (1). Then adjust it
to the appropriate height.C010304ATD
Armrest (if equipped)
To use the armrest, pull it forward from
the seatback.
OTD039010OMG039037
WARNING
Make sure the headrest locks in
position after adjusting it to proper-
ly protect the occupants.
OMG035036
Page 33 of 353

317
Safety features of your vehicle
C020102ATD-EU
Seat belt - Driver's 3-point systemwith emergency locking retractor
To fasten your seat belt:
To fasten your seat belt, pull it out of the
retractor and insert the metal tab (1) into
the buckle (2). There will be an audible
"click" when the tab locks into the buckle.
The seat belt automatically adjusts to the
proper length only after the lap belt por-
tion is adjusted manually so that it fits
snugly around your hips. If you lean for-
ward in a slow, easy motion, the belt will
extend and let you move around. If there
is a sudden stop or impact, however, the
belt will lock into position. It will also lock
if you try to lean forward too quickly.
✽ ✽ NOTICE
If you are not able to pull out the seat
belt from the retractor, firmly pull the
belt out and release it. Then you will be
able to pull the belt out smoothly.
Height adjustment (if equipped)
You can adjust the height of the shoulder
belt anchor to one of the 4 positions for
maximum comfort and safety.
The height of the adjusting seat belt
should not be too close to your neck. The
shoulder portion should be adjusted so
that it lies across your chest and midway
over your shoulder near the door and not
your neck.
To adjust the height of the seat belt
anchor, lower or raise the height adjuster
into an appropriate position.
B180A01NF
1
2
OMG035038