Page 69 of 613

•Unlock the doors automatically.
In order to reset the Enhanced Accident Response System
functions after an event, the ignition switch must be
changed from IGN ON to IGN OFF.
If A Deployment Occurs
The Advanced Front Air Bags are designed to deflate
immediately after deployment.
NOTE: Front and/or side air bags will not deploy in all
collisions. This does not mean something is wrong with
the air bag system.
If you do have a collision which deploys the air bags, any
or all of the following may occur:
•The nylon air bag material may sometimes cause
abrasions and/or skin reddening to the driver and
front passenger as the air bags deploy and unfold. The
abrasions are similar to friction rope burns or those
you might get sliding along a carpet or gymnasium floor. They are not caused by contact with chemicals.
They are not permanent and normally heal quickly.
However, if you haven’t healed significantly within a
few days, or if you have any blistering, see your doctor
immediately.
•As the air bags deflate you may see some smoke-like
particles. The particles are a normal by-product of the
process that generates the non-toxic gas used for air
bag inflation. These airborne particles may irritate the
skin, eyes, nose, or throat. If you have skin or eye
irritation, rinse the area with cool water. For nose or
throat irritation, move to fresh air. If the irritation
continues, see your doctor. If these particles settle on
your clothing, follow the garment manufacturer’s in-
structions for cleaning.
•Do not drive your vehicle after the air bags have
deployed. If you are involved in another collision, the
air bags will not be in place to protect you.
2
THINGS TO KNOW BEFORE STARTING YOUR VEHICLE 67
Page 84 of 613
Installing a Child Restraint with an ALR:
1. To install a child restraint with ALR, first, pull enough
of the seat belt webbing from the retractor to route it
through the belt path of the child restraint. Slide the latch
plate into the buckle until you hear a “click.” Next,
extract all the seat belt webbing out of the retractor and
then allow the belt to retract into the retractor. As the belt
retracts, you will hear a ratcheting sound. This indicates
the safety belt is now in the Automatic Locking mode.
2. Finally, pull on any excess webbing to tighten the lap
portion around the child restraint. Any seat belt system
will loosen with time, so check the belt occasionally, and
pull it tight if necessary.To attach a Child Restraint tether strap:
Tether Strap Mounting (Two-Door Models)
82 THINGS TO KNOW BEFORE STARTING YOUR VEHICLE
Page 91 of 613
Periodic Safety Checks You Should Make Outside
The Vehicle
Tires
Examine tires for excessive tread wear and uneven wear
patterns. Check for stones, nails, glass, or other objects
lodged in the tread or sidewall. Inspect the tread for cuts
and cracks. Inspect sidewalls for cuts, cracks and bulges.
Check the wheel nuts for tightness. Check the tires
(including spare) for proper cold inflation pressure.
Lights
Have someone observe the operation of exterior lights
while you work the controls. Check turn signal and high
beam indicator lights on the instrument panel.
Door Latches
Check for positive closing, latching, and locking.
Fluid Leaks
Check area under vehicle after overnight parking for fuel,
engine coolant, oil, or other fluid leaks. Also, if gasoline
fumes are detected or if fuel, power steering fluid, or
brake fluid leaks are suspected, the cause should be
located and corrected immediately.2
THINGS TO KNOW BEFORE STARTING YOUR VEHICLE 89
Page 140 of 613
Front Passenger Easy Entry Seat — Two-Door
Models
Pull upward on the recline lever (toward the rear of the
vehicle) and slide the entire seat forward.To return the seat to a sitting position, rotate the seatback
upright until it locks and push the seat rearward until the
track locks.
Easy Entry Lever
Easy Entry Seat
138 UNDERSTANDING THE FEATURES OF YOUR VEHICLE
Page 147 of 613
3. Return the seat to the normal position.
4. Raise the rear seatback using the assist strap and
firmly lock the seat into position.
Removing The Rear Seat — Two-Door Models
WARNING!
•It is extremely dangerous to ride in a cargo area,
inside or outside of a vehicle. In a collision, people
riding in these areas are more likely to be seri-
ously injured or killed.
•Do not allow people to ride in any area of your
vehicle that is not equipped with seats and seat
belts.
•Be sure everyone in your vehicle is in a seat and
using a seat belt properly.
•In a collision, you or others in your vehicle could
be injured if seats are not properly latched to their
floor attachments. Always be sure that the seats
are fully latched.
1. Fold the rear seat forward following steps 1 and 2
under “Fold And Tumble Rear Seat” in this section.
Folding Rear Seat
3
UNDERSTANDING THE FEATURES OF YOUR VEHICLE 145
Page 156 of 613

NOTE:The Daytime Running Light on the same side of
the vehicle as the active turn signal will turn off auto-
matically when a turn signal is in operation and turn on
again when the turn signal is not operating.
Interior Lights
The overhead light will turn on when a door is opened. It
may also be turned on by rotating the control for the
dimmer switch on the multifunction lever fully upward.
The overhead light will automatically turn off in approxi-
mately 10 minutes if a door is left open or the dimmer
control is left in the dome light position. Turn the ignition
switch ON to restore the overhead light operation.
Cargo Lamp
The courtesy and dome lights will turn on when the front
doors are opened, by rotating the control for the dimmer
switch on the multifunction lever fully upward, or if
equipped, when the UNLOCK button is pressed on the
Remote Keyless Entry (RKE) transmitter. The sports bar reading lights (available on four-door
models) can be turned on by pressing the switches,
located on either side of the lens. Press a switch a second
time to turn the light off.
The rear cargo light may be turned on by pressing the
lens. Press the lens a second time to turn the light off.
Sports Bar Reading Light
154 UNDERSTANDING THE FEATURES OF YOUR VEHICLE
Page 241 of 613
5. Insert the slider feature of the knuckles into the door
frame tracks and slide the top forward.
6. Ensure that the top locks into the Sunrider�locking
mechanisms that are located above the front of the rear
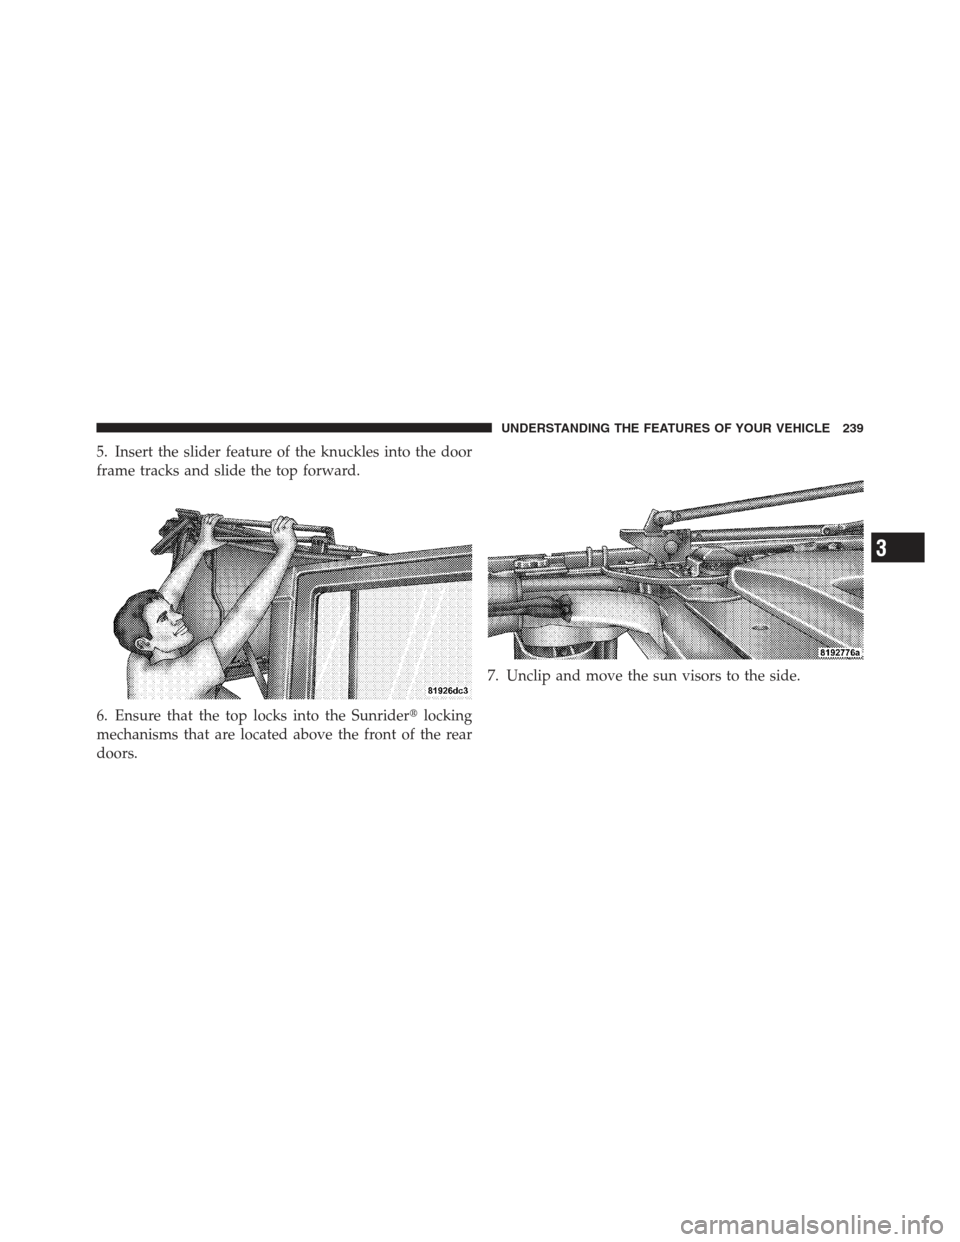
doors. 7. Unclip and move the sun visors to the side.
3
UNDERSTANDING THE FEATURES OF YOUR VEHICLE 239
Page 294 of 613

•Check Gascap (refer to “Adding Fuel” in “Starting
And Operating” for more details)
•Oil Change")
•Gate Ajar (with vehicle graphic showing the Liftgate/
back door open and A single chime )
•Check Gascap (refer to “Adding Fuel” in “Starting
And Operating” for more details)
•Oil Change Required (with a single chime)
•ECO (Fuel Saver Indicator) — if equipped
Oil Change Required
Your vehicle is equipped with an engine oil change
indicator system. The “Oil Change Required” message
will flash in the EVIC display for approximately 10 sec-
onds after a single chime has sounded to indicate the next
scheduled oil change interval. The engine oil change
indicator system is duty cycle based, which means the
engine oil change interval may fluctuate dependent upon
your personal driving style.Unless reset, this message will continue to display each
time you turn the ignition switch to the ON position. To
turn off the message temporarily, press and release the
MENU button. To reset the oil change indicator system
(after performing the scheduled maintenance), perform
the following procedure:
1. Turn the ignition switch to the ON position.
Do not
start the engine.
2. Fully depress the accelerator pedal slowly three times
within 10 seconds.
3. Turn the ignition switch to the LOCK position.
NOTE: If the indicator message illuminates when you
start the vehicle, the oil change indicator system did not
reset. If necessary, repeat this procedure.
292 UNDERSTANDING YOUR INSTRUMENT PANEL


 and slide the entire seat forward.To return the seat to a sitting position, rotate")